Reason Tutorial: Become a Power User Part 3 – MIDI Recording and Programming 2
Hollin Jones continues to explain the intricacies of MIDI integration in Reason… 7: If you don’t have access to MIDI controller hardware, you can go into any MIDI track and add notes by painting them in using the Pen tool. You can also reveal the controller lane at the bottom of this window and draw […]
Hollin Jones continues to explain the intricacies of MIDI integration in Reason…
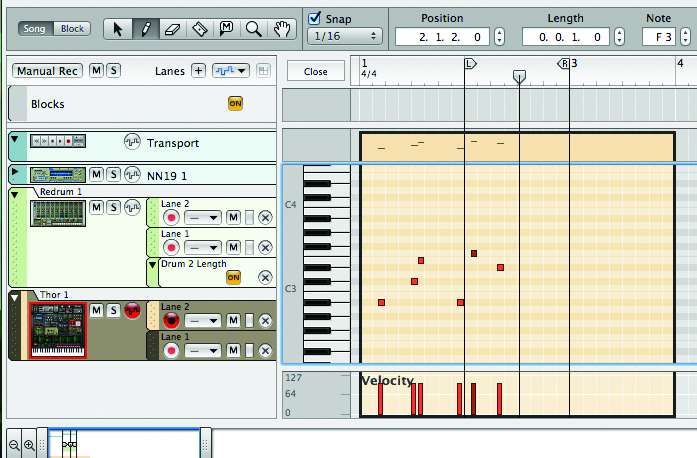
7: If you don’t have access to MIDI controller hardware, you can go into any MIDI track and add notes by painting them in using the Pen tool. You can also reveal the controller lane at the bottom of this window and draw in things such as sustain and velocity to create a more realistic effect despite not having played any keys.

8: Alternatively, go to the Window menu and choose Show On Screen Piano Keys (or press [F4]). This reveals a window for playing notes using the computer keyboard or even the mouse. You can use the [Shift] key for sustain, enter velocity variation options and move up and down the octaves with modifier keys. It’s a surprisingly nifty way to program MIDI and can be quite creative to use.

9: You can create MIDI parts using modules in the Rack, too. Select a synth and choose to create a Matrix Pattern Sequencer, which should be connected automatically to the synth via CV. Enter notes into the Matrix grid and a pattern is generated. Alter the notes and resolution of the pattern using the controls on the front panel.
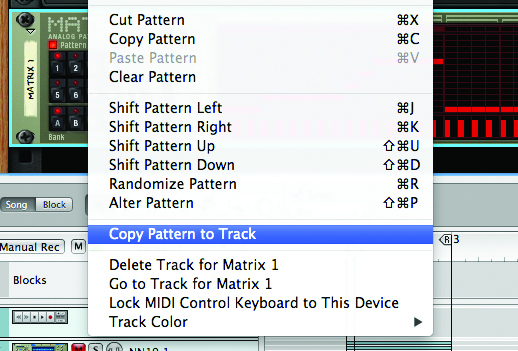
10: There are 32 patch slots available in each instance of the Matrix so you won’t run out of space. The pattern remains ‘virtual’ until you choose to place it into the sequencer. Do this by selecting the Matrix and choosing Edit>Copy Pattern to Track. A version of the MIDI pattern is placed into the sequencer and from here it can be edited, duplicated or moved to trigger other instruments.

11: Now try the RPG-8. Create an instance of it connected to a synth by first selecting the synth and then choosing to create the RPG-8. Direct MIDI focus at the RPG-8 by selecting it in the sequencer and try playing a few notes on your MIDI keyboard. You should find that your input is arpeggiated. The signal is interpreted by the module before being sent to the synth.
12: Alter the settings on the RPG-8 to control the way in which the arpeggiation is performed. By playing with the mode, length and octave parameters you can create some pretty cool-sounding patterns by simply holding a few notes or chords on your MIDI controller. Try recording a part and you will see that what gets recorded is your basic playing; the signal continues to be processed by the RPG-8.

13: You may want to print the MIDI notes currently being generated by the RPG-8 to a track for editing, copying or other tasks. To do this, select the module then go to the Edit menu and choose Arpeggio Notes To Track. This places a version of the pattern into the track, from where it can be edited or moved. Remember after this to mute the RPG-8 in the Rack to prevent duplicate signal.

14: It’s also possible to manually remove steps from an arpeggiated pattern while it’s being generated by the RPG-8. Go into the Pattern window and switch the relevant steps on or off. You can also activate a Shuffle function here to add more swing to what is otherwise a fairly mechanical pattern. Give it a try to see how it works.

15: Reason now supports MIDI out – and this is big news. Go to an empty space in the Rack and choose to create an instrument, then select External MIDI Instrument. An innocuous-looking module is created. To choose how it should send MIDI out of your computer, go to the device dropdown menu and select the MIDI hardware you want to send signal to.
16: With this device selected in the sequencer, playing MIDI notes on your keyboard or using the computer keys (or even the mouse) should send signal out through the device. You will need to set your hardware up to receive on the correct MIDI channel and connect its audio outputs to something (preferably the audio ins on your interface) so the results can be recorded.

17: The controls to the right are handy, too. The Program Selector can be used to select a patch on your external hardware. This can be automated to send program-change messages at specific points – for example, to change from a piano to a bass patch at a certain point in the song. Automating it works in the same way as automating anything else in Reason.

18: The CC Assign control is also useful. Use the number arrows to select any available CC and then the knob to set a value for it. The knob behaves separately for every CC, so you can set any CC to any value you like and the knob will adjust its position to fit. This can also be automated, so it’s great for doing things such as filter sweeps on external MIDI hardware.
