Reason Tutorial: Become a Power User Part 11 – Mastering in Reason
Mastering is the last step before your Reason tracks are ready for the world. Hollin Jones gives you the lowdown on how to become the master of your musical domain… You may already be aware that the answer to the question of why your mixes don’t sound as loud as tracks you hear on the […]
Mastering is the last step before your Reason tracks are ready for the world. Hollin Jones gives you the lowdown on how to become the master of your musical domain…
You may already be aware that the answer to the question of why your mixes don’t sound as loud as tracks you hear on the radio can be summed up in one word – mastering. Once the preserve of high-end studios the process of mastering is now well and truly accessible to almost any producer, and that includes Reason users. The MClass mastering effects have been around for a while now, and there’s also an excellent master buss compressor that can be used to give that ‘radio ready’ sound to your tracks.
It’s often a good idea to separate the mixing and mastering stages of any production, even though it’s technically possible to apply mastering processing at the same time as mixdown. This is because the two steps are actually quite different. Mixing is about balancing the elements of a track, and mastering is about achieving a great balance, volume and EQ treatment across the whole thing.

So it’s advisable to do your mixdown, perhaps with a little master buss compression applied, then bounce out to a stereo file and, after a break, re-import the file to a fresh project and master it from there. You get a range of tools including stereo widening, limiting, specialised EQ and more compression to help you achieve a good, solid, balanced sound that’s ready for playing back on any device.
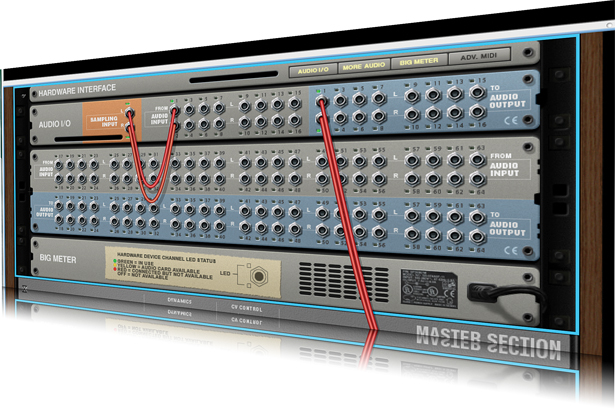
If for any reason you want to mix or master on a different system, Reason also enables you to batch-export stems or groups of tracks with a number of options such as dry or wet, pre- or post-fader, etc. This can be invaluable if, for example, you want to mix on a hardware desk.
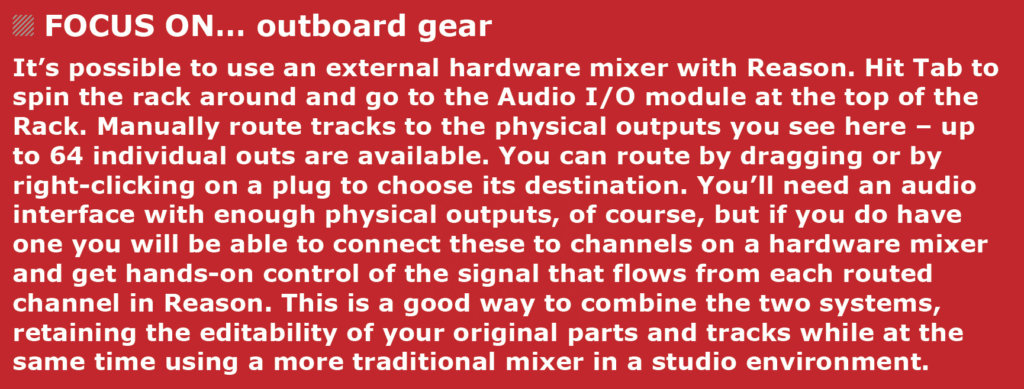
Take your stems, load them onto a different system and mix as if the tracks had been recorded in that studio. You lose much editability, but by taking different versions of tracks with and without effects you can generally get around any problems pretty easily. Mastering in Reason is an art form just as it is anywhere, of course, but it’s easier than you might think…
How to master and export
1: Begin by creating a blank project and import your stereo
mixdown onto a single audio track. Tempo information isn’t particularly important here since you’re not making any edits, merely processing the sound using the available rack modules. It makes sense to set up a loop around the track because you’re likely to be listening back to it repeatedly.
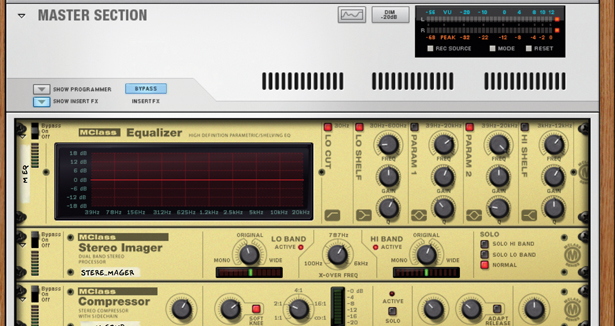
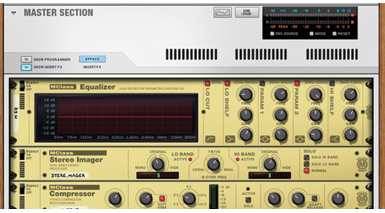
2: You can start to add processing on the audio track itself or by adding mastering units as inserts attached to the Master section of the Rack. It doesn’t matter where you do this but it makes sense to pick one method and stick with it. You may find that there’s a default mastering suite already present, so go to the Master module and see what’s loaded.

3: The MClass effects may be bypassed by default, so, if they are, click Bypass to enable them. It’s a good idea to start with some gentle compression, using a ratio of around 2:1 and a threshold of -10 or thereabouts, though this will depend on what exactly you’re mastering. Bypass the other mastering modules temporarily to get an idea of what’s happening in the compressor.

4: Don’t overdo the compression. The idea should be to get a nice audio ‘glue’ effect to pull everything together but without creating a pumping effect. Now move on to the EQ module and apply a curve across the whole signal, with the aim of subtly making certain elements more or less prominent. Remember that you’re affecting the entire signal, so beware of sounds that exist in a similar range.

5: By adjusting the Q values of the different EQ points you can pick out specific frequencies more precisely. For example, you could use narrow Q values, displayed by sharper points in the curve, to isolate a lead guitar line while leaving the synths relatively untouched.

6: Stereo widening is a handy tool to have but it should be used carefully. Generally speaking you want the lower end of your track to have more of a mono focus and be centred, since this is where much of the weight and power of the sound lives. The Hi Band can be widened a little to add breadth. Control the cutoff point between the two bands using the X-Over Freq control in the centre.

7: The Maximizer module is used to add volume to the signal in order to squeeze more power out of it without clipping. Activate limiting using the Limiter button and switch on Look Ahead to ensure more accurate processing. Then drive the input gain a little to push
the signal while leaving the output gain set at 0 or -0.1dB to avoid
any clips.

8: To get a head start with mastering, go to the Master Inserts preset section in the main mixer and click on the file load icon. This will take you to a folder of presets supplied with Reason that are genre specific. Of course you will need to tweak things quite a lot to suit your track, but it can be a great time saver.
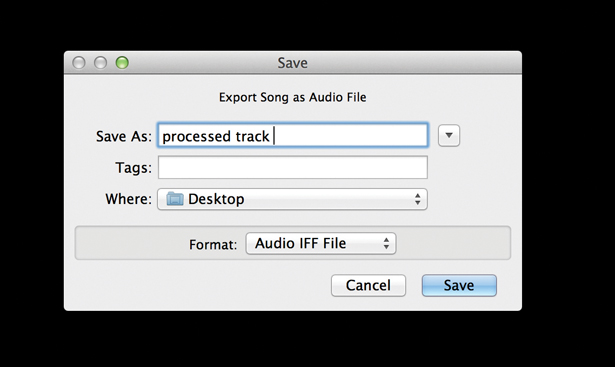
9: Once you’ve worked on the sound and feel and have achieved a good overall balance of sweetness and volume, go to the File menu and choose Export Song as Audio File. This enables you to output the processed track to a single stereo audio file on your hard drive so you can test it on different systems.
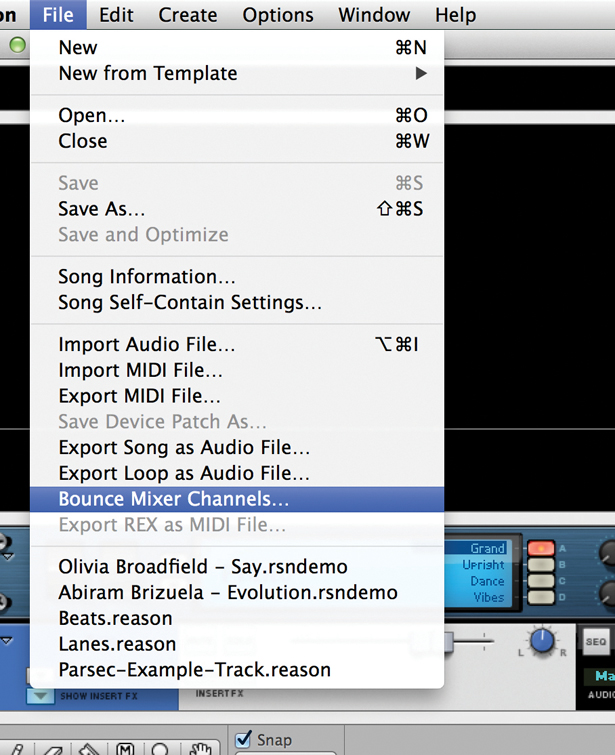
10: If you are exporting a track to be mixed on another system you almost certainly won’t be able to load up the Reason track as a raw project. You will need to export it as a bunch of stems so it can be loaded as simple audio files on the target system – say, for example, a Pro Tools system plumbed into a hardware mixing desk. Go to File > Bounce Mixer Channels.
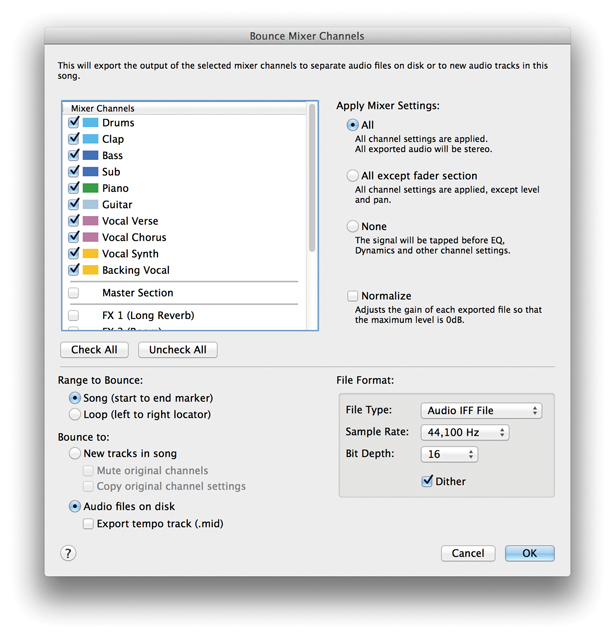
11: Here you have lots of choices. Select the tracks you want to export by ticking them in the main list. As well as the individual channels you can choose to add the master section to output a
regular mixdown at the same time for reference, and there are FX channels which are useful for just taking the effected versions of specific sounds.
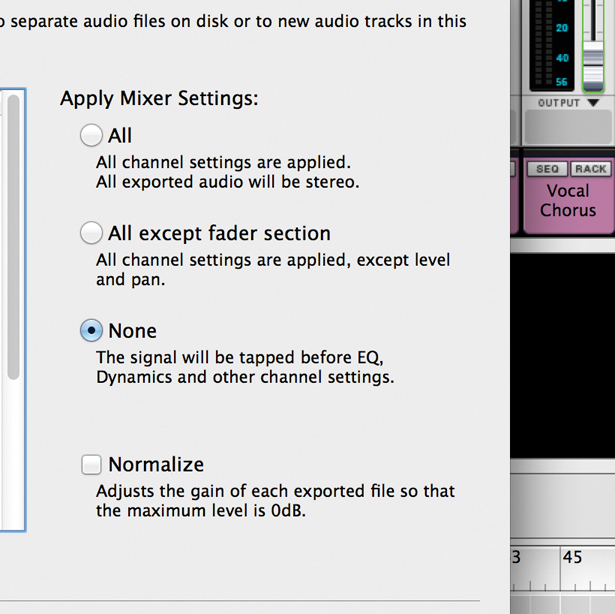
12: The Apply Mixer Settings section is crucial. Choose the first option to include all the effects, EQ and levels from the mixer in the stems. Choose the second to include effects but not level and pan, for starting a mix from scratch. Choose the third to export raw versions of tracks if you want to apply dynamics and mixing on the target system only.
