Reason Tutorial: Adding MIDI Hardware
Reason 7 can send MIDI to the outside world, opening up a wealth of creative possibilities in your studio. Hollin Jones sends the signals in this Reason Tutorial Reason has always been very good at getting MIDI in from keyboards, control surfaces and other devices to enable you to play and program its […]
Reason 7 can send MIDI to the outside world, opening up a wealth of creative possibilities in your studio. Hollin Jones sends the signals in this Reason Tutorial
Reason has always been very good at getting MIDI in from keyboards, control surfaces and other devices to enable you to play and program its many instruments. Version 7 brings a new feature in the form of MIDI out and it’s integrated in typical Propellerhead fashion: unobtrusively and efficiently.
Before we go into detail about how it works, let’s briefly think about why MIDI out is such a big step forward for this much-loved DAW.
Although Reason is particularly good at generating sounds and effects virtually, many studios still have a lot of MIDI-triggered hardware lying around. Vintage kit such as drum machines and synths are generally equipped with MIDI, and anything more recent – like a workstation – definitely will be. Indeed, new hardware offering MIDI as a means of controlling it is being developed all the time.
Reason’s sequencing tools are especially fun and powerful to work with, and devices such as the RPG-8, the Matrix Pattern Sequencer and the ReGroove system for real-time groove quantization make it easy to create great-sounding parts. And the sequencer itself makes MIDI and pattern editing a breeze.
So while this is all well and good for triggering stuff in the Rack, imagine if you could also use it to program your classic drum machine or vintage keyboard. Well, now you can, and it doesn’t end there. Unless you are running your mix through a hardware desk you will almost certainly want to record the results of external MIDI triggering back into Reason, and this is easy to do using a simple interface so the whole thing becomes a loop. And thanks to the new audio-slicing tools, you can turn recorded parts into REX loops with just a few clicks.
First Steps
The first thing you will need to do is tell Reason which MIDI interface to use, which you can do in the Preferences>Advanced section. Most audio interfaces also have hardware MIDI in/out ports, so make sure that you select the relevant interface.
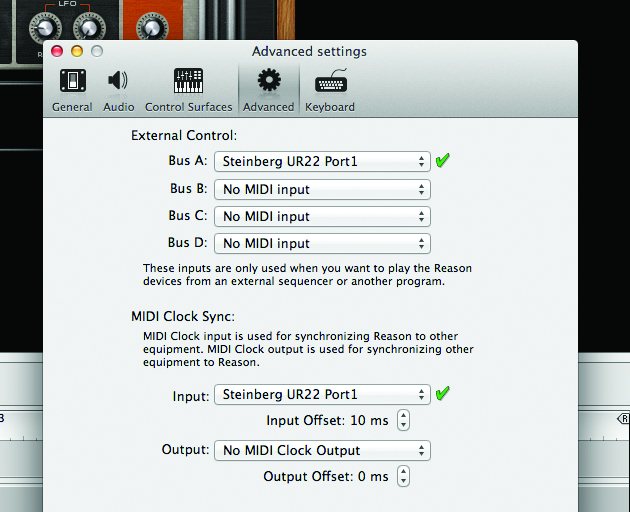
If you are using a MIDI-only interface, choose that. There’s nothing to prevent you from using separate MIDI and audio interfaces, though in many cases one unit will do both. Now go into your project, locate the Create menu and choose to create an External MIDI Instrument.
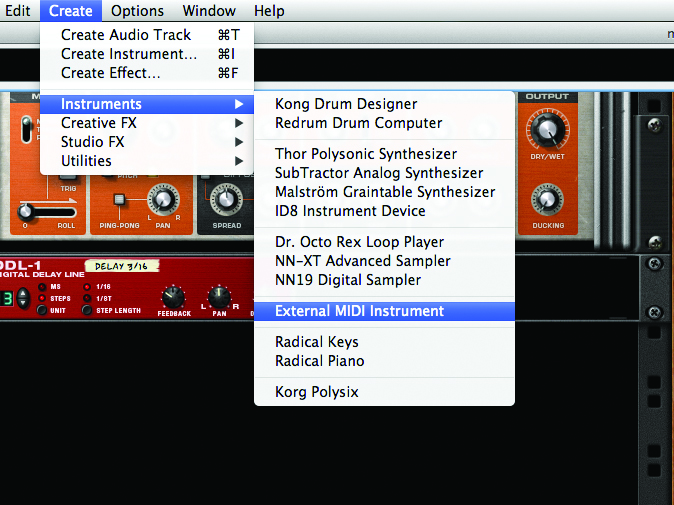
Once created, a small module will appear in the Rack.
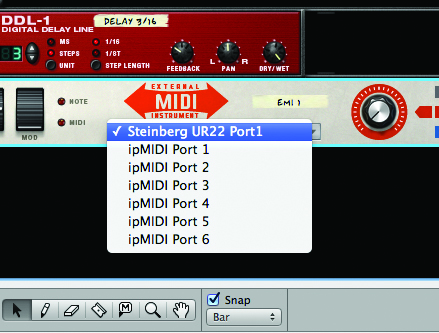
In the EMI’s output selector, choose the MIDI interface you specified in the Preferences and the module will be routed to it.
Of course, you will also need to make sure that you have a MIDI cable connected from your interface’s MIDI out port to the MIDI in port on your keyboard or drum machine and that it is set to receive on the correct channel (typically channel 1 unless you are using several devices). You may also have to set the instrument to external rather than local MIDI control and connect its audio outputs to something so it can make noise.
In many cases this could mean routing it back into Reason, in which case you need to create a new audio track. Make sure that this is set to receive audio from the inputs to which you have connected your instrument’s audio outs.
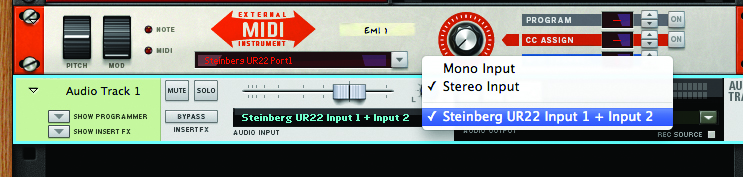
With these steps completed you should find that sending MIDI from the EMI or its sequencer track triggers the hardware and the resulting sound plays through the audio channel you just created. You will probably be able to hear the audio from the instrument without creating an audio track for it since it is playing through your interface, but to actually capture its output you will need to create a track to record it.
Get with the Program
Now you need to generate some MIDI notes, which you can do either by simply playing notes in from a MIDI keyboard/pad or by connecting an RPG-8 or Matrix to the EMI device in the Rack.
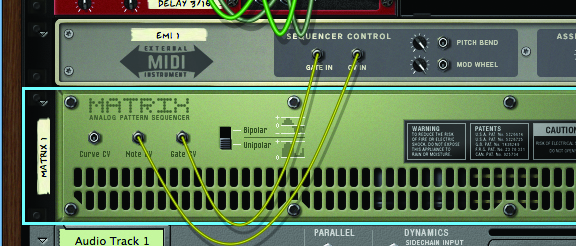
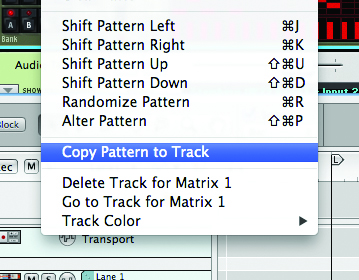
Remember that this will be sent outside Reason to your external kit, but it behaves in the same way as if you were triggering one of Reason’s own modules. Matrix data remains virtual until you choose Edit>Copy Pattern To Track, at which point it is treated like any other sequencer data.
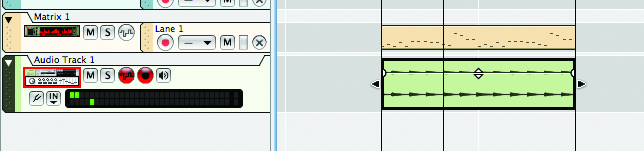
What you now have is an external instrument effectively integrated into your Reason Rack. It can, of course, be recorded as audio by hitting record with the relevant audio track record-enabled – and as a bonus it’s now automatically sliced-up.
The EMI has a few more tricks up its sleeve apart from simple triggering, pitch and mod wheels. To the right-hand side you will see a row of buttons, the first of which is for sending Program Changes. Click on the up and down arrows here and you can cycle through presets on your external kit without having to leave your chair. As well as being useful for auditioning sounds, this can be automated like pretty much everything else, which can be very handy.
All Change
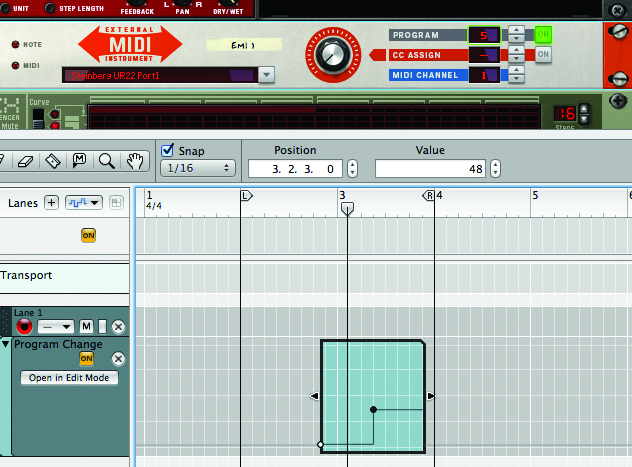
Imagine that you want your drum machine to use one patch for one part of a song but a different one for another part. Simply automate the Program Change control by [Alt]-clicking on it and changing the Program number at the relevant point during playback. The EMI gets a new automation lane in the sequencer, and you can use the Pen tool to manually draw in Program Changes or to edit existing ones.
Here we have told Reason to send a Program Change from preset 5 to 48 at a specific point. Like all automation data it can be freely moved, and in this case it’s also saved with a project. This means that on opening a project, Reason will automatically set any connected external instruments to the correct patch for the current song position.

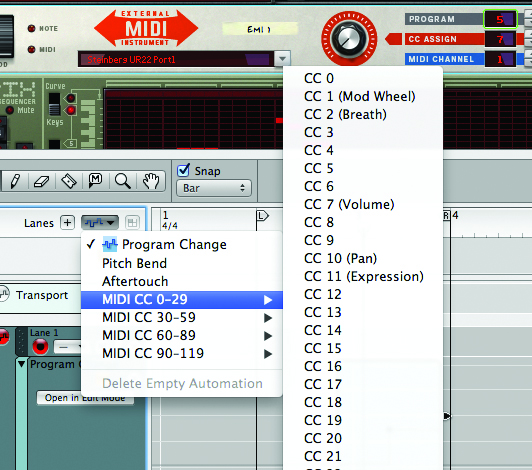
The next option down is CC Assign, and the knob is contextual depending on which of the available CCs you choose, meaning it can be set independently for each one. Control messages like these are used for all MIDI kit to send various types of changes, such as sustain, velocity, breath and all manner of other parameters that can be controlled.
In order to see what each CC corresponds to you can try hovering the mouse over the knob with a specific CC number selected; alternatively, go to the Track Parameter Automation dropdown menu in the sequencer and click on it to see more clearly.
You can customise CC assignment on your hardware by mapping specific CC numbers to parameters and so set up custom maps to automate anything you like from within Reason.
Auto Pilot
Automation of CCs works in a very similar way to Program Changes, except that here you automate the knob when a specific CC number is selected. [Alt]-click on the dial or right-click and choose Edit Automation and an automation lane is created in the sequencer for that particular CC channel. Any changes that you enter while recording are now recorded as automation and can be edited as usual.

Since each CC can have its own automation lane, you can theoretically have more than 100 parameters being automated for each EM1. In reality you might only need things such as volume, sustain, pan or filter frequency, but it’s always useful to be able to automate these kinds of things on your external hardware. In fact, it’s usually far easier than trying to do any real-time parameter changes on the hardware itself, and enables you to creatively program and record the results back into Reason without having to involve yourself in fiddly menus on your workstation or drum machine.
Out and About
The External MIDI Instrument module may look small and somewhat inconsequential, but in actuality it opens up your Reason system to a whole new world of easy MIDI programming of external kit and the recording of its sounds straight back in. Now, therefore, in addition to all of the excellent bundled instruments and Rack Extensions, you can incorporate vintage or up-to-date MIDI-triggered instruments into your productions with a minimum of fuss – and using equipment that you very probably already own.
This is great news for anyone running Reason, and makes it an even more powerful tool for working with sound and MIDI in your studio or on the stage.