Reason Tutorial: Fatten Up Your Synth Leads
A great sounding synth lead can make all the difference, and it’s not so hard to build your own. Hollin Jones explains how it’s done… Synth lead sounds are one of the building blocks of many different musical styles. Most obviously, this is with any kind of EDM but also increasingly with rock, indie and […]
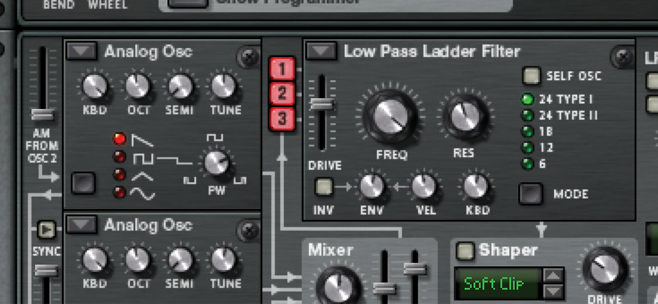
2: The first thing to do is turn the Filter 1 frequency and resolution controls to the right, and activate the buttons to send oscs 1, 2 and 3 to this filter section. It won’t sound great immediately but this is necessary for the next steps.
A great sounding synth lead can make all the difference, and it’s not so hard to build your own. Hollin Jones explains how it’s done…
Synth lead sounds are one of the building blocks of many different musical styles. Most obviously, this is with any kind of EDM but also increasingly with rock, indie and pop as well, where electronic sounds have long since seeped into the fabric of genres they never used to be associated with.
Although lots of instruments come with a bunch of synth lead patches, they’re not always as impressive and in-your-face as is sometimes required, especially for heavier tracks. Even if you don’t need a lead sound that punches a hole in the speakers, you still probably don’t want one that’s weedy and unimpressive.
The fact that Reason and other DAWs come with synthesizer modules that are fully programmable means that if a sound isn’t quite doing it for you, there’s no reason at all not to dive in and start tweaking things to fatten it up and make it more interesting.
Your exact approach will depend on the set of controls that’s available to you but you will generally have two oscillators or perhaps three as is the case with Thor in Reason. A sound generated by a single oscillator will often have to be run through a number of effects to make it sound bigger, but if you introduce a second oscillator you immediately double the potential of that sound.
Each osc can be tuned and a different waveform or synthesis method used as its basis. At the very simplest, tuning one osc five semitones up or down from the other will produce a thicker, harmonic sound.
Tuning oscillators an octave apart produces a bigger sound without the harmonic variation. Other synths let you add ‘sub’ to a patch with a special sub oscillator. This adds a kind of extra bass tone that shadows whatever the main oscillator does.
The waveform you choose also makes a big difference, with some having a clean sound and others a much more raw and intense character. And of course you can balance the two or more oscillators against each other to give one emphasis, or to throw the kitchen sink at it by turning them all up full.
Filtering is usually the next step in designing any synth sound, and if you’re looking to make a big, impressive patch you might want to look at experimenting with higher frequency and resolution settings on your filters as these will make the sound more piercing and nasal. Going the other way will make a sound more muffled and rounded, if that happens to be what you want. Filters also usually have an envelope section where you can control the attack, decay, sustain and release of the filter module.
Dial up the Modulation
Adding movement to a sound is a good way to make it more interesting and help it to stand out in the mix. Almost all synths will have an LFO section and this can be used to dial in specific kinds of modulation that can be directed at various different other sections of the synth.
In a simpler setup, like that of the Subtractor, you’re able to route one from a choice of six waveforms to one of six destinations, with variable rate and amount settings. Modulating parameters like filter frequencies or mix amounts turns an inert, constant sound into a more dynamic one.
In a more advanced synth like Thor you have far more options: in fact you have a modulation matrix from where you can assign a wide range of parameters to an equally wide range of destinations within the synth. This exponentially opens up your freedom to sculpt and manipulate the sound in order to make it bigger and more exciting. By using LFOs to modulate pitch, filter settings, portamento and all manner of other things you can effectively take a simple enough signal and make it much more complex.
Everything mentioned so far happens before we even get to effects, which are a huge component of the power and prominence of any sound. Synths like Thor have an effects section built in, with delay, chorus and an extra filter section available.
Simpler synths don’t, but it’s easy to just add regular effects modules in the rack. One nice thing about having internal effects as in Thor is that you can use them as modulation destinations easily, having certain sections alter the delay time, amount or feedback for example.
Adding chorus to a synth lead has the effect of widening it by introducing an element of phasing or movement, though this shouldn’t be over-used. Delay is also excellent for leads and should generally be tempo sync’ed. The attacking, spiky nature of leads means they are well suited to the staccato effect that delays can bring. Distortion and crunch are also great bedfellows for synth leads, and dirtying up a sound will lend it both grit and punch.
The other obvious candidate is probably compression, which can help a lead sound achieve clarity in the mix without becoming so loud that it starts to be a problem. Using some or all of these tools and techniques will help you to get bigger and better lead sounds, so why not try it out today?
Focus On Shortcuts

The integrated Browser section in Reason 8 lets you easily run text-based searches across your sound library. The results are displayed independently of which module they relate to so you can, for example, find all patches with “lead” in the name with a couple of clicks.
You can double click any patch to instantly load it in its associated module in the rack, and also drag and drop a patch either straight to the rack or into its correct module to load it as well. If you click the patch browse button on any module, the associated patch types in your sound library are automatically displayed in the Browser section on the left.
Step By Step: Fatten Up Your Leads
[metaslider id=35437]
