Capturing life with Sample One XT in Studio One
The sampling potential of Presonus’ Sample One XT is often underrated, but when used in conjunction with the dexterous Studio One, its true abilities are unveiled.
Last time we looked at Impact XT and saw that it’s a very useful and powerful drum sampler. Following on this month, let’s look at another of Presonus’ unsung heroes – Sample One XT. But first, a very brief history…
Prior to the development of samplers, one could only craft tones on synthesizers, but trying to recreate realistic sounds was nearly impossible. Then samplers came along and allowed us to record real sounds and use synthesis techniques to modify those sounds to our own needs. Samplers were not really commercially available (or affordable) for the masses, however, until the mid-1980’s due to the lofty prices of the earliest samplers.
With the introduction of affordable samplers from Ensoniq, EMU, Korg, Roland and Akai the world was suddenly sample-crazy. But, though sampling was now affordable, sampling time was very limited due to the high cost of RAM and other technological limitations. Nowadays, with virtually unlimited RAM and processing power in computers, we can do so much more with sampling. Let’s take a look.
Drop the bass
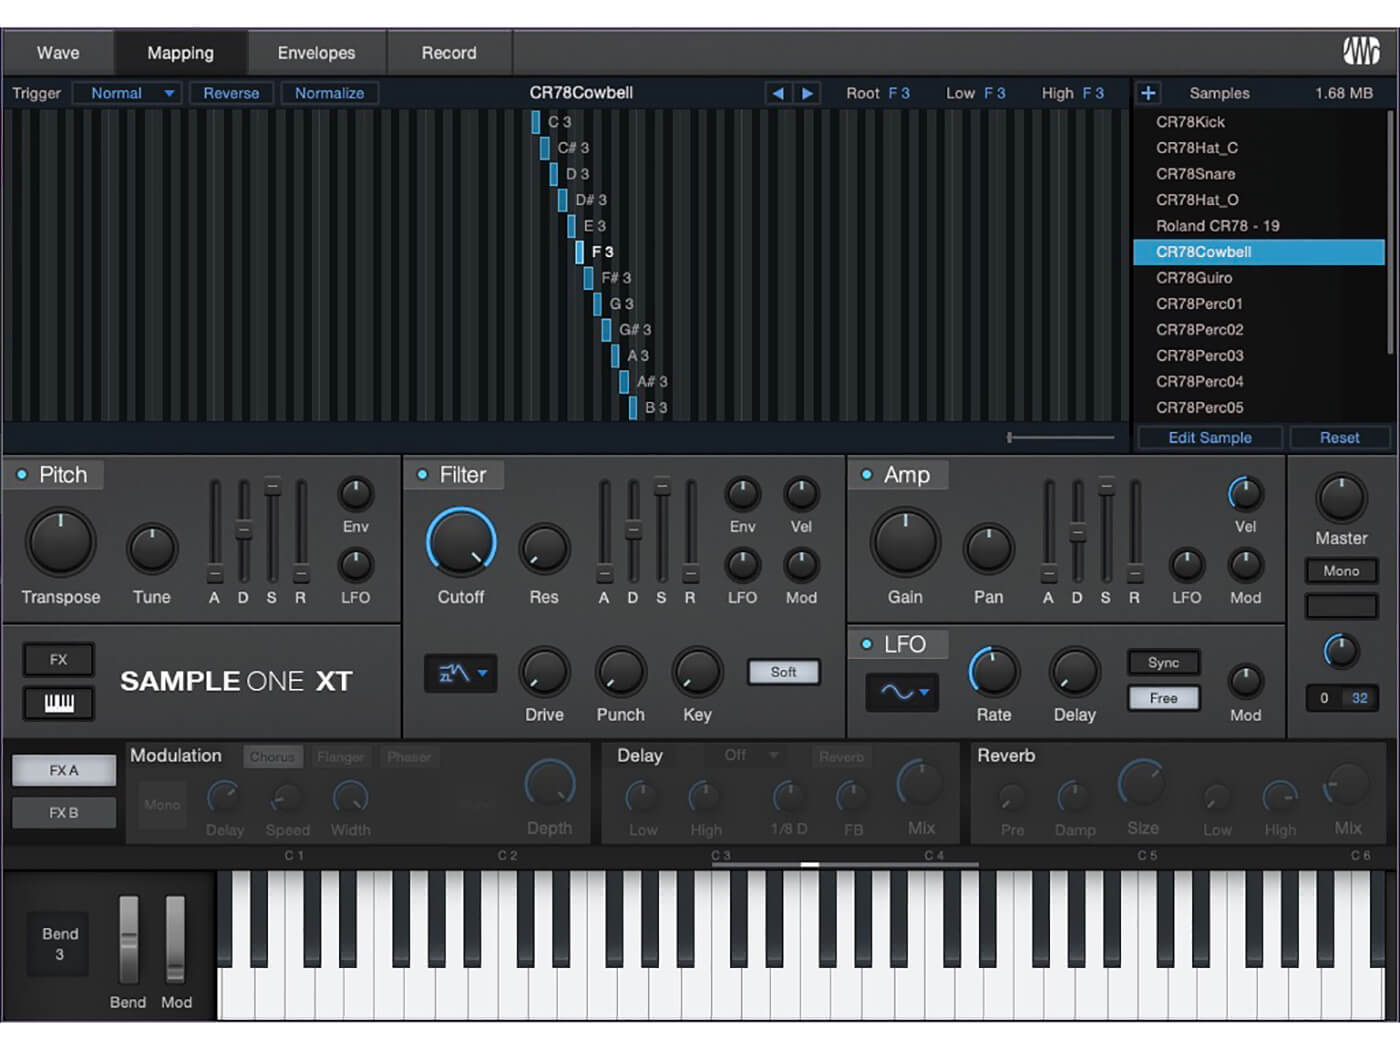
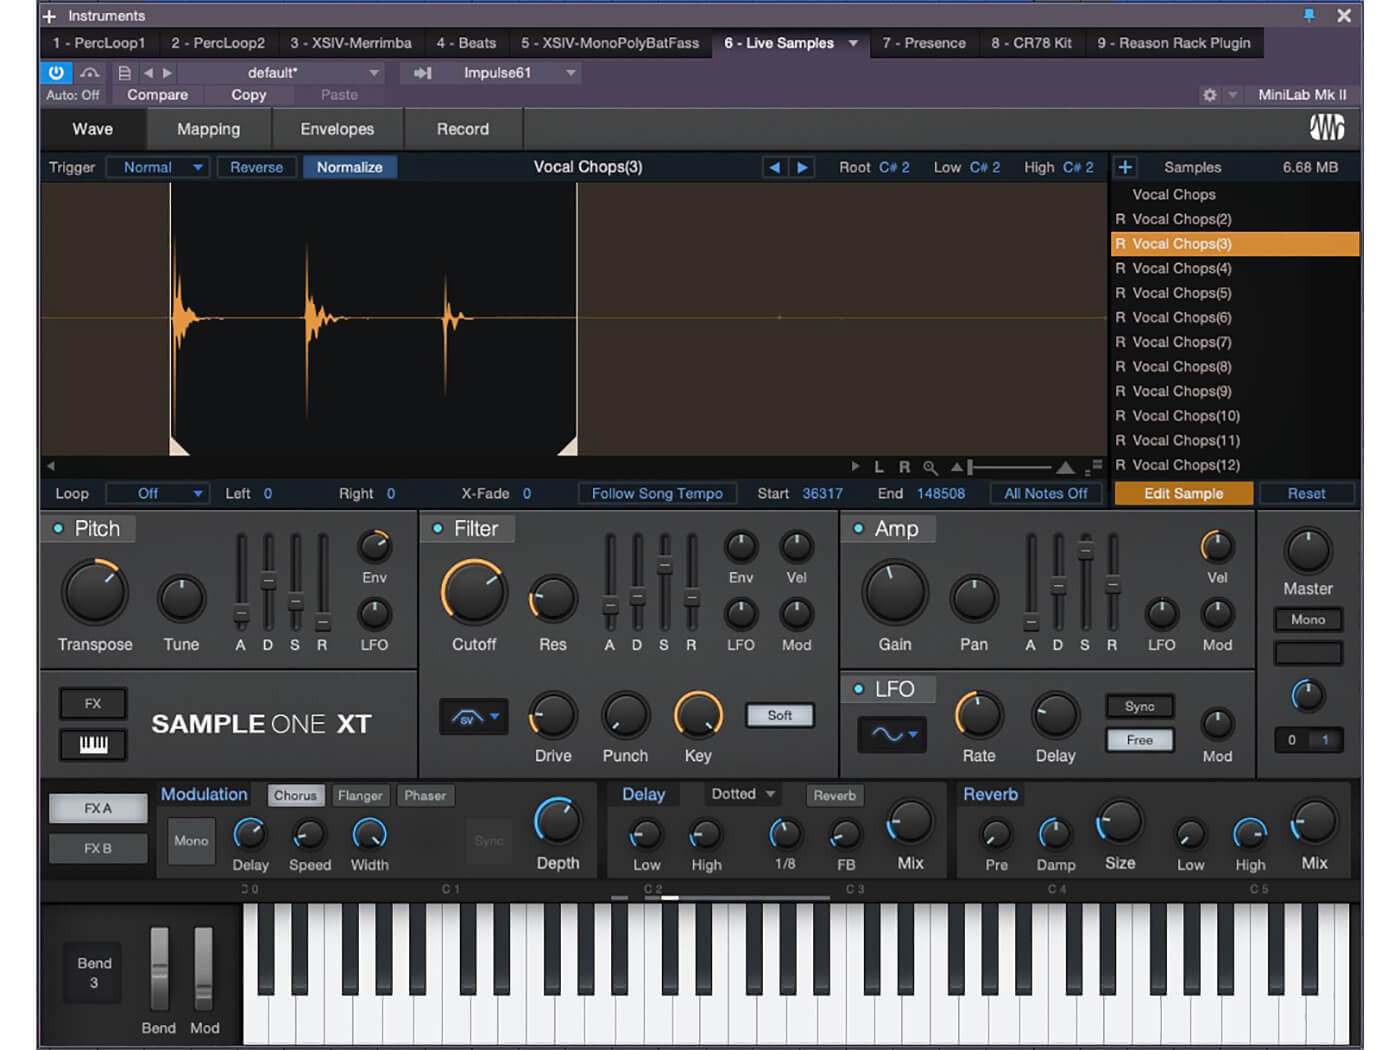
When we first open Sample One XT, we’re presented with what initially looks like a software synthesizer with Pitch, Filter, Amp, LFO and various other familiar controls. However, when we load a sample, it becomes apparent this is something else altogether.
There are four tabs across the top of Sample One XT: Wave, Mapping, Envelopes and Record. The Wave tab is the visual display and shows us the waveform we’re working with and provides controls for modifying the sample and its playback behaviour. This is also where we can add, remove or replace, and edit samples. We can set loop points for our sample so that it continues to play one particular section of the sample until we release a held key.
There are triggering options here that will allow us to trigger the sample in Normal mode (it starts when you press a key and stops when you let up on the key), One Shot mode (it plays all the way through when you press a key… even if you let up on the key), and Toggle mode (the sample plays when triggered and only stops when triggered again).
Finally, we can reverse our samples and/or normalise them. Reversing it is as it sounds. Normalising a sample means automatically increasing the overall volume of the sample so that its highest peak in the waveform is at just below full scale.
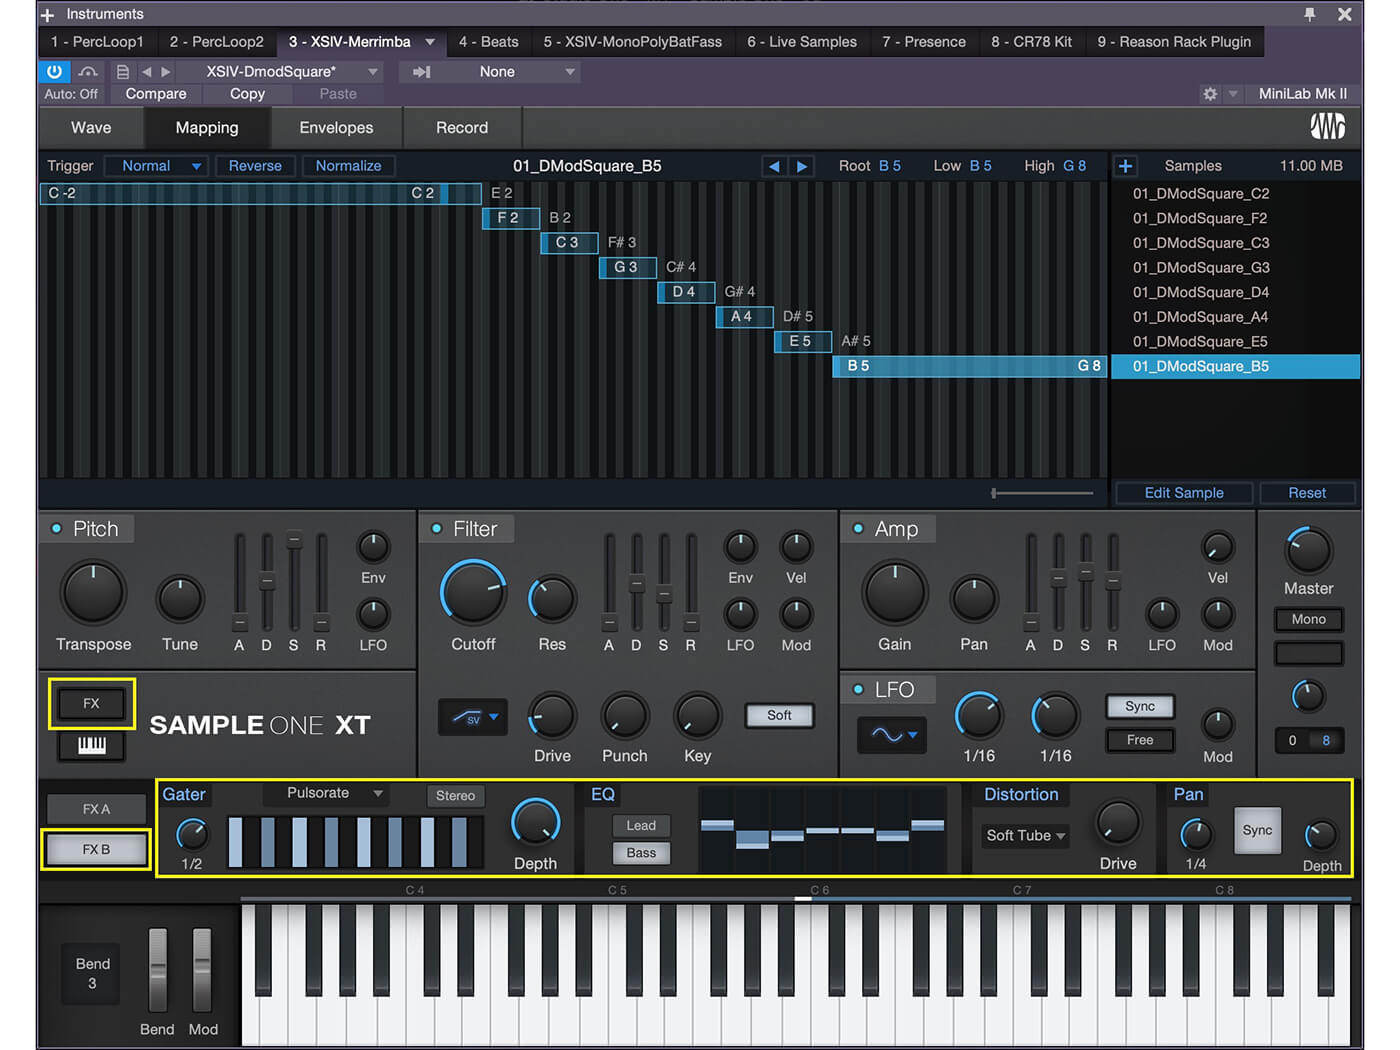
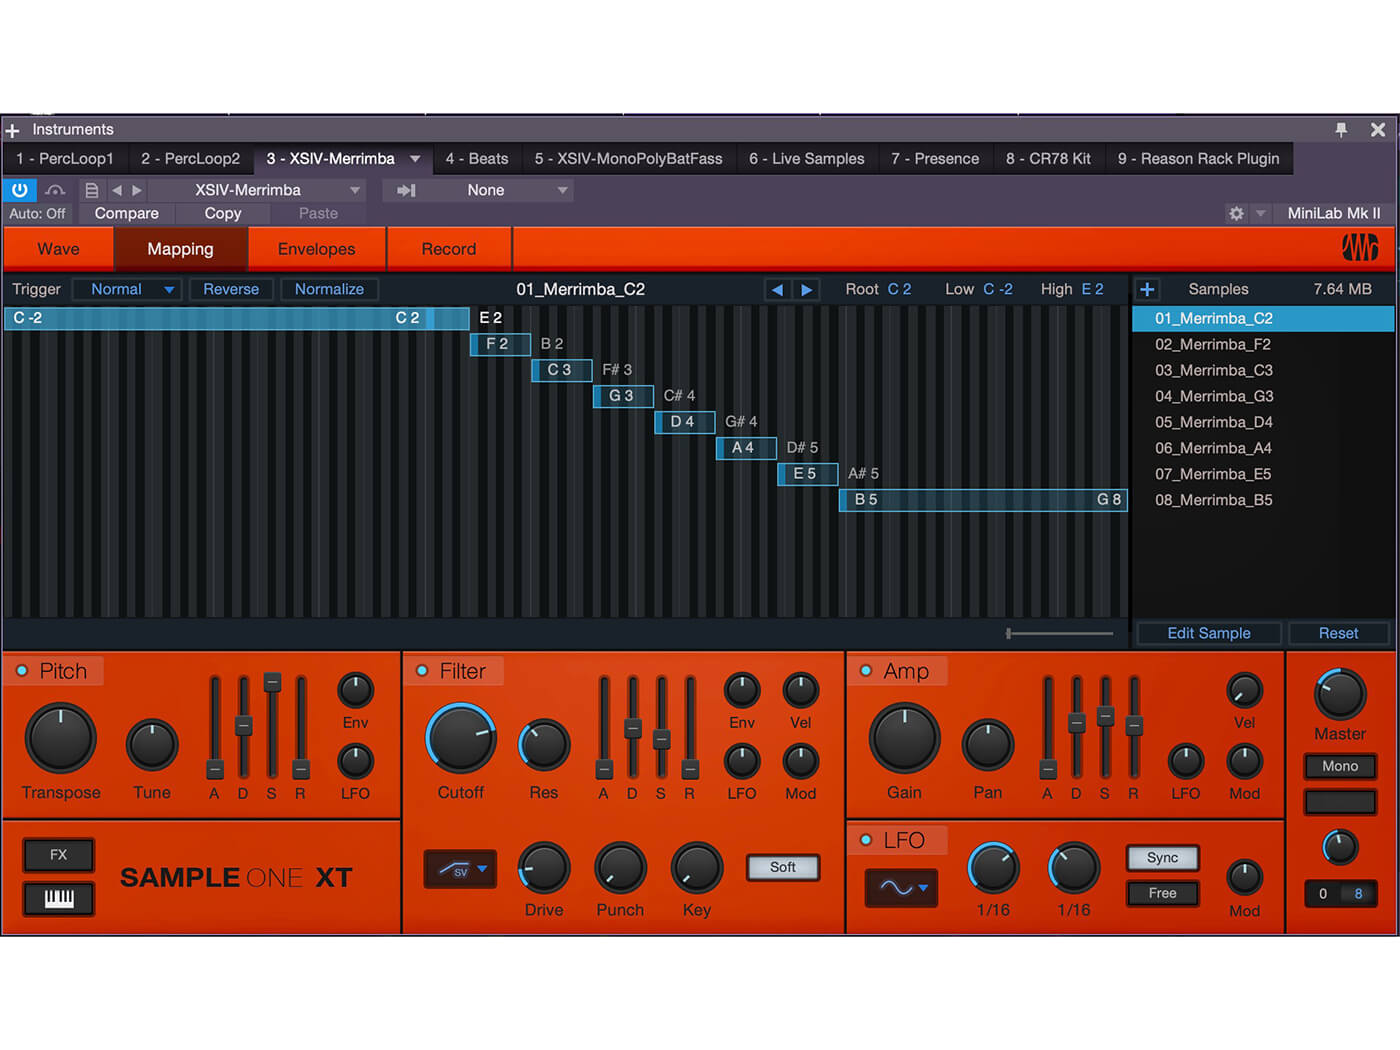
Once we have our samples loaded and tweaked to our liking, we can go to the Mapping tab to determine which key(s) on the keyboard triggers the sample. We can do this by clicking in the Low / High Notes boxes and typing in values or by clicking and dragging the range for each sample in the map view. When multisampling, this is a great way to create splits and/or layers.
If we have several samples that make up a sound we particularly like, we can make quick work of creating a preset in Sample One XT.
Major labels
Often, a group of samples for a specific sound will be labeled with the root key for each sample. So, for example, if we have 8 synth string samples that are labeled as:
• Sstring_C2,
• Sstring_F2,
• Sstring_C3,
• Sstring_G3,
• Sstring_D4,
• Sstring_A4,
• Sstring_E5,
• Sstring_B5…
…then we might map them as follows:
• Sstring_C2, Root: C2; Low: C1; High: E2
• Sstring_F2, Root: F2; Low: F2; High: C3
• Sstring_C3, Root: C3; Low: C3; High: G3
• Sstring_G3, Root: G3; Low: G3; High: D4
• Sstring_D4, Root: D4; Low: C1; High: E2
• Sstring_A4, Root: A4; Low: C1; High: E2
• Sstring_E5, Root: E5; Low: E5; High: B5
• Sstring_B5, Root: B5; Low: B5; High: C7
This spreads each sample out so its root note is the natural note, Low is the lowest note of the sample, and High is the highest note the sample is stretched to. Setting the High note to one semitone below the next sample will make a decent transition. We can also overlap the Low and High notes’ ranges by a semitone or two to try and minimise variations in the samples, but this can lead to louder notes depending on the samples used because we’d be playing two samples at the same time in that overlap.
Sample one for me please
One of Sample One XT’s great strengths is in how easy it is to sample your own custom patches. Selecting the Record tab in the interface allows us to sample any input. This can be done manually, or a gate threshold can be set. Once the signal passes above the threshold, Sample One begins recording and then stops when the signal falls back down below the threshold. This makes quick work of multi-sampling a drum kit or a chromatic instrument because Sample One begins recording a new sample each time the threshold is crossed.
Capturing life with Sample One XT: Step-by-step
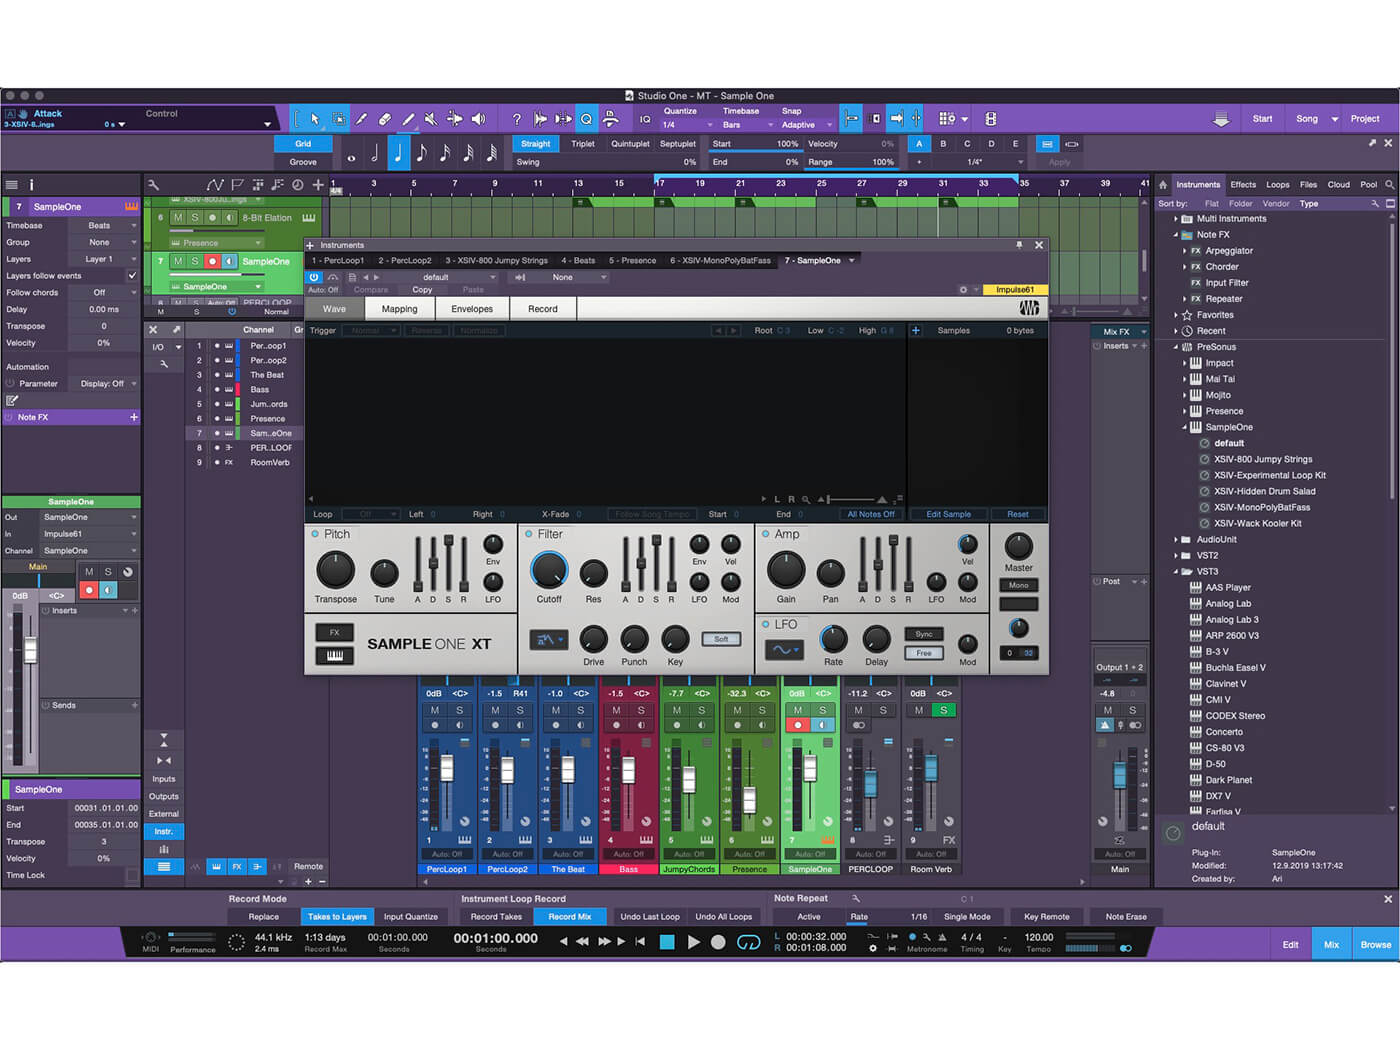
1. Drag Sample One XT into the Session area of Studio One. Sample One opens empty unless otherwise configured.
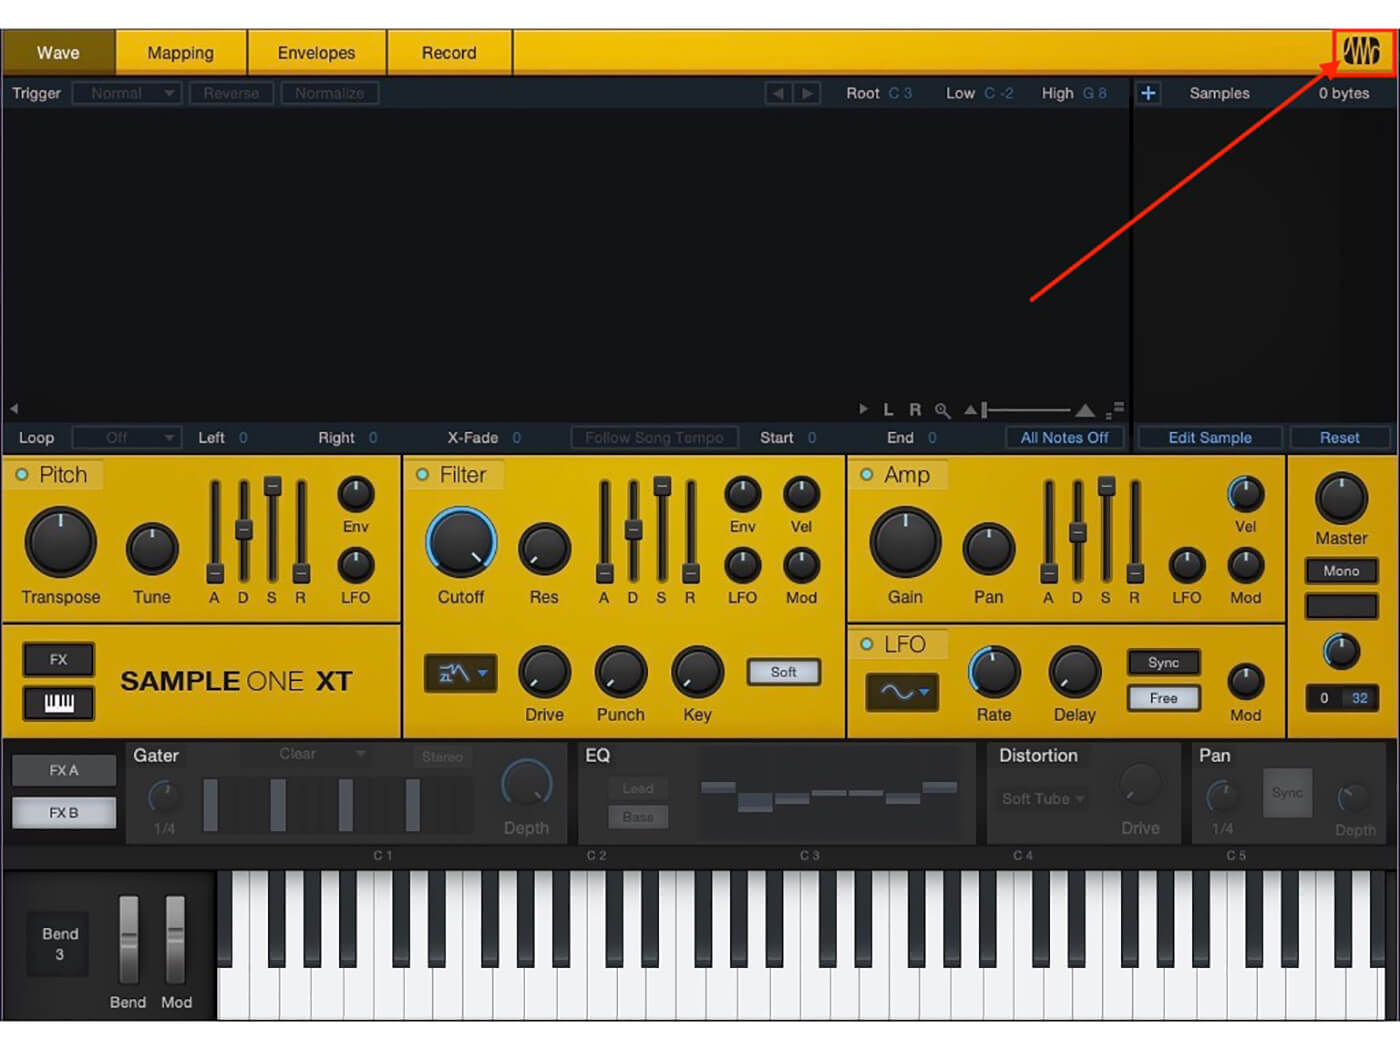
2. Click the Presonus logo in the top right corner to change the color of Sample One. It makes it easier to tell which instrument is which when working with multiple instances of Sample One.
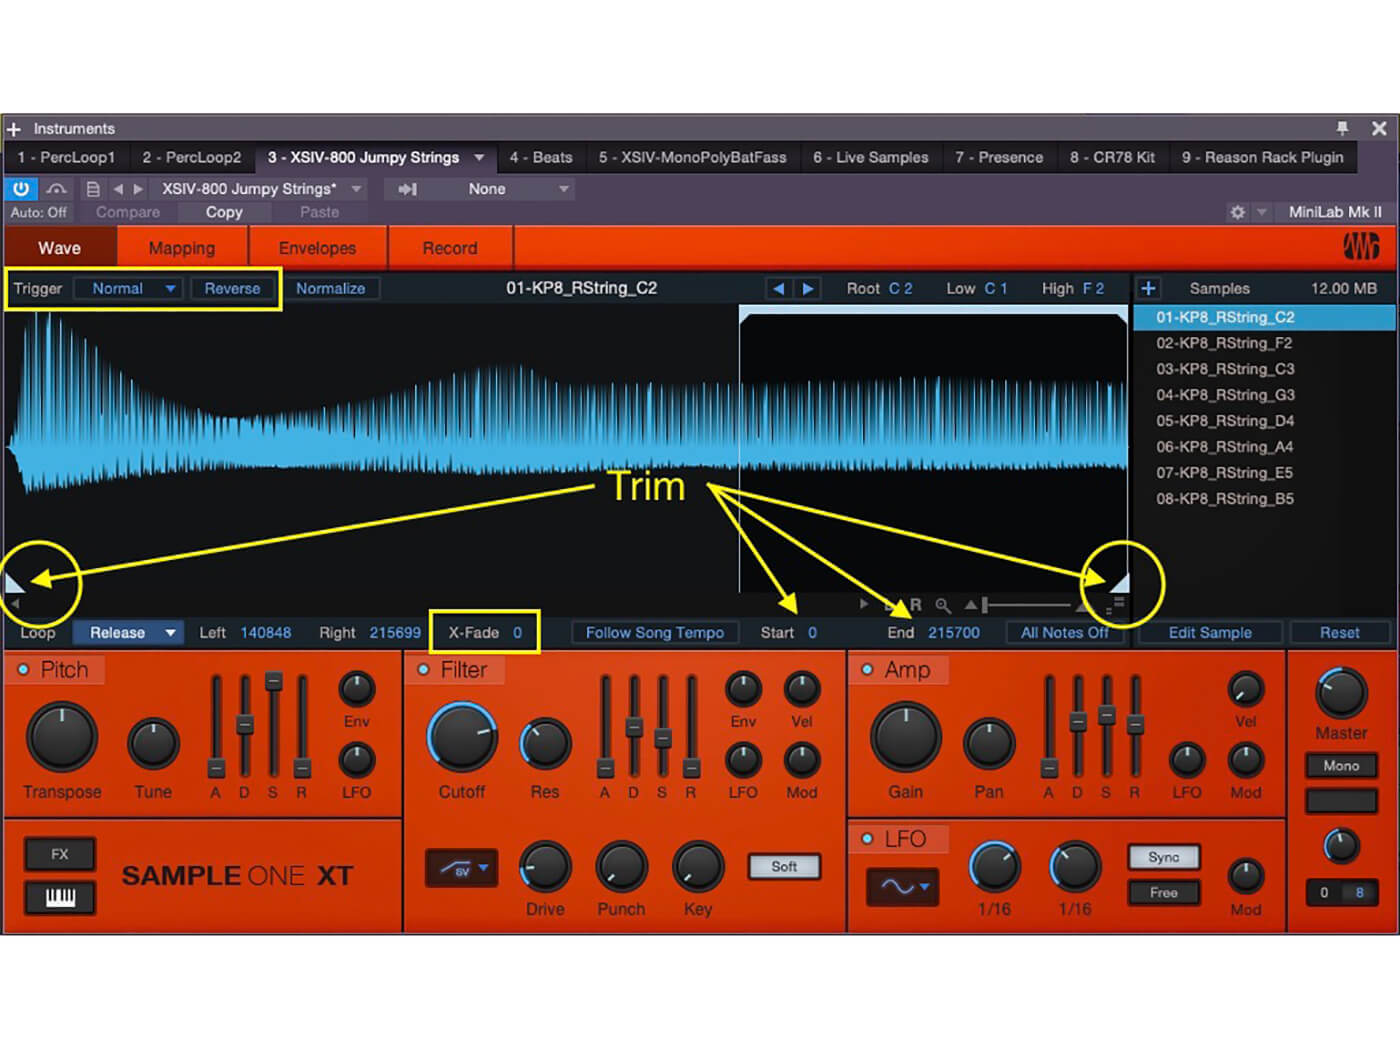
3. Let’s trim the samples using the Trim Brackets and set Crossfade values for each sample. Click each sample in the Sample Browser to adjust the settings individually.
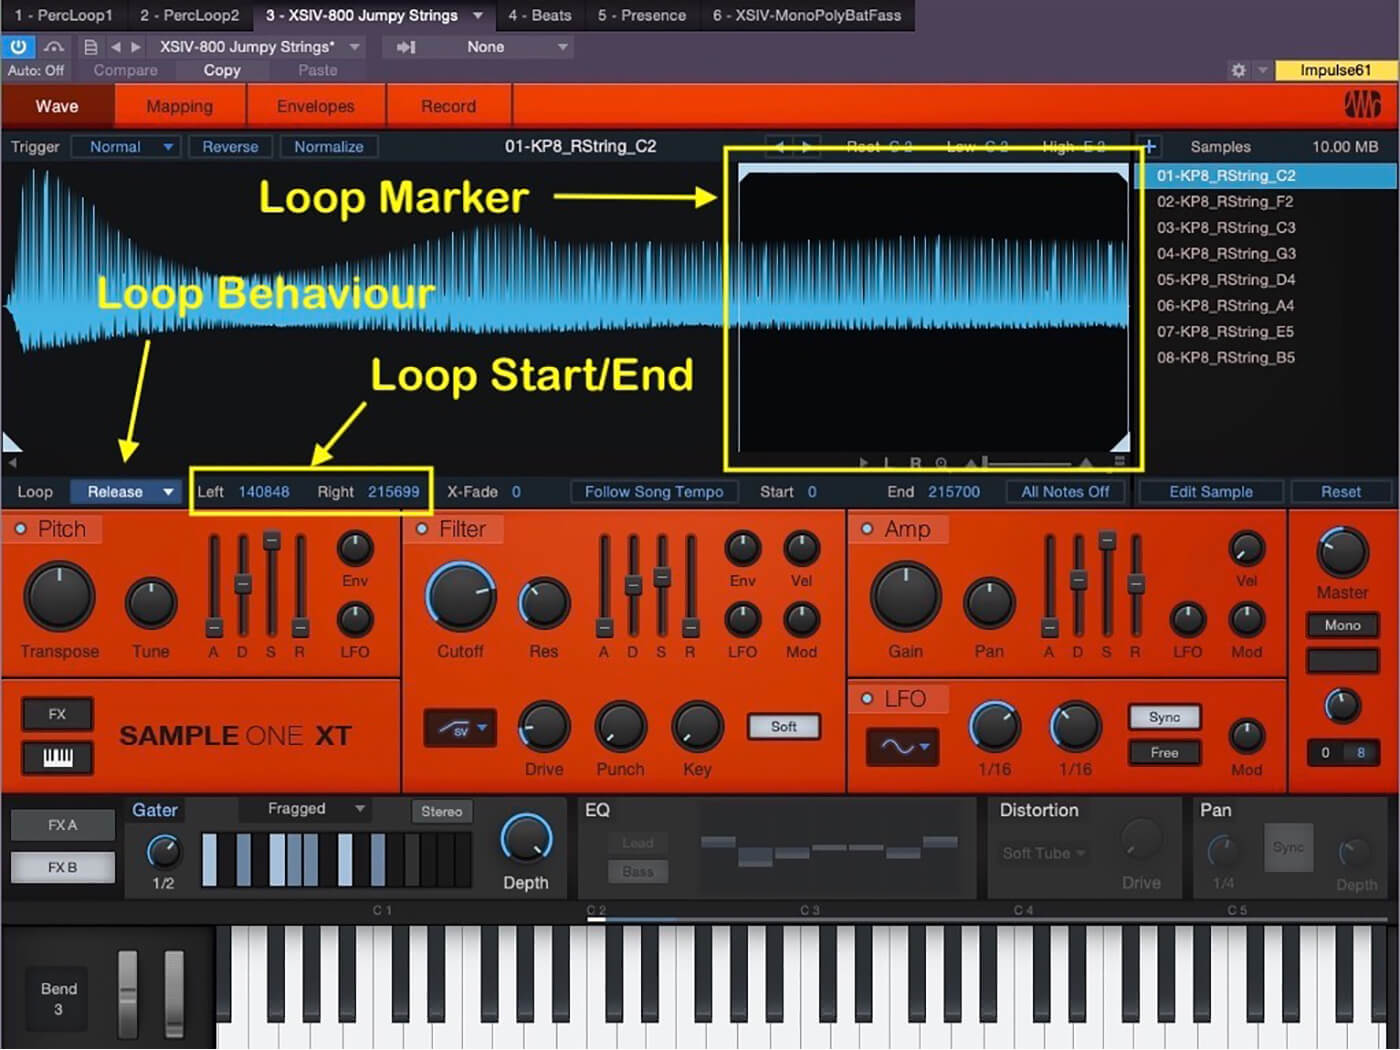
4. We can now set loop behaviour for the samples. Drag the loop markers to set the loop range. Alternatively, click in the Loop Start and End boxes and type in values.
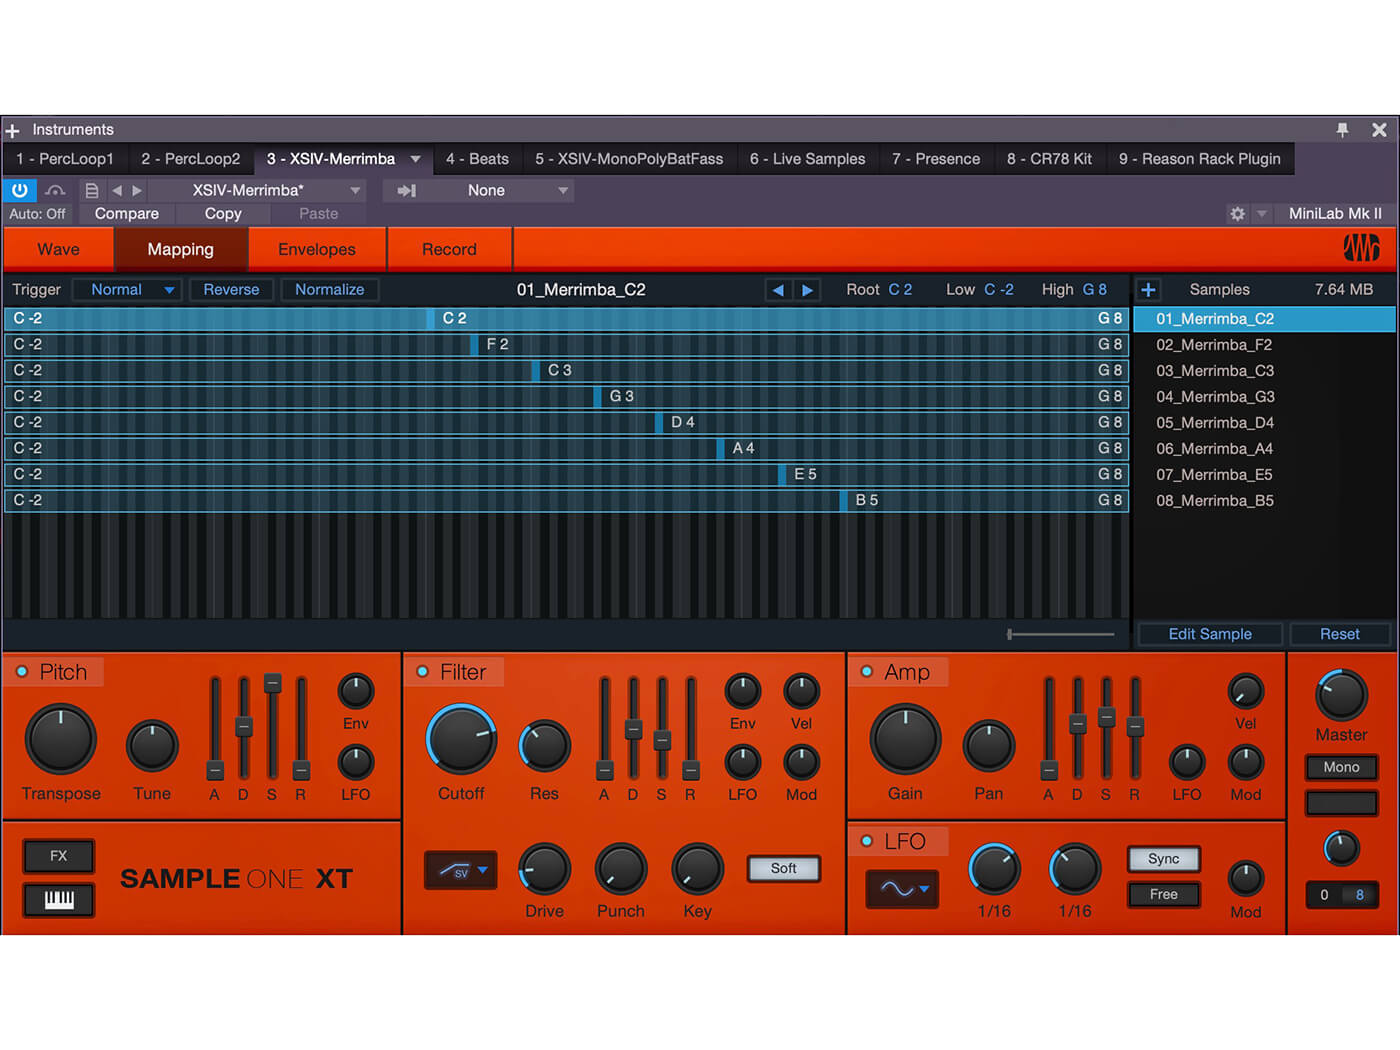
5. We can set the Root Note and Hi and Low notes for each sample on the Mapping Tab. Click and drag the note range for each sample or, again, type in values.
6. Once we have all the sample ranges set, we can begin tailoring the overall sound of the patch to our liking using the Pitch, Filter and Amp envelopes and the LFO.
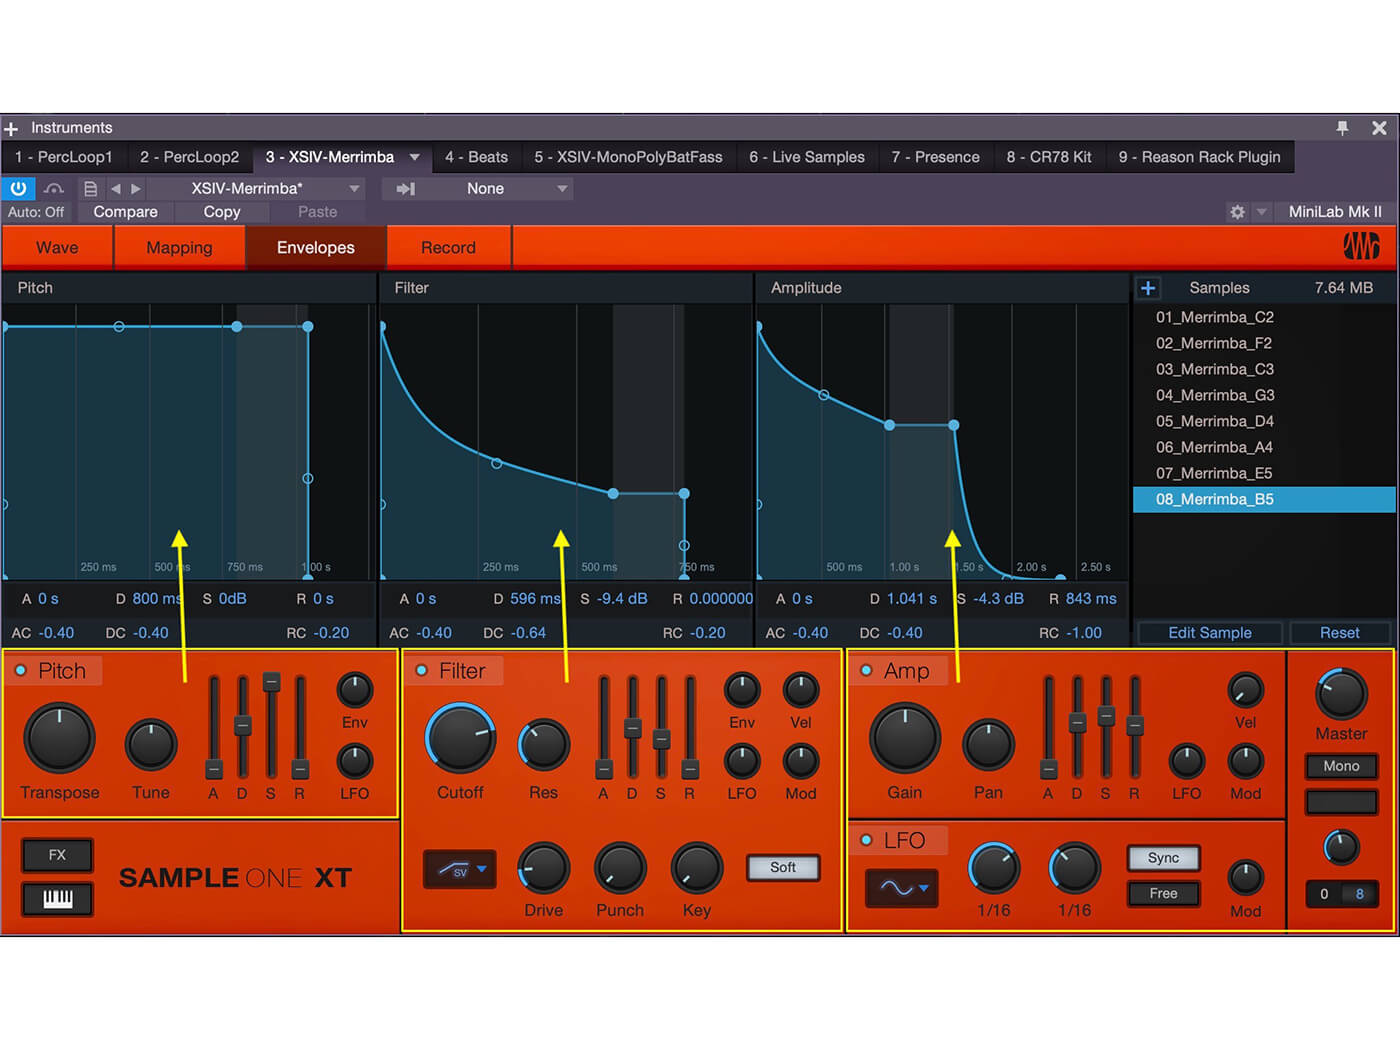
7. Click the Envelopes tab to begin tweaking. We can use the knobs and faders in each section or just click and drag in the envelope view.
![]()
TRIGGER MODES There are three trigger modes available for samples in Sample One XT – Normal, One Shot and Toggle. Play a note in Normal mode and the sample plays until we release the key. In One Shot mode, playing a key plays the entire sample. This mode is perfect for drum kits. Toggle mode is best for droning pads and loops. Playing a note in Toggle mode plays the sample and it only stops playing when the note is triggered again.
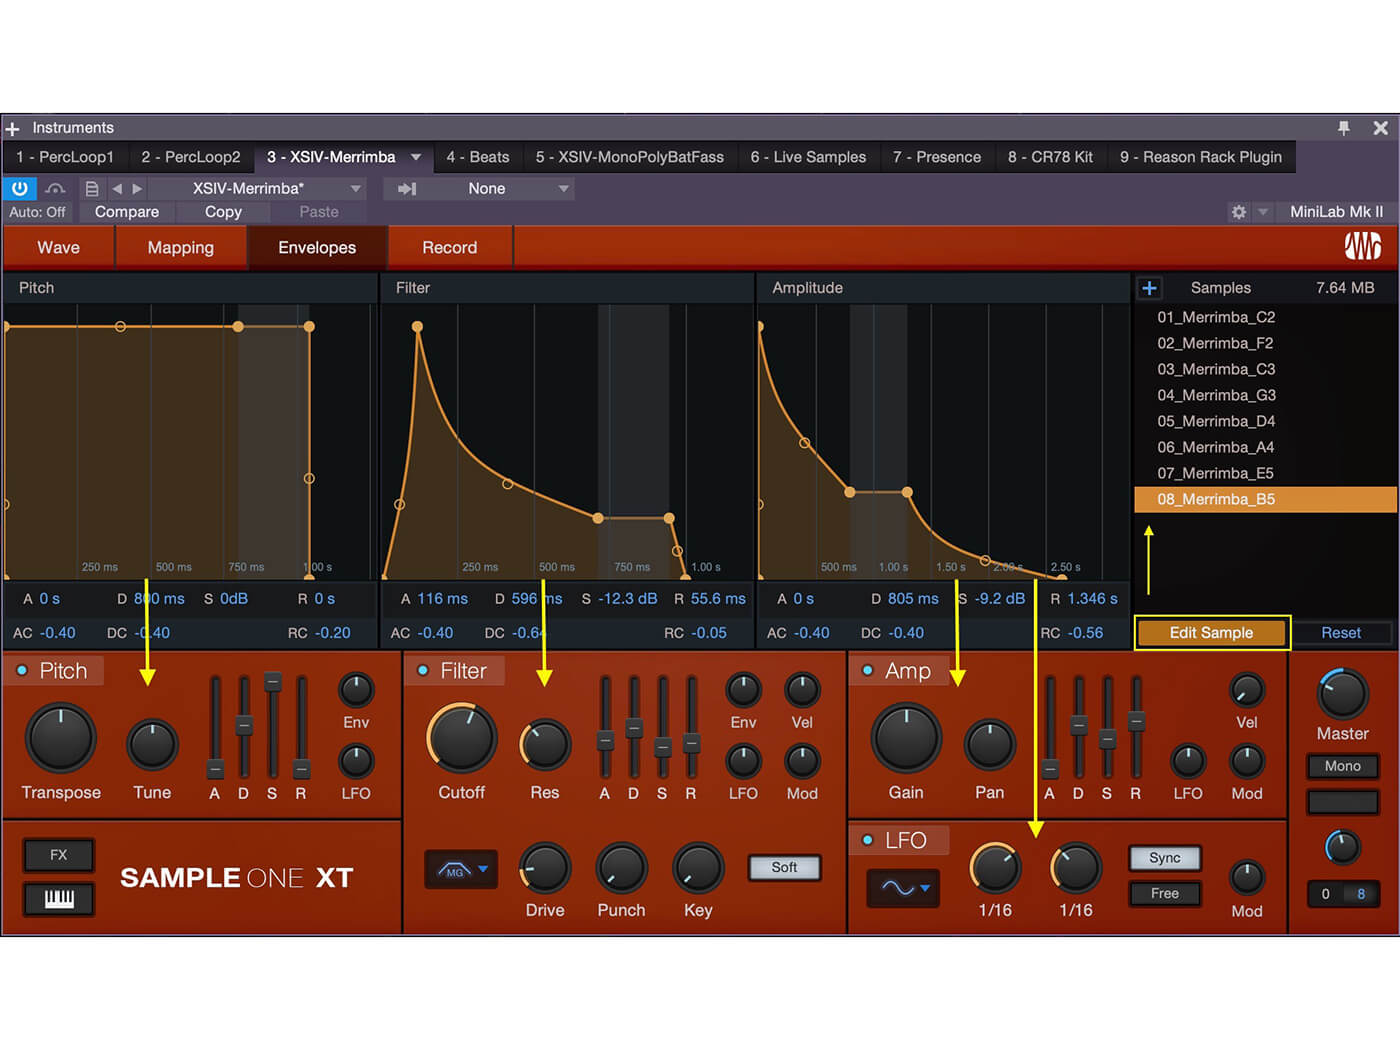
8. If we find that we need to adjust the envelope settings for each sample individually, click the Sample Edit button. This does not change the overall settings for the patch.
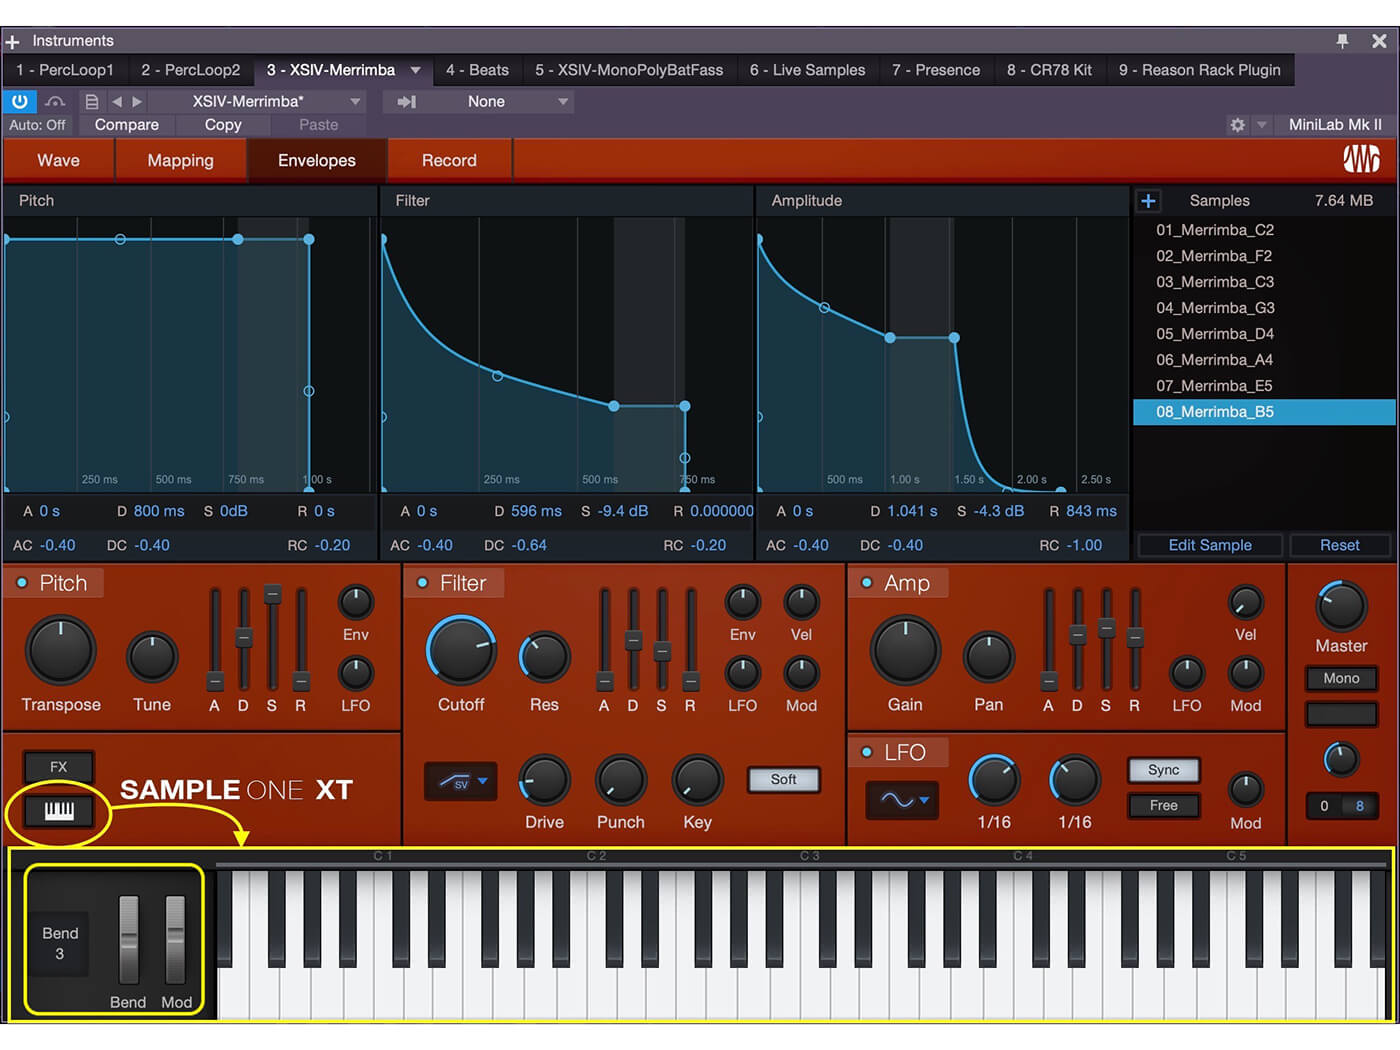
9. While tweaking our sound, it might be necessary to use the on-screen keyboard to test our sound. This panel is where we can also adjust the pitch bend amount.

10. Now let’s add some effects to our sound. Click the FX and FX A buttons to see: Modulation (Chorus, Flanger, and Phaser), Delay and Reverb panels. Tweak away.
11. Clicking FX B will give us access to a rhythmic Gater, EQ, Distortion, and Pan controls. Let’s add some gating effects from the drop-down menu.
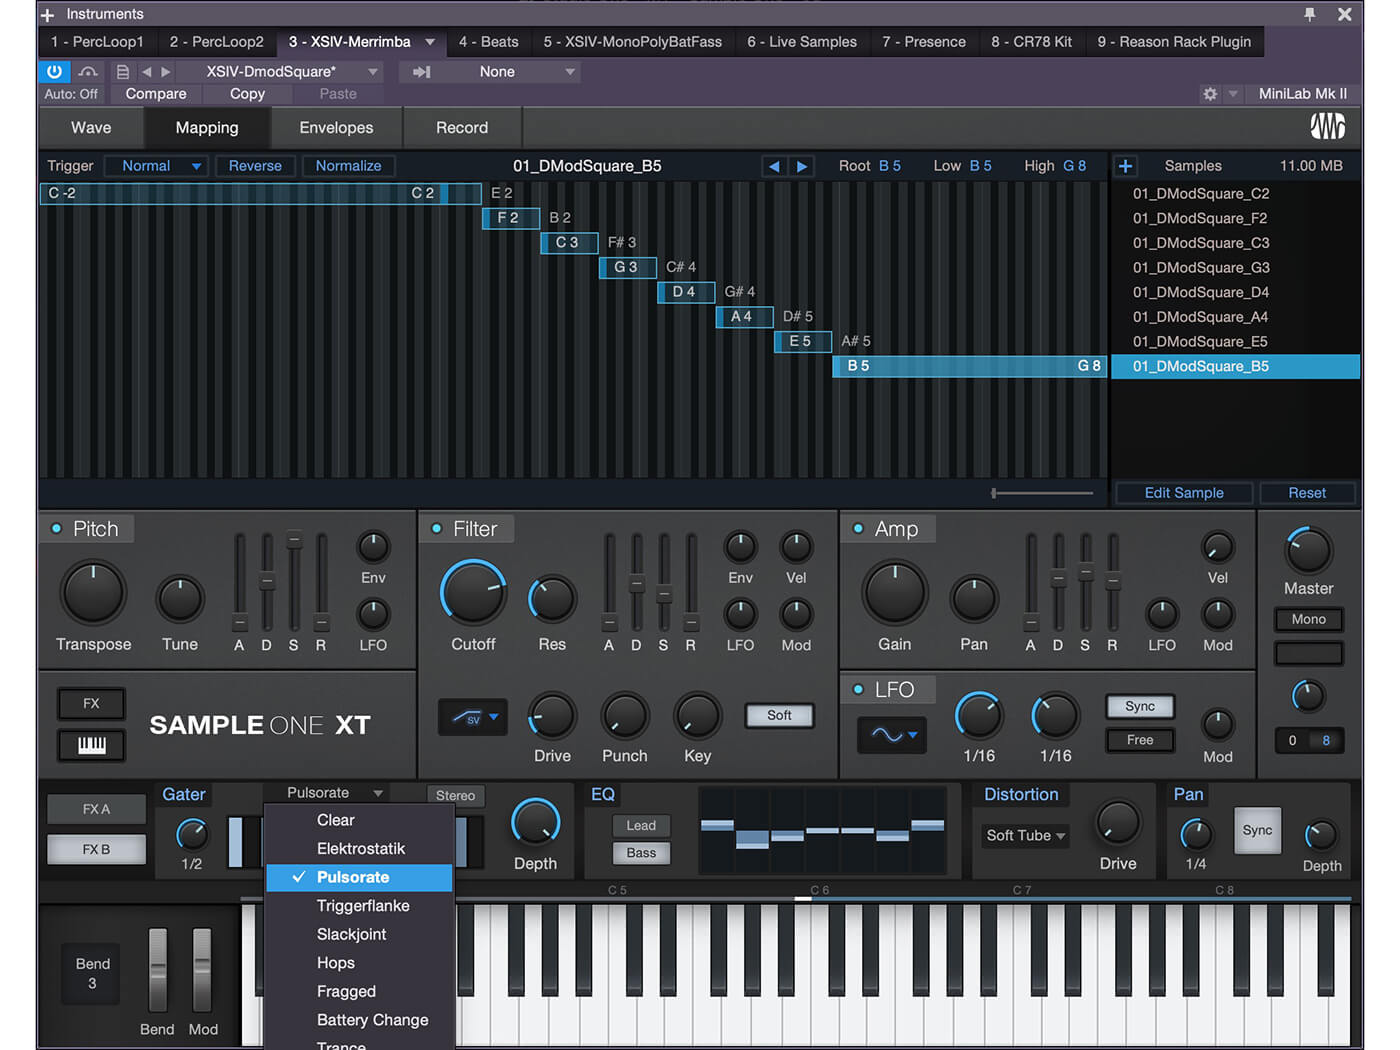
12. There are lots of options here that can add great movement and interest to our patch. Let’s choose Pulsorate from the menu and then add some Distortion.
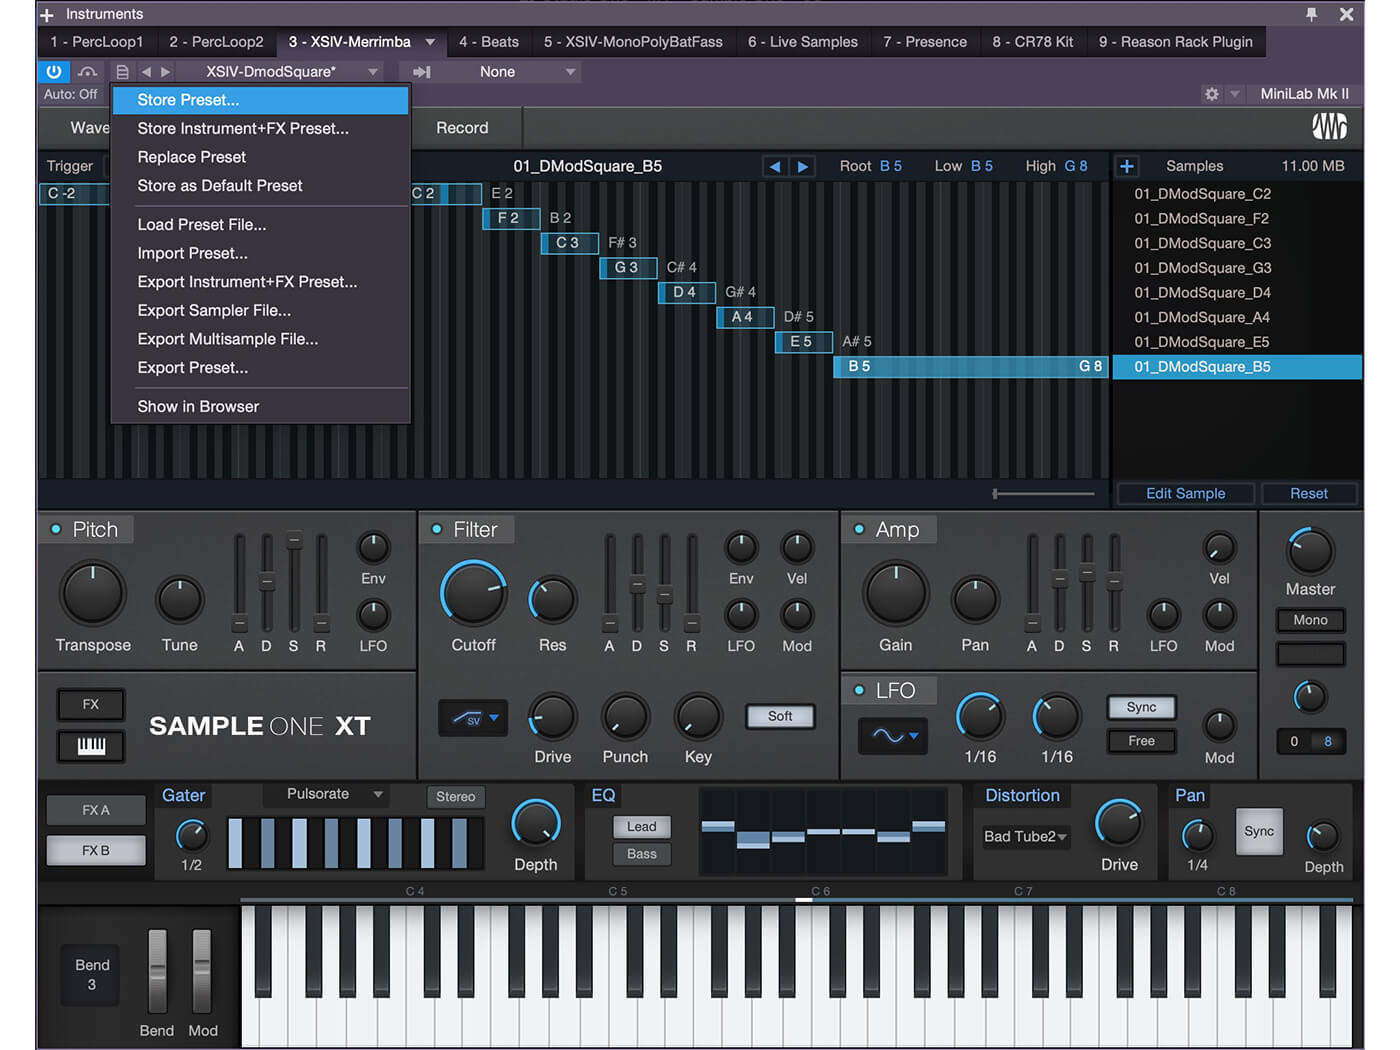
13. Let’s not forget to save our patch often. There are several options for saving… including the ability to save a preset with any FX we may have added.
![]()
LOOP PLAYBACK MODES There are three loop modes – Sustain, Release, and Ping-Pong. In Sustain mode, releasing a key causes the sample to continue past the loop range based on the release of the Amp envelope. In Release mode, the sample continues looping when the key is released, then fades based on release in the Amp envelope. Releasing the key in Ping-Pong mode causes the loop to continue to the end of the loop range and then play in reverse back to the start of the range.
14. Using the same method described above, we can make quick work of building drum and percussion kits. Make sure to plan ahead and know which drums we want assigned to what keys.
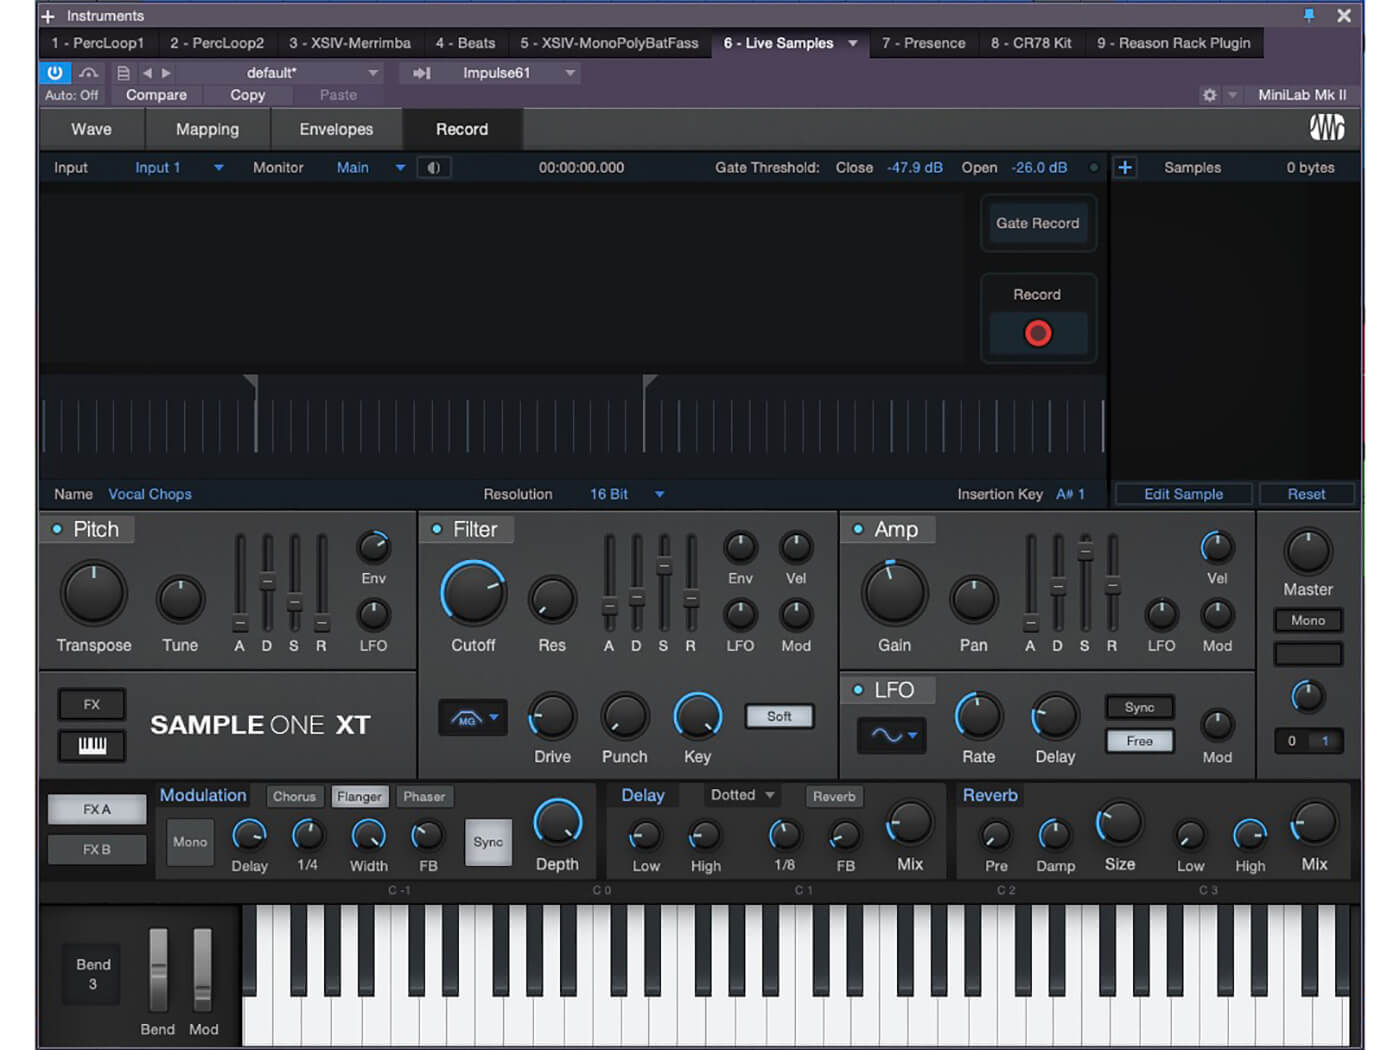
15. Let’s make our own samples. Click the Record tab, select an Input Source, name our samples, set a recording threshold, sample rate and Insertion key. Click record and play the source.
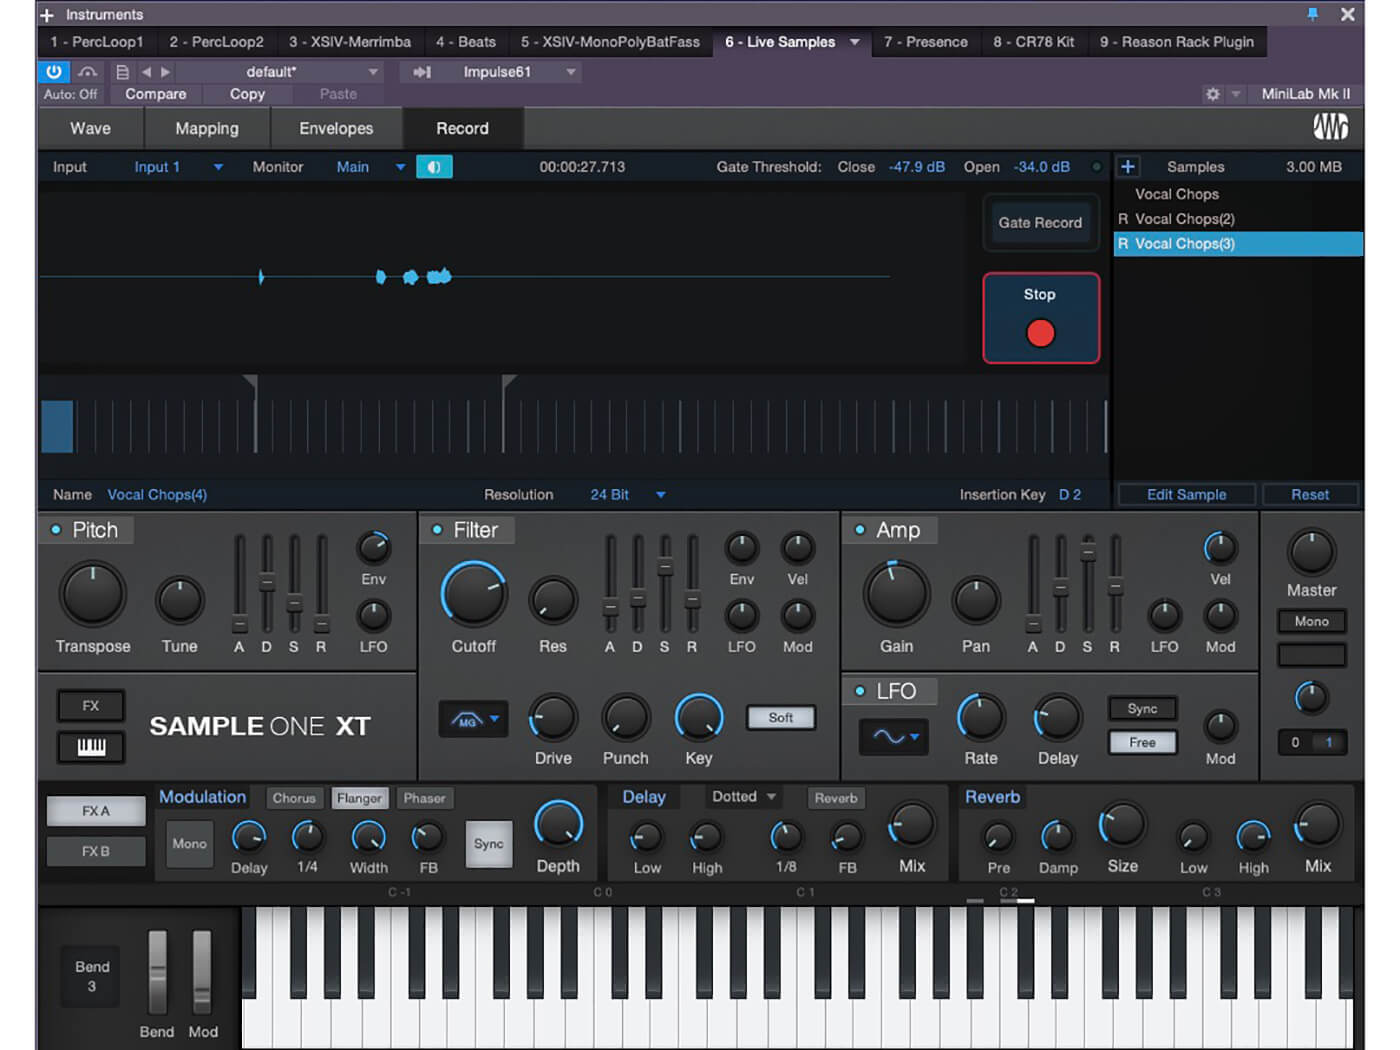
16. Sample One will continue to record until we click the Record button again. If the waveform is too small, either adjust the input or Normalise (depending on noise).
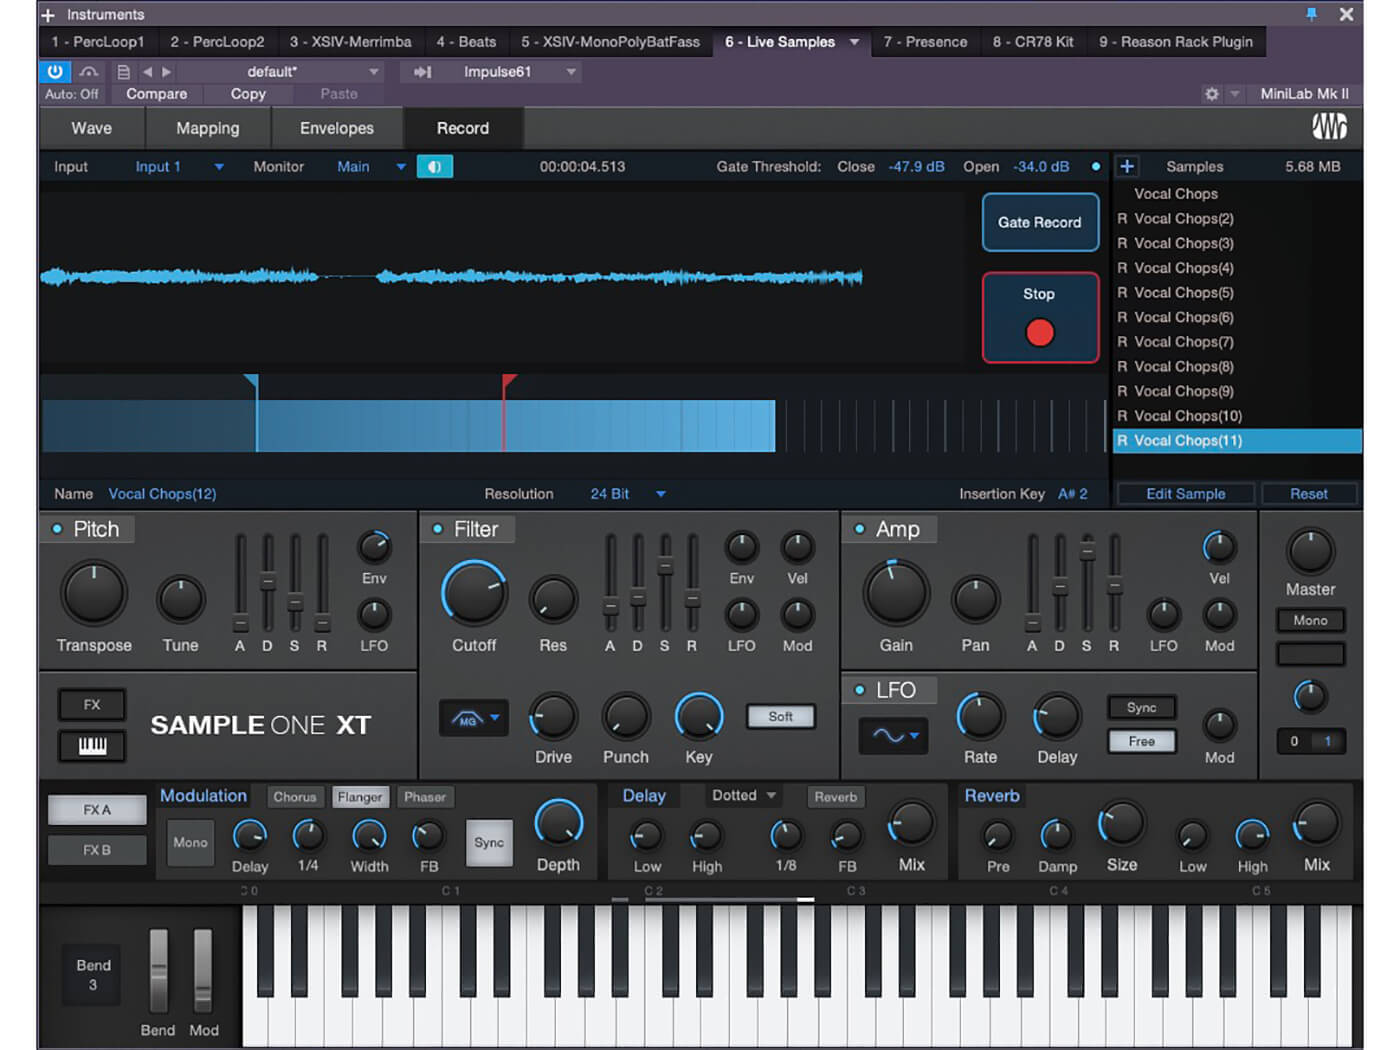
17. Let’s use Gate Record. This will allow us to adjust the opening and closing gate levels. Now, each time a sound crosses the Open/Close thresholds, it will record a new sample.
18. With our new samples, we can go back to the Wave tab and adjust an individual sample’s parameters (including sample trim and loop playback) by clicking the Edit Sample button.
For more PreSonus Studio One tutorials and workshops, check here.