Getting started with mixing in Studio One
One of the most popular DAWs around at the moment provides a very streamlined, effective workflow for mixing with ease. It’s time to take a look at the best way to prepare for some serious mixing sessions with the incredibly flexible Studio One…

Since its release in 2009, Studio One has developed quite a following and has fast become a leading DAW for hobbyists, project-studio owners, and serious audio professionals alike. With each iteration, Studio One has provided users with more and more tools to compete with the biggest platforms out there. Now, at version 4.5, Studio One is perfectly suited to handling even the most challenging recording and mixing tasks. In this article, we’ll look at the tools and some tricks that make it easier than ever to mix the next international hit song.
To begin with, you could open a new session from the main screen. As you can see on the left, there’s nothing here but an empty session. You’ll have to add tracks (audio, group busses, FX tracks) as you need them. What’s nice about Studio One is that you can literally drag and drop your audio files into the session window and audio tracks will be created for each one. This same principle applies to MIDI parts and FX tracks; just drag-and-drop them into an empty area in the session panel and it will create the tracks for you.
Alternatively, you could start from a template, it’s often preferable to work this way, because it’s so much faster to get mixing if you don’t have to worry about building all your tracks. This, too, is pretty easy. Just create all the tracks you think could be in a session (kick, snare, hi-hats, bass, guitar 1, guitar 2, etc), then add your effects tracks (Room Reverb, Delay, Hall Reverb, etc). The template can also contain the plug-ins. So, if you have a favourite reverb, delay, compressor or EQ, you can store this as part of the template and have it at the ready each time you create a new song file. Once the template is created, it’s simply a matter of dragging audio files to the appropriate tracks.
There are some mixers who prefer to only include buses (drums, bass, keys, etc), effects channels and their favourite plug-ins in the mix window and save the template with no audio tracks. This way, they can drag all audio files for a song straight into the session window and Studio One will very smartly create the tracks. Then, simply arrange the tracks, rename them (if desired) and colour them to make the most sense of any similar instrumentation.
For example, you might put all drums together and make them blue; then, bass and make it yellow. Next, drag all your guitars together and make them green… and so on. If you use this colour scheme in a template, then you always have the same visual reference for where instruments are in your project.
Building blocks
In this tutorial, we’ll walk through setting up a template, adding audio tracks and working through the basics of the mixing process. One thing to note: there’s more than one way to mix a song. Some mixers like the traditional approach where they start with all faders down and work through each track – bring up each fader and building the mix this way.
Others like to use the ‘top down’ approach where they begin with effects on the main buss and then build the mix with these turned on. This approach gives the song a more polished sound as it is built and allows the mixer to hear more of what needs to be done to achieve the ‘finished sound’ – this often enables them to use fewer plug-ins on the individual channels and get a more natural sound.
The point is… there’s no right or wrong way to mix and, at the end of the day – the mix is purely subjective. So, use the tools available and find the approach that works best for you. And the most important factor in mixing is to use your ears. It’s easy to begin setting EQs and compressors based on what you’ve read, or by what experiences you’ve had, but listening is the only way to really understand what’s going on in your mix and where problems are that need to be addressed. Try turning off your screen occasionally and just listening.
Go compare
It’s a good idea to compare your track to a released song that’s at least similar to the one you’re mixing and use it as a point of reference. Drop it into your session with no effects on whatsoever and use it for comparison. Listen for the way the bass sits and how the guitars are panned. Listen for any effects treatments on the vocals and how they relate to the rest of the mix. Then, mute the reference track and continue working. This will go miles toward helping you mix.
One final word – mix at low levels. The thought is: if you can’t carry on a conversation while the music is playing, it’s too loud. Your ears become less capable of making accurate mix decisions. So, keep that volume down.
Mixing in Studio One: step-by-step
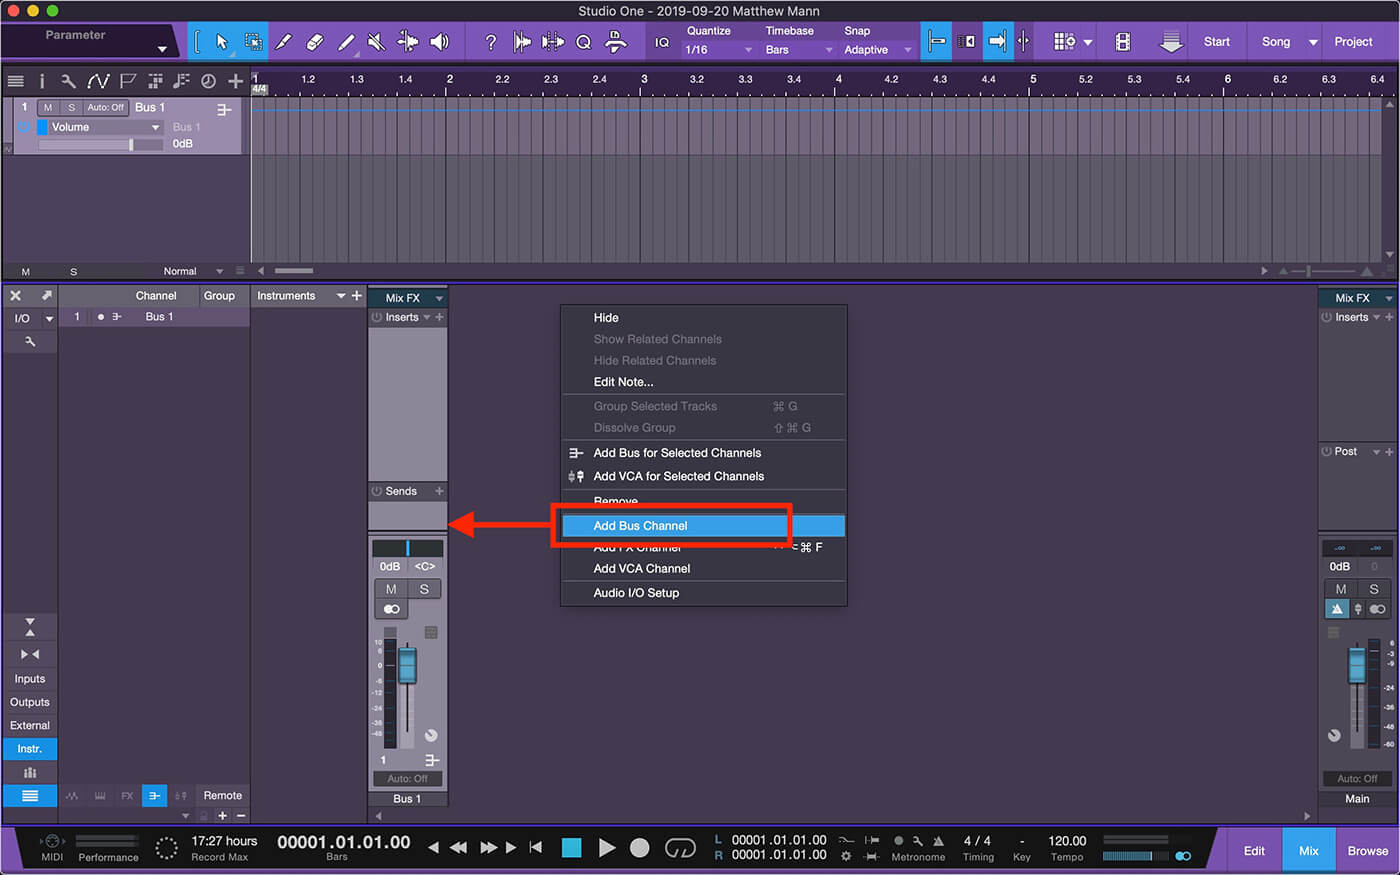
1. Let’s begin with an empty song. Click F3 to open the Mix view. Right-click in the empty space and choose Add Bus Channel. We’ll repeat this stop until we have enough buss channels. Once we have enough buses, we’ll highlight them all and click on the name box for one of the bus tracks. Now choose a colour for your buses.
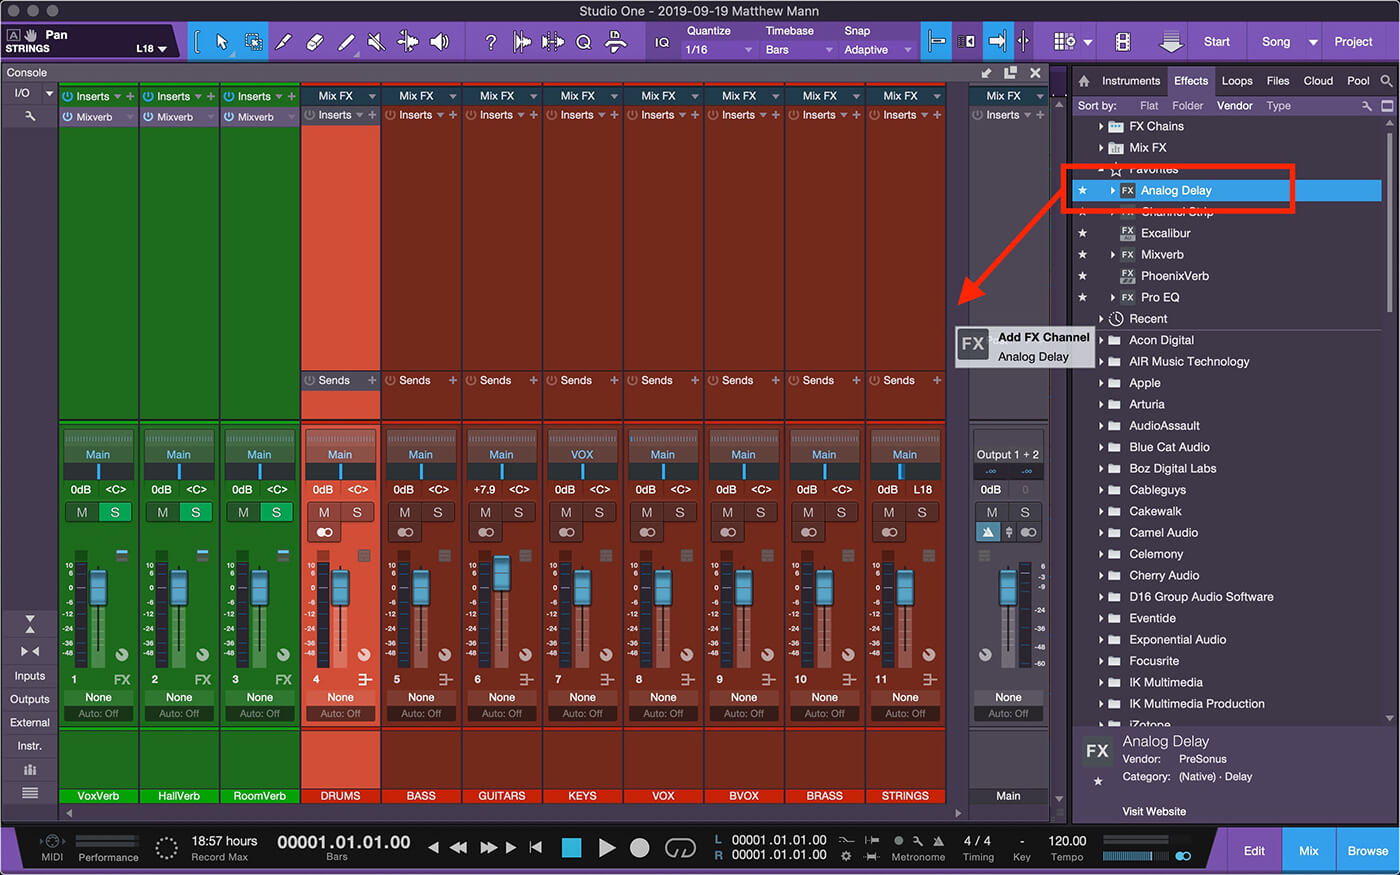
2. Next, we’ll create our FX buses. Start by clicking the F7 key to bring up the Effect Plugins list. From here, we can drag-and-drop our favourite effects plug-ins onto an empty space in the session area and Studio One will create an FX bus. Click F7 again to hide the plug-ins list. Colour and name the effects buses as desired.
3. Now let’s assign plug-ins to our Master Buss. Click on the + to show your list of effects plug-ins again. Studio One allows us to save favourites at the top of the plug-ins list; otherwise, we’ll just scroll until we find what we need and click it. The effect will then appear in the Master Buss.
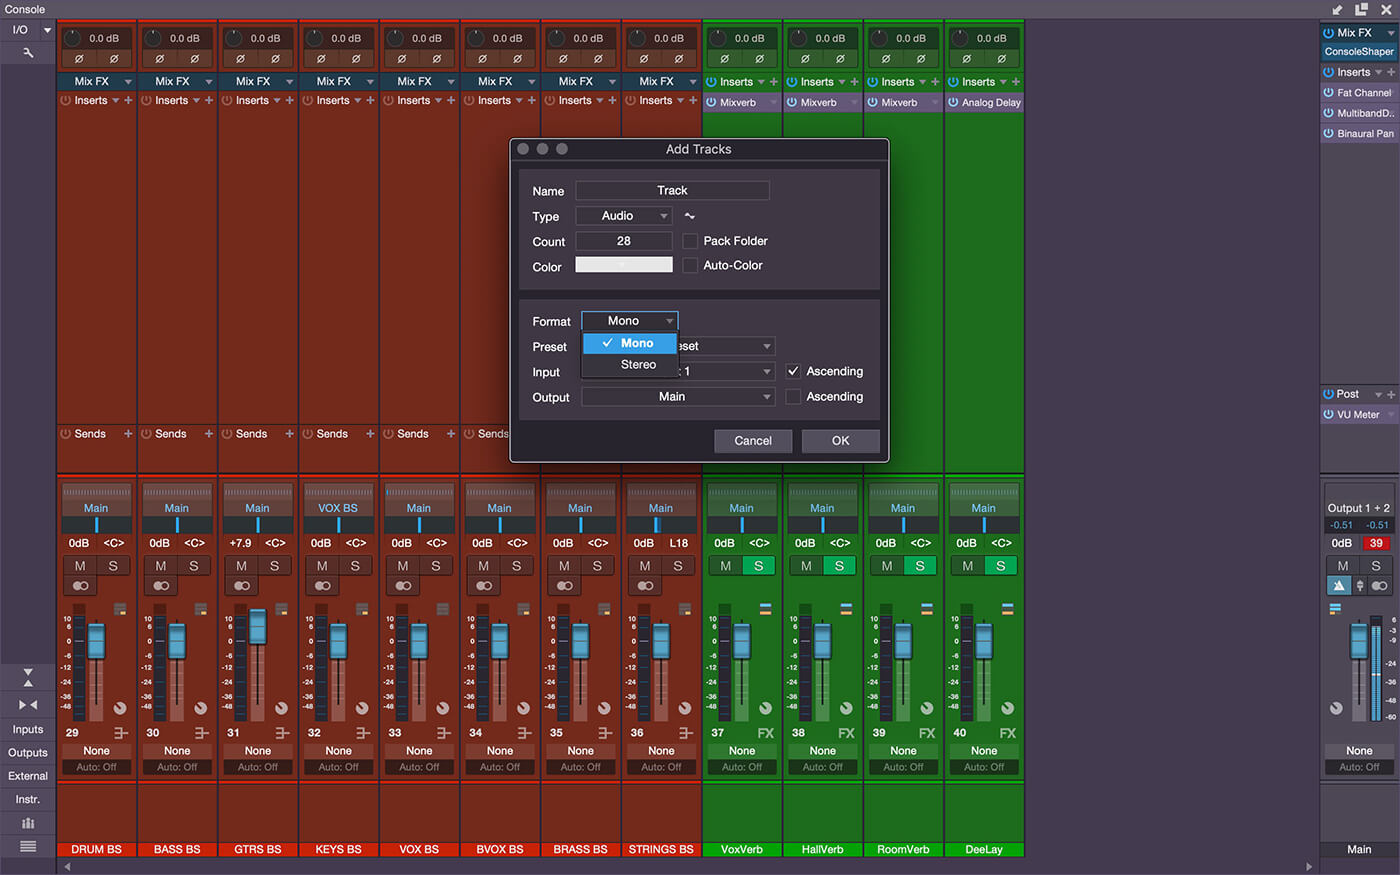
4. Once we’re happy with the basic template, we could go ahead and save it as a template; however, for this article I’m going to go ahead and prepare empty tracks to include with your template. Press T on your keyboard to open the ‘New Track’ dialogue. Here, I’ve selected 28 mono audio tracks to be labelled ‘Track’ in ascending order.

5. Now that all our tracks have been created, we’ll rename and colour them as we did with our buses. We’ll also add some effects plug-ins to our tracks as needed.
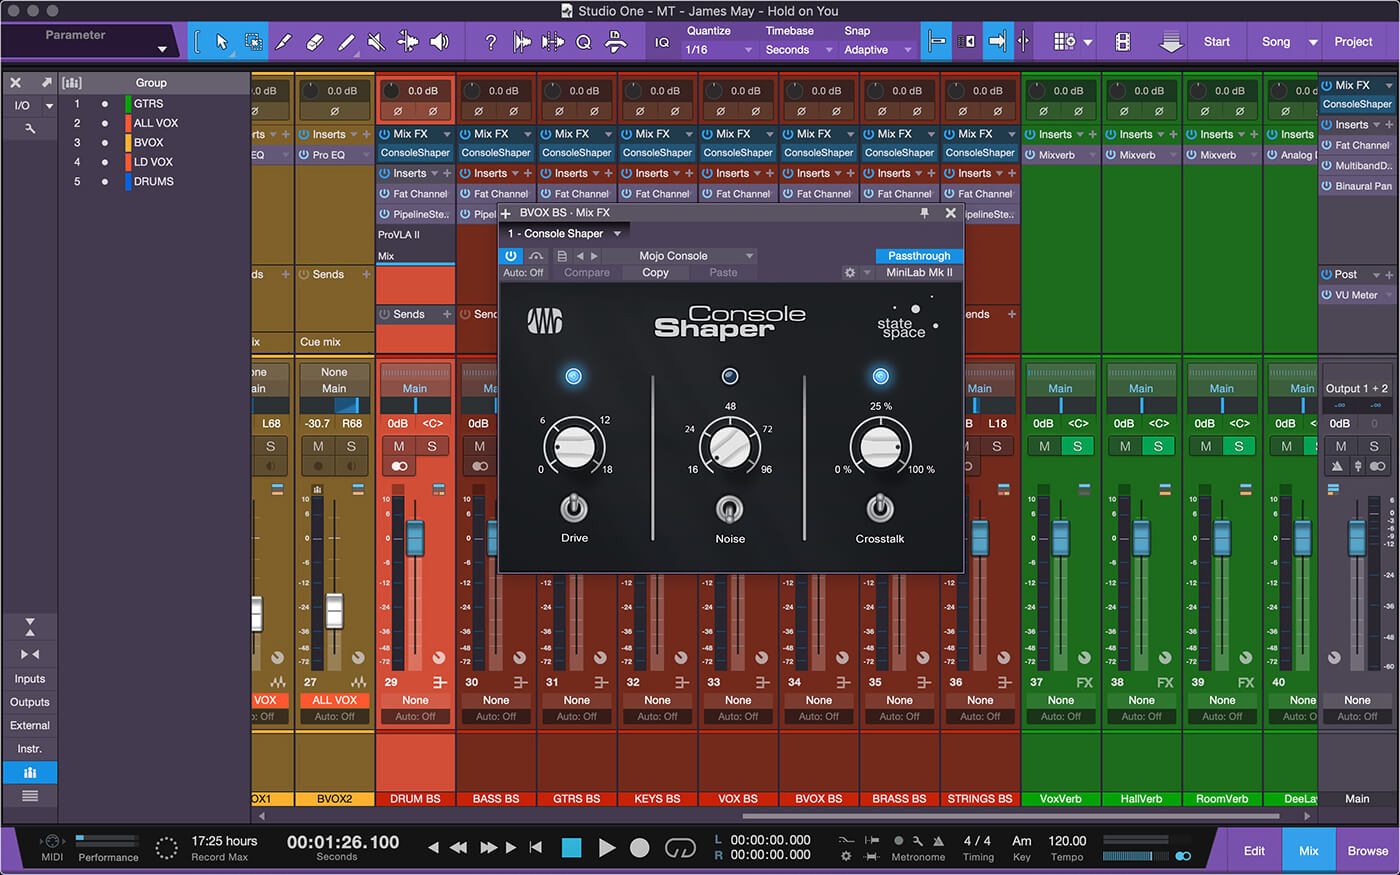
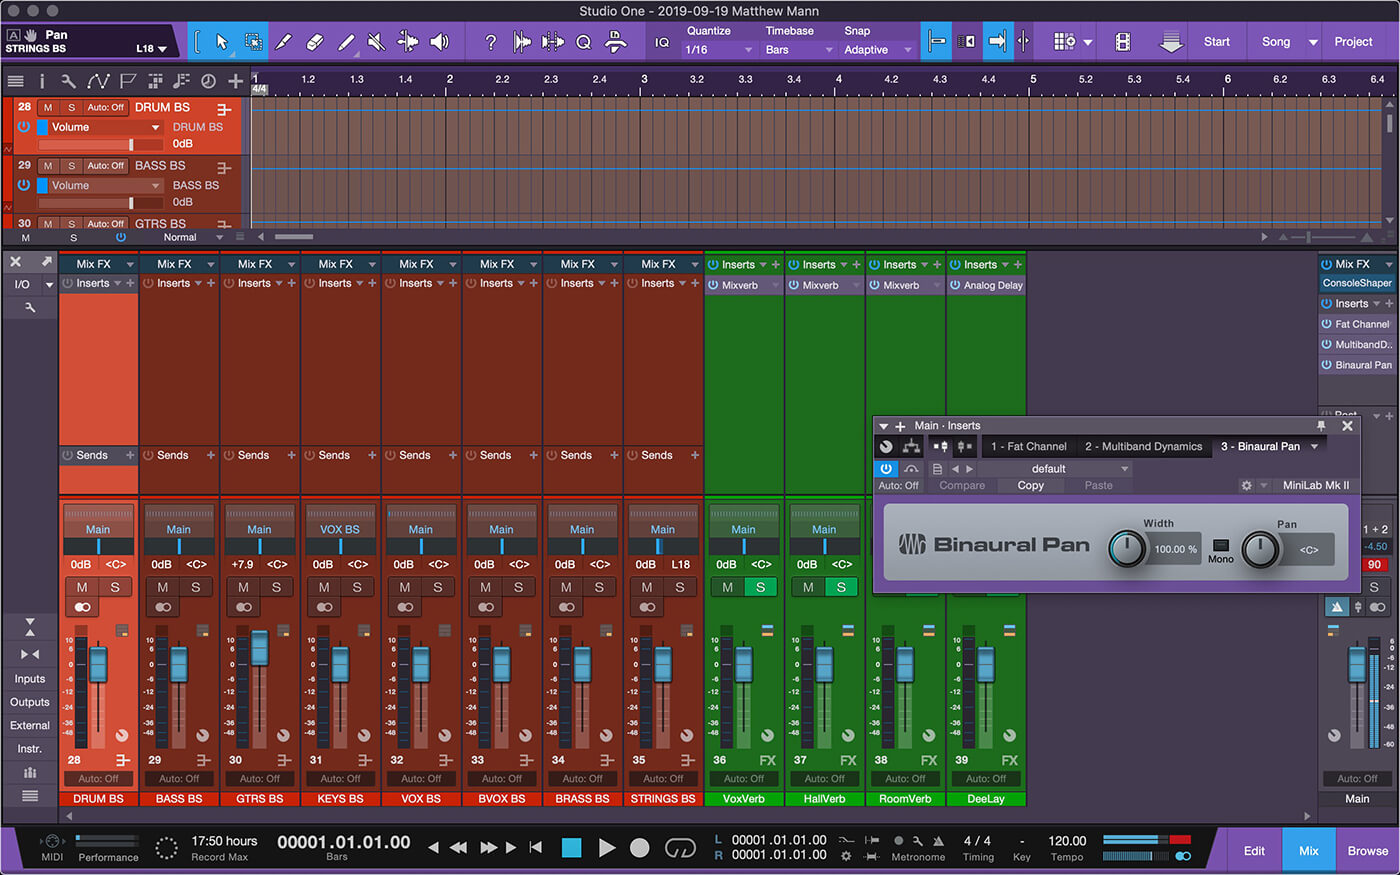
6. Before saving the template, I highly recommend adding the Console Shaper to each buss. It emulates the sound of a console and really helps glue your tracks together. Click the arrow next to Mix FX at the top of the buss tracks to add it. We can add drive, noise and crosstalk to taste.
![]()
GROUPS To make changes to multiple tracks at once (ie, all drums, etc), create groups. Select the tracks either by holding down Shift or Command/Ctrl and clicking on each track. Once tracks are selected, Command/Ctrl-G will groups them. If a track in a Group needs a change, holding down Option/Alt will allow the change on just the one track. Shift-Command-G dissolves the group.
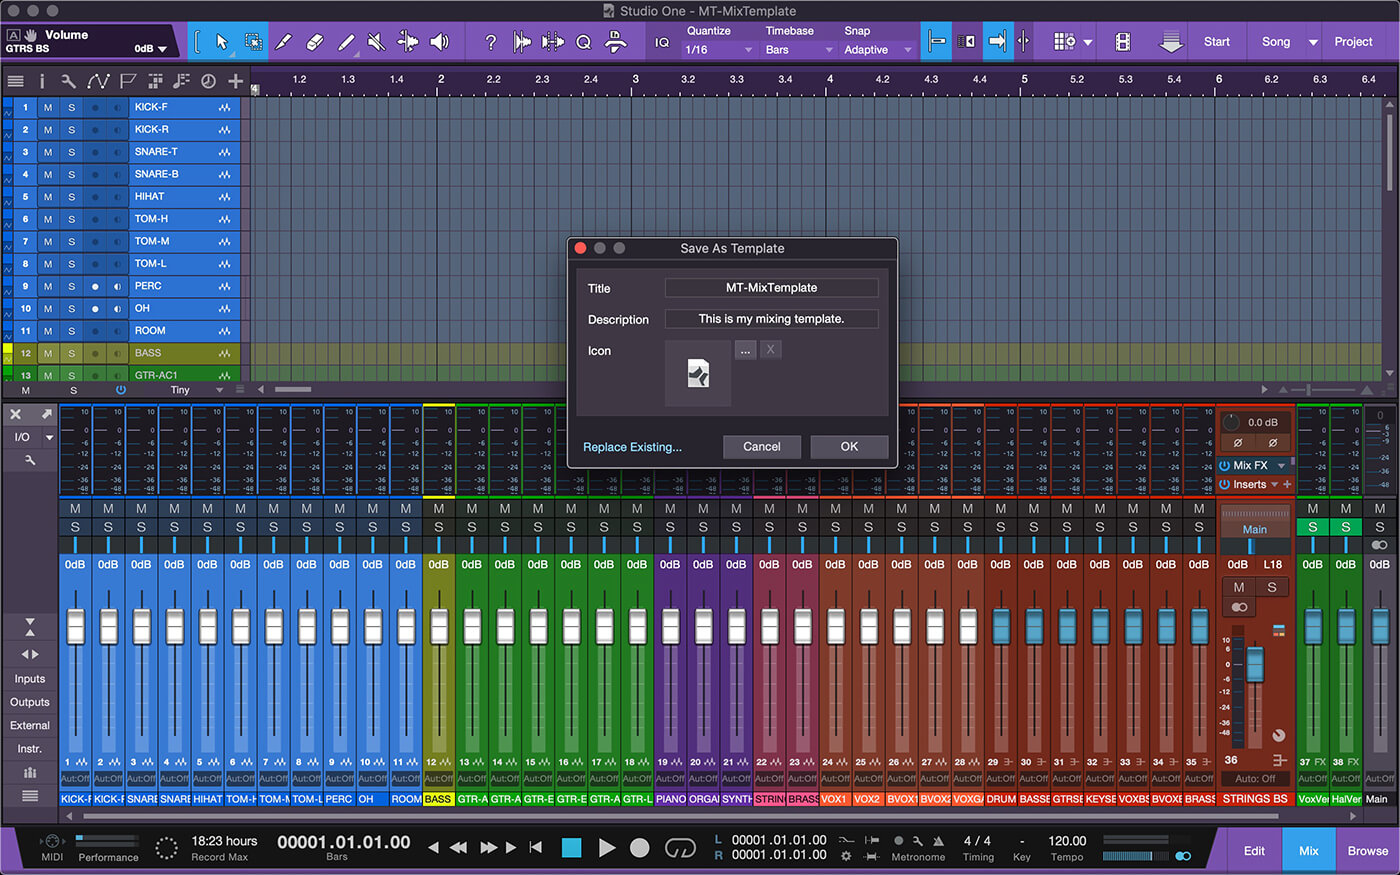
7. Now that all our buses and tracks have been created, named, coloured and we’ve added our plug-ins, we can save our template. Click File > Save As Template… and name your template. You can also add a details if you’d like. Click OK and then close the session.
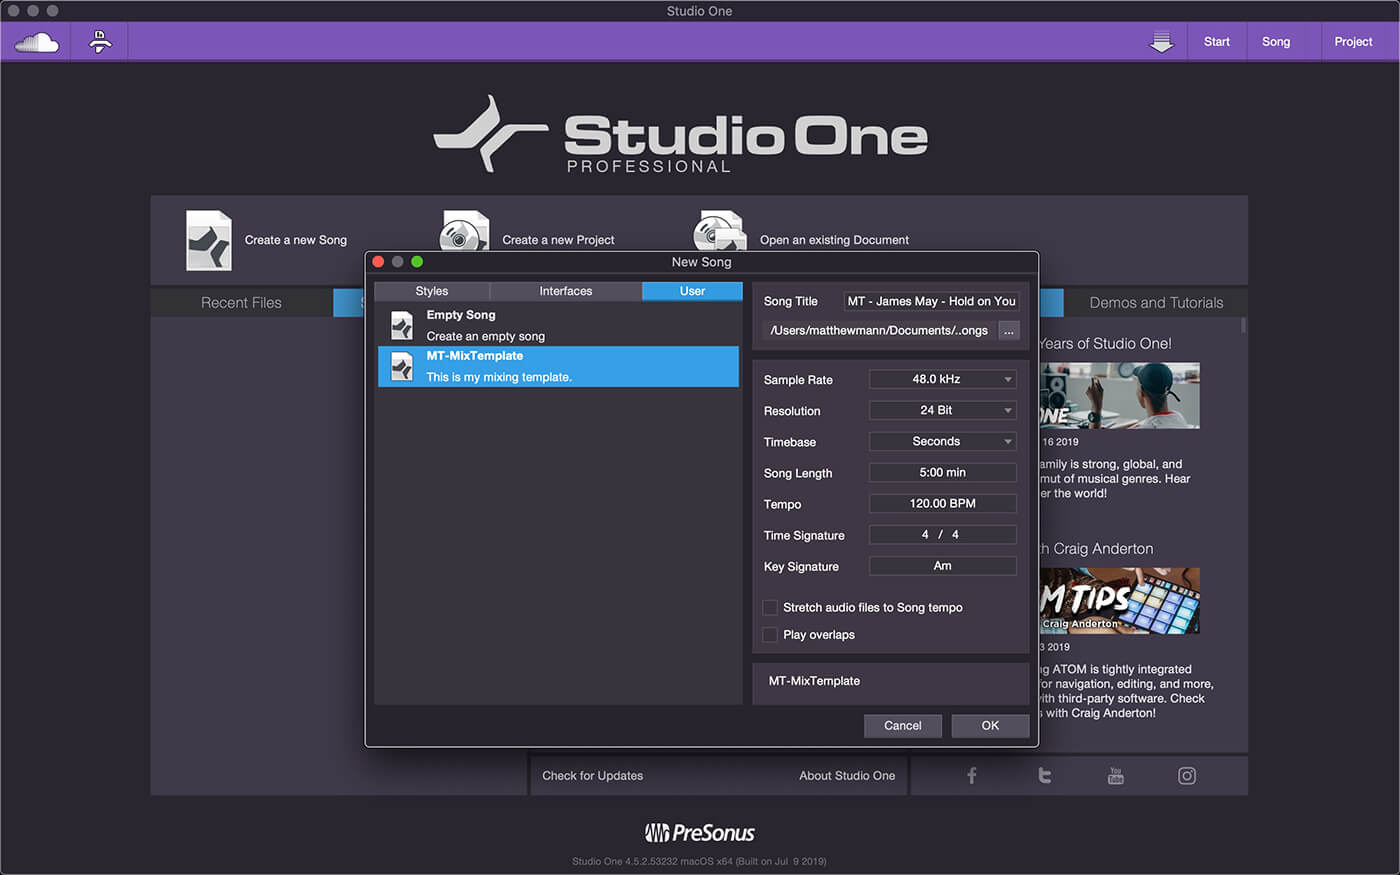
8. Go to the Start Page and click Create a New Song. From the pop-up menu, click the User tab and then click our new template. Here, we can name our session, set the sample rate, resolution, and more. Make sure to select a location for your song file; then, we’ll click OK to create our song.
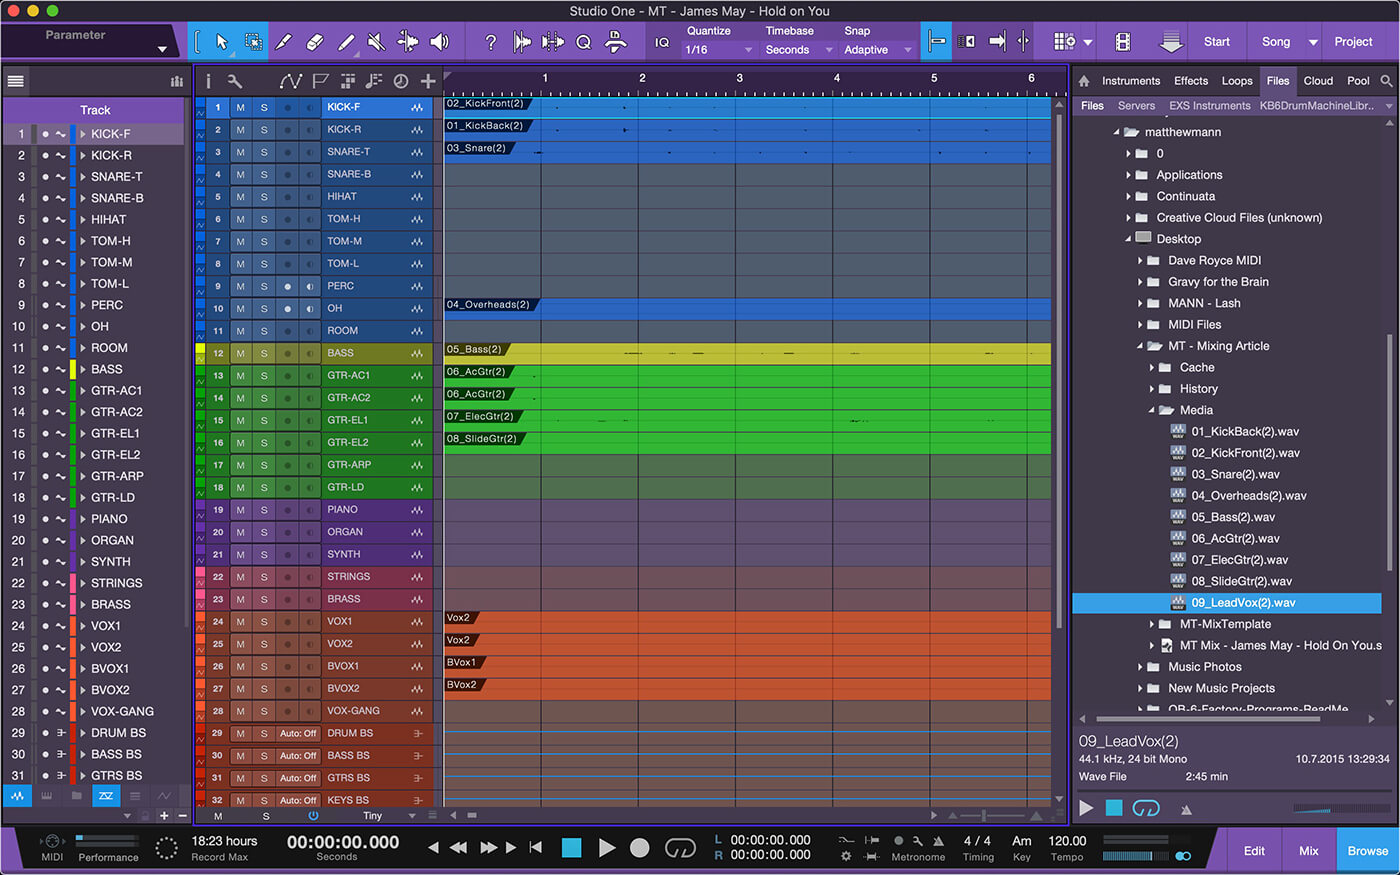
9. Now it’s time to drag our audio files into our new session. Click F9 to open the Files viewer. Find our audio tracks and begin dragging them to the tracks in our song. Make sure to drag them to zero on the timeline. Once, they’re all in the song, click F9 again to hide the file viewer.
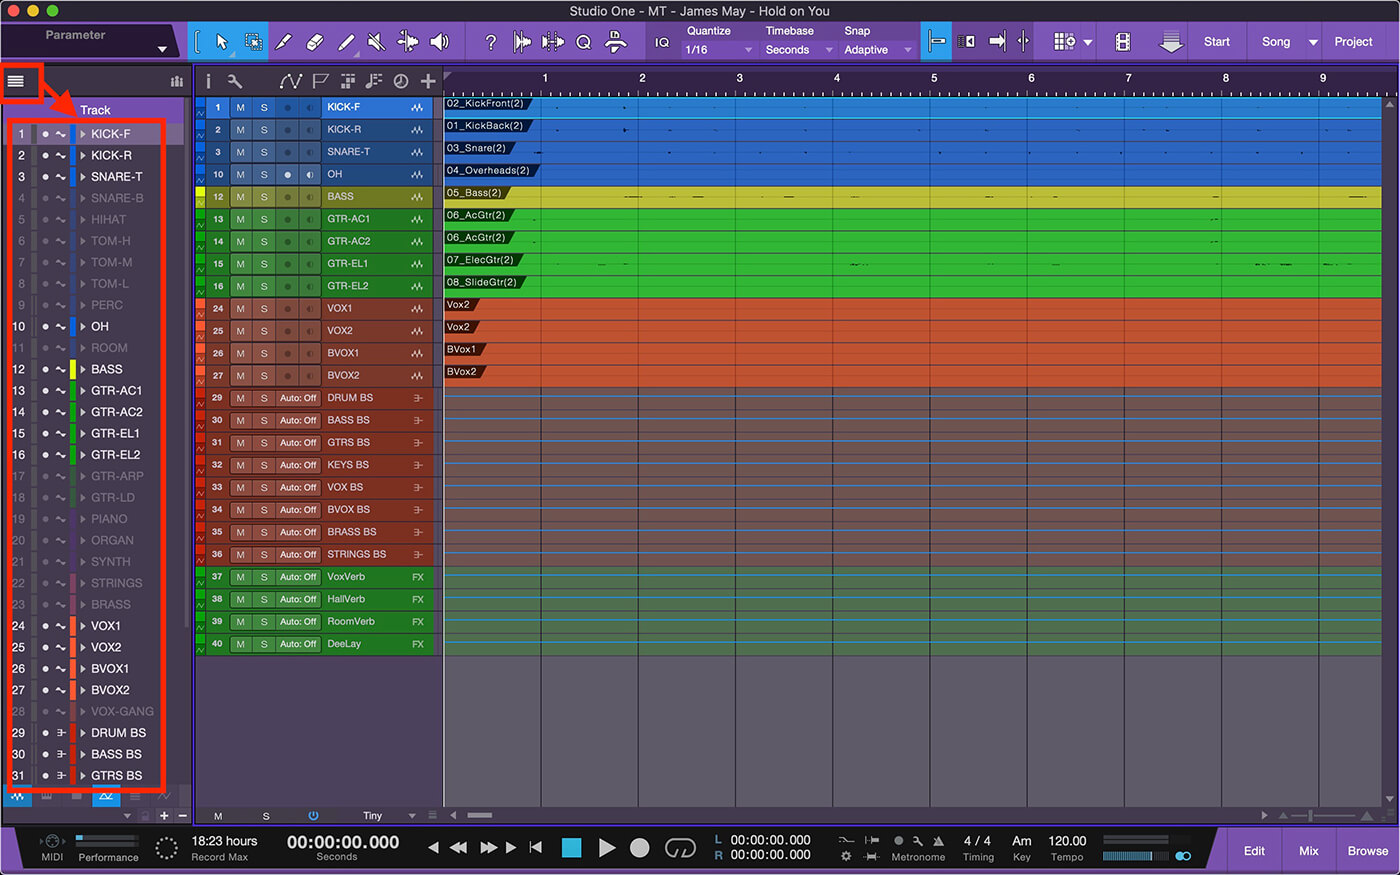
10. Remember all those extra tracks we created in our template? Use the Tracks List to show all tracks in our current song. By clicking on the little dot to the left of a track name, we can hide that track from the session view and the mix view. We also have the option of deleting each track.
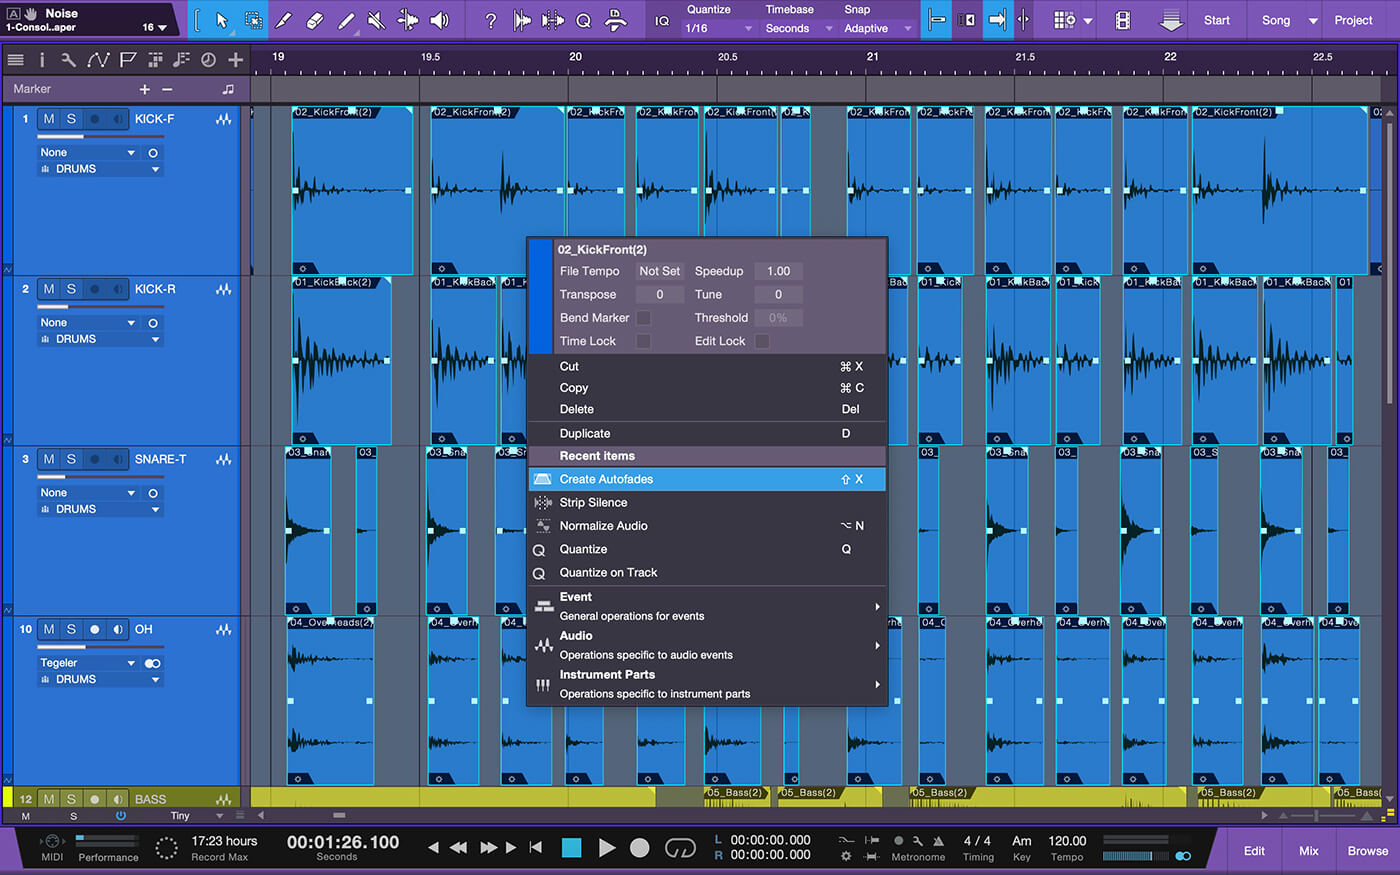
11. Best practice is to clean up all spaces between audio events. One quick way to do this is with the Strip Silence panel. It can take some tweaking in the panel to get the threshold just right, but it can save tonnes of time. Once all the silence has been cut out, highlight it all then press [Shift]-X to place fades at the beginning and end of each audio event.
![]()
PIPELINE XT Some mixers like using outboard gear to process tracks. Pipeline XT inserted on a track will send the signal to outboard gear with delay compensation. Additionally, Pipeline XT accepts images and notes for each instance – this will keep a visual and/or written record of the outboard processor’s setting, so they can be recalled quickly.
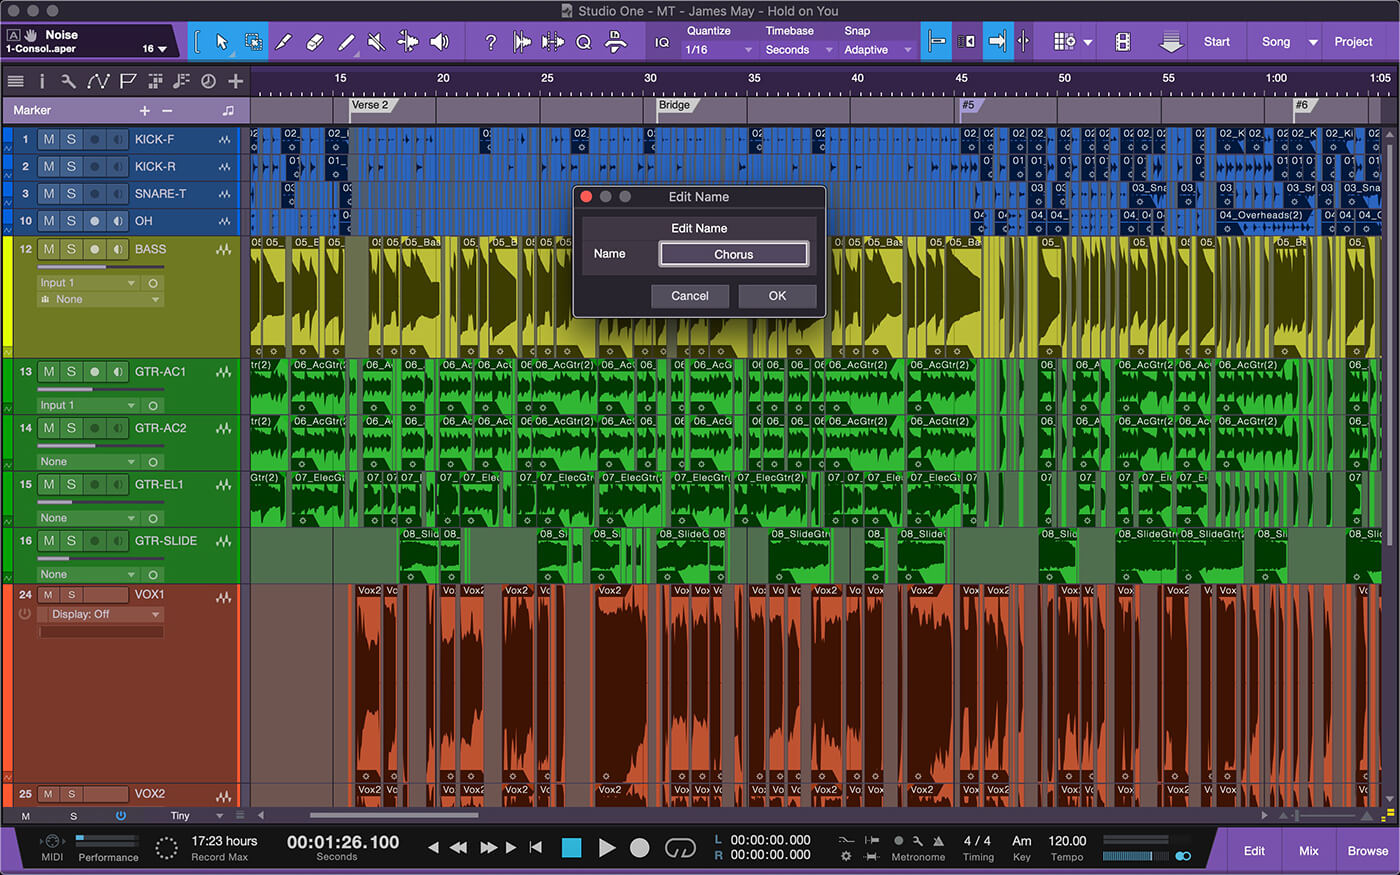
12. Listen through the song. As the song is playing, hit the Y key at the start of each section (verse, chorus, bridge, etc). This will place a marker in the Marker Track. Double-clicking on these markers allows us to rename them. It’s now much easier to jump from one section to another. We can also loop a section between two markers.
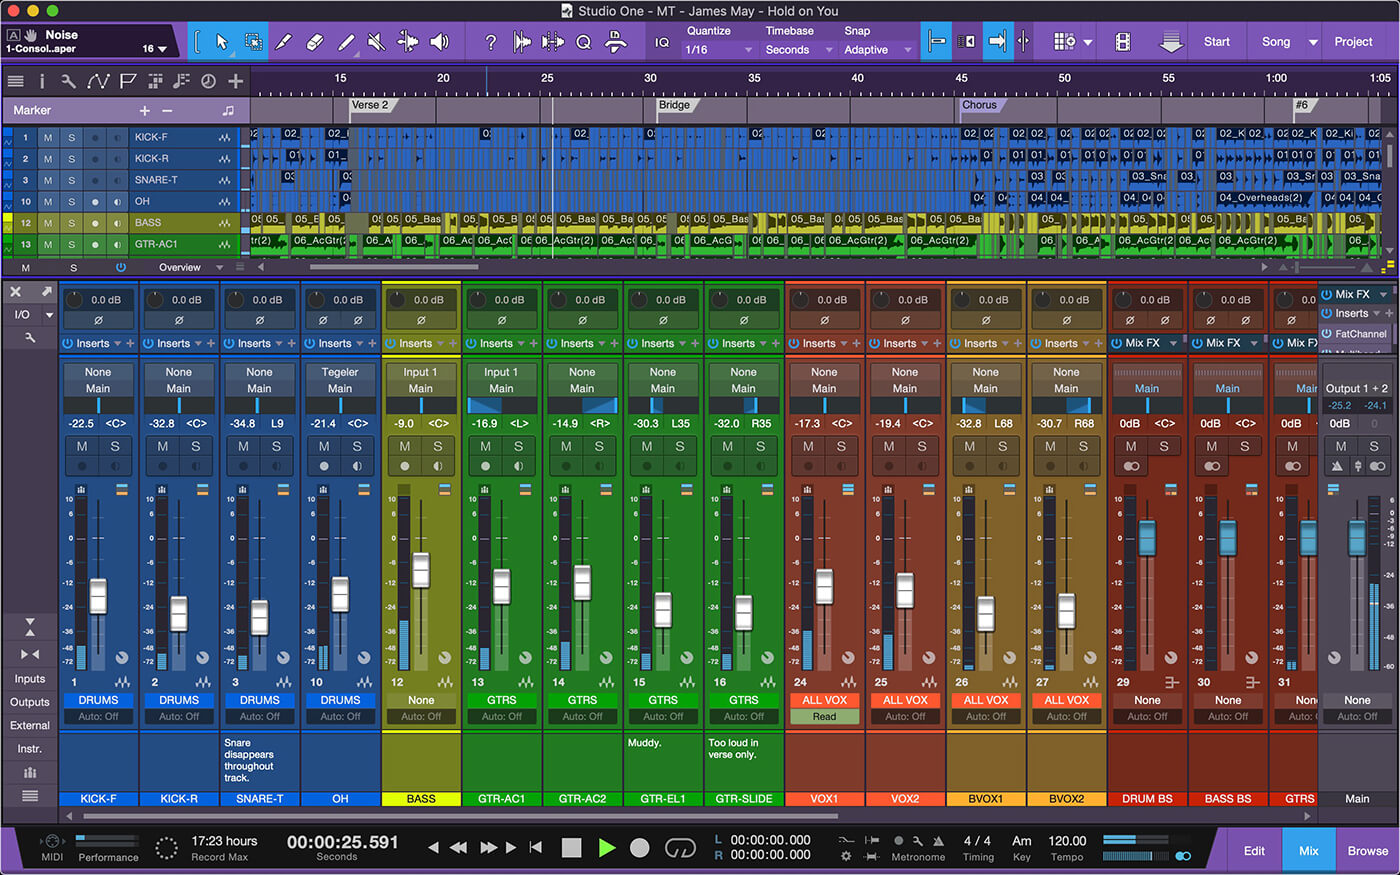
13. To get back to the Mix window, click F3. Let’s start mixing by bringing all faders down to zero. Begin bringing up faders and getting a basic mix. Do your best to balance the instruments, so you can hear them all. This is where you should also start panning instruments to the left and right.
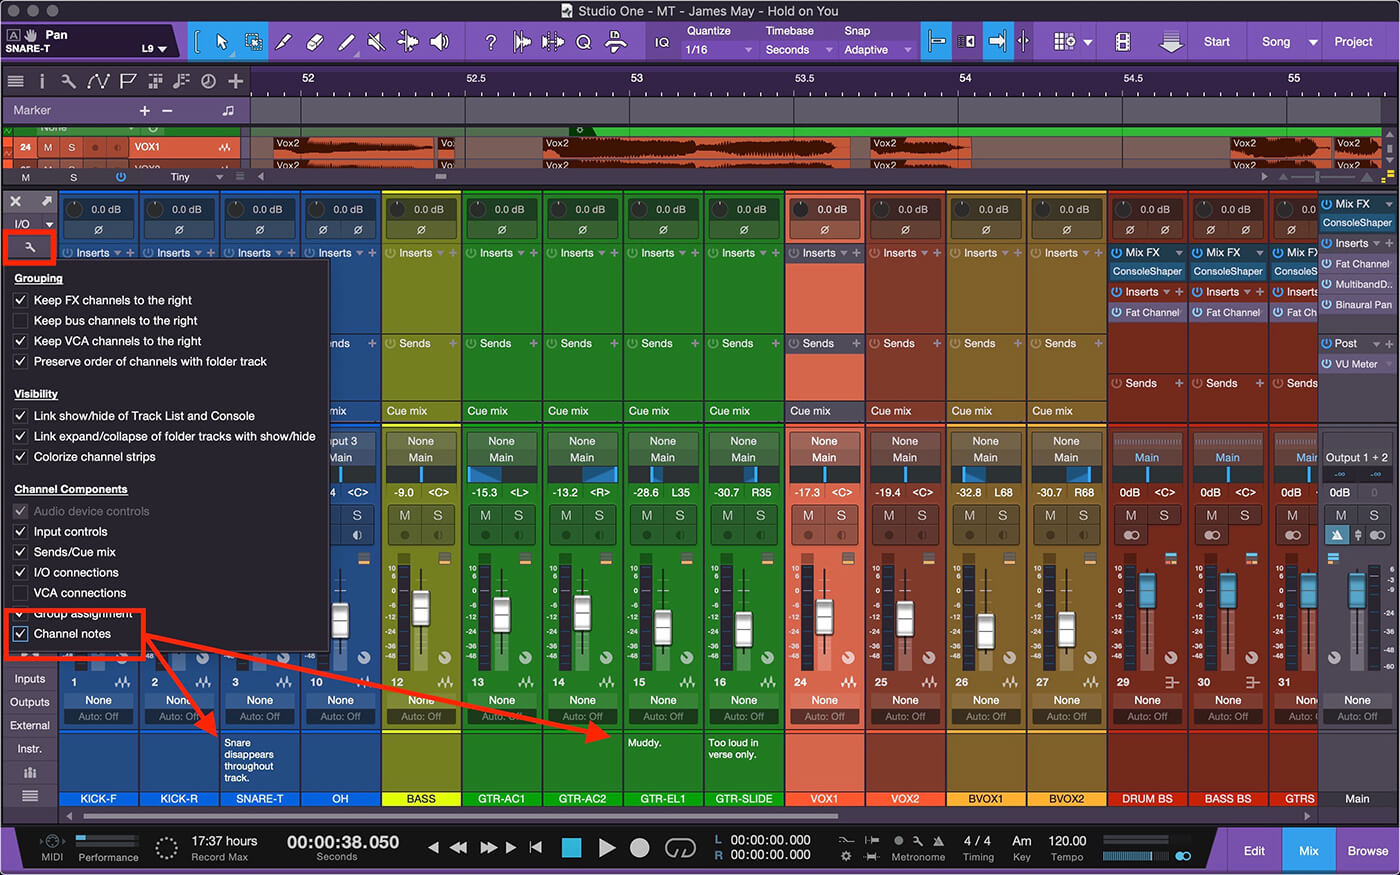
14. Let’s listen again to the song and make any notes about problem areas. We recommend making notes for individual tracks in the Track Note area at the bottom of each fader. This feature can be found in the Track Options menu. It’s a good place to list EQ problems and/or where an instrument disappears in the mix so I can go back and compress or automate later.
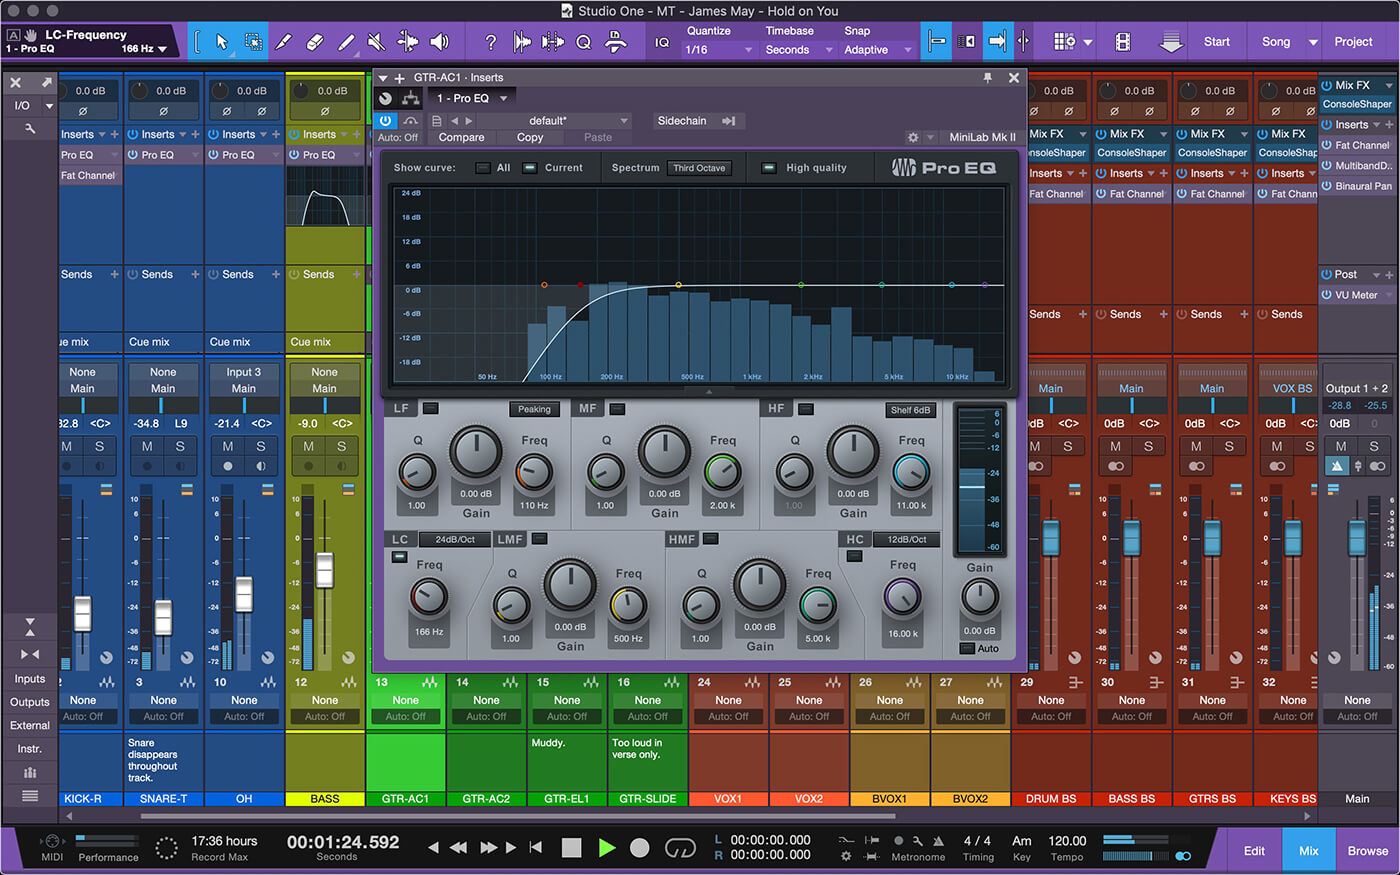
15. Now let’s clear up some mud and regain some head room. Let’s cut the low frequencies on each instrument up to around 100-150Hz. This leaves room for the bass and kick to stand out. Start with a low cut and dial the frequency up until the instrument starts sounding thin – then back down just a tiny bit. Apply this step to each track as needed.
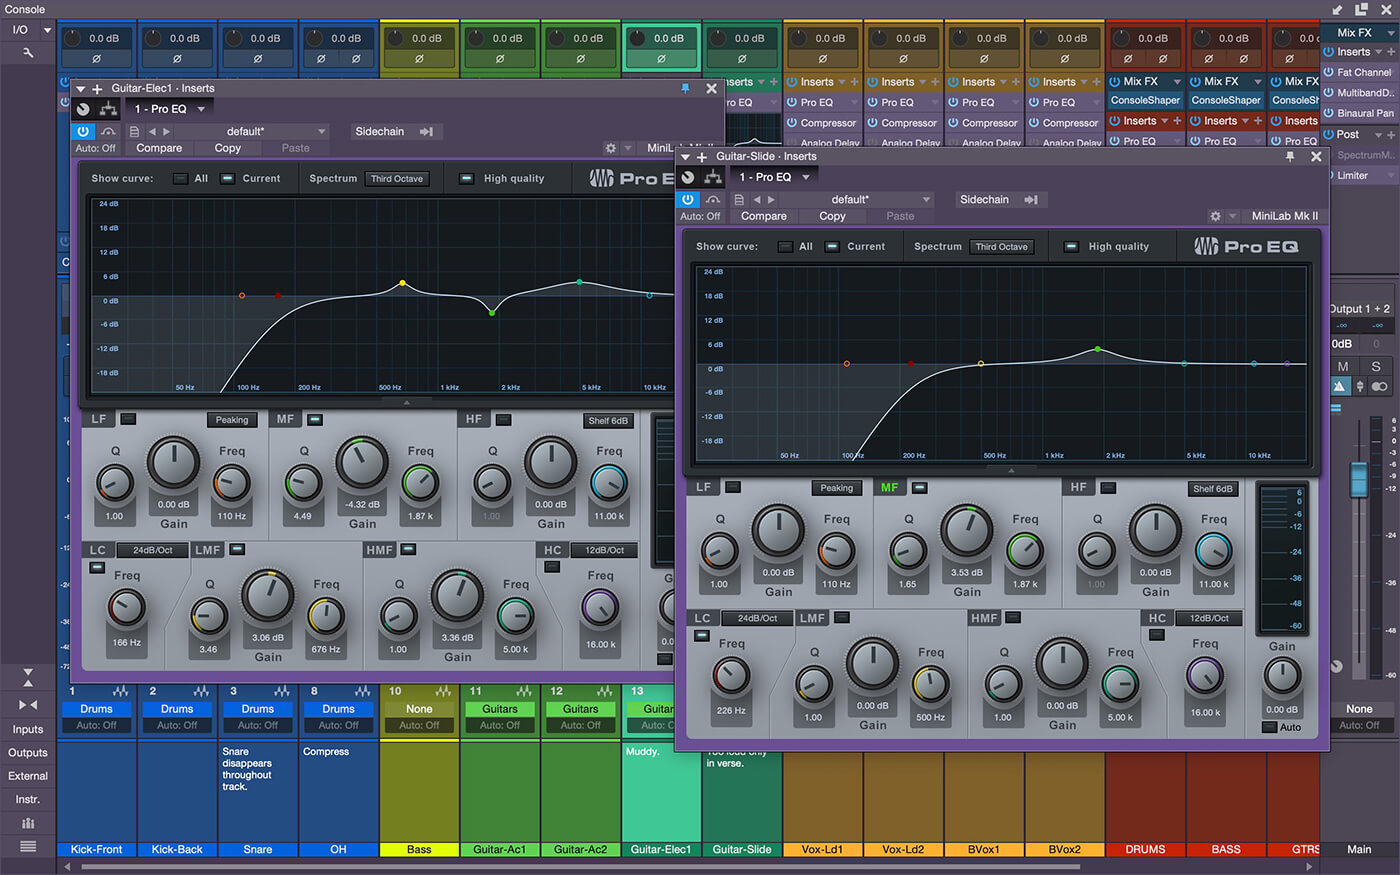
16. Now listen for places where instruments disappear in the mix. This is where surgical equalisation comes into play. In this example, the electric guitar and slide guitar compete for space – so, adding a little EQ boost at 1.87k on the slide and cutting at 1.87k on the other brings the slide guitar out better so you can hear it. Remember: it’s usually better to cut than boost!
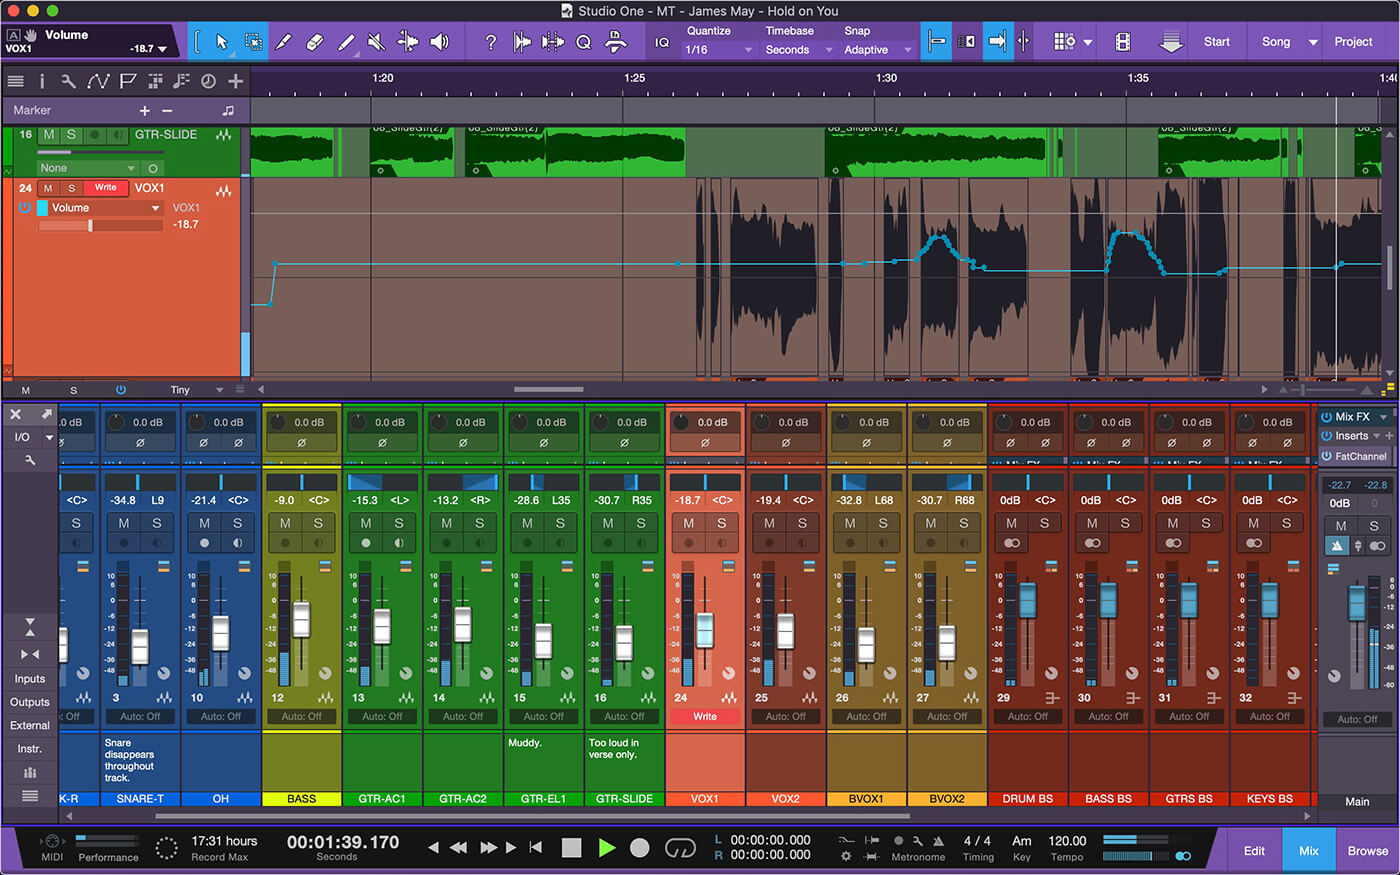
17. Now, that our tracks are competing less and everything has its own place, it’s time to start adding automation. We tend to use automation on vocals: if a word or phrase gets lost in the mix, we automate a little volume boost just at that place on the vocal. Set the Automation mode to Write, start playback, and ride the fader to get your boost. Remember to change the automation mode to Read when finished so you don’t overwrite what you just did.
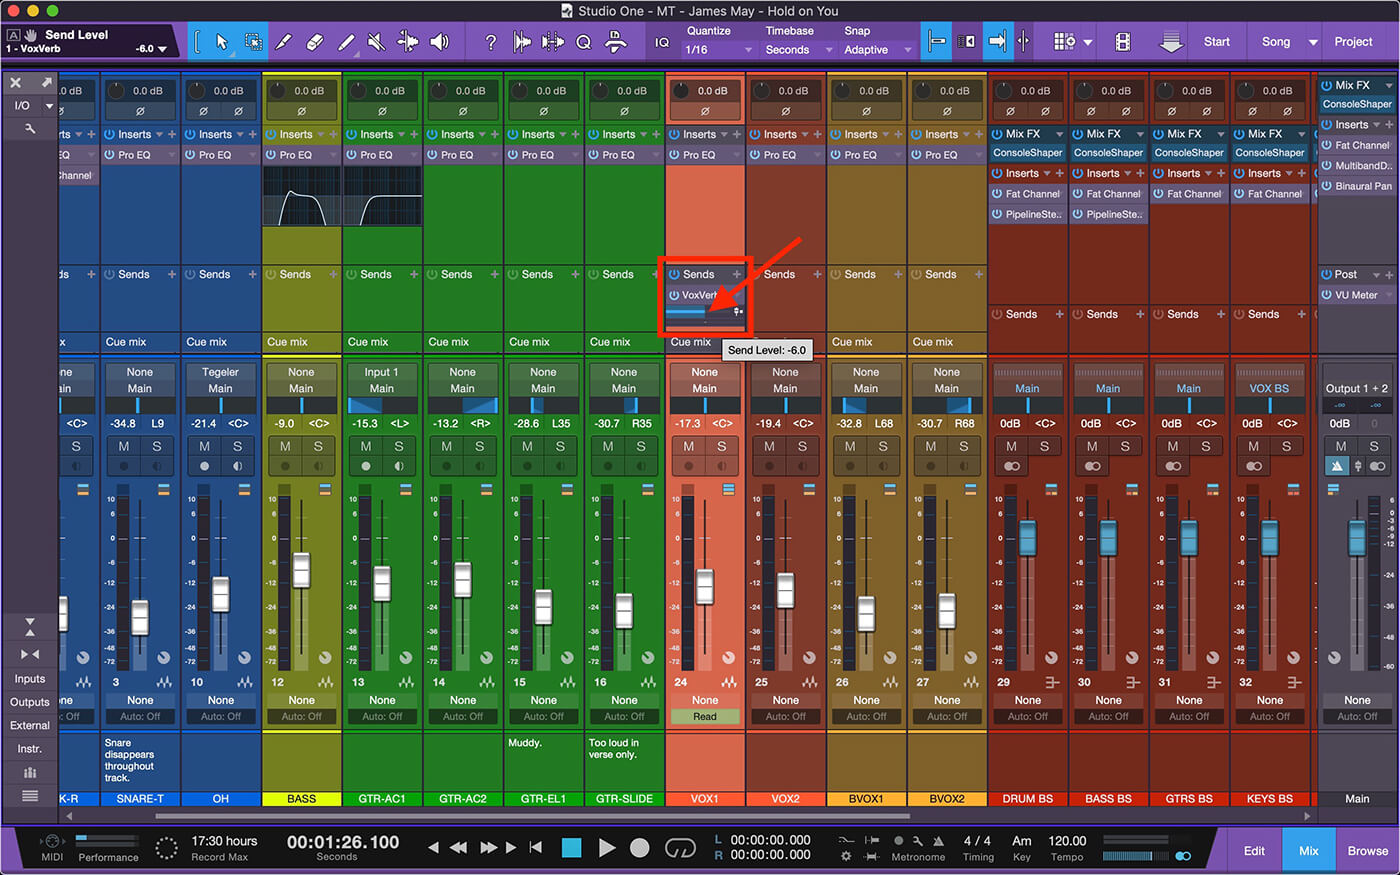
18. Now we can add effects to taste. We’ll click the [+] next to the send of the track and then click on the FX buss we want. Now we adjust the amount of level sent to the effect. To add effects to a group of tracks all at once, add the send to the bus for those instruments or highlight those tracks, right-click and choose Add Bus for Selected Channels.
For more Studio One tutorials and workshops, check here.