How to make an impact with Studio One’s Impact XT
A highly flexible drum machine sits within Studio One. With a little exploration and experimentation, the rewards could have a fundamental effect on your music making.
One thing that Digital Audio Workstations are often judged on is their onboard instrumentation. As such, many people look to the tools built into their favourite DAW as the key ingredients to a ‘good’ DAW. In this workshop series, we’ll look more in-depth into the built-in instruments and tools in Studio One that can help take your productions to the next level. In this tutorial, we’ll look at the onboard drum machine and beat-making tools that Studio One offers. They’re much more powerful than at first glance.
Unfortunately, people often overlook Studio One’s Impact XT drum machine because, on initial inspection, there doesn’t seem to be much to it. But there’s much more going on ‘under the bonnet’ than it appears. So, let’s take a look at Impact XT and see just how powerful it is.
The basics
Dropping Impact XT into a session is very easy to do. Choose the icon from the Instruments tab in the Browser. We can even click the expand arrow and choose from a predefined kit. Now, by just dropping it onto the session window, Studio One will create the instrument track and present us with Impact XT’s interface. The kit of choice will be loaded and ready to play.
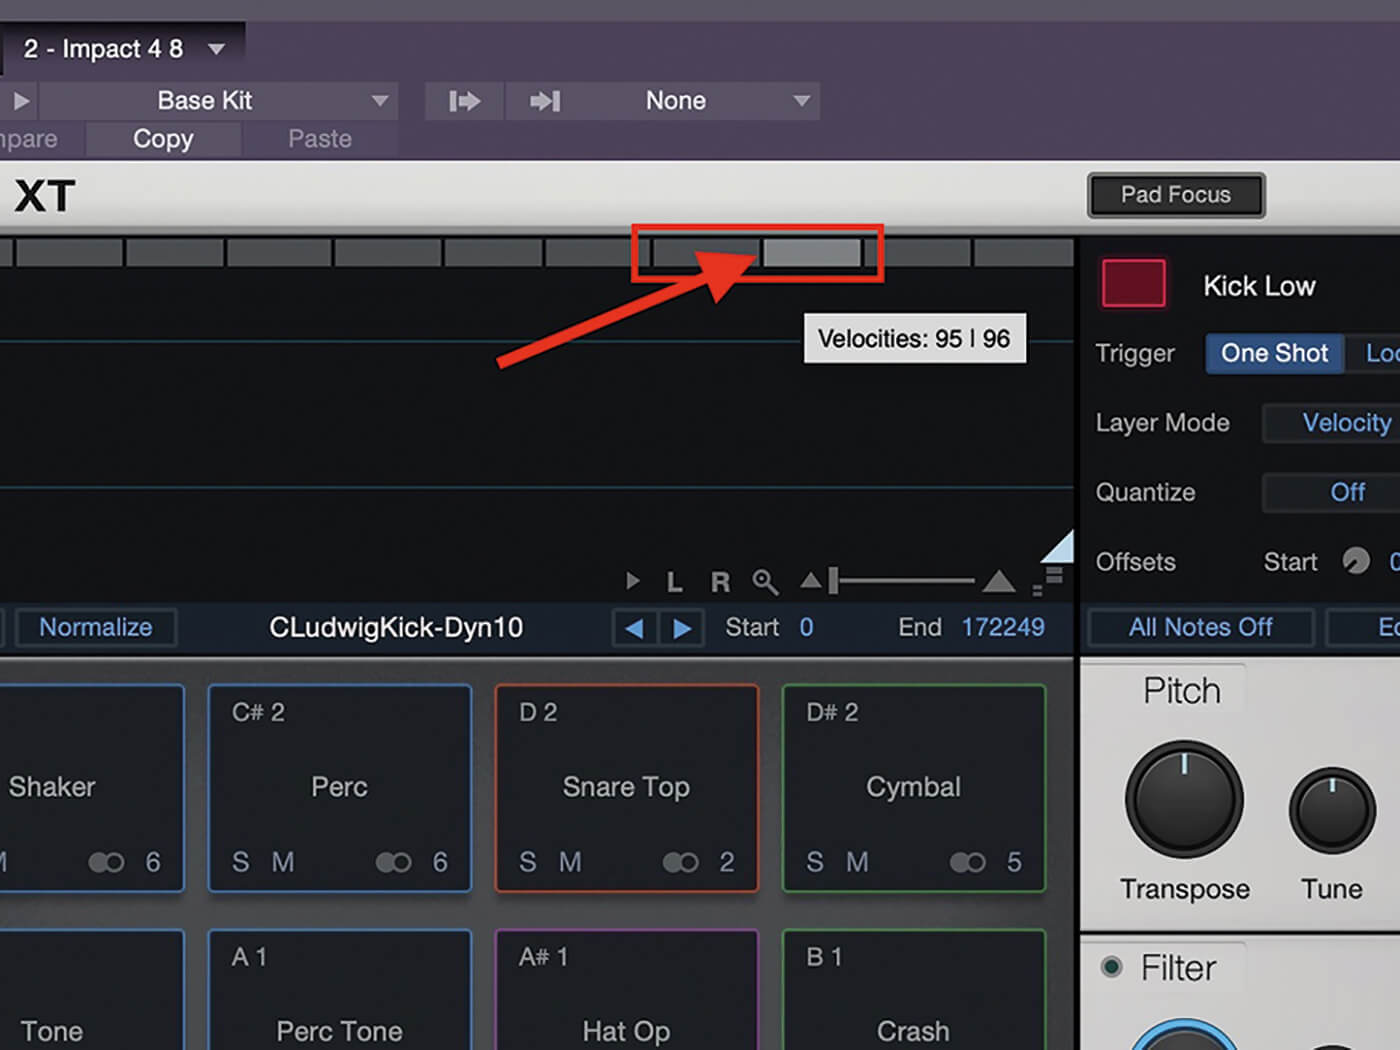
The interface features 16 MPC-style pads that correspond to MIDI notes C1 through D#2, but there’s much more to it than that. There are actually 8 banks of 16 pads and, yes, we can load samples on every one of them, if we need to.
Adding or modifying samples in a kit is also very straightforward. Samples can be dragged and dropped from within the browser straight onto a pad. From there, the pad options allow you flexibility in the sound of the samples and how the pads react to your performance.
Impact XT even allows us to layer multiple percussion elements onto the same pad. The obvious reason we would do this is to layer, say, several snare drums – all at different velocities – so the snare sounds more realistic and natural. The not-so-obvious use option would be to layer different types of samples onto the same pad. This could lead to some very interesting results. Creativity and your imagination are key here.
Impact XT also gives us the ability to take a drum loop and chop it up across several pads. This can certainly be a great way to use that loop we might have been storing for years on our hard drive. Now, instead of just throwing that Amen Break loop into our production, we can use the same sounds from the loop and play them the way we want.
Padding the results
Each pad displays useful information and provides options for editing and playing the samples. We can decide how the samples are triggered, how sample layers are handled, whether or not a sample chokes when another pad is played or when the pad is re-triggered, and when you can trigger a sample during the playback of your track (using Quantise). We can also choose to have Impact automatically time-stretch a sample to fit the tempo of the song.
There’s also solo and mute on each pad, so we can mute or even isolate a pad during playback. This is a good way to build a track live. Starting with a completely produced track we could, for example, mute all the elements and then bring them in one at a time – just like some of those hardware drum machines we’ve all seen.
And each sample can be edited right from the waveform display above the pads. We can adjust the sample start and end points, reverse a sample, normalise the sample, adjust the sample’s pitch, filter settings, and amp settings – including gain, panning and velocity.
We can also assign different colours to each pad in order to group like instruments or like types of samples. For example, we could colour all loops red, single-shot percussion green, layered sounds yellow and so on. This makes it much easier to visually tell what’s going on in your percussive masterpiece. And you can assign each pad to a mono or stereo output for further processing and mixing.
Now if we use pattern mode to develop our drum patterns, we can open up a whole world of flexibility and find creative new ways to expand our drum tracks. Once we’re happy with our patterns, we can even turn them into individual bounced audio stems for mixing. Take a look…dig deep…you may find your favourite drum software right in your own back garden.
Next time, we’ll look at one of Impact XT’s siblings – Presonus’ very own sampler – SampleOne XT.
Hot to use Impact XT in Studio One: step-by-step
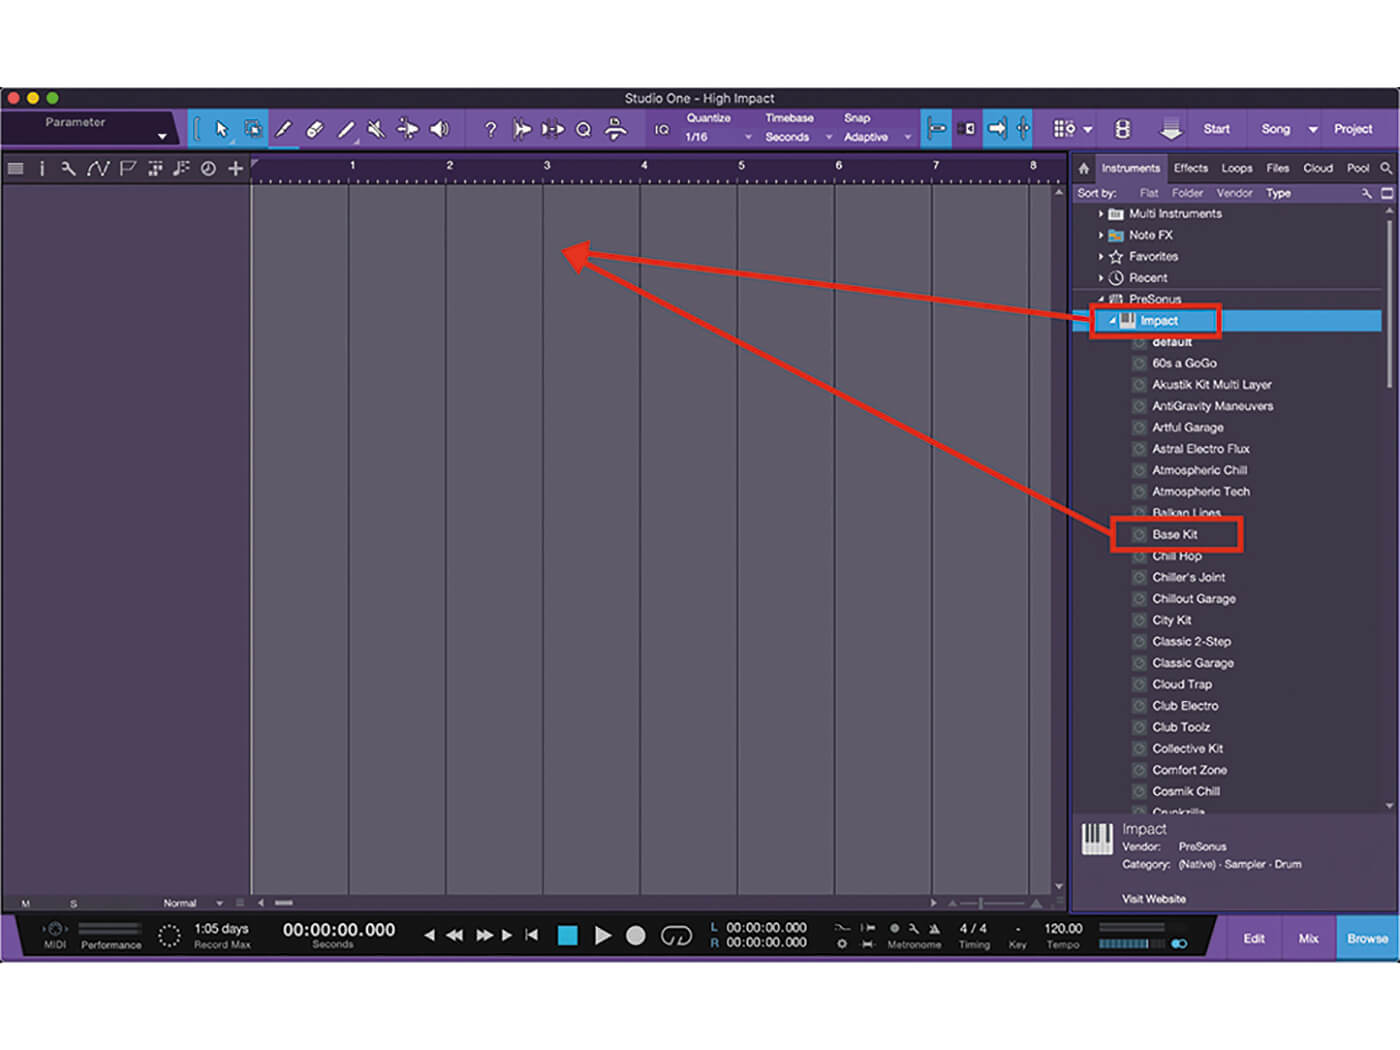 1. Grab Impact XT in the Browser and drag it over into the Session area of Studio One. Alternatively, click the arrow and choose a specific kit to drag it over.
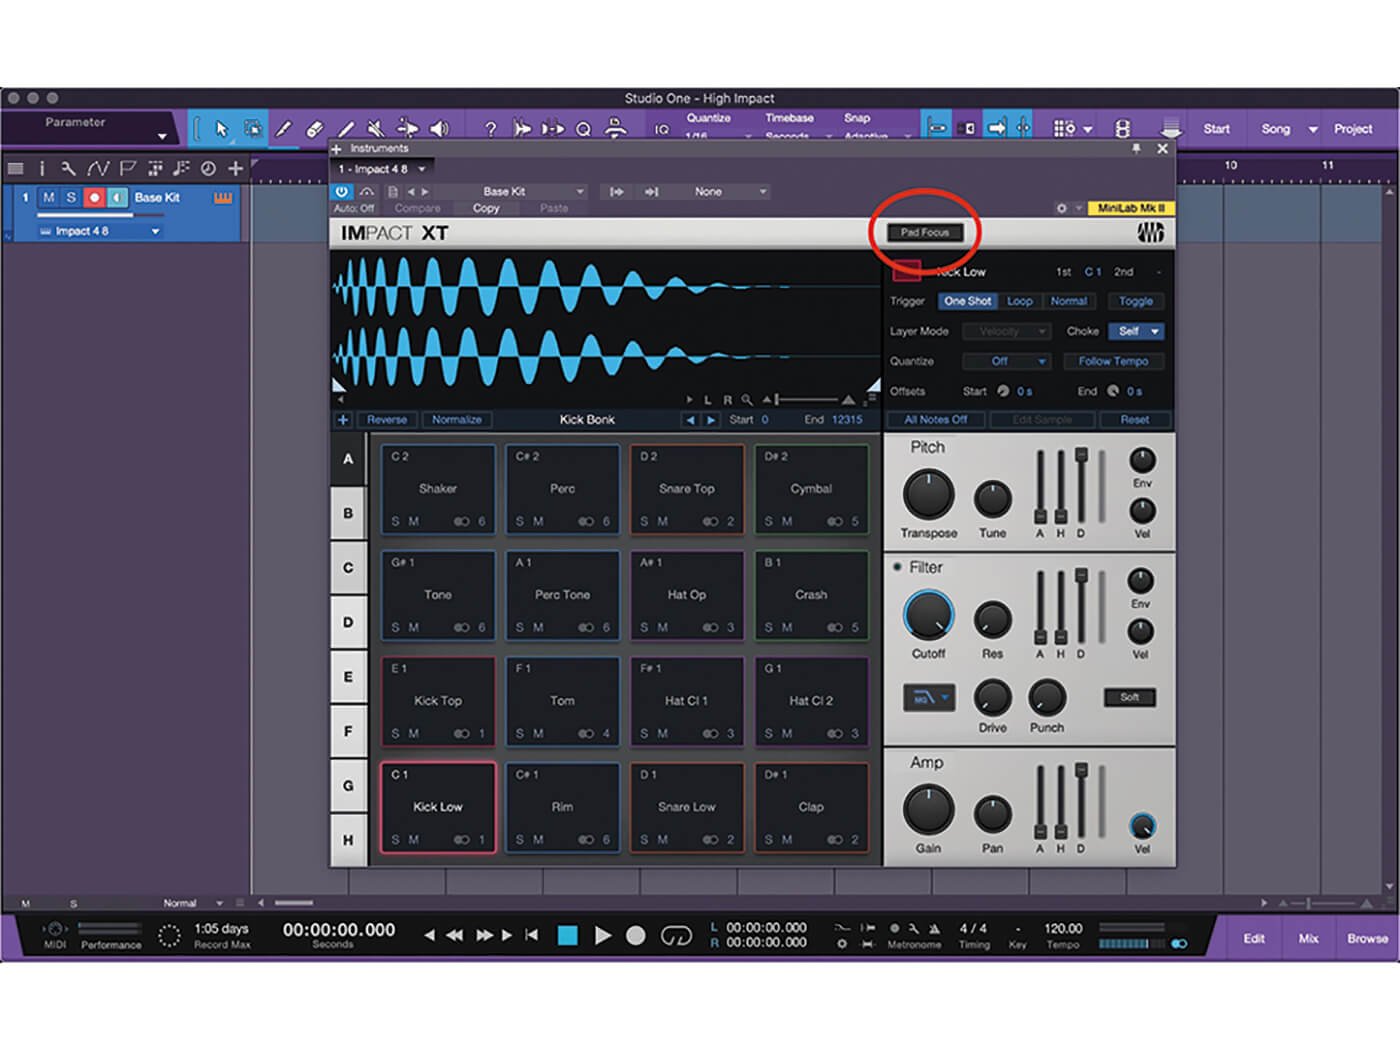 2. We’re ready to tweak and customise it to our liking. Select Pad Focus to see parameters for each pad. Let’s open the Browser and find the perfect drum samples.
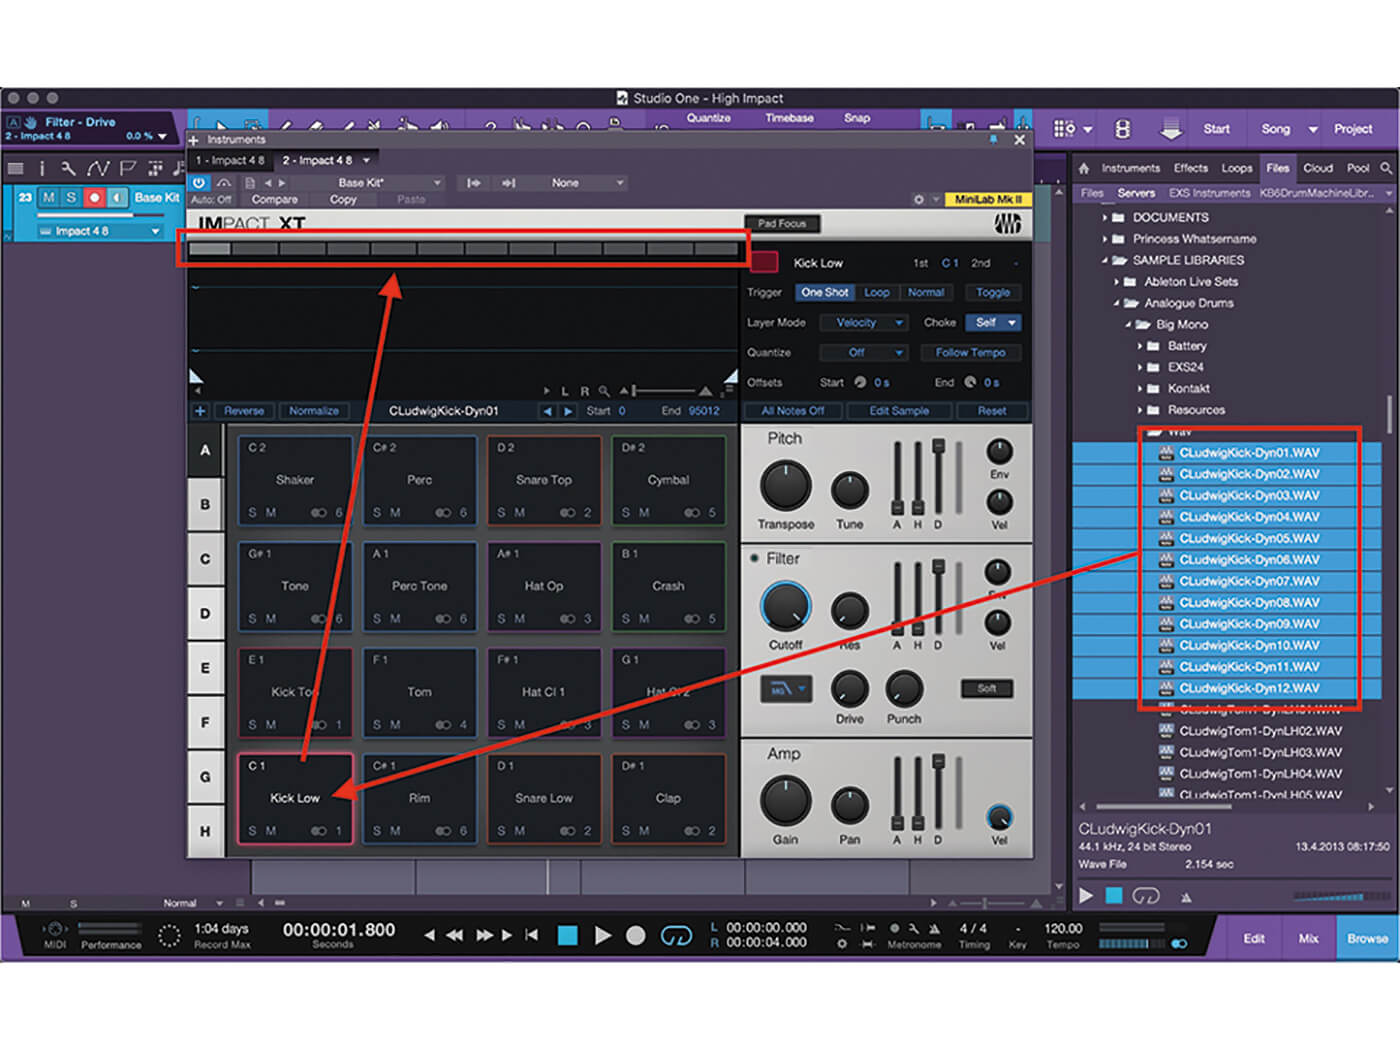 3. Highlight several samples and drag them to a pad to create a layered drum. We can view each sample with the grey buttons at the top above the waveform view.
 4. Click and drag the lines between the sample selector buttons to adjust where the velocity change occurs between different samples.
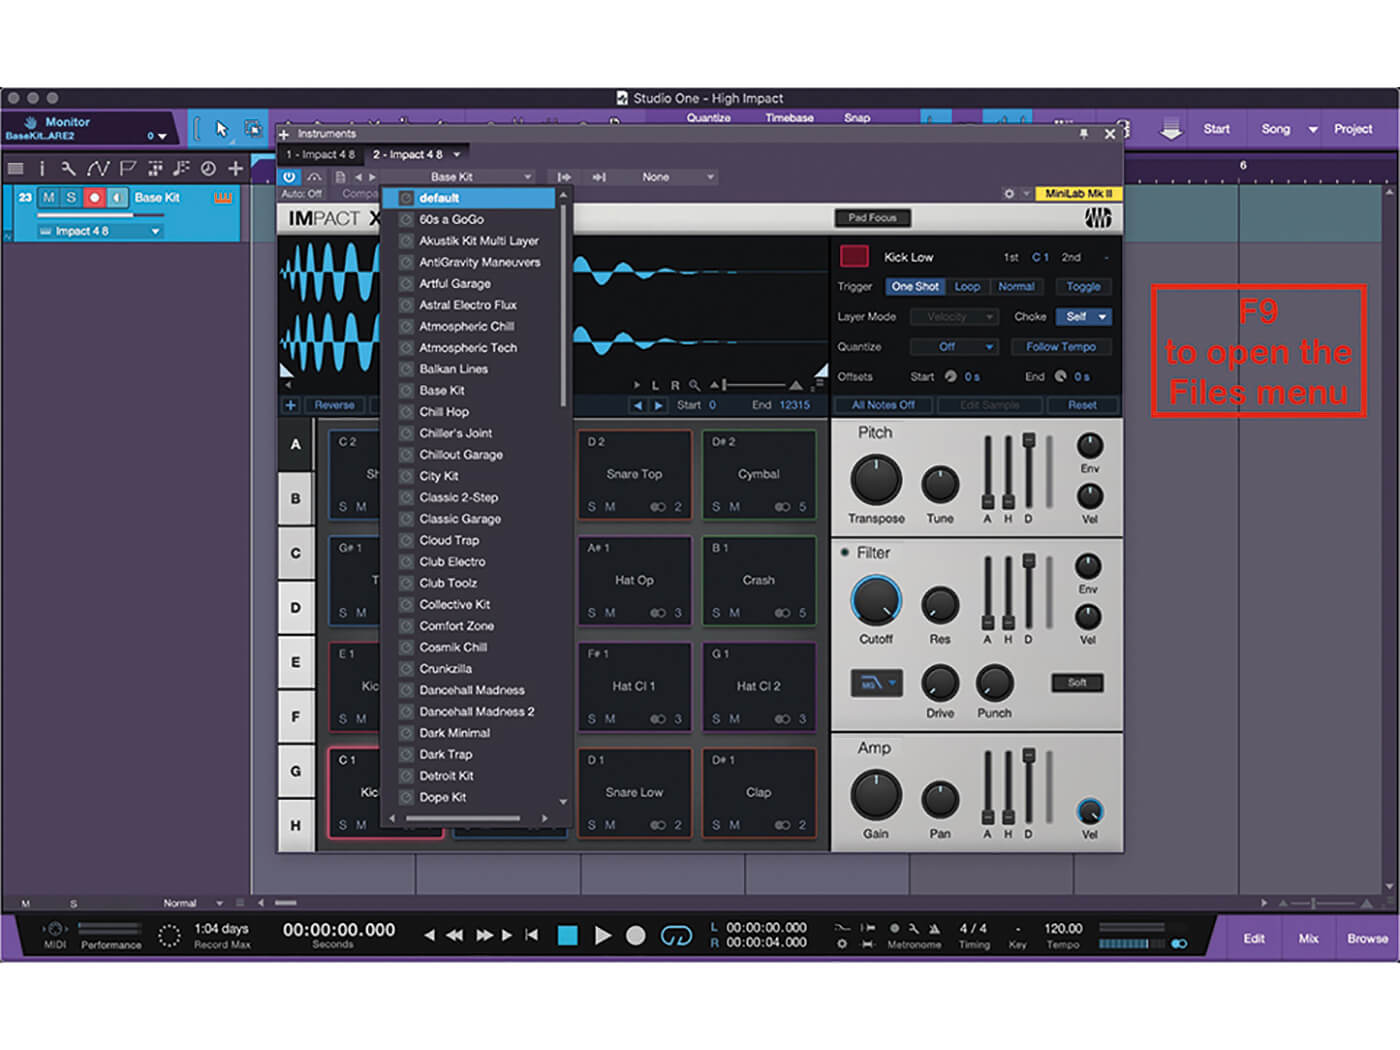 5. Let’s go back and start with an empty kit. Select “default” from the kit preset menu. Select F9 to open the Files menu and choose the samples to use.
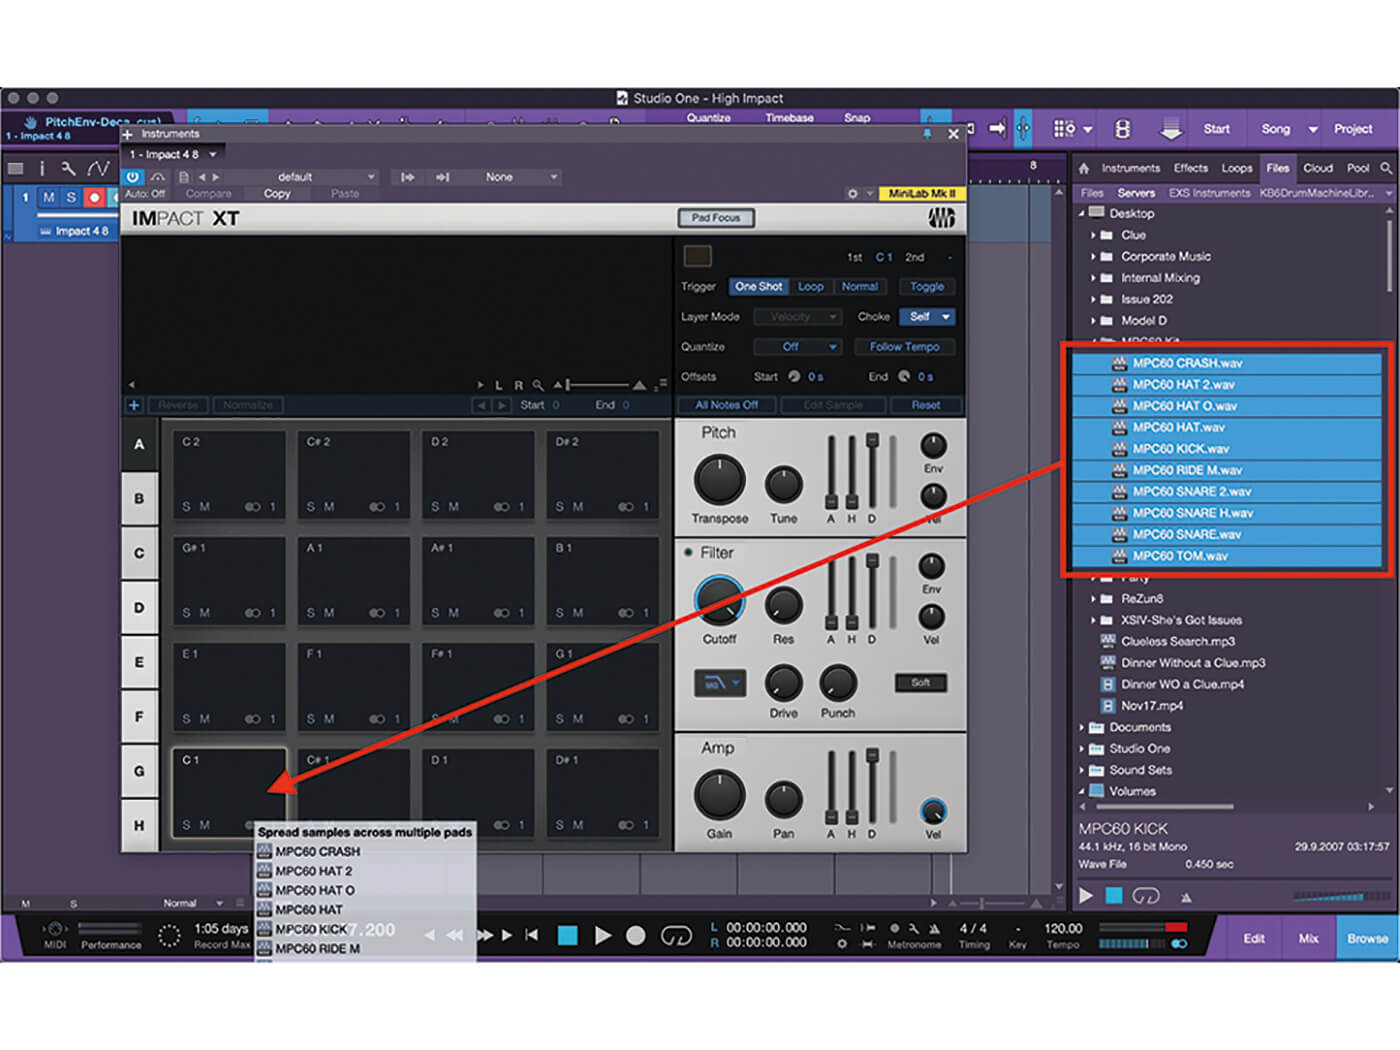 6. Select the samples, hold [SHIFT], and drag the samples to a pad in Impact XT. This will map the samples across several pads. The other option is to drag them one at a time.
![]()
NOTE FX In addition to the Pattern Part, we also have the option of using Note FX to generate interesting parts in Impact XT. If we look at the Note FX in Studio One, we’ll find an Arpeggiator, the Chorder, and Repeater. Experiment with each of these tools!
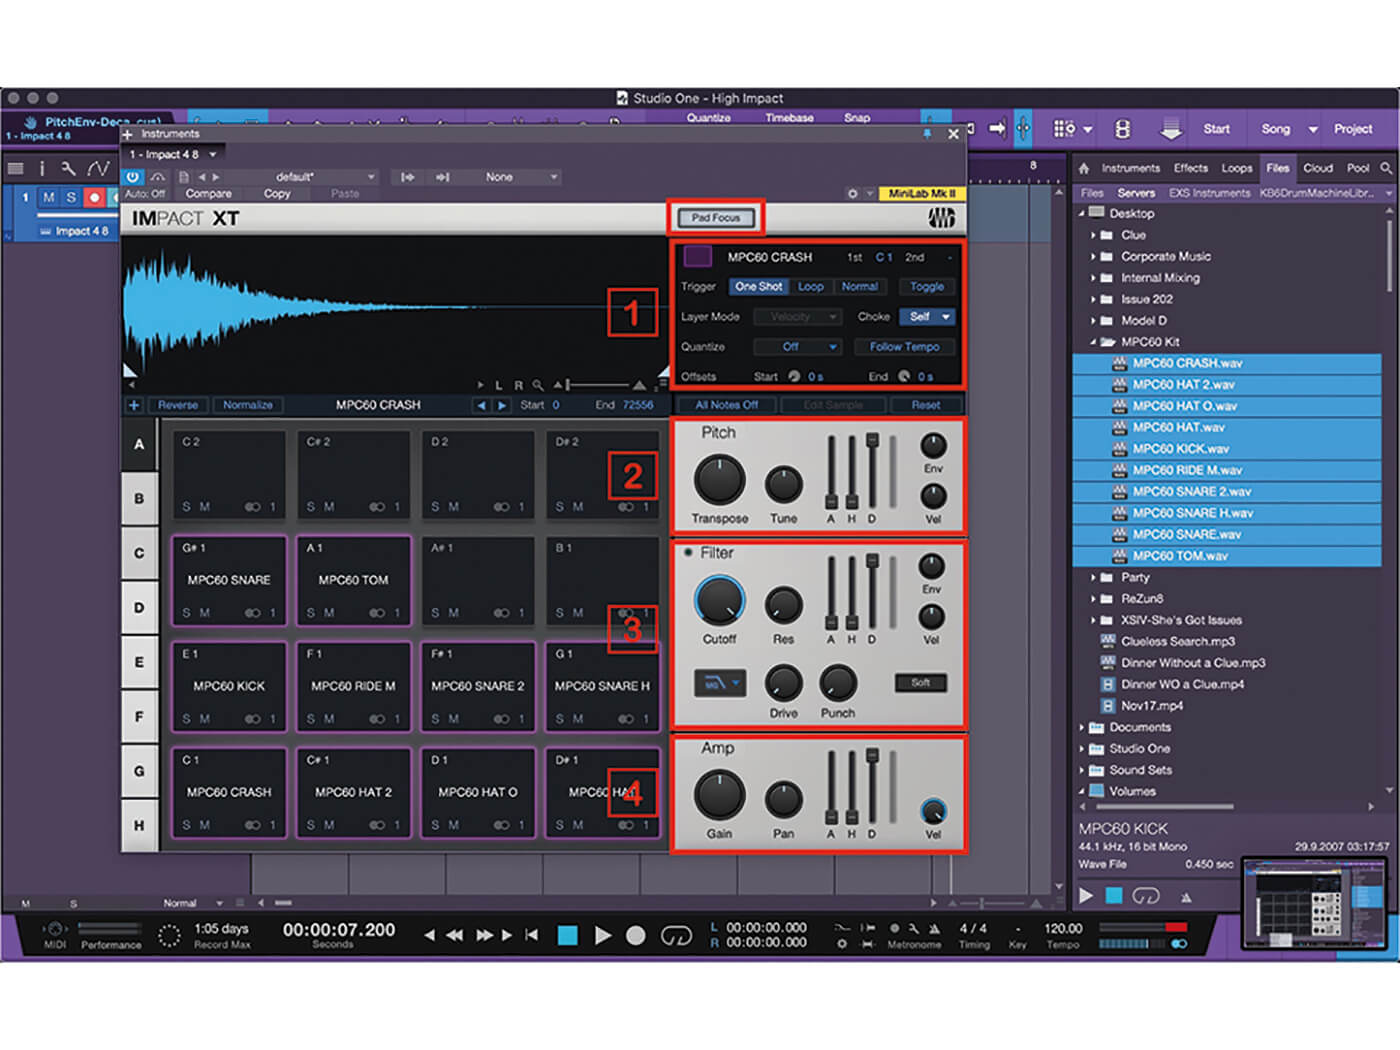 7. Click [Pad Focus]. Now, clicking a pad will show parameters for that pad only. We can now adjust the play modes [1], Pitch Envelope [2], Filter Envelope [3], and Amp Envelope [4].
 8. Use the colour selector next to the waveform viewer to choose a colour for pads/groups. Now would also be a good time to set our Choke Group settings for each pad.
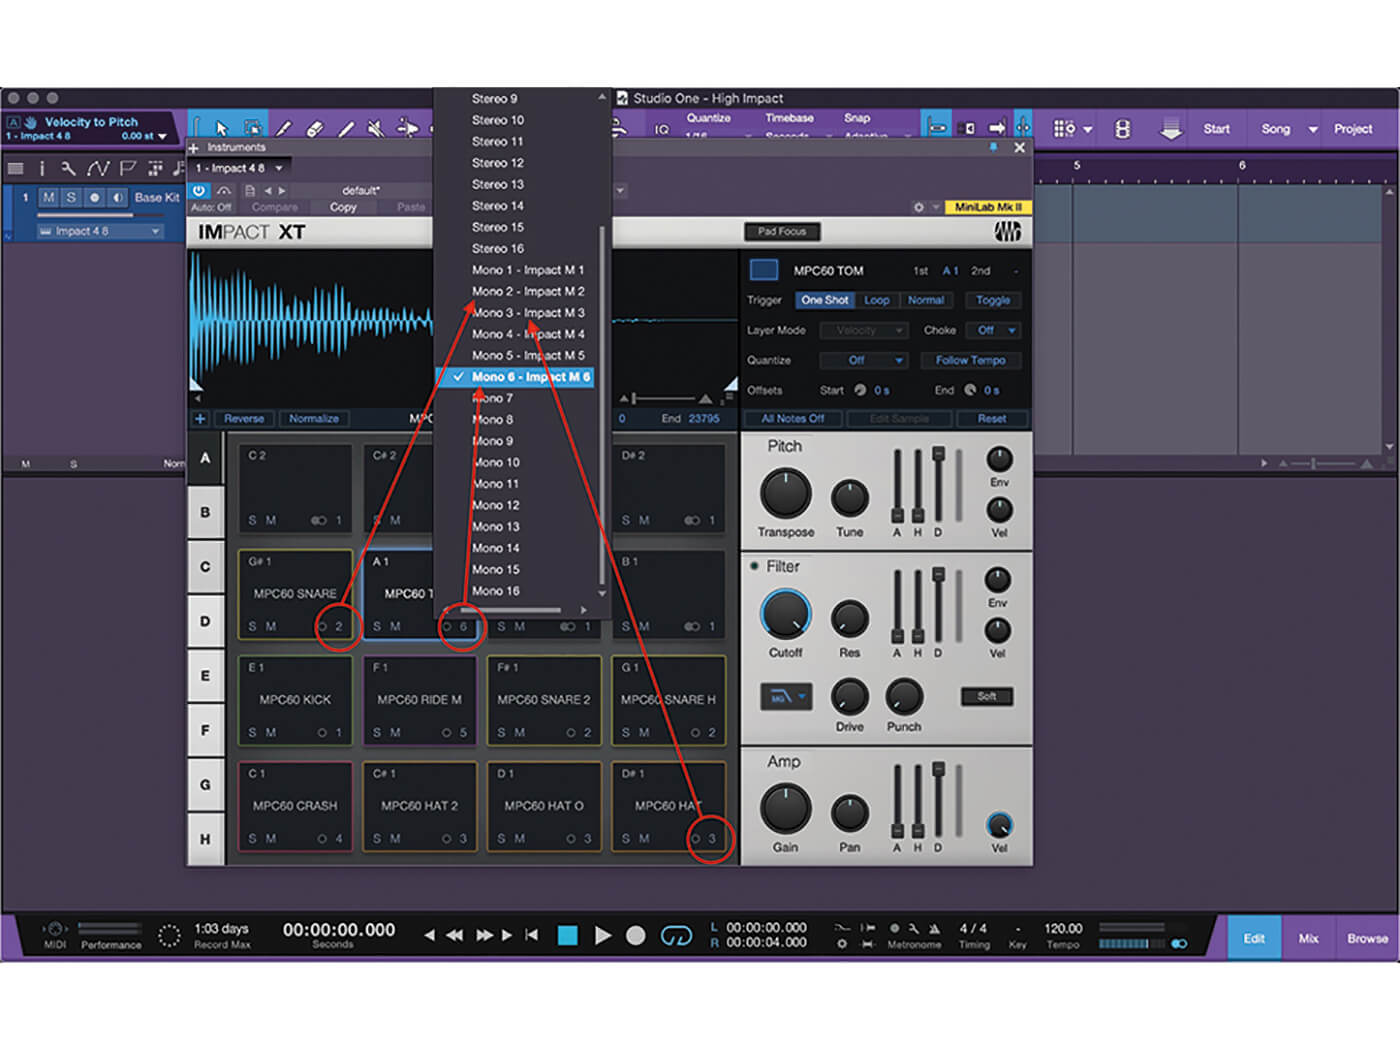 9. Clicking the small number in the lower right of each pad allows us to assign a stereo or mono output to each instrument. These outputs will show up in the mixer.
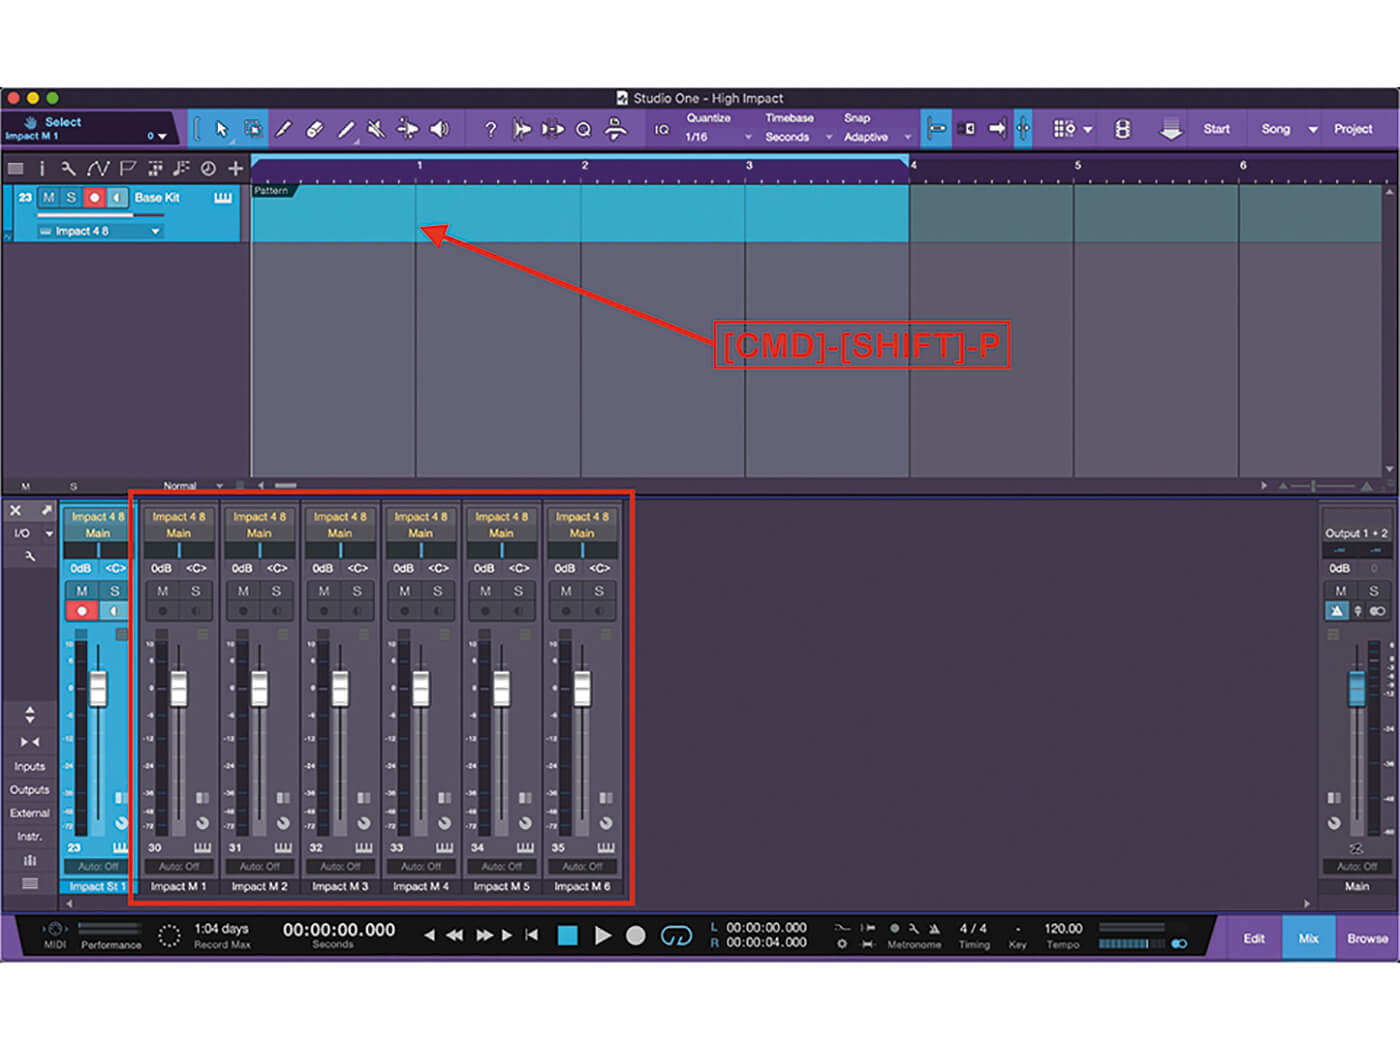 10. We’ll hit [F3] to show the mixer and see the new channels. Hold down [CMD]+[SHIFT]+P to create a Pattern Part in the session. Now we can start working on patterns.
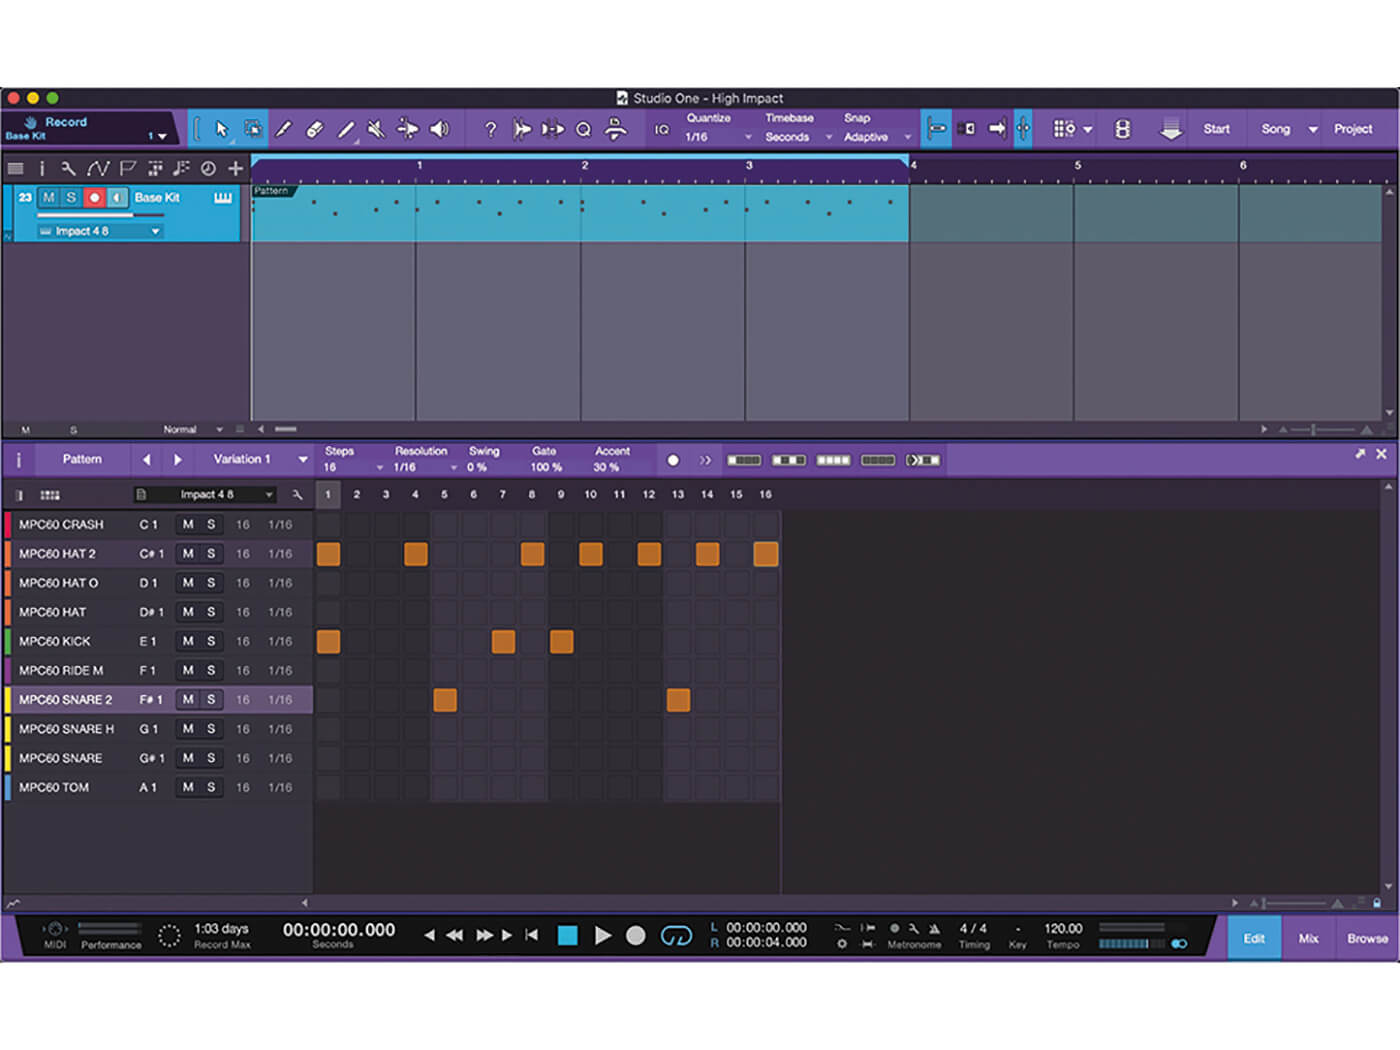 11. Double-clicking our new pattern will open the Pattern Edit window. Look familiar? This is a classic drum machine step-edit interface. Click in the boxes to create a pattern.
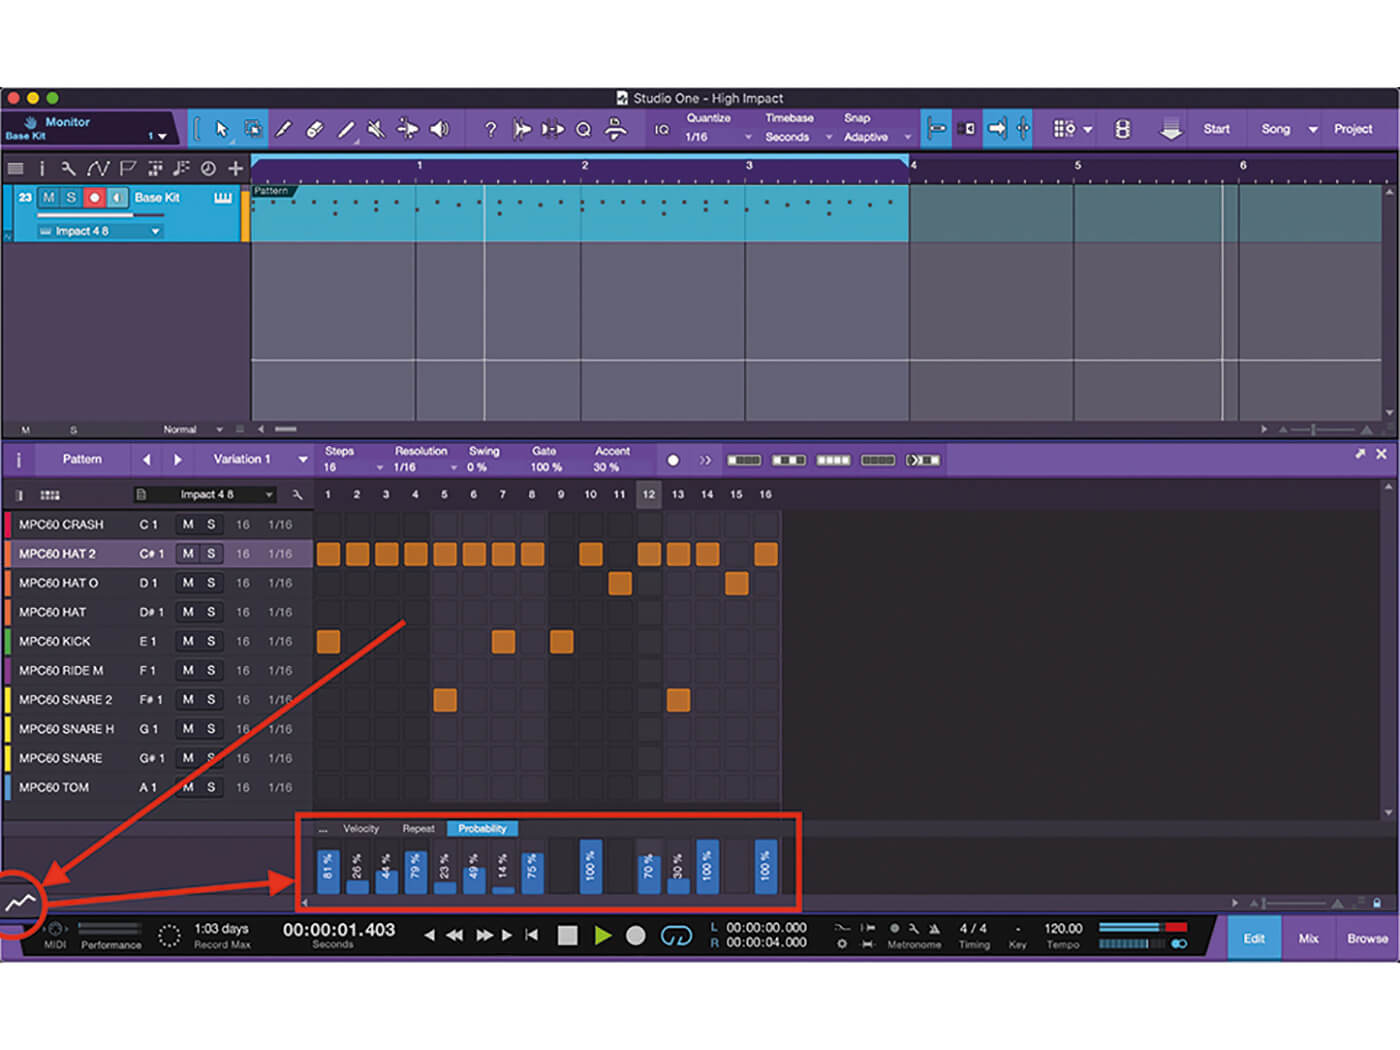 12. Open the Automation Lanes to find Velocity, Repeat and Probability. Velocity is as one would expect. Set individual velocity levels per note for realism and interest.
![]()
TRIGGER MODES The Trigger Modes each provide something different and give us a lot of flexibility. One Shot plays the sample when the pad is hit. Loop plays the sample over and over until we stop pressing the pad. Toggle allows the sample to start when the pad is hit and continue playing until the pad is hit again.
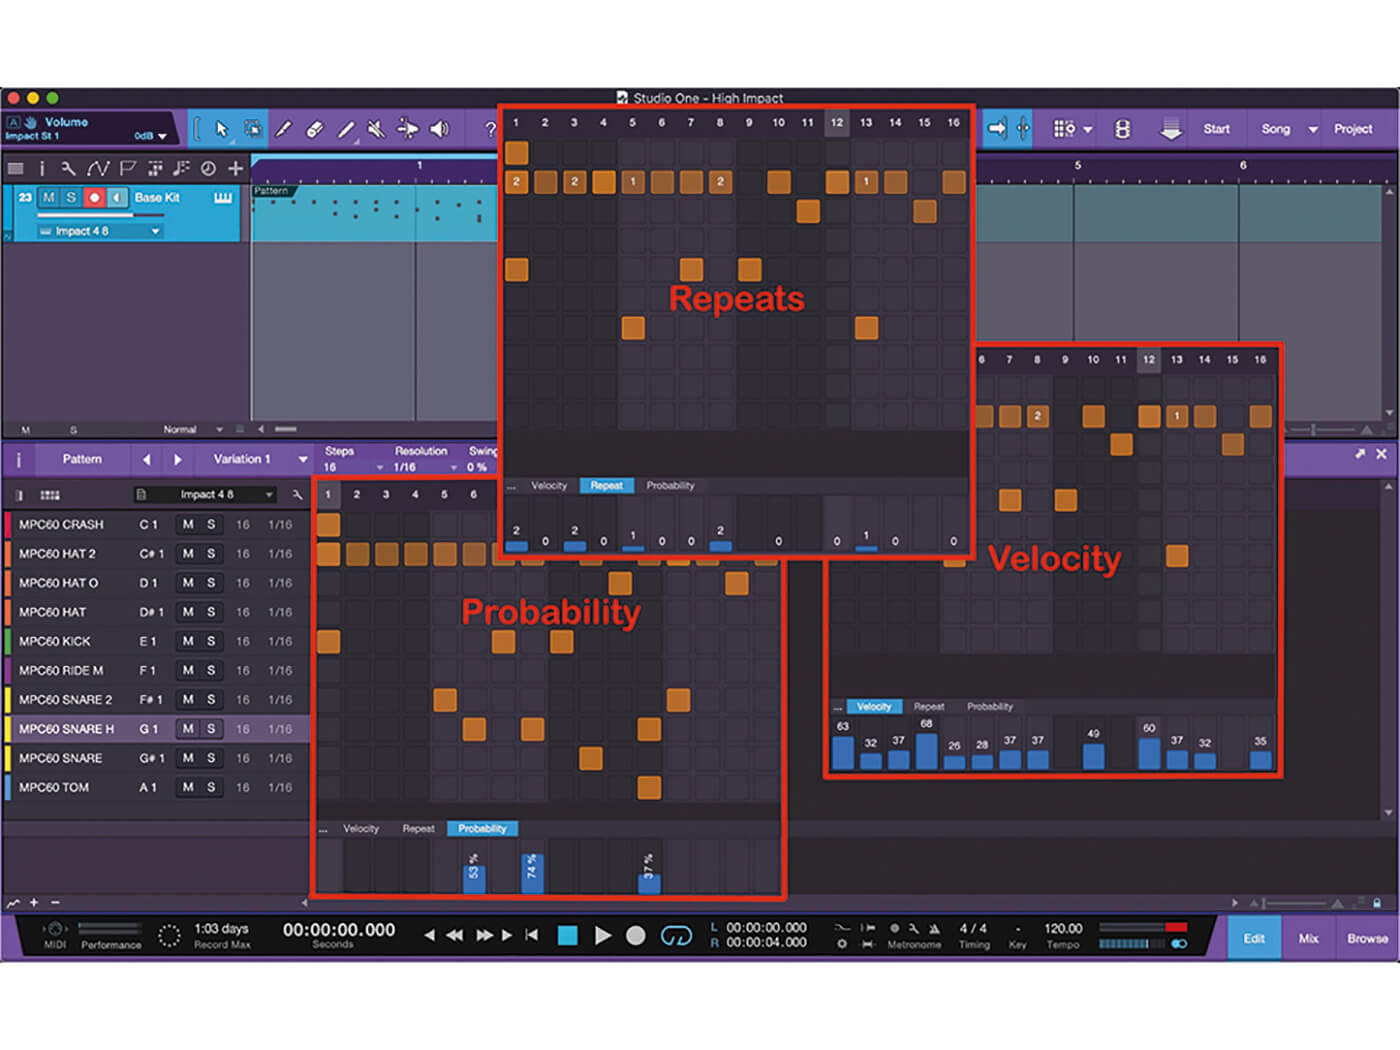 13. Repeat adds up to 10 repeat notes wherever selected. Adjust the sliders up and down per note. Probability provides randomness. The lower the number, the less likely that note will play during each loop.
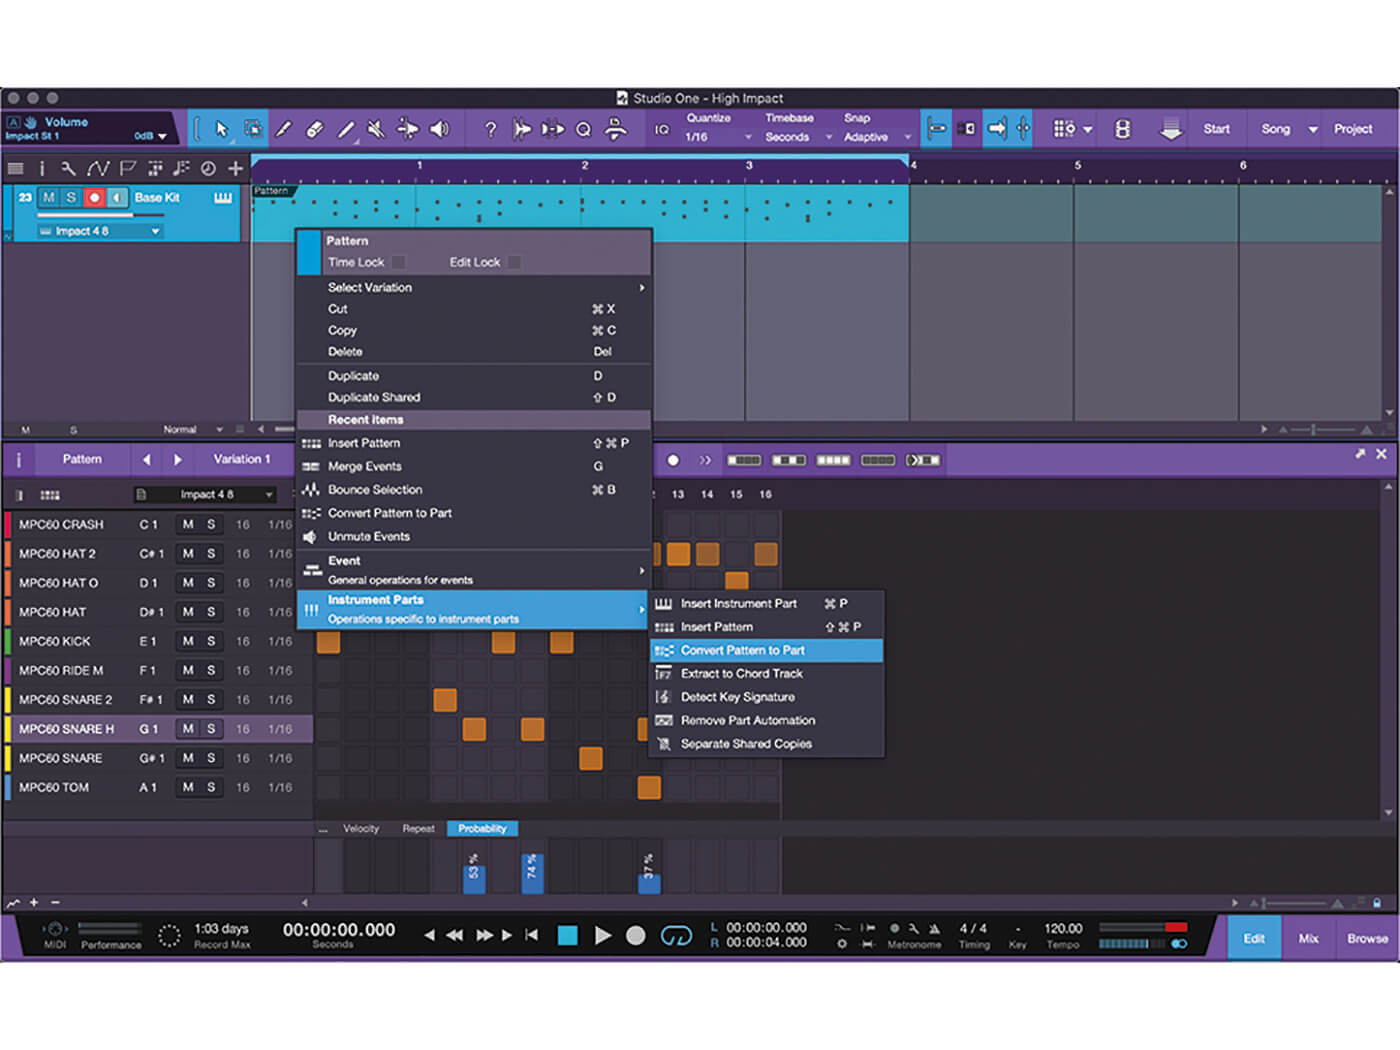 14. Now suppose we want to be able to mix the individual elements of our kit separately. Right click on the Pattern Part and select Instrument Parts > Convert Pattern to Part.
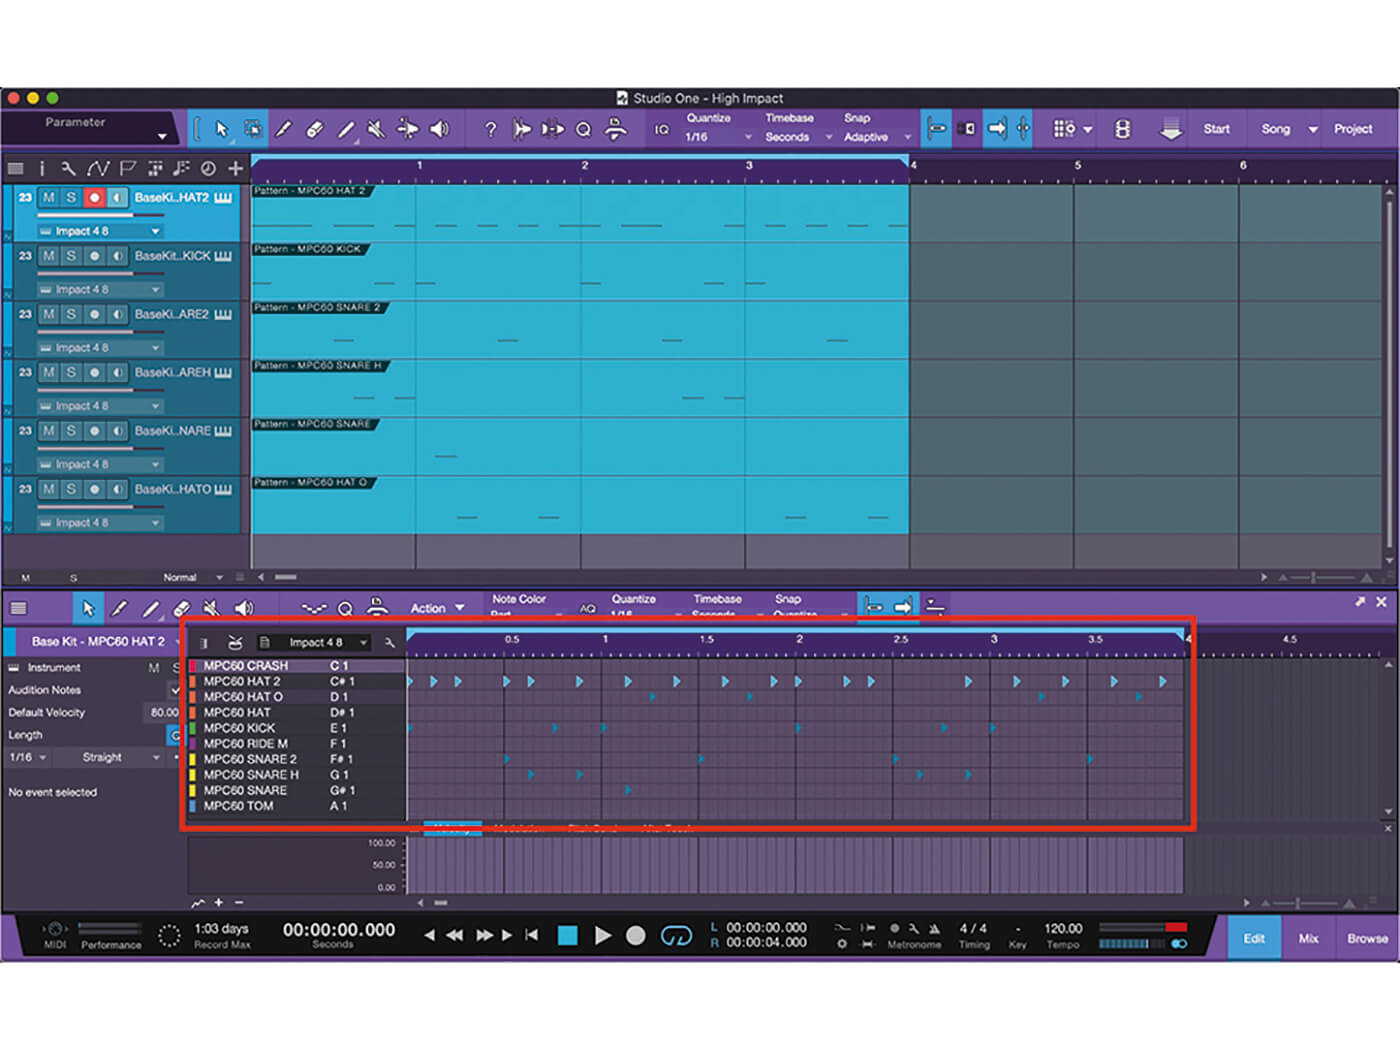 15. This creates a Drum Part which could actually be used to create drum parts in a linear fashion; however, we’re going to take it a step further and separate our drum elements.
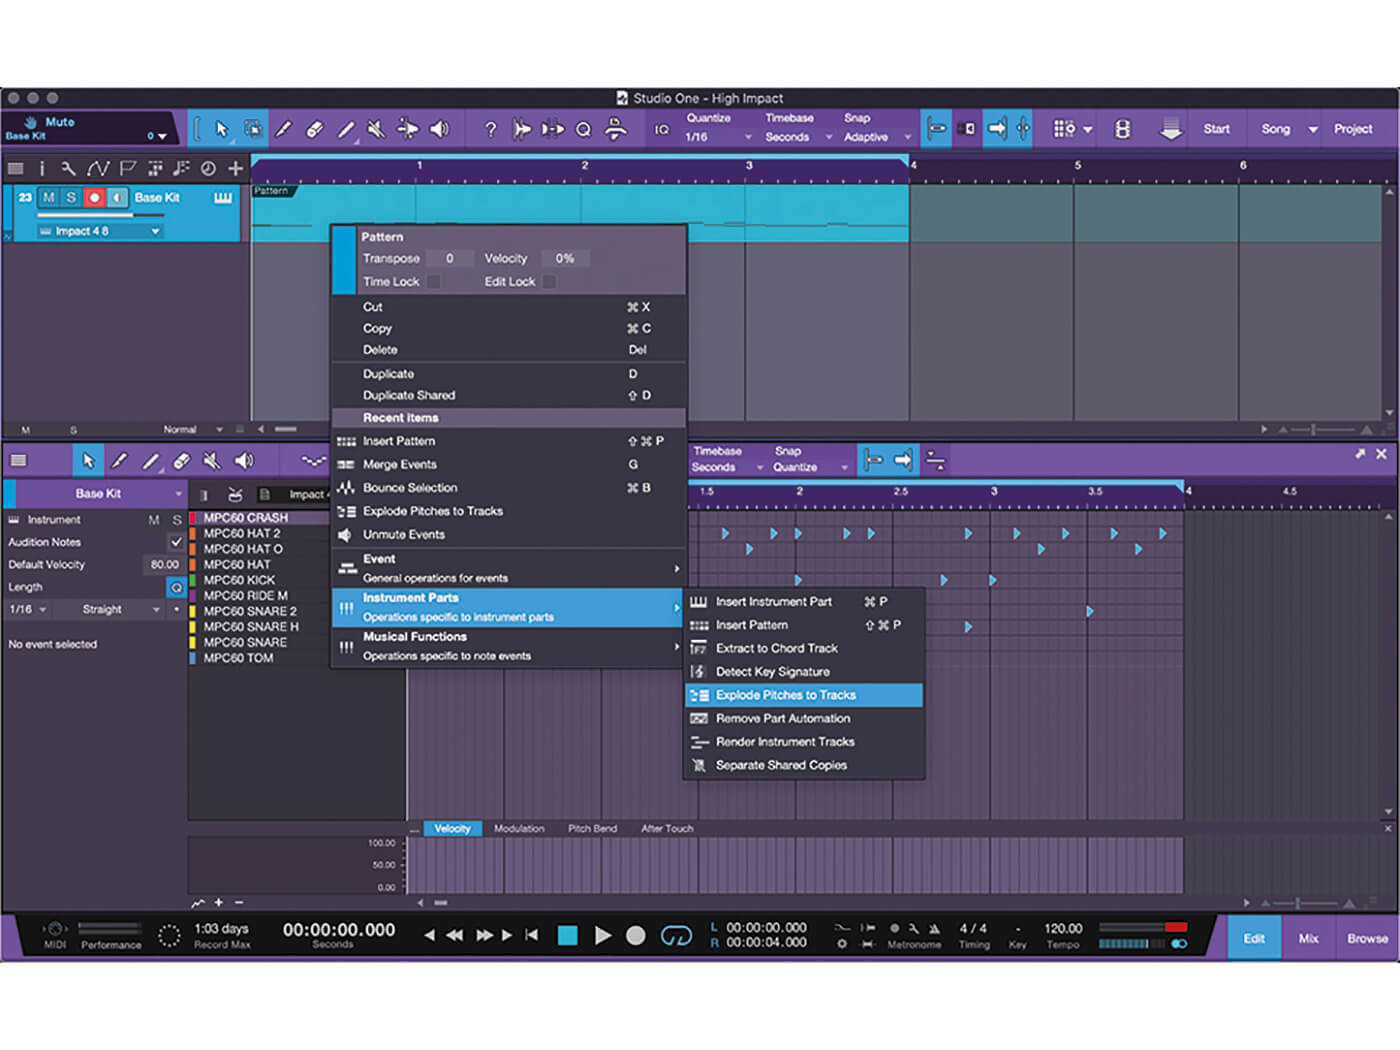 16. Now, we select the part on the timeline, right click the part and select Instrument Parts > Explode Pitches to Tracks. This will create separate tracks for each pitch.
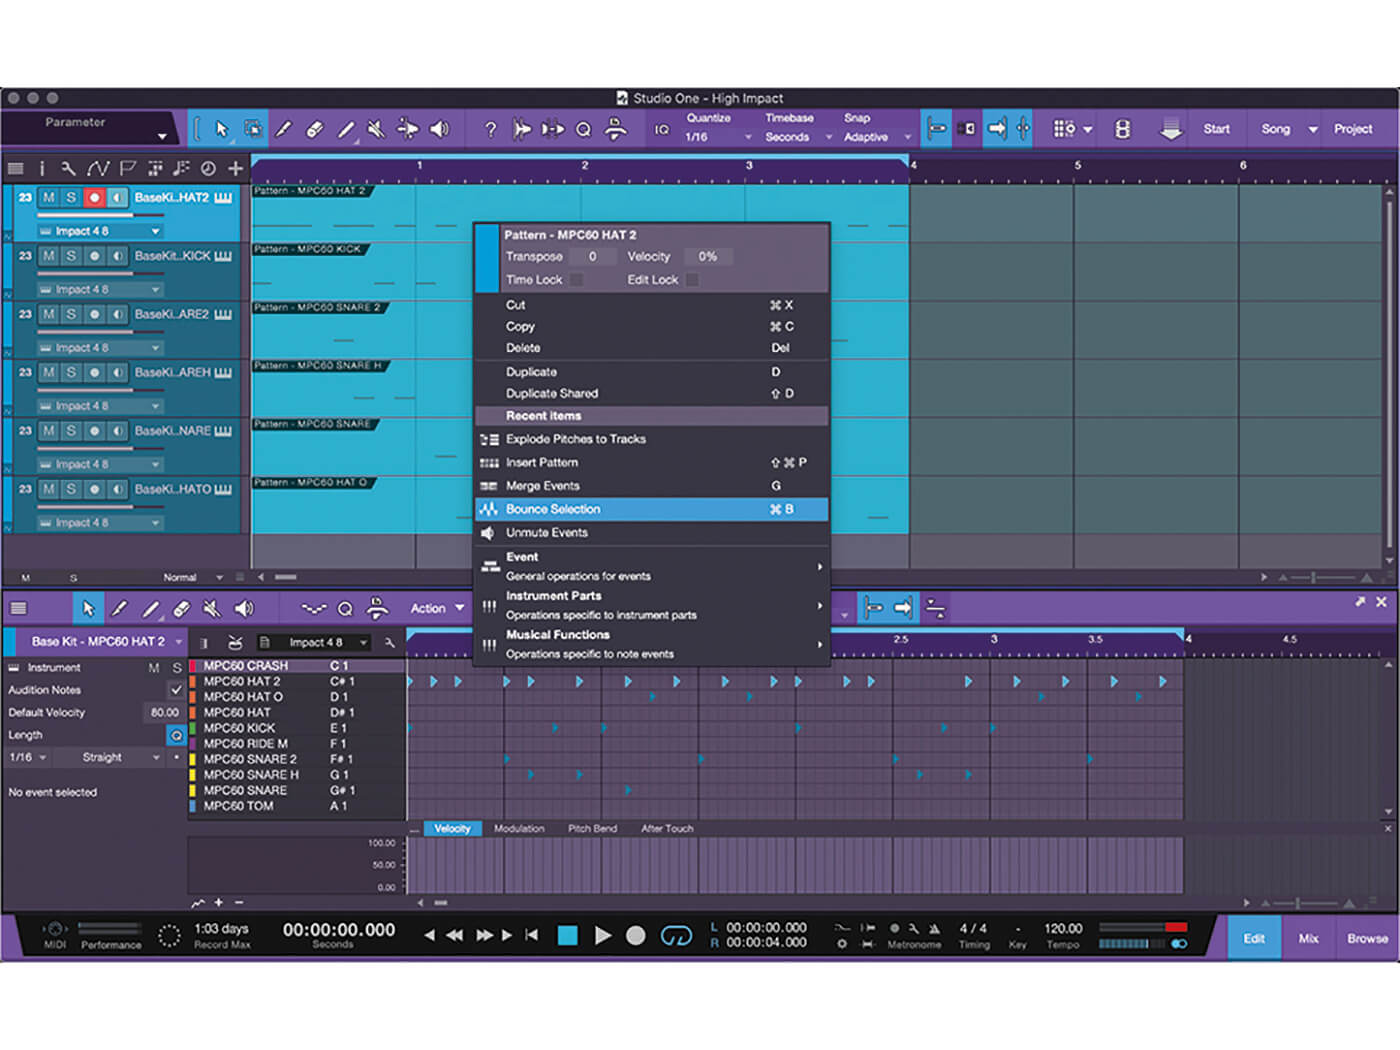 17. With each track’s part selected, we once again right click and select Event > Bounce Selection (or [Command]+B). This will create audio parts for each track and disable the instrument tracks.
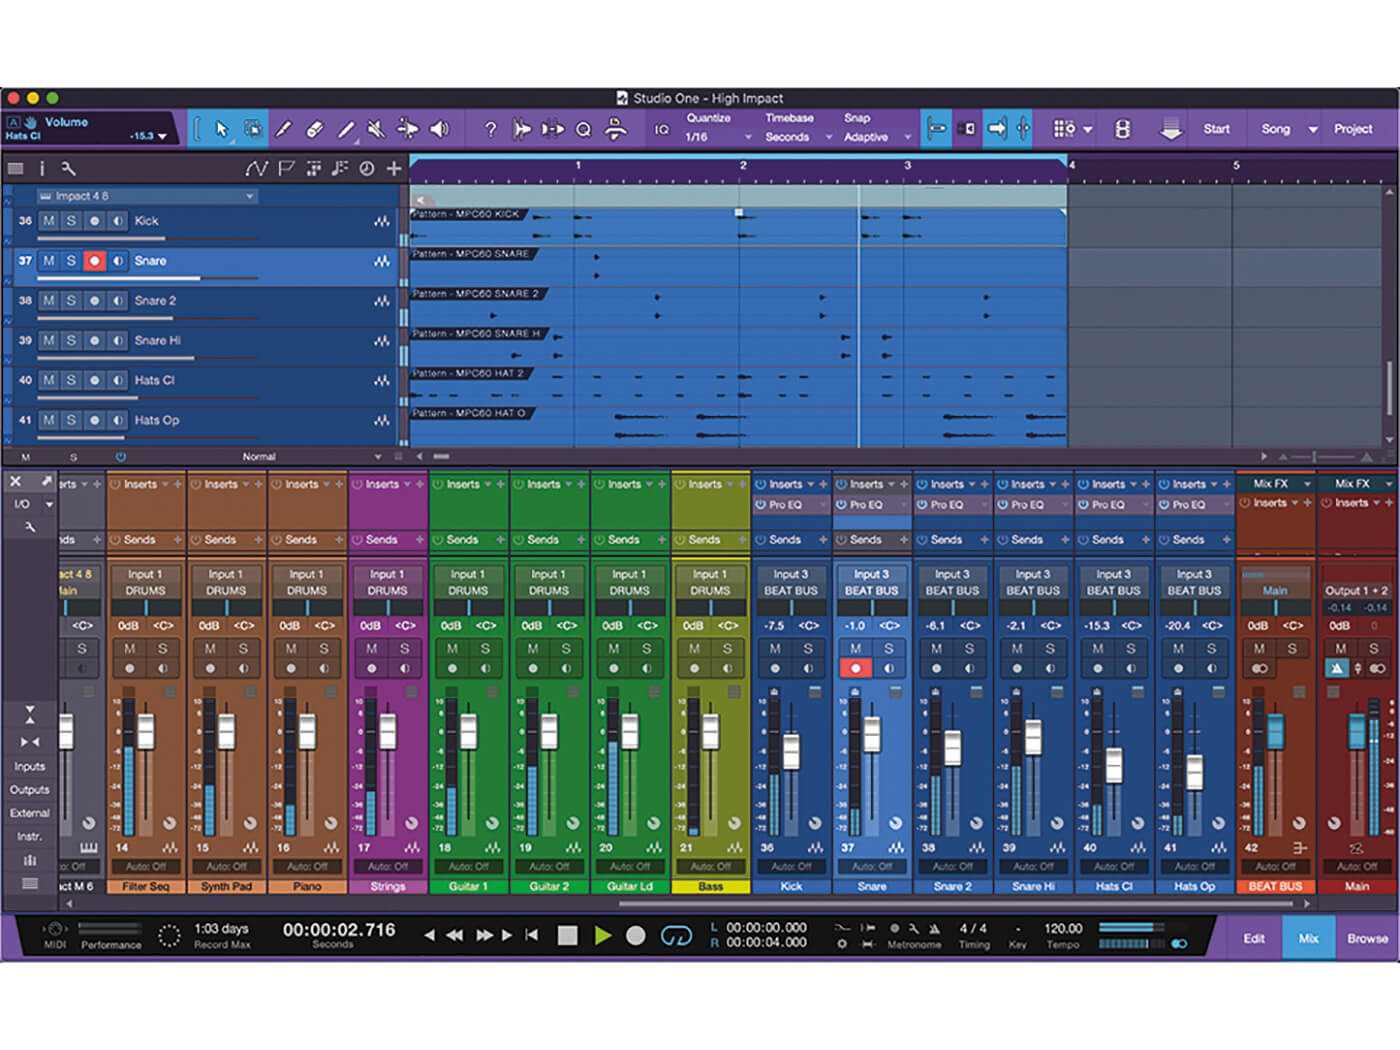
18. We now have all our drum instrument tracks available in the mixer. We can now feel free to process each track as necessary. We can create a drum bus for additional processing.
For more PreSonus Studio One tutorials and workshops, check here.