Performing with the Show Page in Studio One 5
Among Studio One 5’s new additions is its Live-like ability to arrange your tracks specifically for live performances – and all the permutations that go with such nerve-wracking endeavours
Fans of Studio One are always on the lookout for the next addition that will further streamline their workflow. By this point, users are well aware that PreSonus always has its
ear to the ground and works tirelessly to put its most requested features in place,
so the requests come thick and fast. Earlier this year, PreSonus released Studio One 5, with a host of new features. One of those features was a processor-friendly version
of the Song Page, now dubbed the Show Page. Its purpose? To finally provide users with a platform for honest-to-goodness live performance. Getting to grips with how this works is the first step to breaking your Studio One production environment out of the studio and on to the stage.
The show must go on
The Show Page can be accessed in a couple of different ways. From the Start Page, you can click the New Show icon at the top or use the key commands [Cmd+Shift+Option+N]. Another way to create a new show is from within a song. This makes it especially easy to launch a song straight into a show without having to leave your production.
The Show Page creates a processor-friendly page from which you can set up backing tracks, live inputs for vocals, guitars or any other instruments you can think of, as well as those of the virtual variety. The number of live inputs is only limited by the number of inputs on your audio interface, which means you could have an entire band set up with effects on each channel, plus backing tracks and virtual instruments, all easily controllable from one screen.
Studio One’s handling of the Show Page and the way it works allows you to leave the most commonplace tasks to the DAW. For example, let’s suppose you have a track on which you only play keyboards and sing. You could have the Show Page mute your guitar. Do you want unique guitar patches for each song? Of course you do. The Show Page can change the patches on your guitar channel or even change the patches on your virtual instruments, making it very flexible.
The one thing that the Show Page doesn’t seem to be able to do is change patches while in the middle of the song. Nevertheless, it remains a malleable feature that grants you increased control, ensuring that Studio One users can finally get out of the studio and perform in a live environment (or engage in lockdown-led livestreaming) using their favourite DAW. This impressive patch-automation function can be turned off entirely too, should you want to handle all this manually.
Live aid
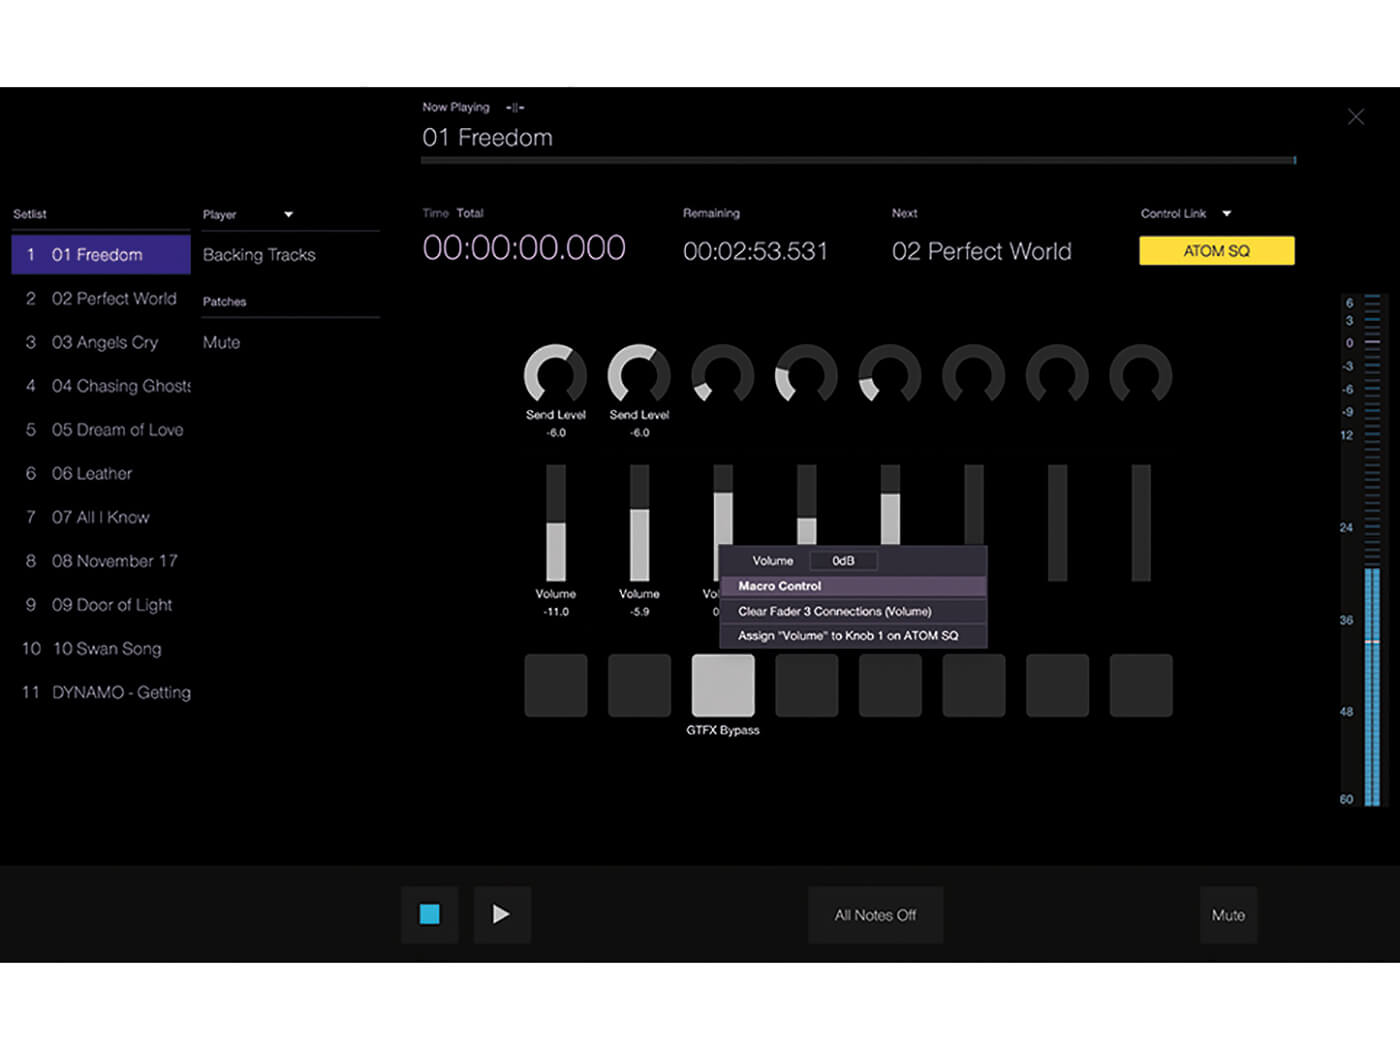
Within the Show Page, you’ll also find a sub-page labelled Perform. This may remind you of OSC apps such as Lemur, OSC/Pilot and TouchOSC. Though the Perform page is not nearly as flexible as those apps, it lets you link various controls to macros that, in turn, can be mapped to a MIDI controller. The large controls in the centre of the screen can be named and colour-coded, and can function as volume, panning, send levels or anything else you need access to.
PreSonus has even included a few buttons to help you manage those terrifying onstage moments
This page also displays basic information related to live performances, such as your setlist, the players in your set, what song is currently playing as well as its playback mode, the time remaining in the current Setlist Item (song), and the name of the next song in the setlist. There’s also a large level meter so that you can see what’s going on, wherever you are on stage.
PreSonus has even included a few buttons to help you manage those inevitable and terrifying onstage moments: there’s a mute button that mutes all output from all the player channels, as well as an all-notes-off button that sends a ceasefire message just in case one of your MIDI instruments seizes up or gets stuck.
Run the risk
The Show Page was designed to minimise risks on stage and during livestreams. While in Performance mode, you can only start or stop the show by hitting the Stop button or the space bar, so you don’t have to worry about accidentally moving elsewhere in the timeline. It’s easy to adjust the setlist based on your crowd too – clicking the X in the top-right corner takes you back to the Show Page to rearrange your setlist. Not only this but the Show Page is lighter on your computer’s processor than a Song Page would be, with all its automation and editing abilities. Try it and see if it doesn’t become your new favourite live player.
Performing with the Show Page in Studio One 5: step-by-step
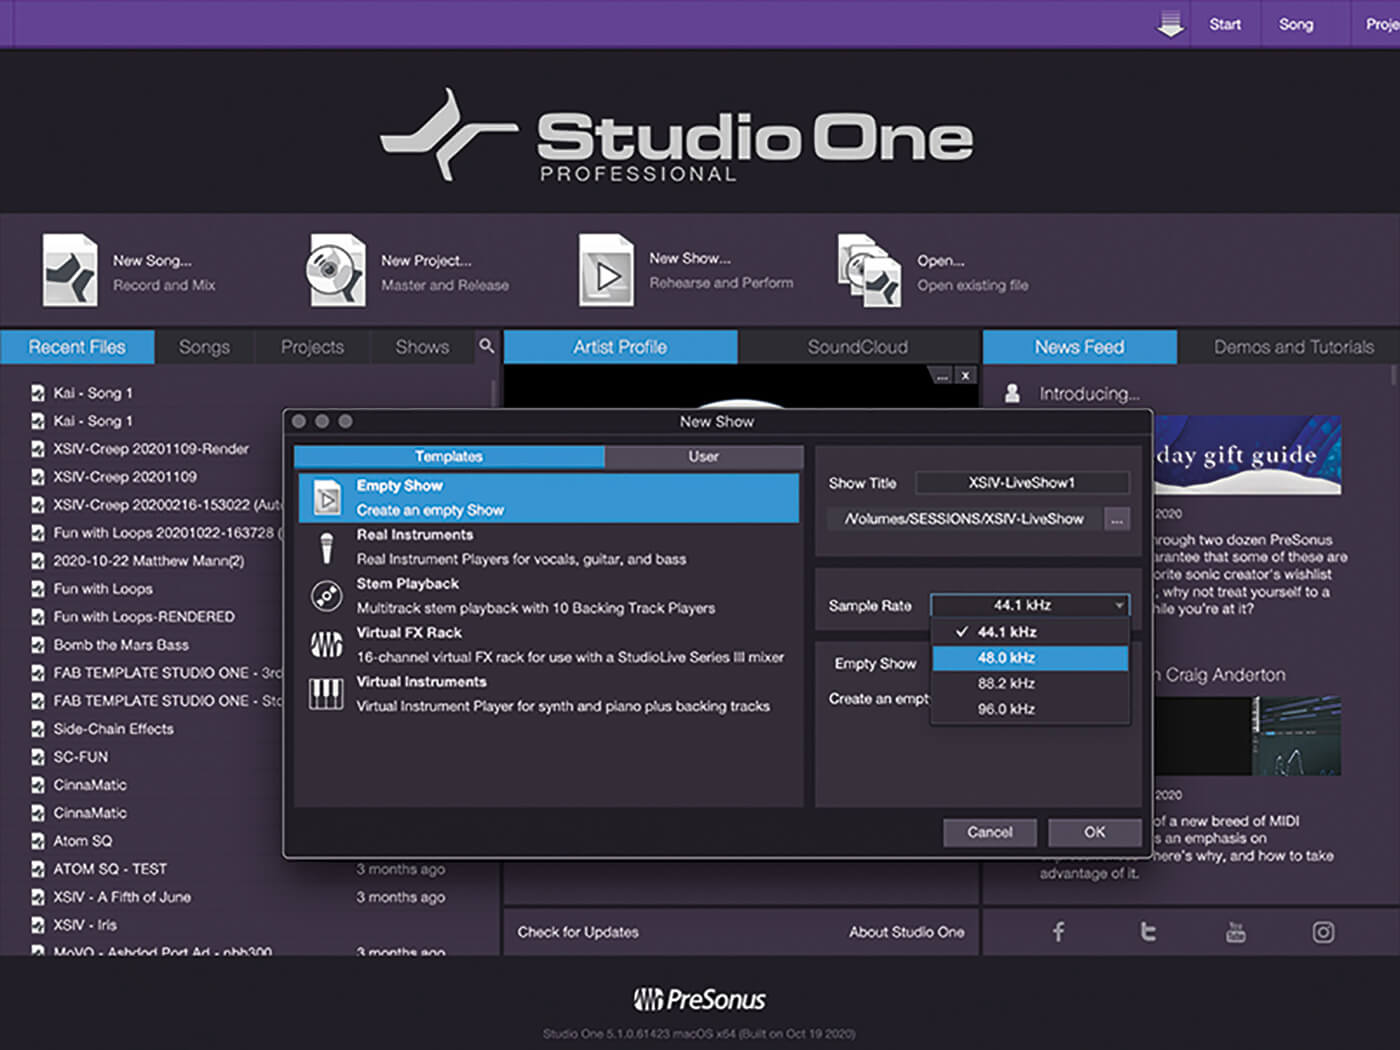
1. Click New Show from the Start Page or hit Ctrl/Cmd+Shift+Option/Alt+N. Choose from the templates, which include Real Instruments and Stem Playback, or click Template to create your own and save it for later use.

2. Click Artist and Venue and alter them as needed. If you know how many players you need, add them via the + button. There are three types of player to choose from: backing, aux and virtual instrument.
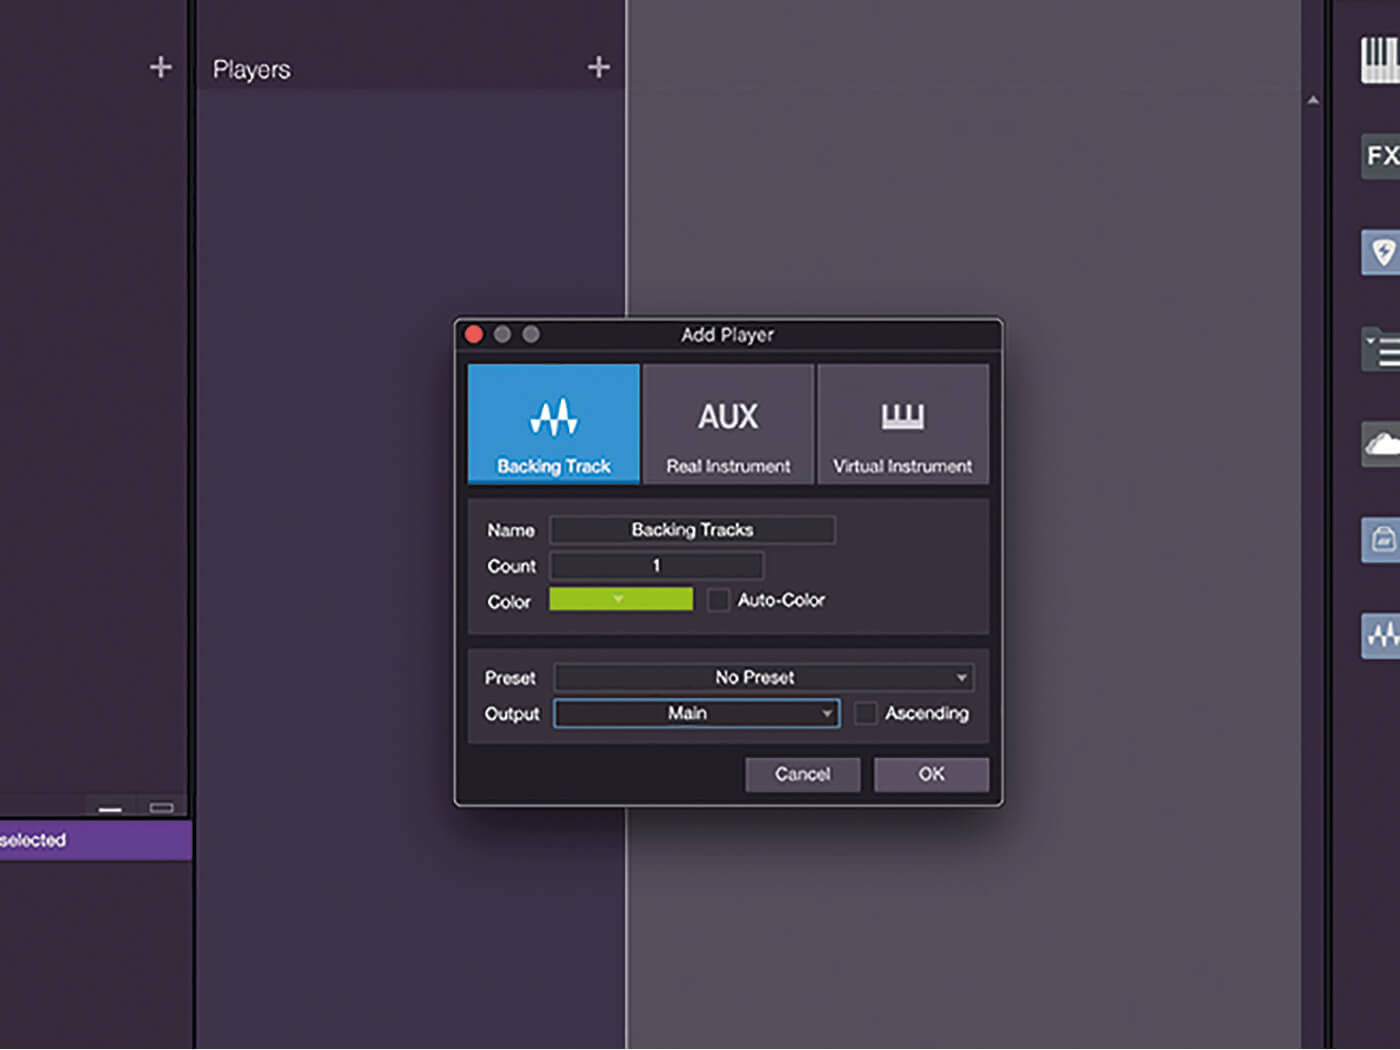
3. Click Backing Track. Name the track, assign a colour, and set the output to the main output on your interface. Ticking the Ascending box will allow Studio One to choose your inputs in order.
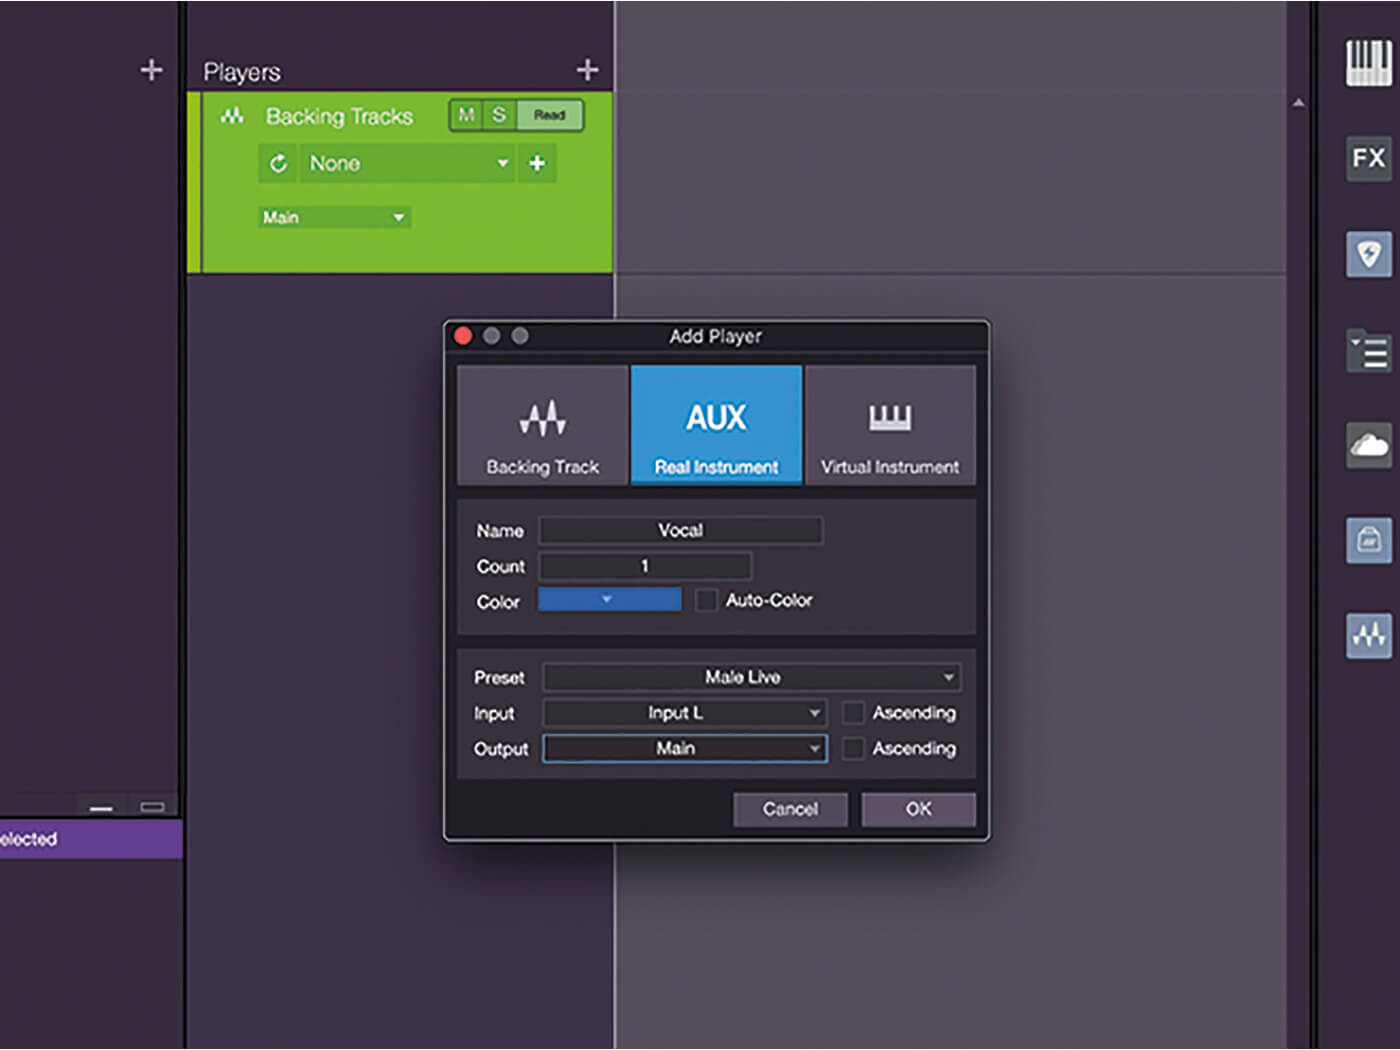
4. Select the aux option. Name it Vocal and give it a colour. Select a preset from the presets drop-down. Pick the input for the vocal (unless you selected Ascending in the previous step). Select output and click OK.
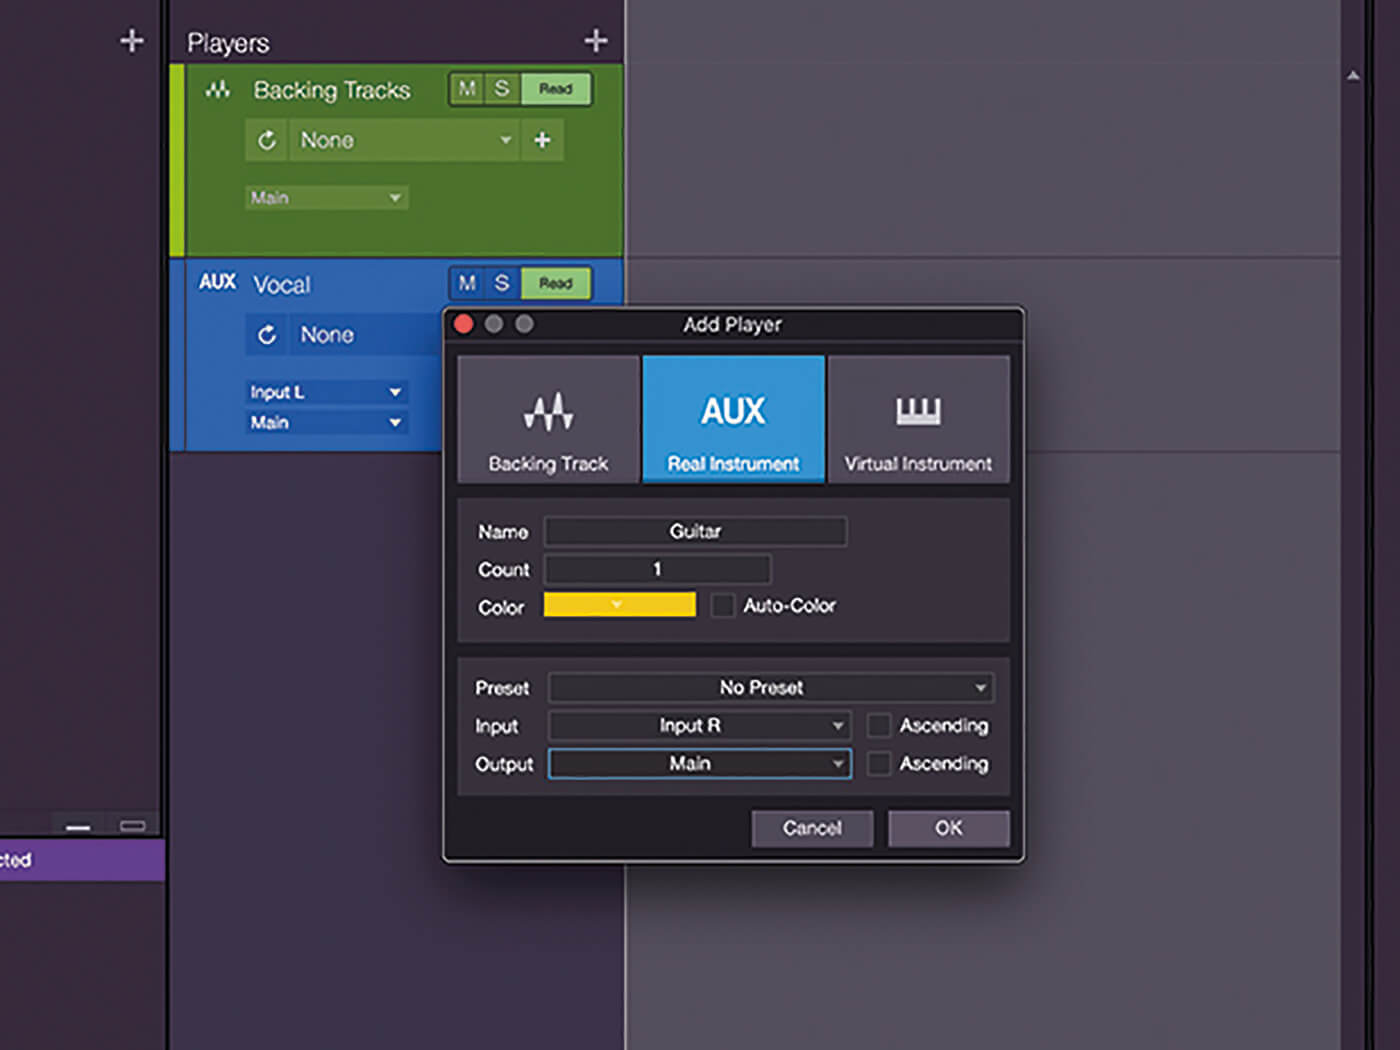
5. Repeat the previous step to create a guitar track. You could select a preset for the guitar but leave it blank for now. There’s a better way to do this for a longer setlist…

6. Finally, create two virtual-instrument players. Repeat the previous steps but set Output to New Instrument and choose None. If you only have one MIDI controller, you can assign it to the input here, otherwise leave it blank.
![]()
REARRANGE With the Show Page, you can rearrange your Setlist Items by dragging and dropping them up or down in the Setlist panel on the left. Creating unique sets for your show and seeing which arrangements work best is simple. Once you’ve modified a setlist’s order, just save it with new name.
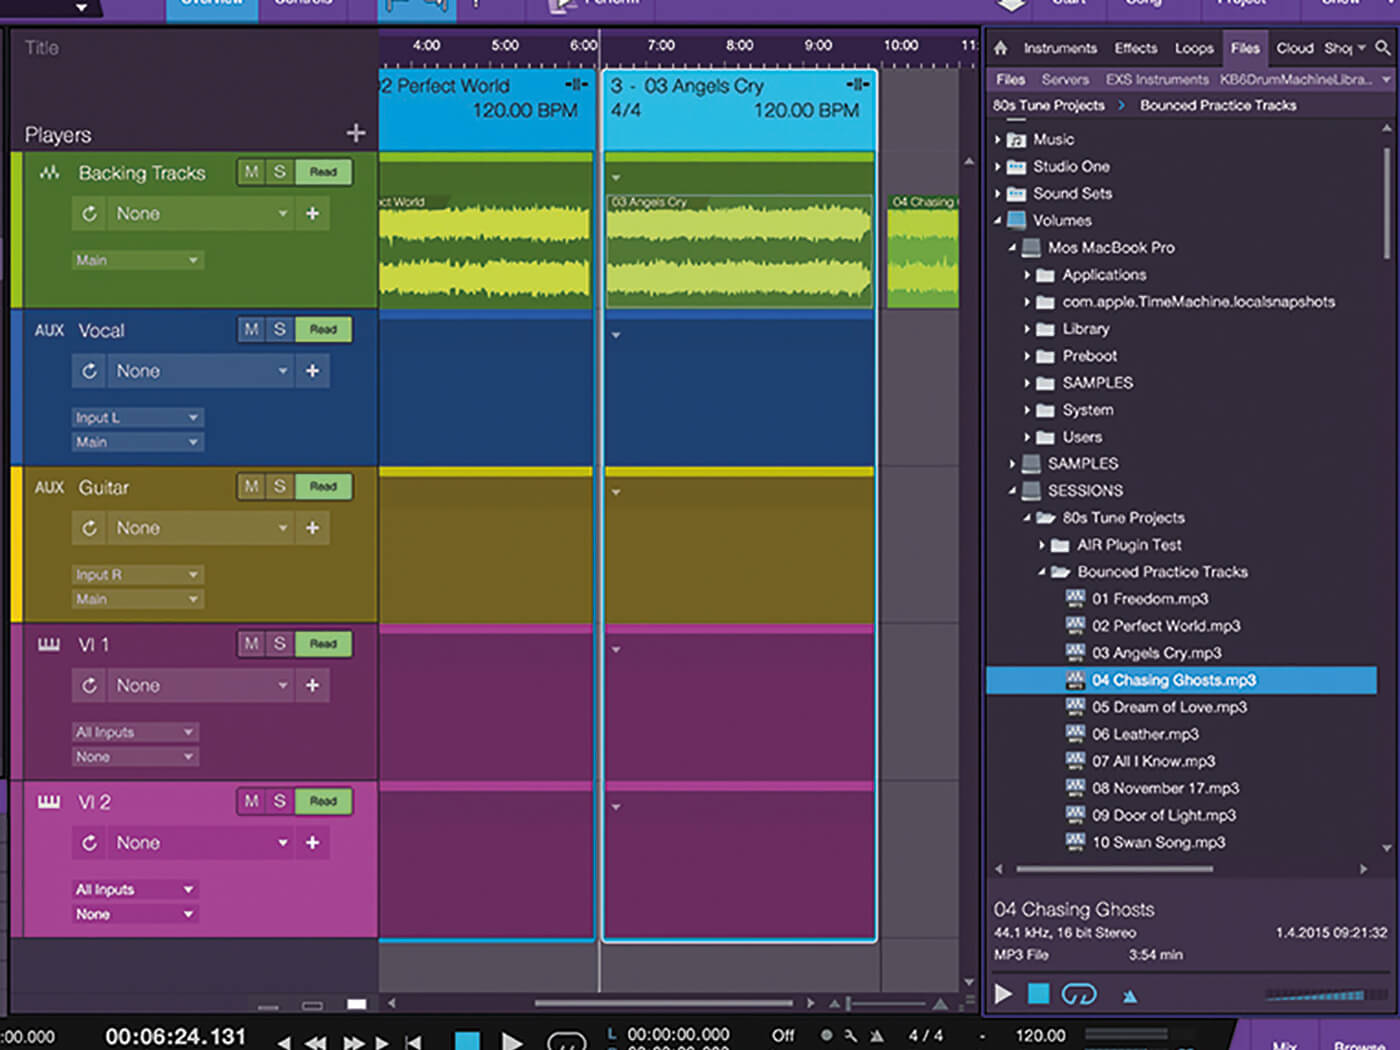
7. Drag mixes of your songs into the timeline on the Backing Tracks player. The width of each song will be adjusted, and you can click and drag up or down in the timeline to zoom out and see more of your songs.

8. Hit F6 to show virtual instruments in the browser. Select the patches for each song (and instrument) and drag them into the virtual-instrument player under each song. Studio One will change the patches for each song.
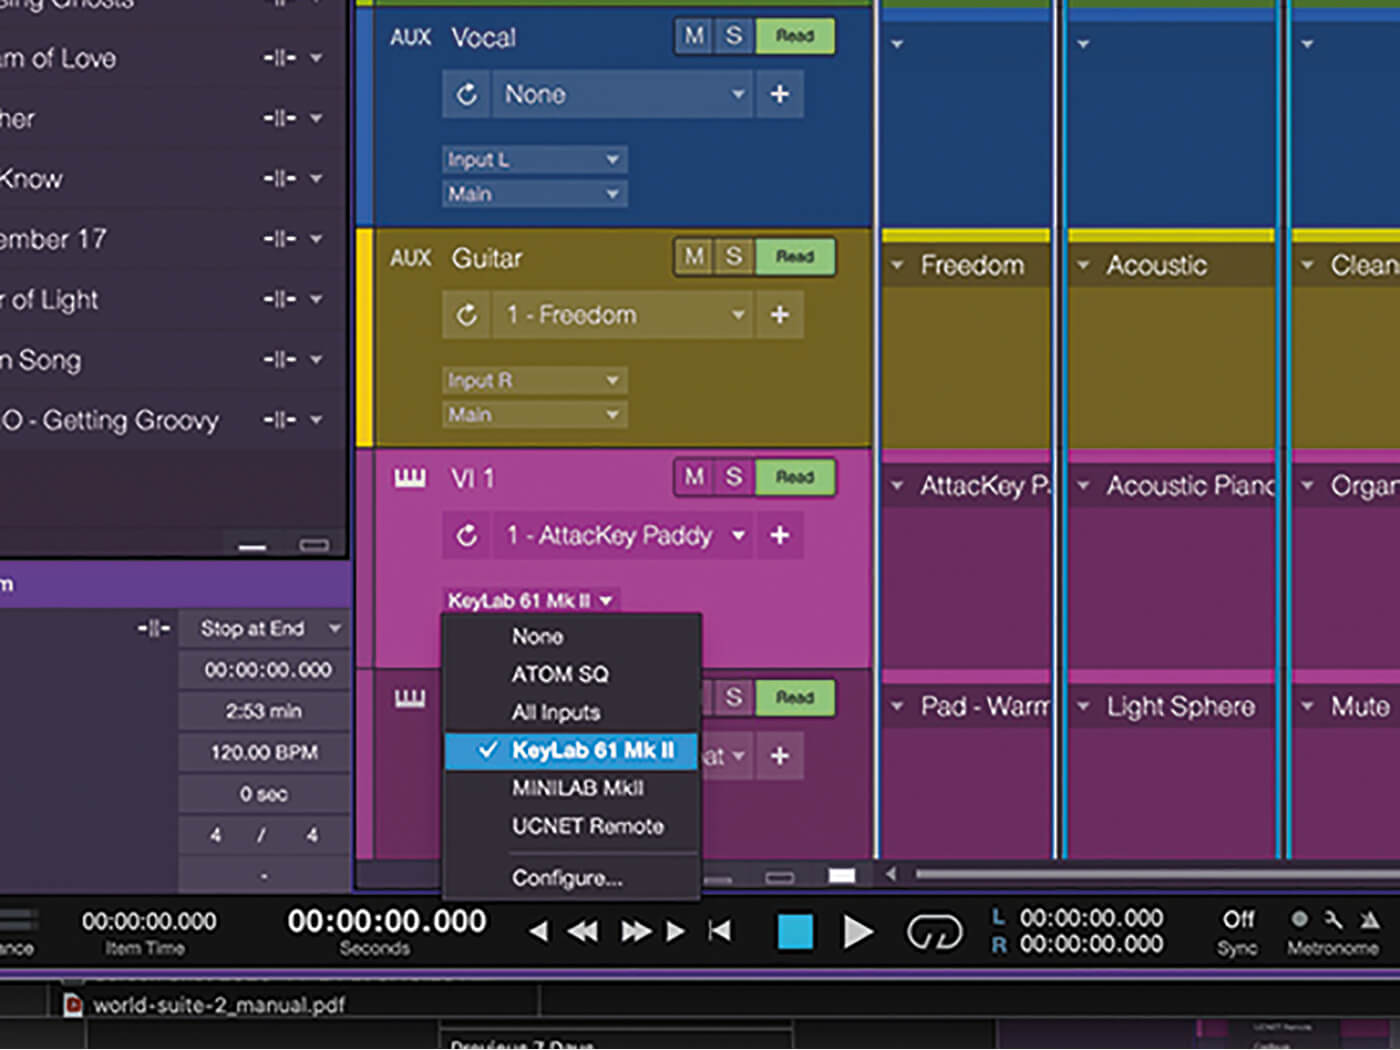
9. Click the Input drop-down menu at the bottom of each virtual instrument and select your controller to assign it to the player. Test your connection by playing your controller. You should hear the first virtual-instrument patch.
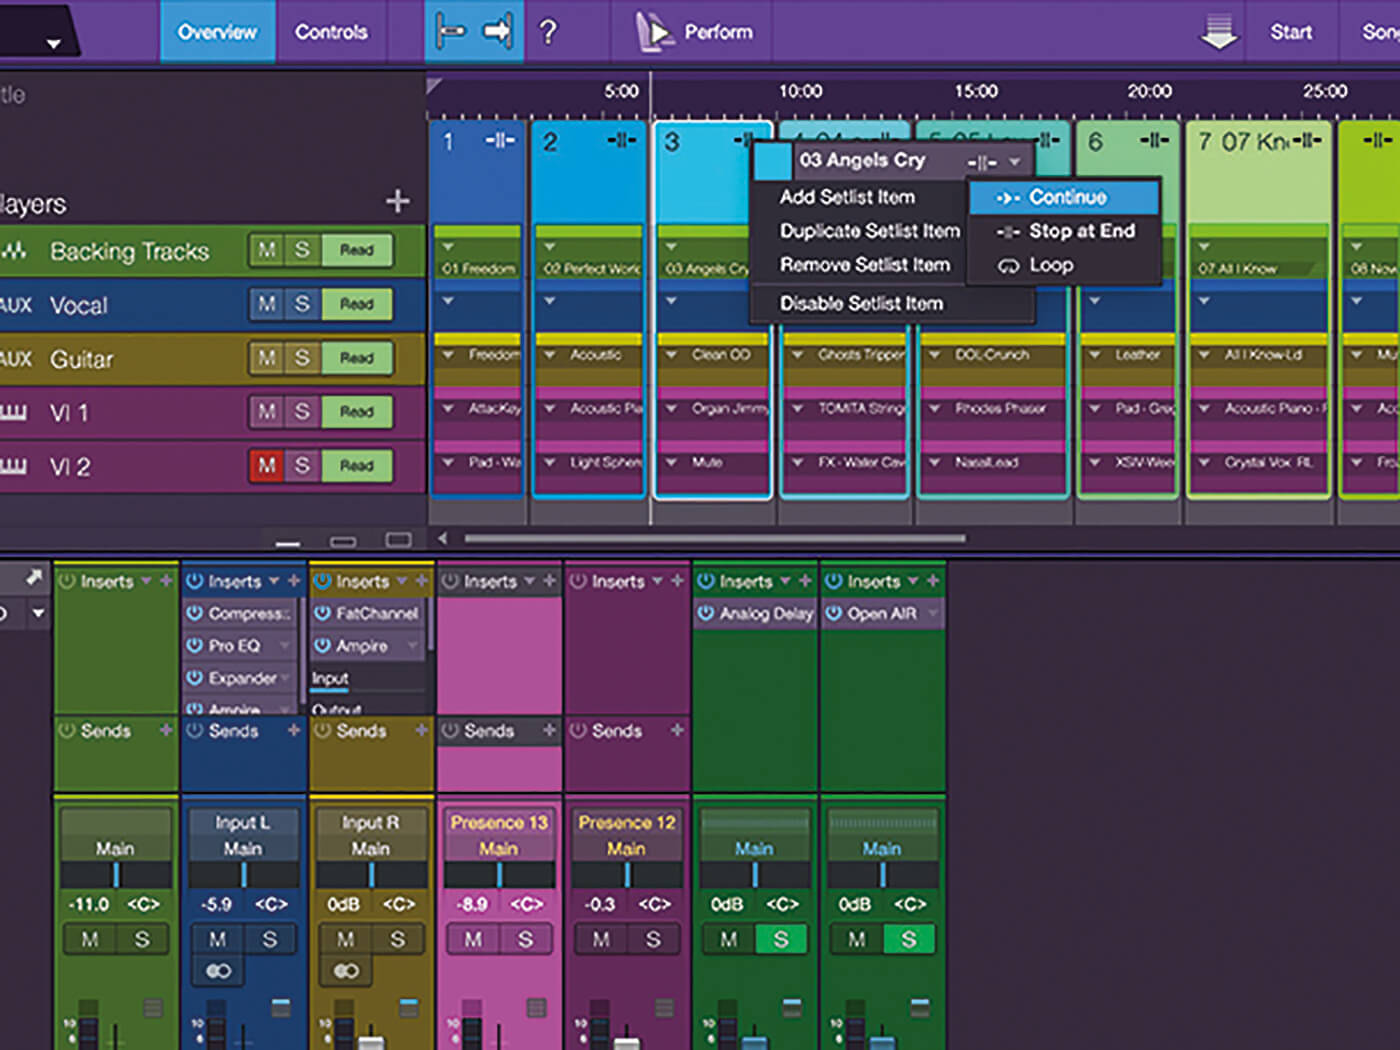
10. Right-click the top of each Setlist Item in the timeline to set follow actions for the song (Continue, Stop at End, or Loop). You can also change the colour of the item, and add, duplicate, remove or disable setlist items.
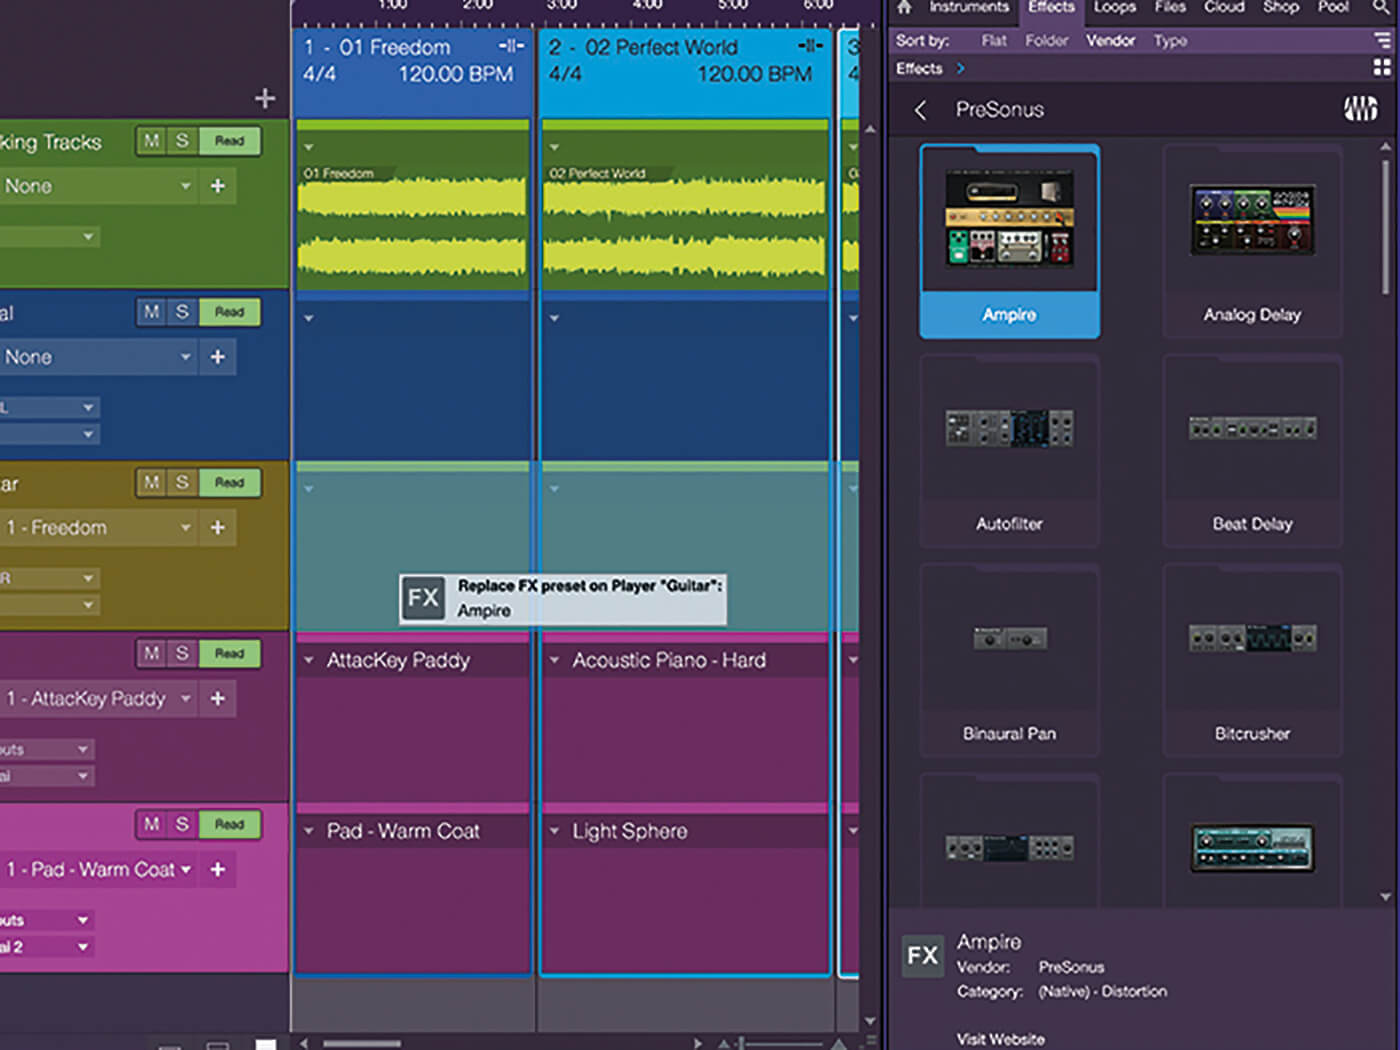
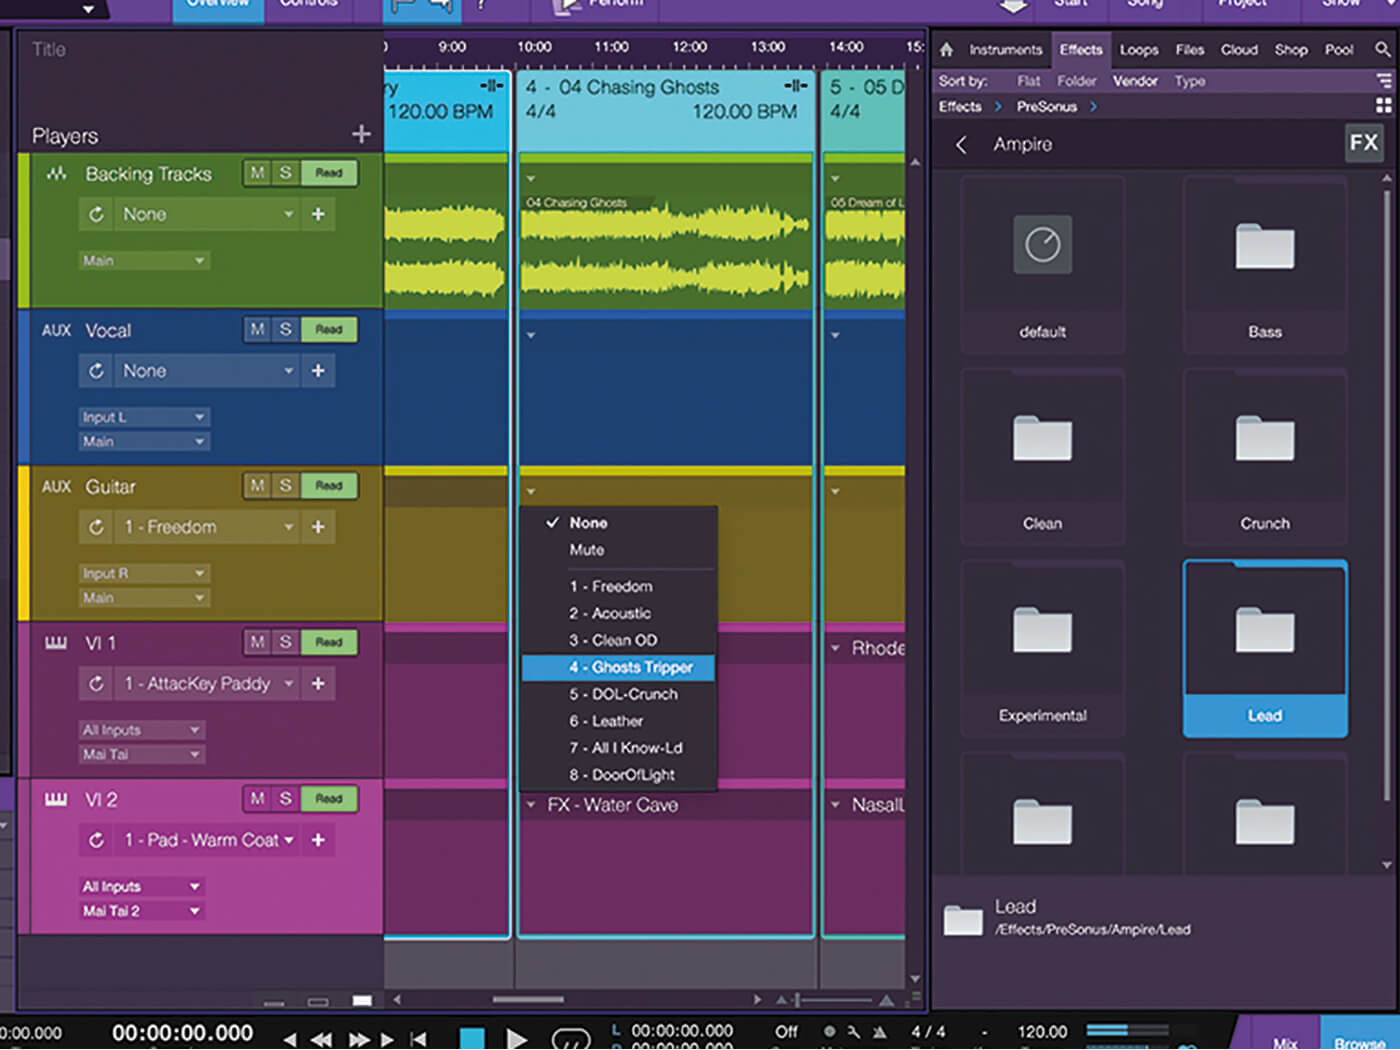
11. If you want to use a virtual effects rack on your guitar, hit F7 and browse through the presets until you find something you like for the first song. Once you’ve found one, drag the preset onto the guitar player track.
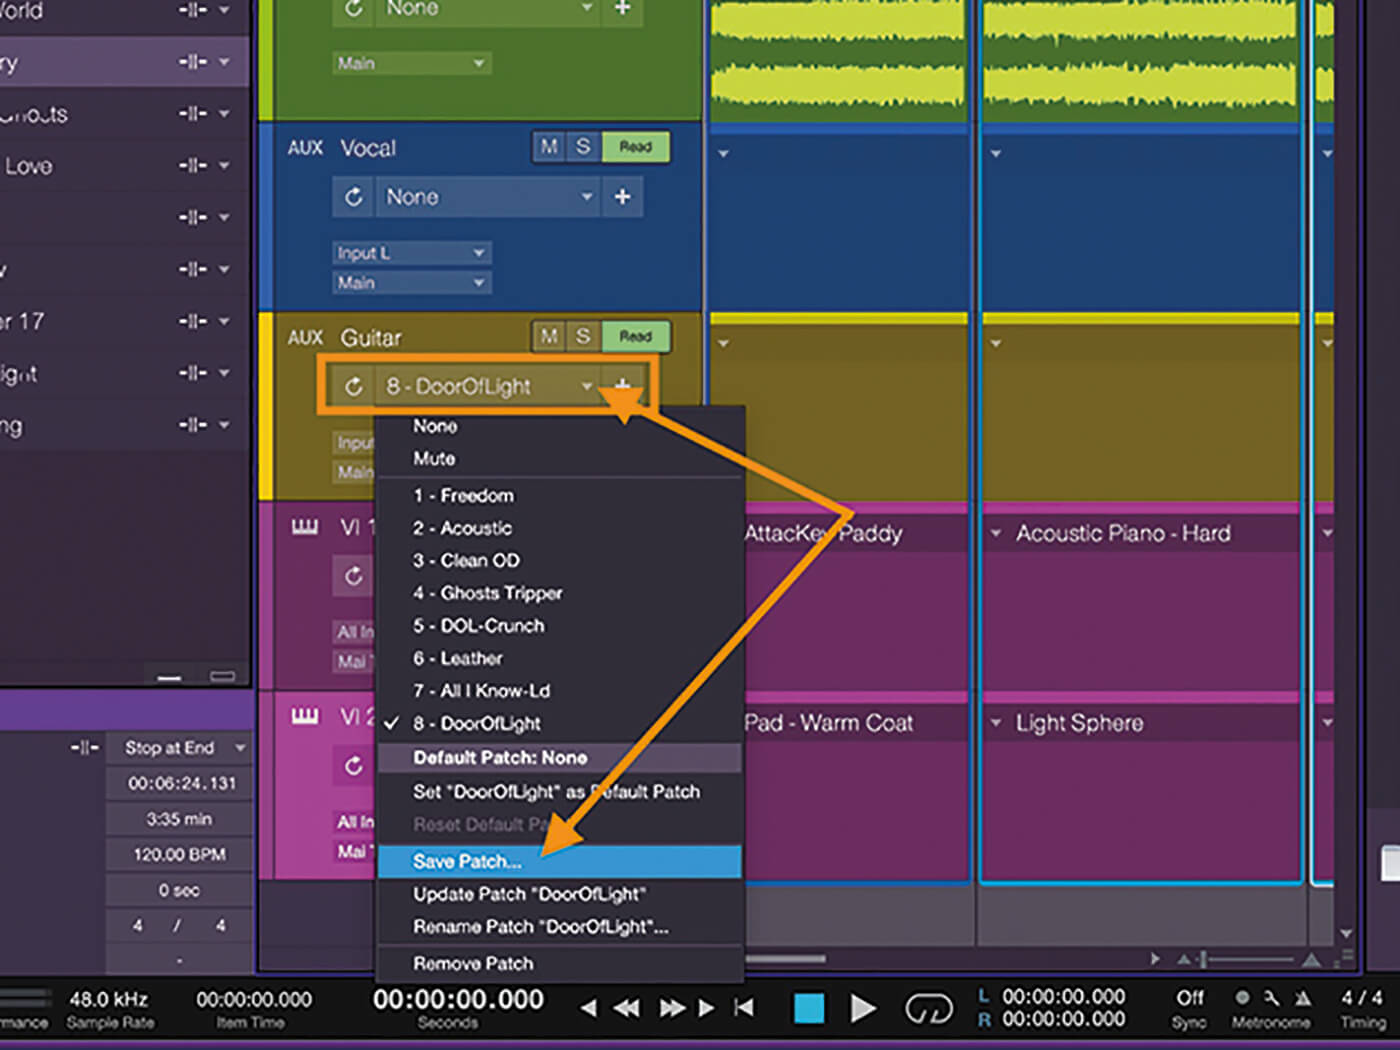
12. Click the Patch drop-down menu for the guitar-player track and choose Save Patch. Give the patch a recognisable name. Repeat these steps for each song, adding new effects patches and saving them.
![]()
THE INFORMATION PANEL In the small box below the setlist panel, you’ll see important information such as your Setlist Items’ Playback Mode and where in the timeline the songs start, as well as their length, tempo, time and key signature. You can even set a pause amount between continuous songs.
13. Click the down arrow for the guitar-player track in each song. Select the patch created for it. Now Studio One will automatically change guitar patches for each song in the timeline. You can do this for the vocal track too.
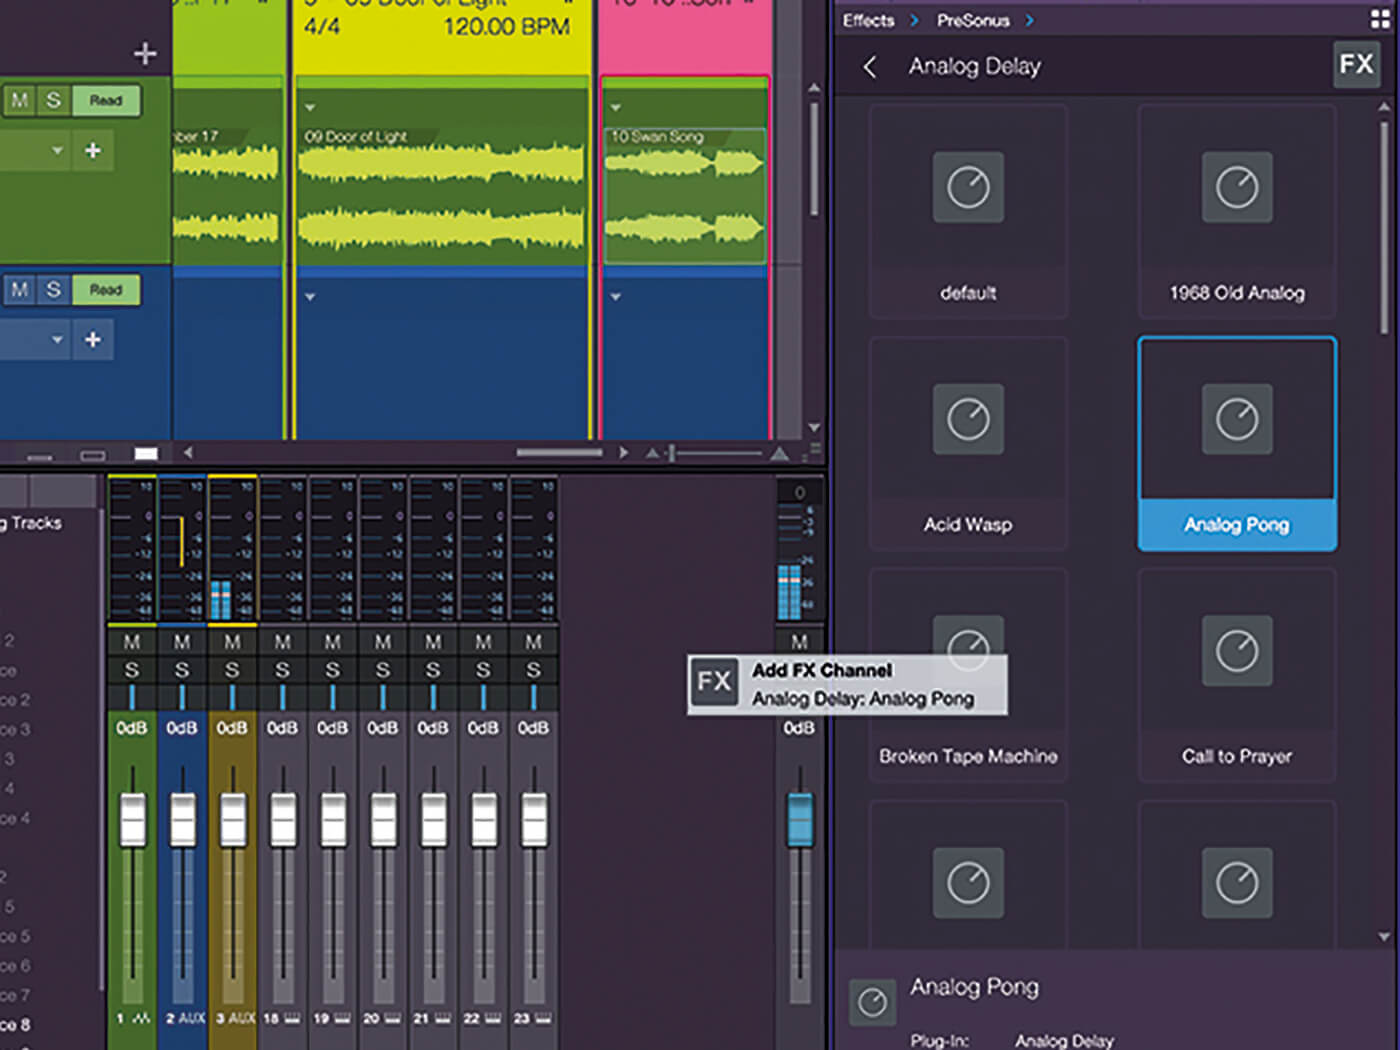
14. Find an appropriate ambience effect or effects to drag into the free space in the mix area. This will create send effects for use with your tracks. Drag a simple vocal delay and a nice reverb here.
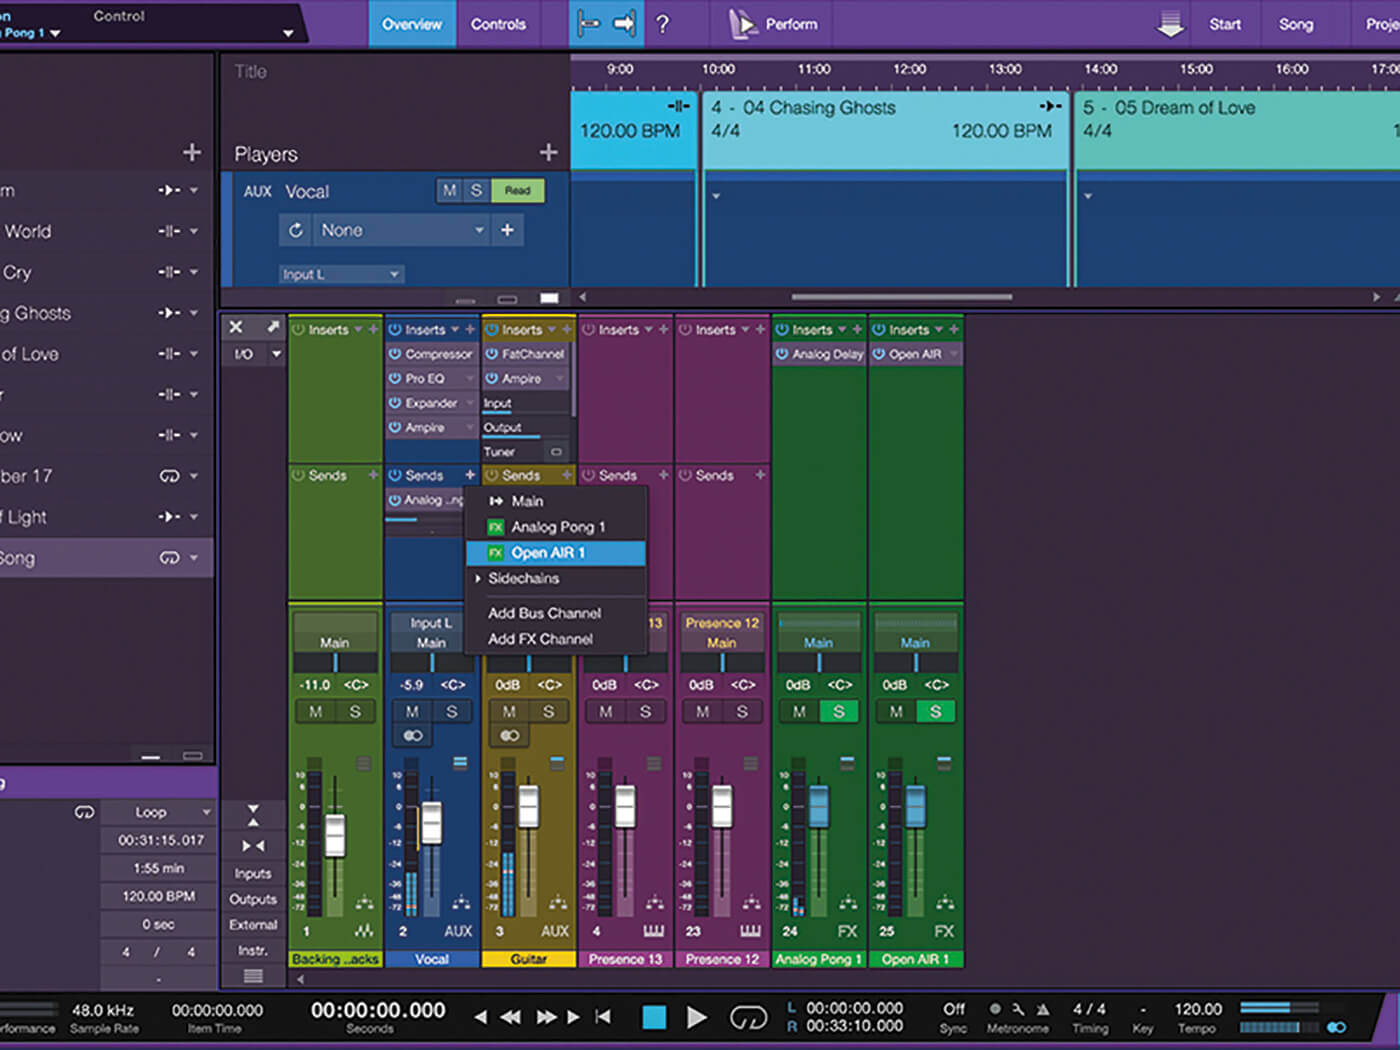
15. Click the + button on the vocal track and select the Analog Pong 1 delay send. Create a send for the Open AIR 1 reverb too. Adjust each to taste via the blue slider in each send. Repeat for the guitar track.
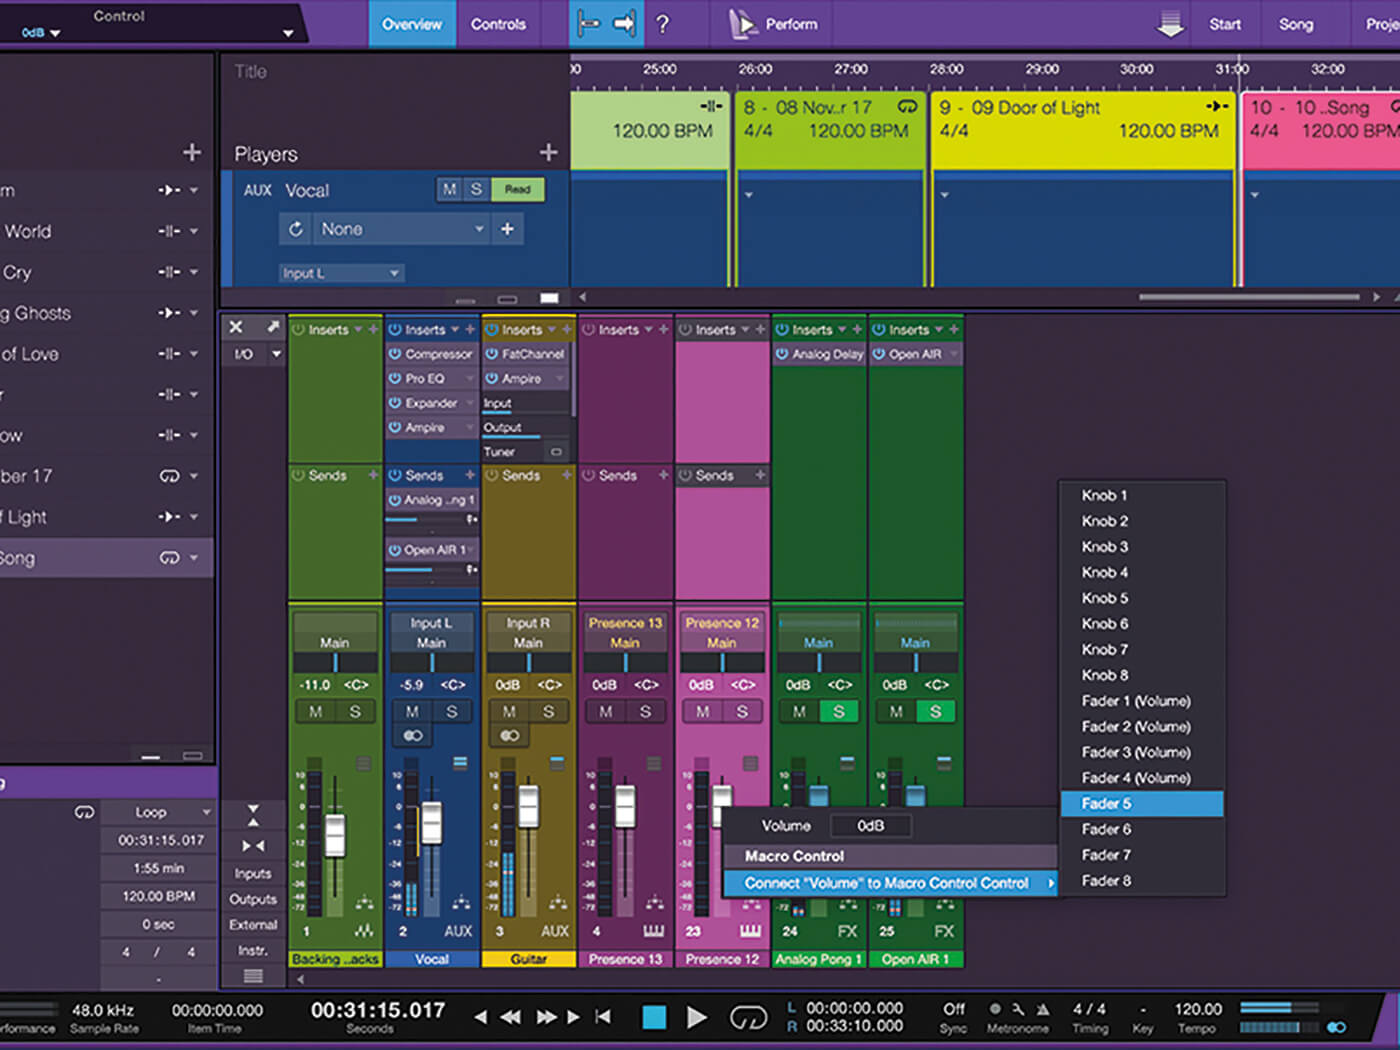
16. Right-click each fader and connect it to a fader in the macro control centre. This will assign it so that each fader can be assigned to and controlled by your MIDI controller. Do this for each player track.
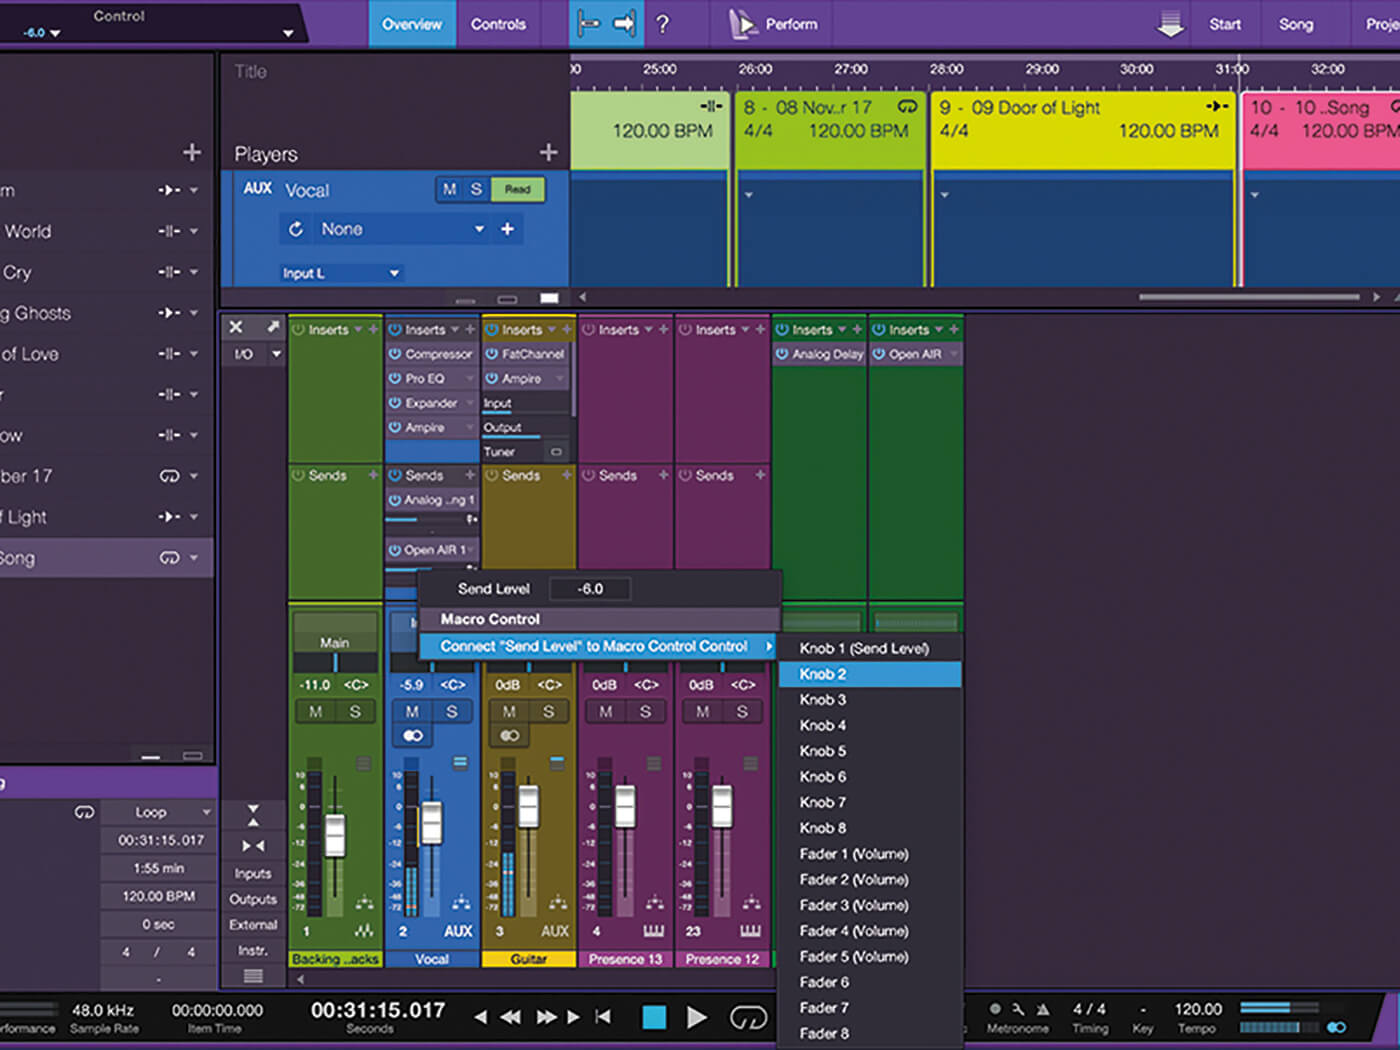
17. Right-click the sliders for each effect send and assign them to knobs in the macro control centre. This will let you connect these send amounts to knobs on your MIDI controller and adjust them live.
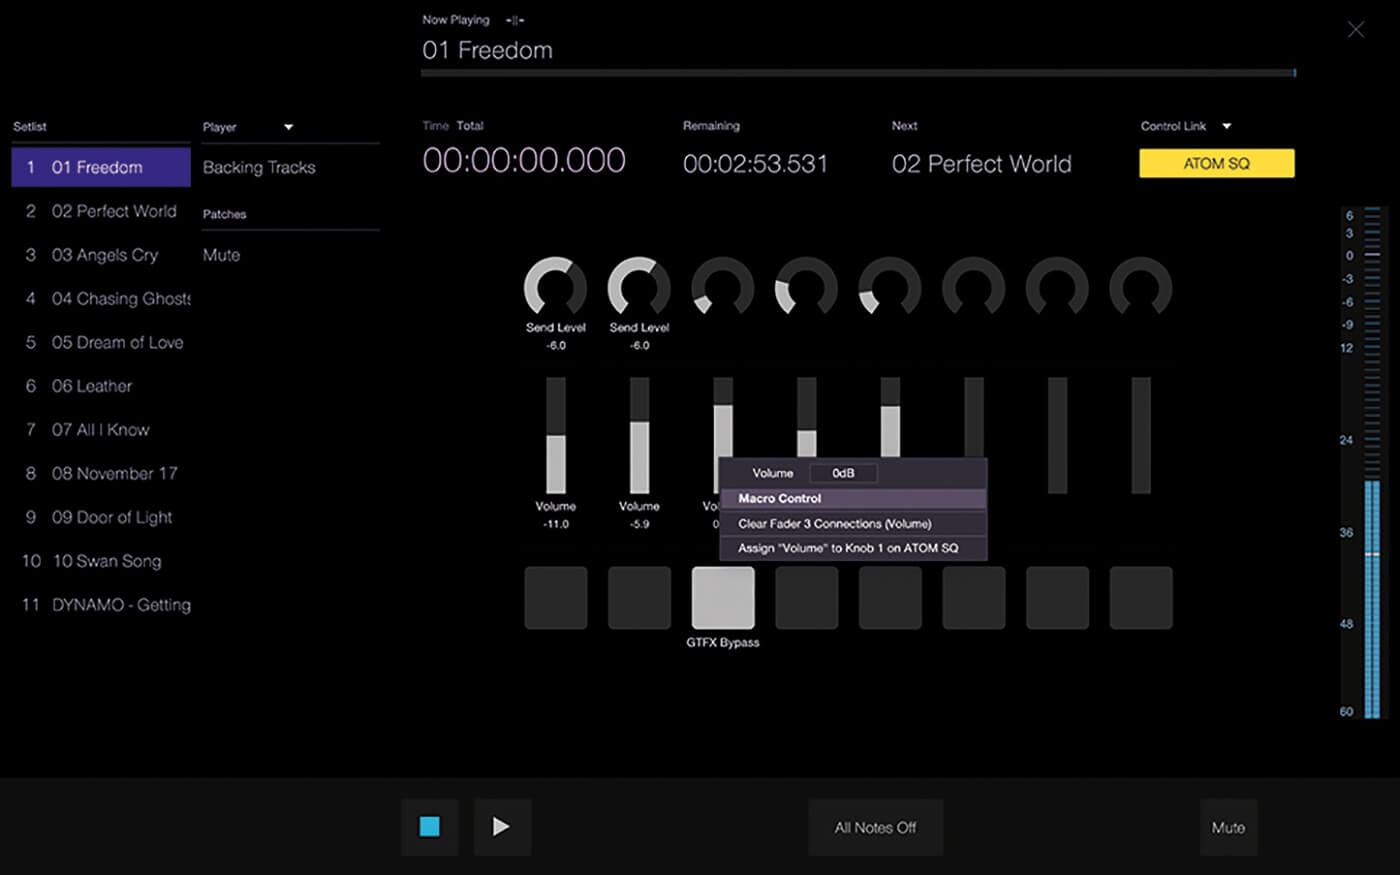
18. Click the Perform button at the top of the Show Page. Move a slider on your MIDI controller, right-click on a fader and assign it to that fader on your controller. Repeat for each fader and your send knobs.
For more PreSonus Studio One tutorials and workshops, check here.