How to record vocals with Studio One
There’s more to recording vocals than sticking a large-lunged singer in front of a mic. You’ll have to consider the microphone type, position and more. Thankfully Studio One has all the tools available to make your voice heard.
In recent tutorials, we’ve walked through the basics of composing, mixing, mastering, and Studio One’s built-in instruments, but there’s an important process that we’ve yet to cover: recording. Let’s spend the next few tutorials helping you better understand how to record using Studio One, from the basics to some intermediate and advanced setups that’ll help get the best out of your drums, guitars, pianos and more. This month, however, we’re kicking off with an instrument a little closer to home: the human voice.
Mic check
To set up and record vocals, you’ll need a microphone. There are many low- and high-quality microphones out there, ranging in price from as little as a tenner to tens of thousands. There are many kinds of microphone, and they all work on vocals, but the four main types to consider are: dynamic mics, condenser mics, ribbon mics and USB mics.
Each of these microphones can handle vocal recordings but, for the purposes of this tutorial, let’s focus on low-cost, high-quality dynamic and condenser mics. For vocals, it’s generally best to use a condenser as they are more sensitive and capture detail and nuance; however, some singers might need to take hold of a mic to give their best performance or might simply want a grittier sound. In both cases, you’ll want a dynamic mic.
Condensers and dynamics typically feature a cardioid pickup pattern, which means the mics mostly pick up sounds in front of the capsule, and reject sounds coming from their sides and rear. Some condensers have options like multiple-pickup patterns (figure-8, omnidirectional and hypercardioid), high-pass filters, and even pad switches to reduce the sensitivity allowing you to record louder sources. These options provide loads of flexibility in the studio.
Experiment. Listen. Choose what sounds the best for each singer.
Studio One set-up
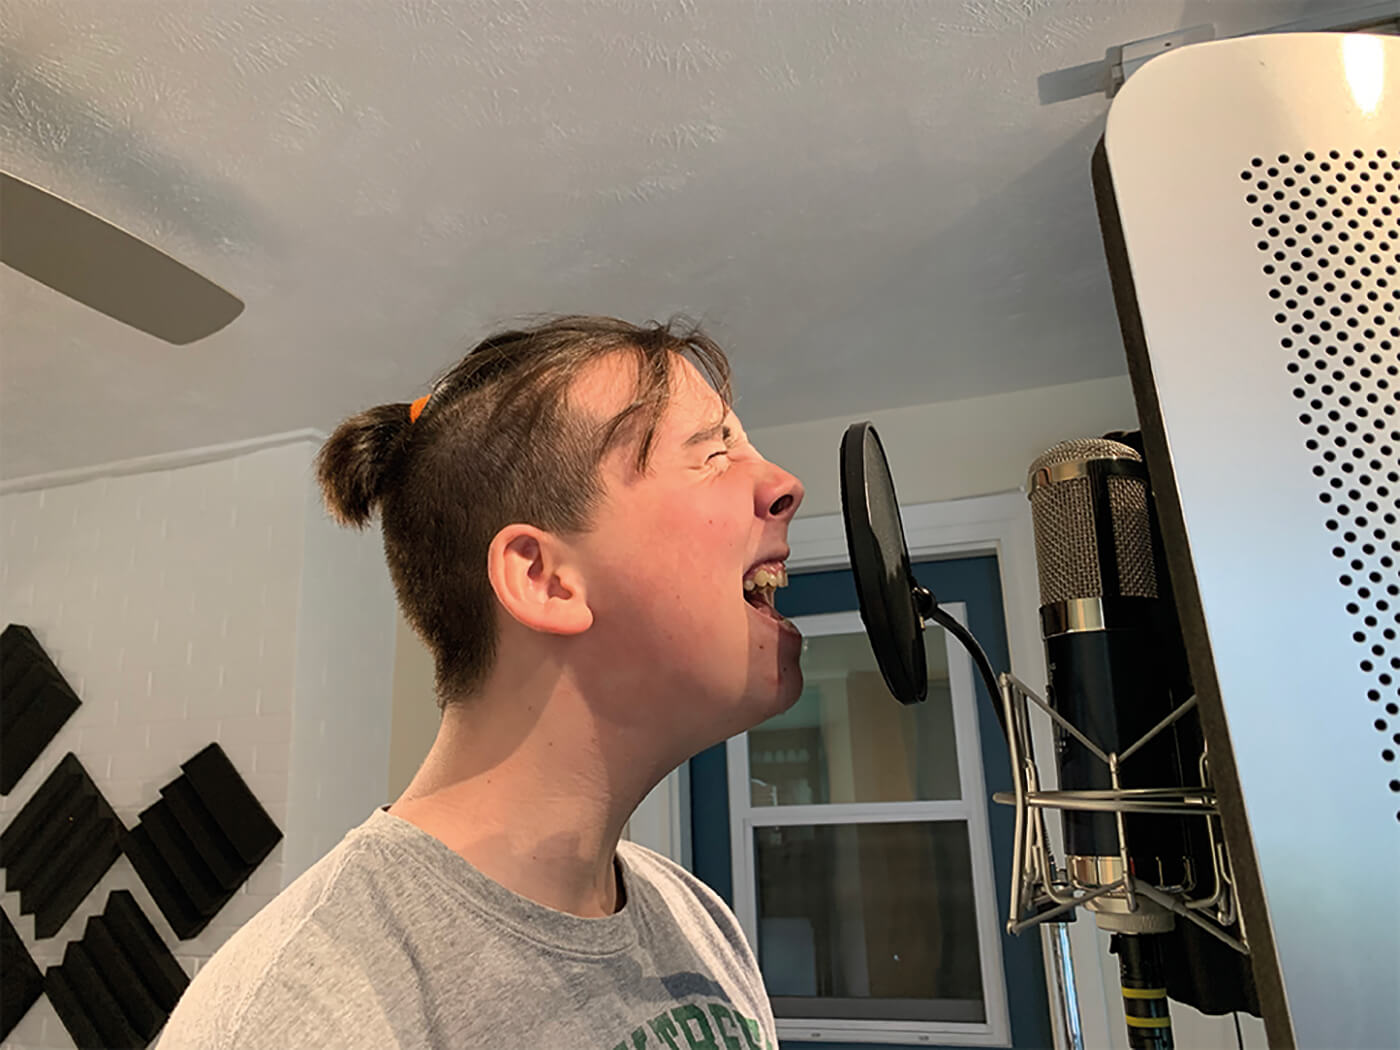
Now you’ll need a solid mic stand and stand mount. Stand mounts are available in a variety of shapes and sizes. The best option is a suspension mount, which should minimise noises coming from the mic stand itself. You’ll also need a pop screen (known also as a pop filter) to reduce plosives such as P and B sounds, which sound terrible and can ruin otherwise excellent vocal performances, and to stop spit from hitting the mic. Fix your pop shield approximately five inches from the front of your microphone.
Connect your mic to an audio interface and feed your signal into Studio One. Having someone sing through a song or just practise scales or warm-ups while you make adjustments will help when it comes to setting the gain of your mic at the interface. Once you’re satisfied that the input levels aren’t peaking at the preamp, it’s time to get into Studio One.
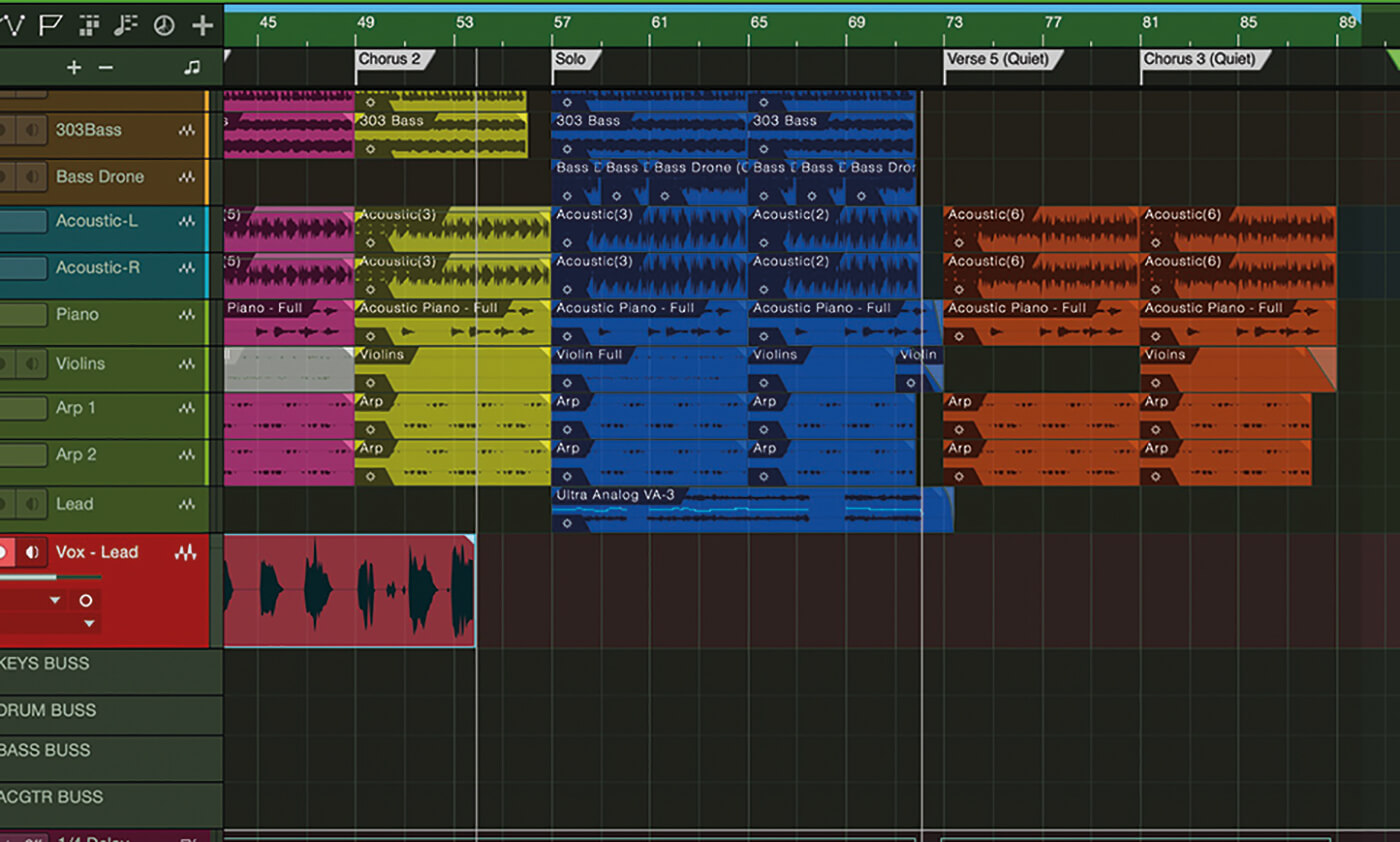
Studio One’s varied toolset should help you get 90 per cent of the way towards great vocal recordings. Open the DAW and create a new audio track. Switch it to mono and label it ‘Vox – Lead’. We can choose a preset at this stage, too. PreSonus provides some excellent starting points for vocal tracks and allows you to get started quickly. Just tweak to taste!
Vox pop
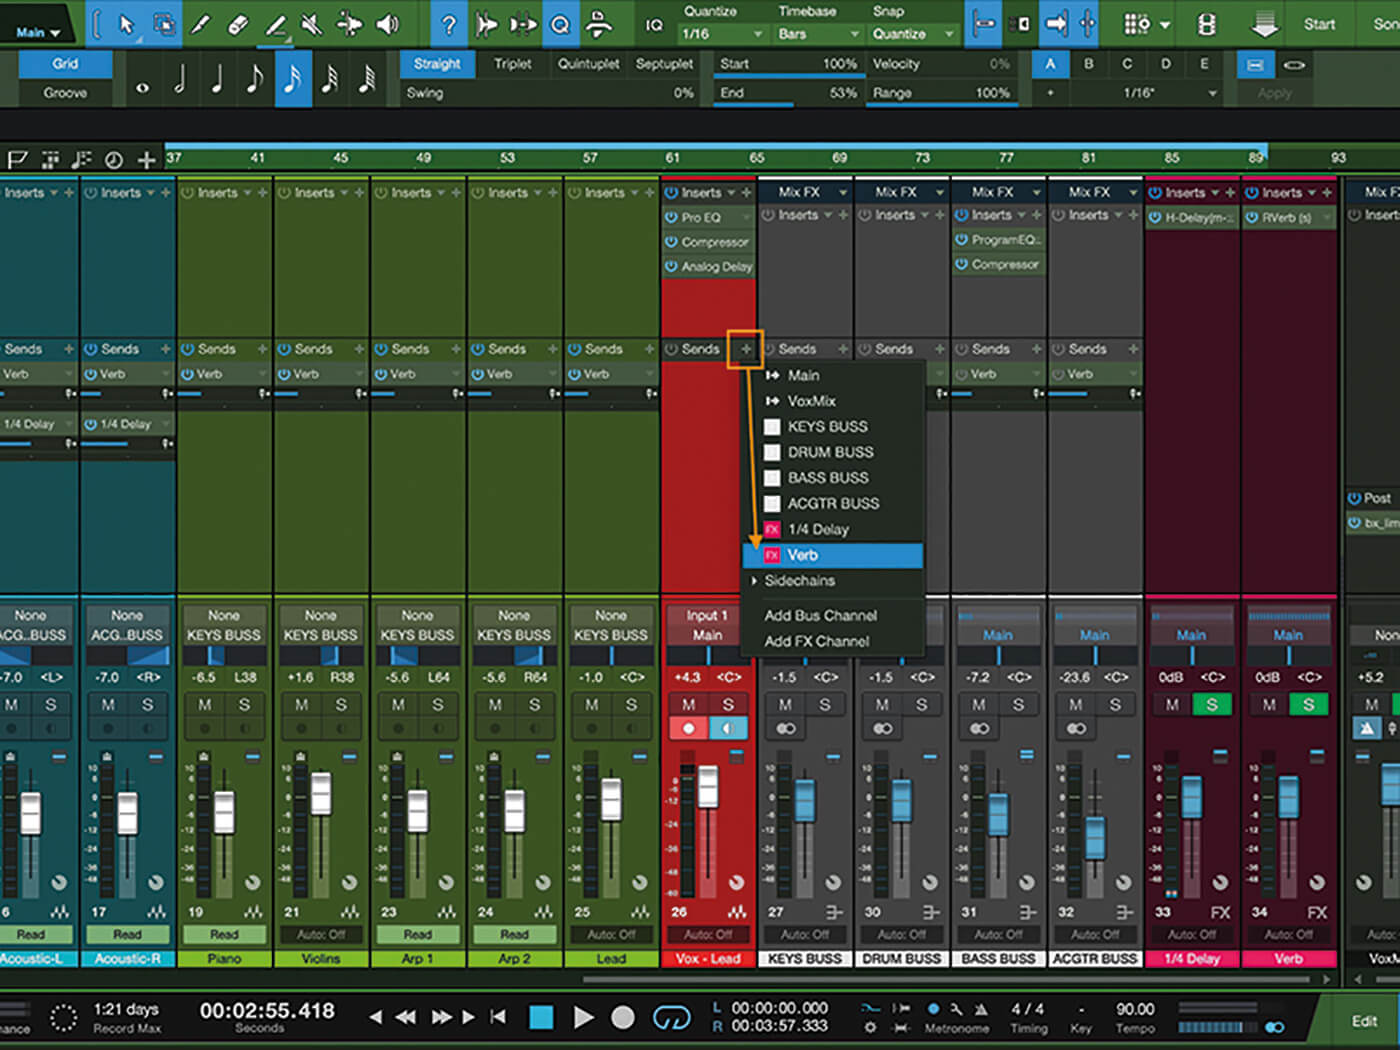
Before recording, make sure your vocalist has a good headphone mix. In Preferences > Song Setup, add a new stereo output and name it. Tick the Cue Mix box next to the output name, creating a Cue Mix in the mixer. Now go to the mixer and you’ll see cue sends at the bottom of each channel. Their faders will be set to the same mix as the channel faders. Moving these sliders will unlock them and allow you to change the mix if, for example, the singer wants less drums and bass and more guitar in their headphones. Changing cue-mix faders adjusts the level of each track in the headphones, while your mix remains the same.
Click the outputs toggle to open the headphone output. Here, you can turn on and adjust the volume of the headphone mix or turn on and adjust the click for the headphones only. You can also add a reverb send to the vocals if your vocalist needs some sweetening in their headphone mix.
With a suitable headphone mix, make sure the performer is positioned properly. The mic should be 6 to 10 inches away and at least 2 to 3 inches above the singer’s mouth. User your ears and see what sounds best. And always be in record – even for rehearsals. You never know when a singer will strike gold.
For backing vocals, try a different microphone or rotate the mic’s axis. This can change the tone enough to keep the lead and backing vocals from competing for acoustic space.
For group vocals, try a figure-8 or omnidirectional mic setting. With omni, you can have singers circle the microphone. Experiment with moving louder vocalists further from the mic and softer singers to the fore. For figure-8, have singers in front of and behind the microphone and experiment with distancing.
These are just the basics of vocal recording. Experiment. See what works for you.
Recording vocals with Studio One: step-by-step
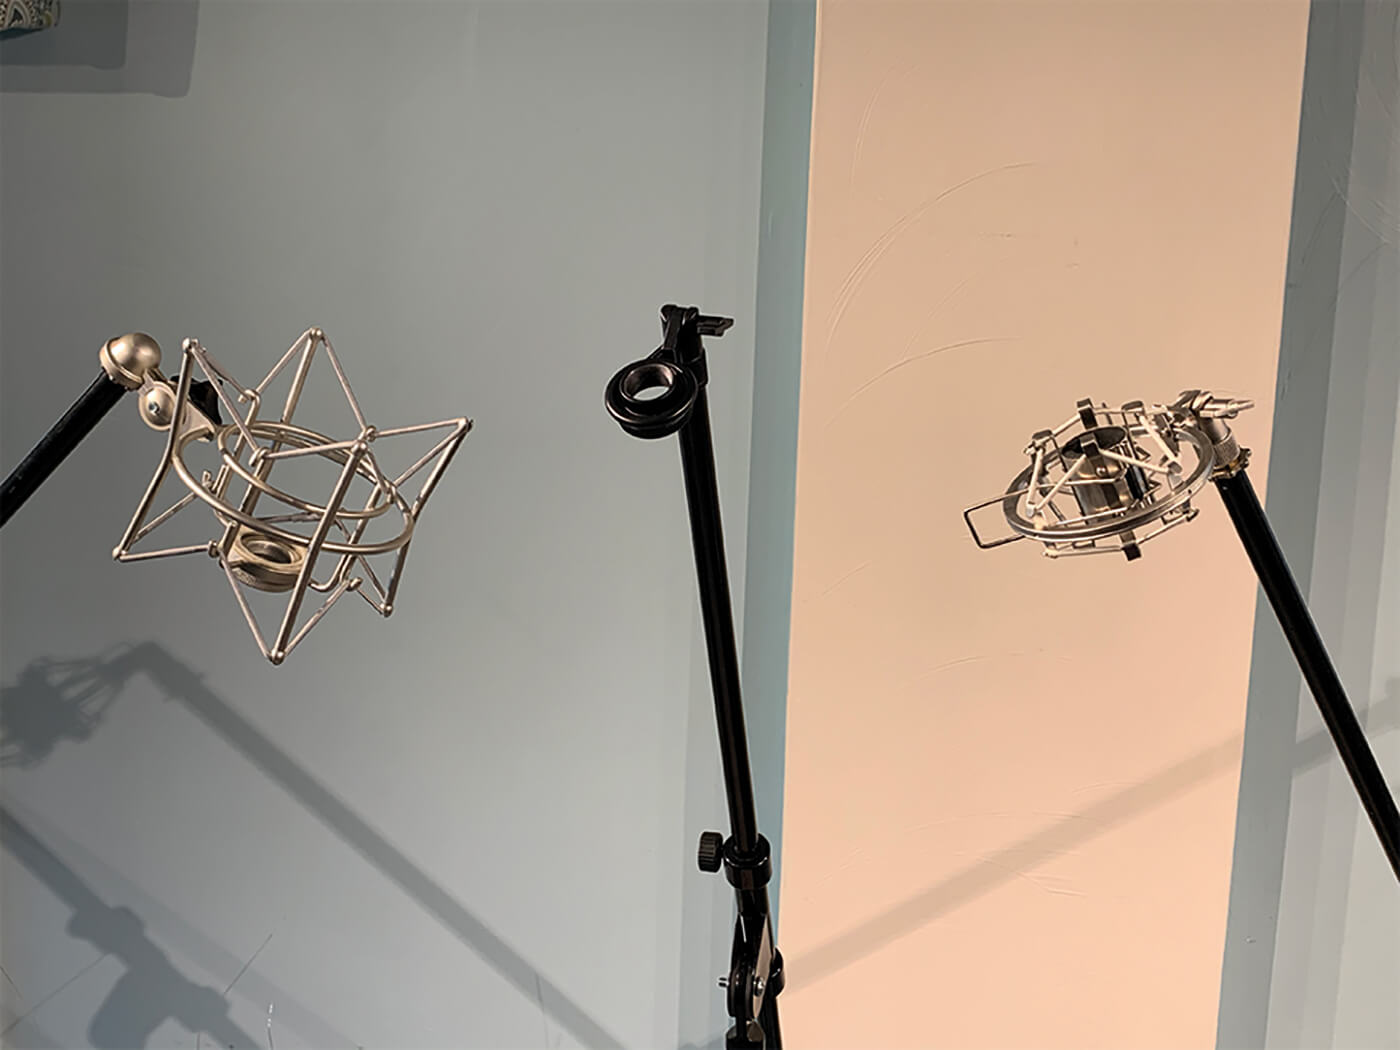
1. Before beginning a session, make sure your mic is attached securely to a mic stand using a microphone stand mount. Suspension mounts such as (a) and (c) are the best options.
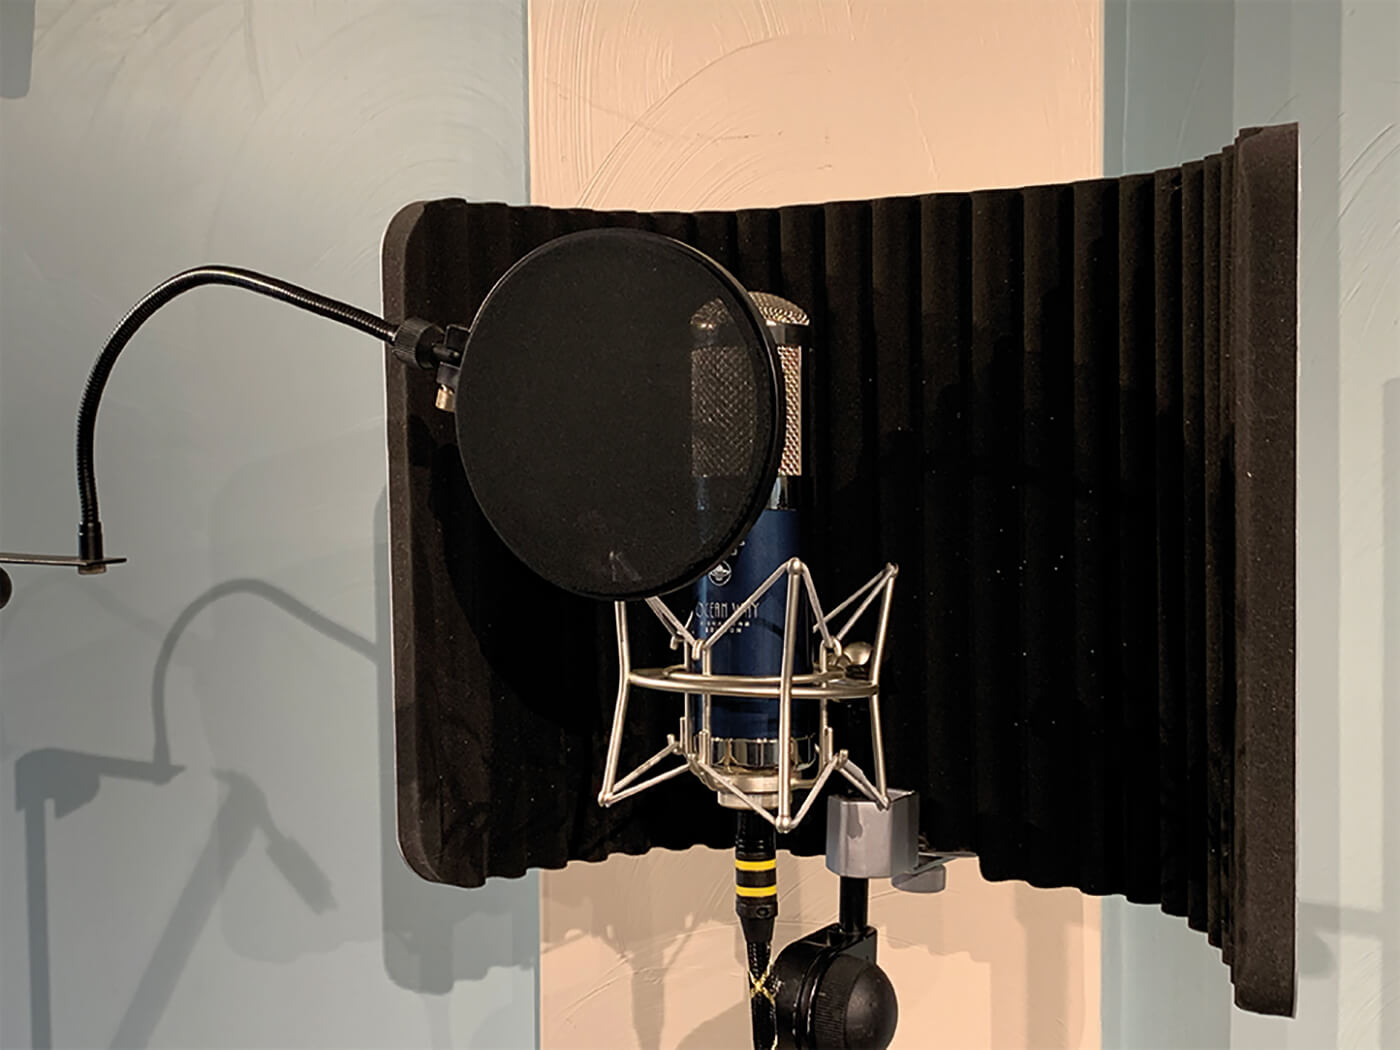
2. Place a pop shield in front of the microphone and, if there’s too much room noise, place a reflection filter behind the mic.
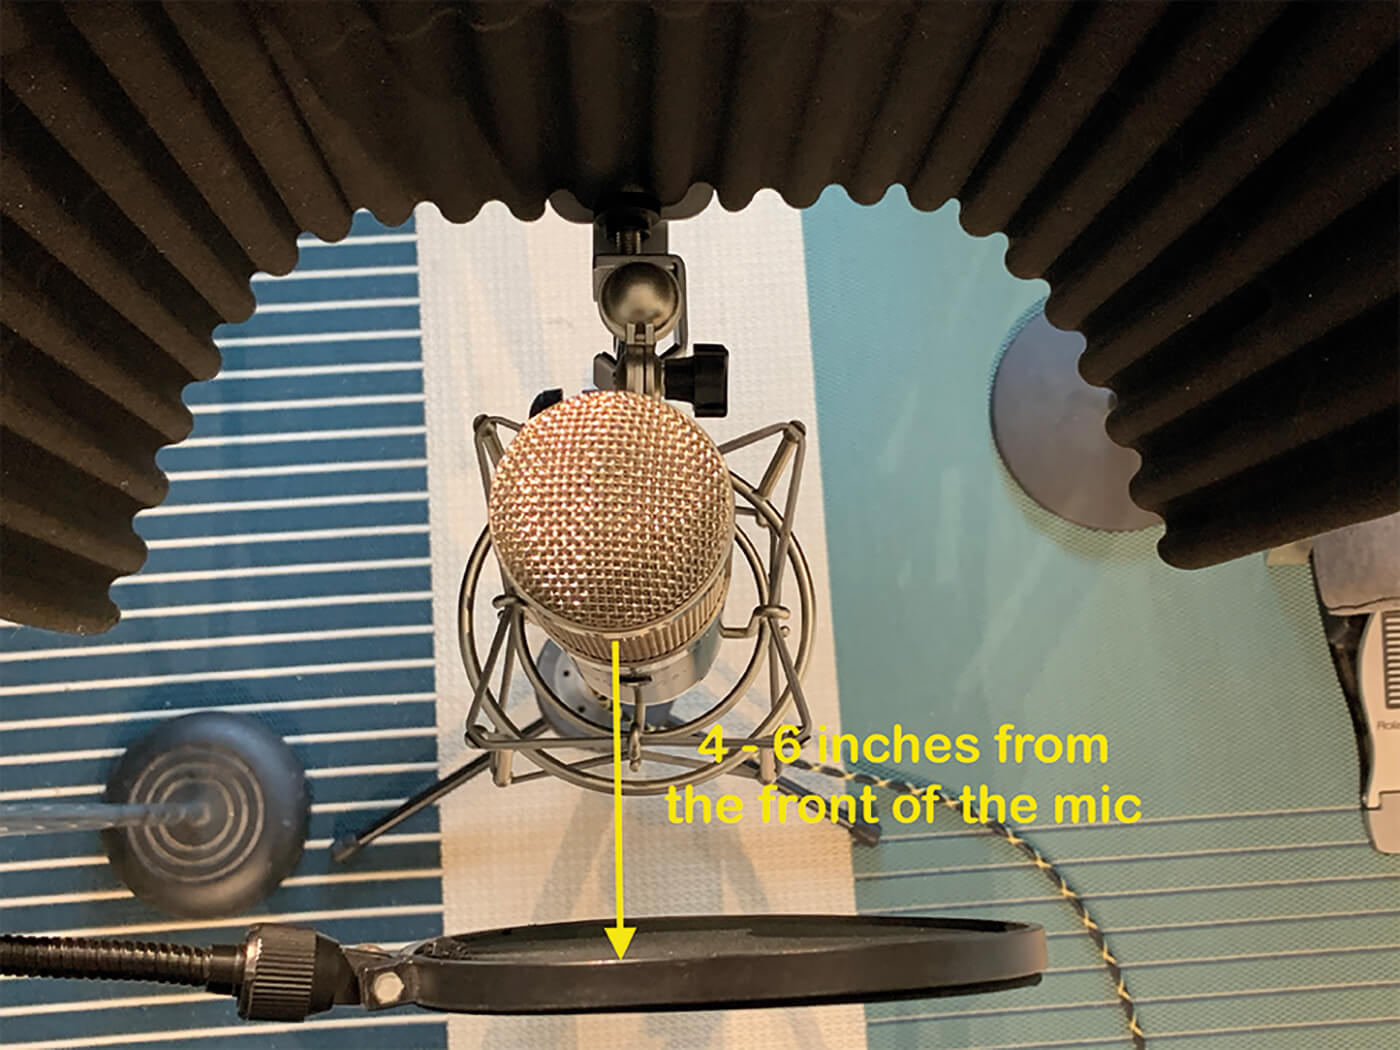
3. Place the pop shield about five inches from the microphone capsule, which should keep plosives and saliva from sullying your recording.
4. Position your vocalist between one and six inches from the pop shield, depending on the amount of room tone you want in the recording. The further they are from the mic, the more of the room you’ll record.
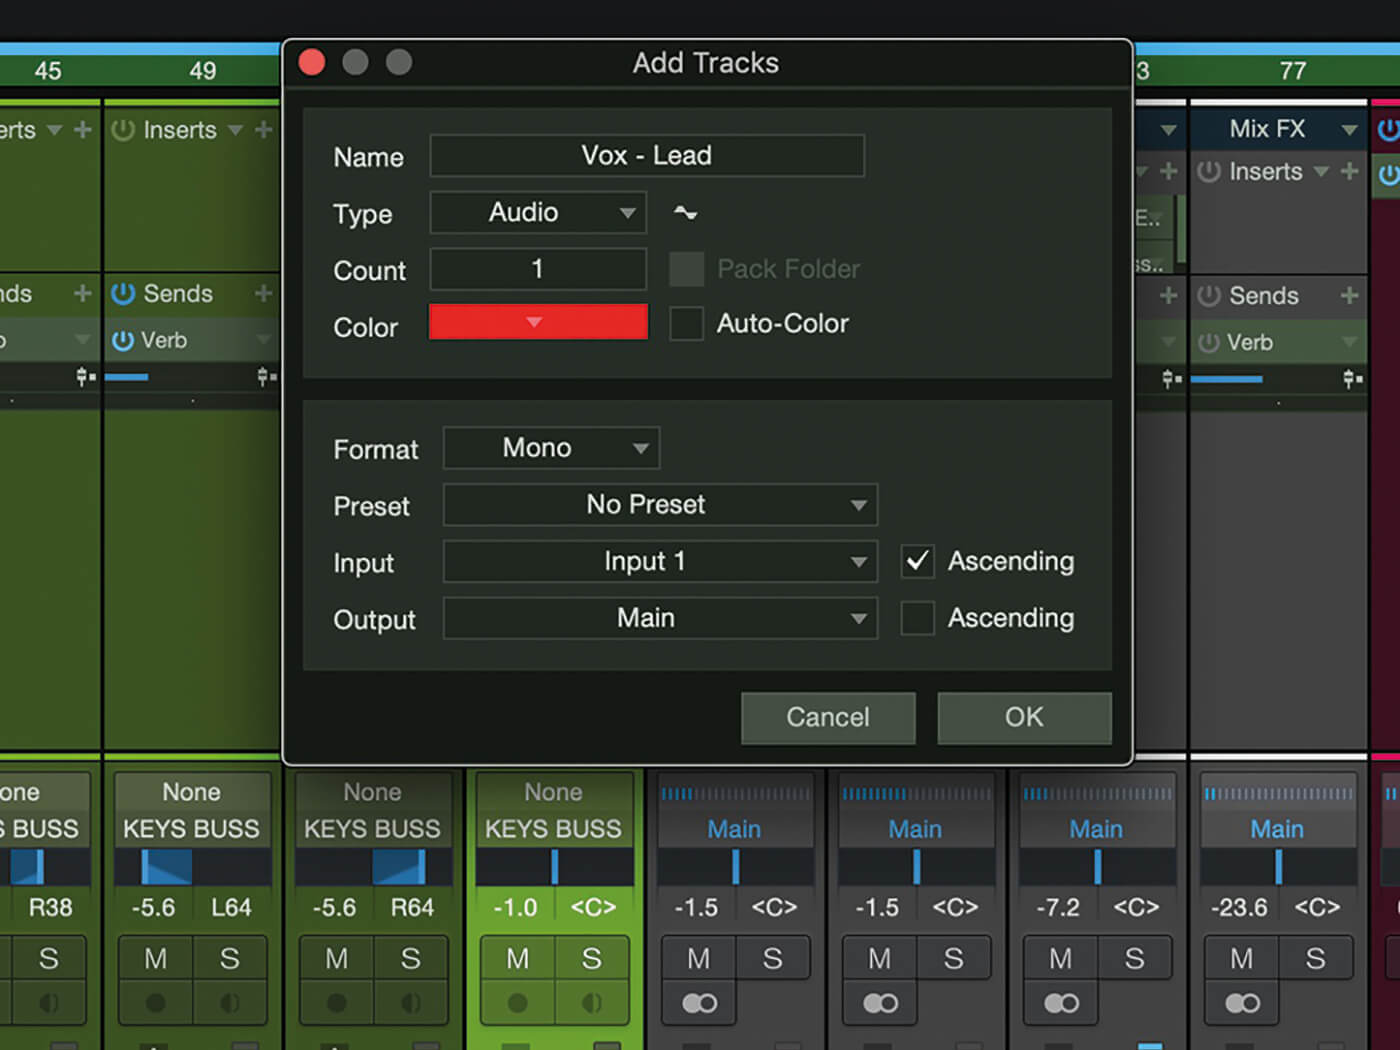
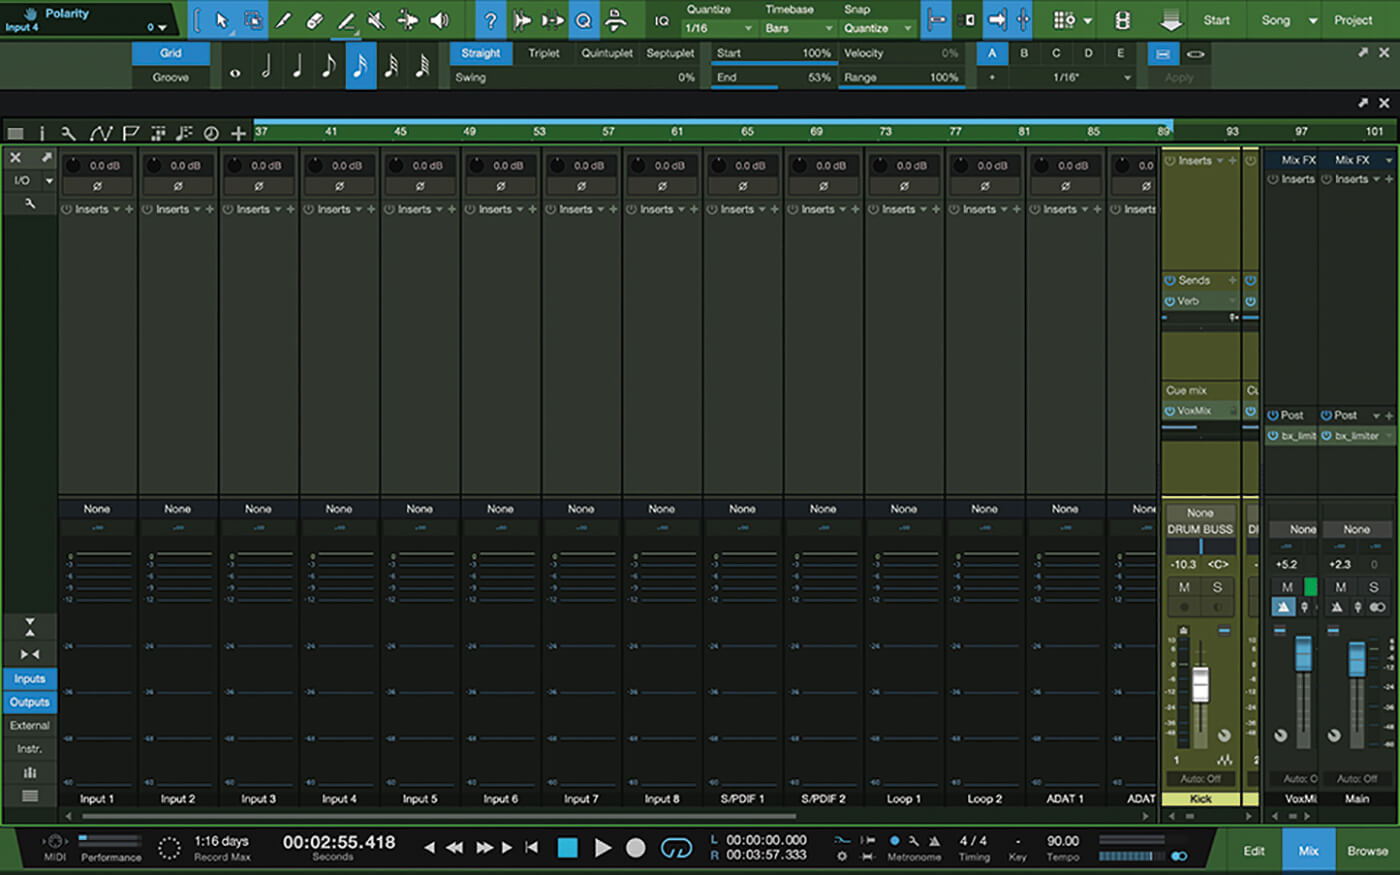
5. Open Studio One and create and name a new mono audio track. You can also choose a track colour, preset and input at this stage.
6. Studio One’s presets offer a helpful leg-up for everything from instrument channel strips to mixing and mastering chains.
![]()
DYNAMIC MICROPHONES There are innumerable high-quality dynamic microphones on the market, making it difficult to know where to start. Excellent choices include industry standards such as the Shure SM58, the Sennheiser e835, the Electro-Voice RE20, and the Miktek PM9. These dependable mics should be within the reach of most budget-level recordists.
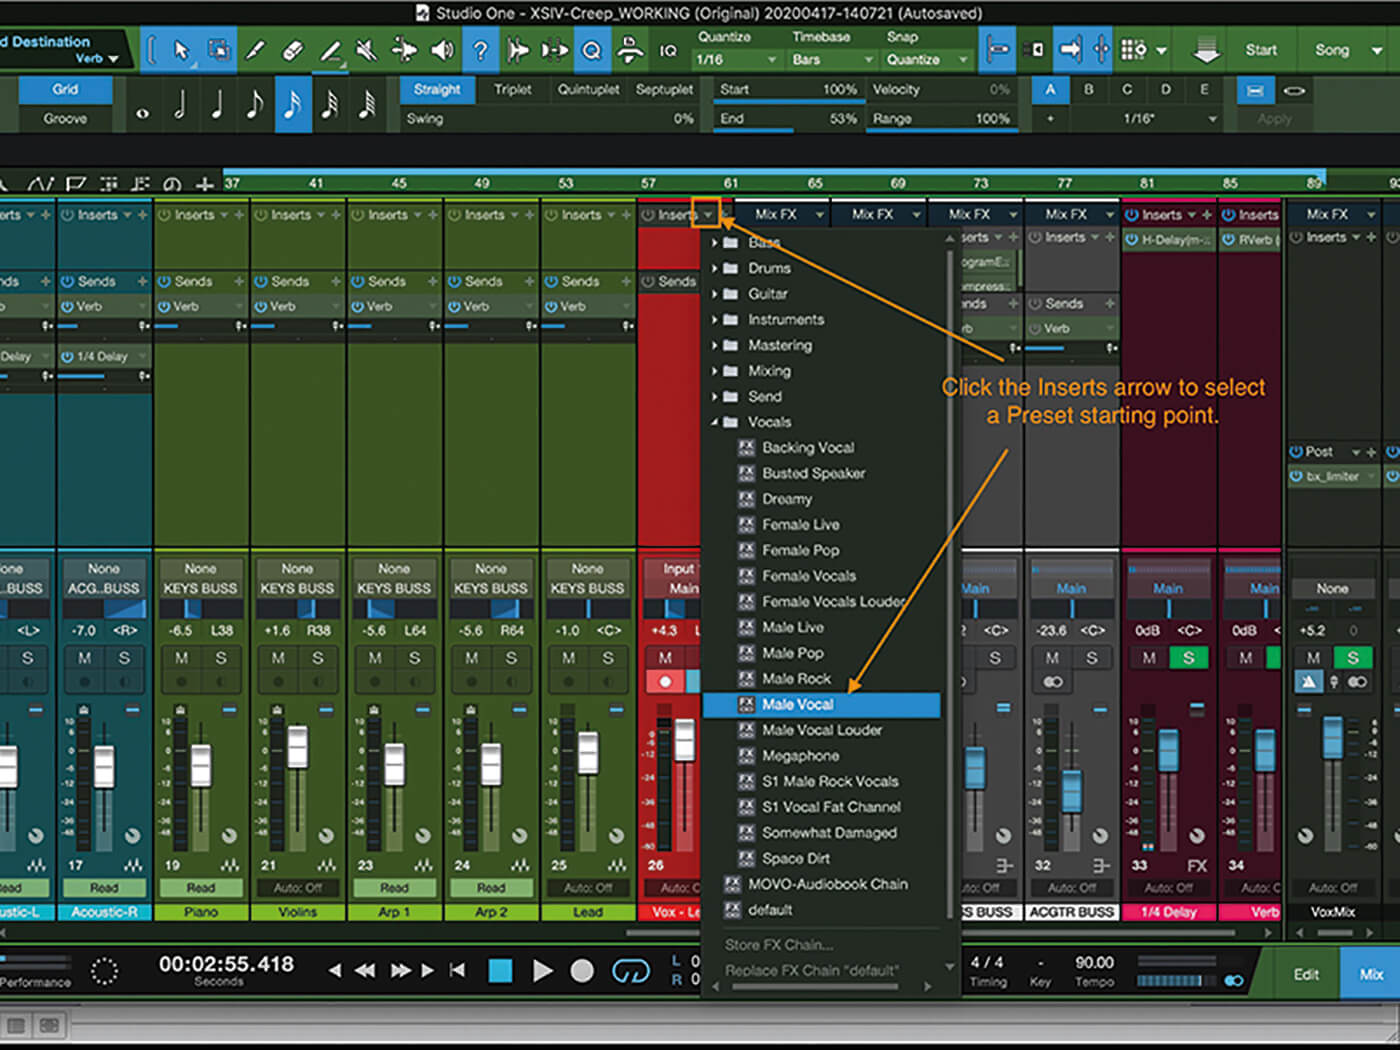
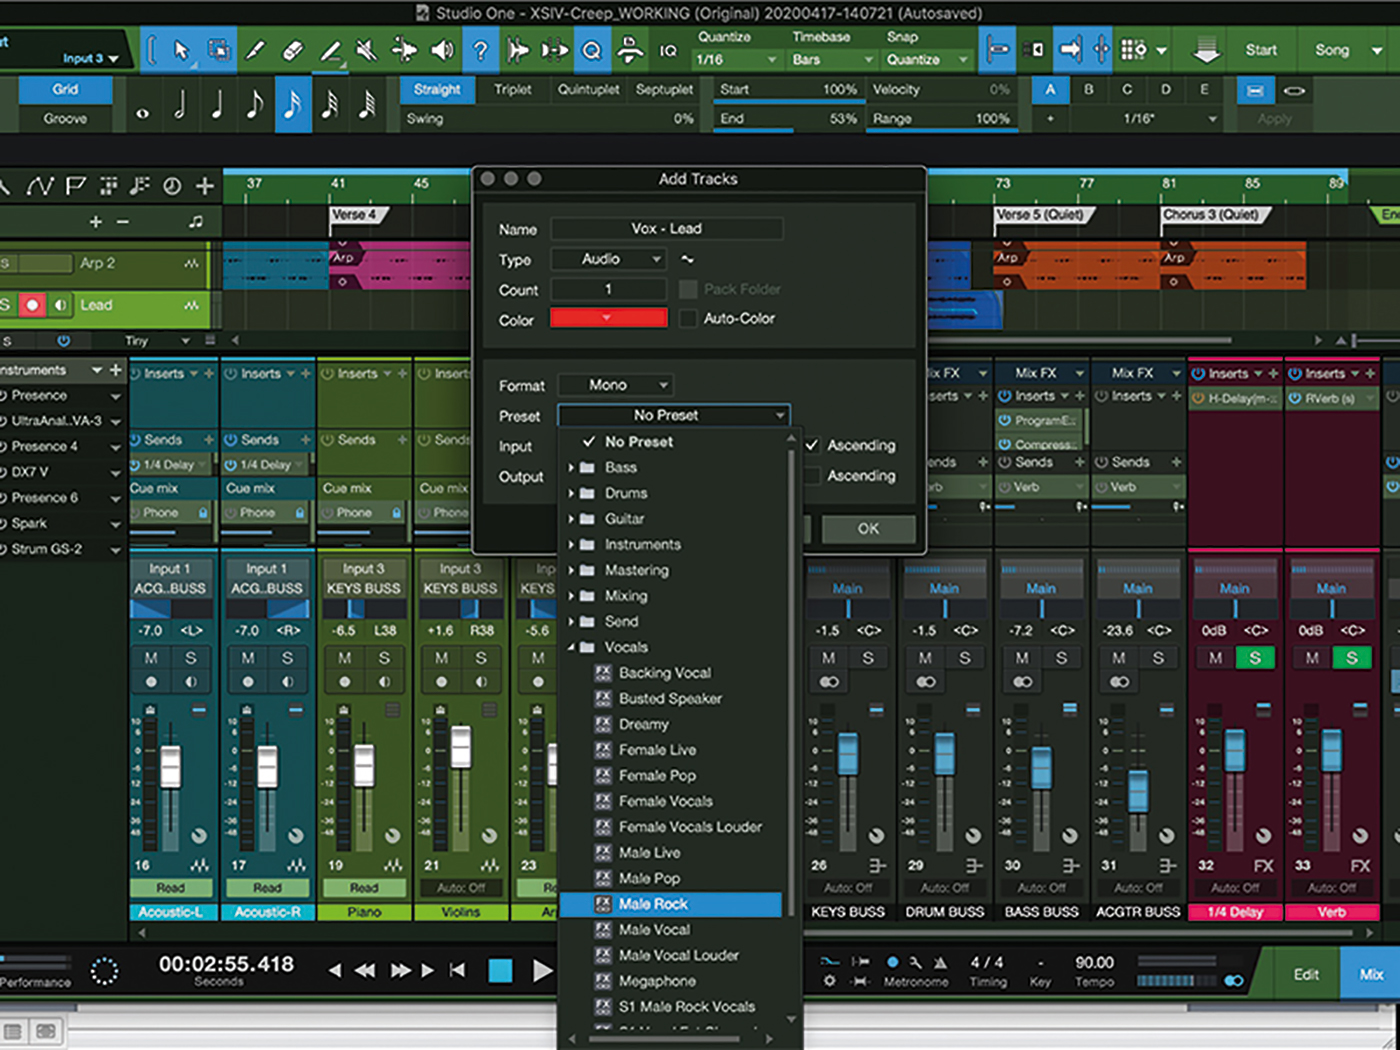
7. Once you’ve created your track, select the Inserts drop-down and choose a preset.
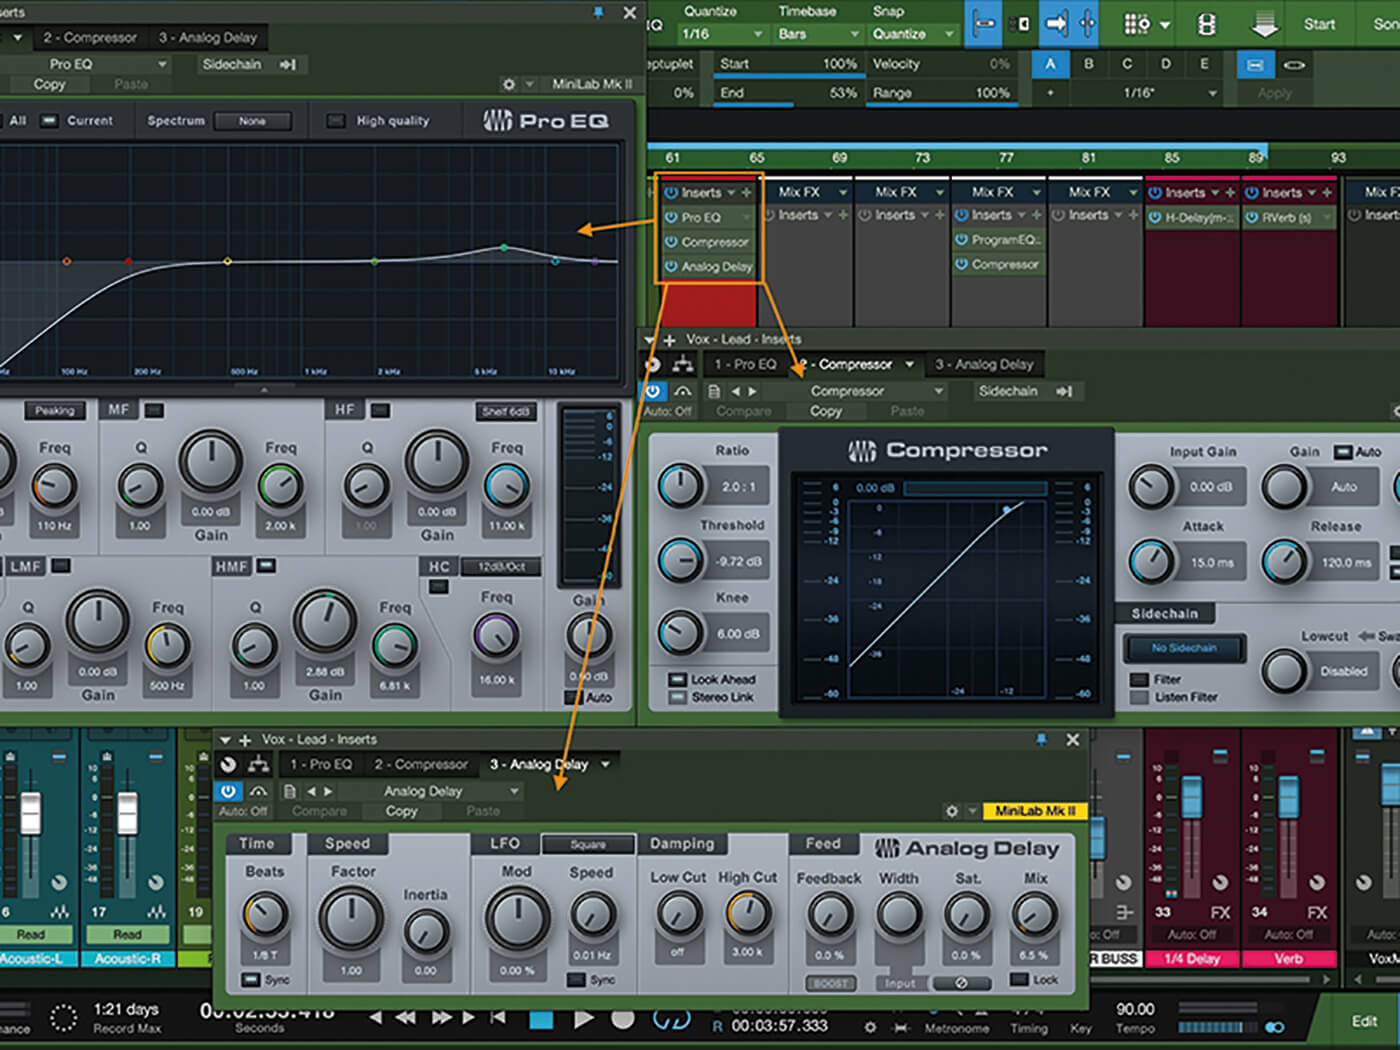
8. A preset inserts a processor chain into the inserts section, with settings already applied. Pick one of these and tweak them to fit your vocalist.
9. You might want to record your vocals with effects such as compression. You can do so by adding the effect on the Input. Click the Inputs button to get there.

10. Adding effects here will print your vocals with effects – you won’t be able to change them later unless you re-record them.
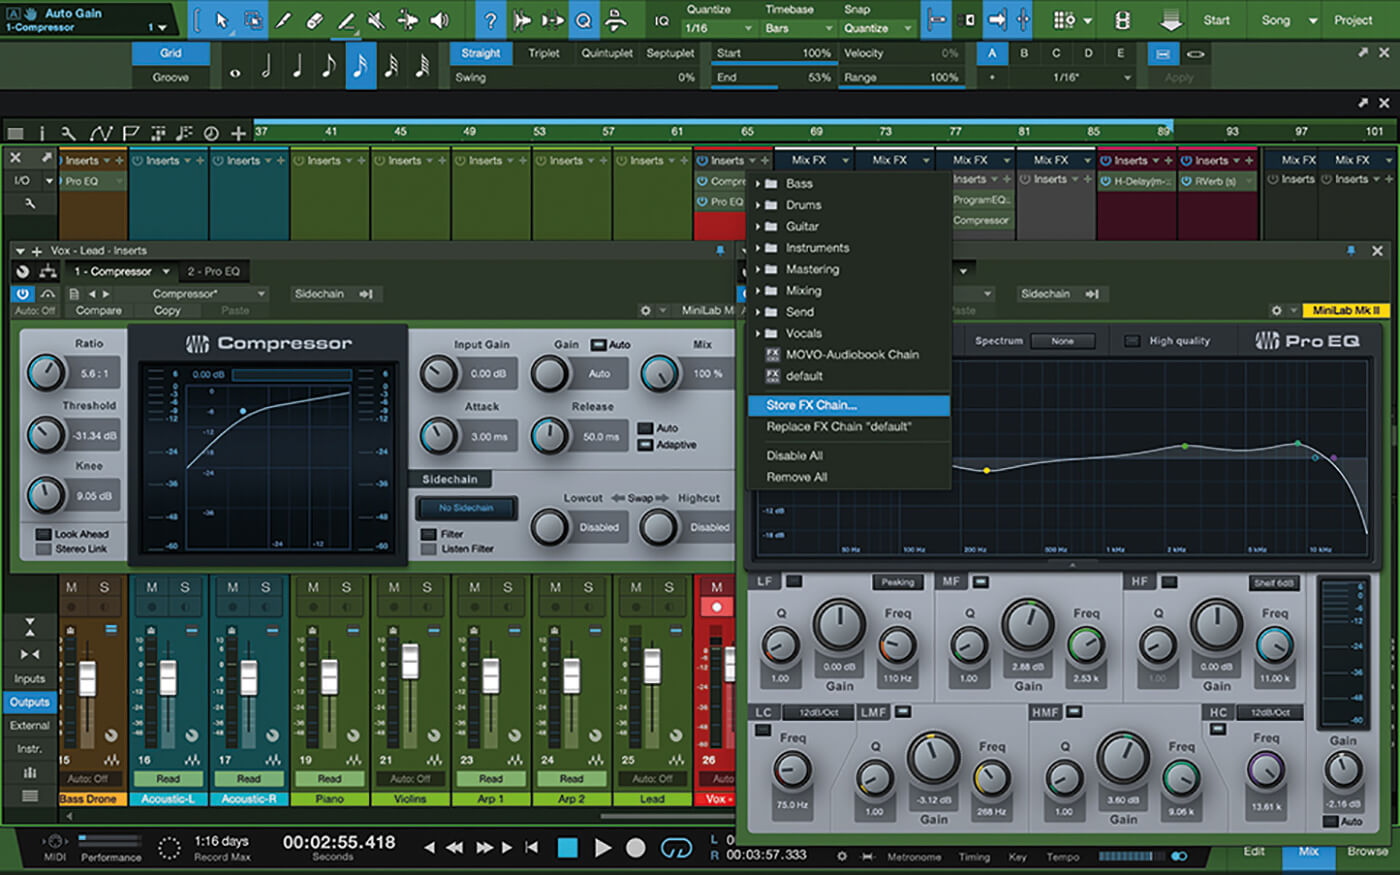
11. Once you’ve tweaked any effects on your track (or input), store the effects chain, which will allow you to easily recall it later. Click the drop-down arrow and select Store FX Chain.
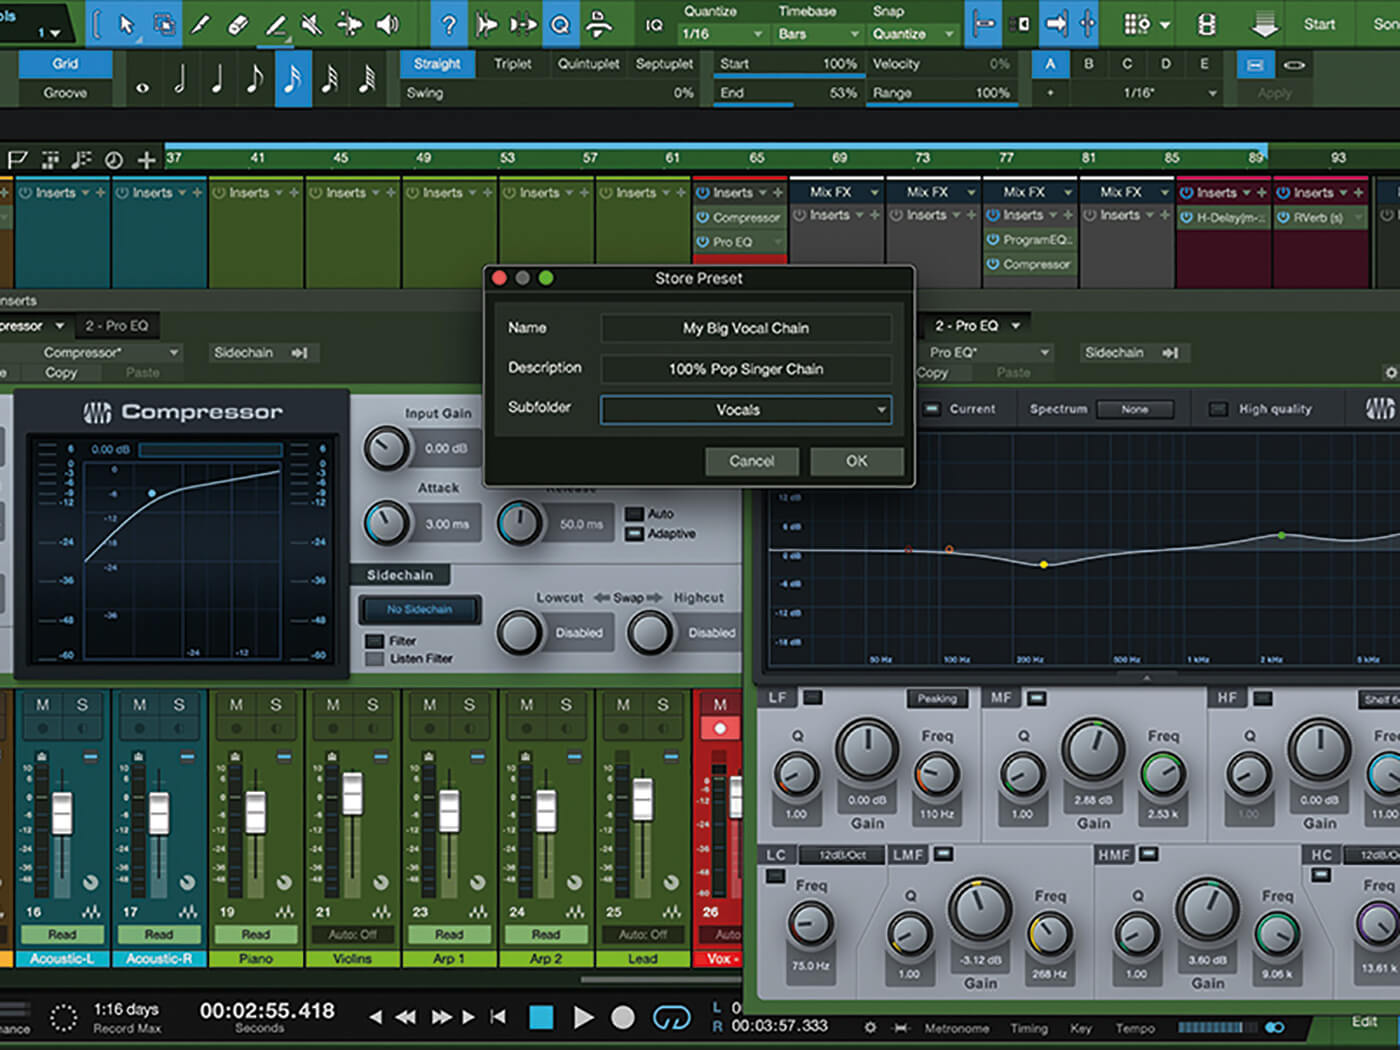
12. Here, name your preset, give it a meaningful description to help you remember its purpose, and pick a subcategory to make it easier to find.
![]()
CONDENSER MICROPHONES
As with dynamic mics, there are many reliable and reasonably priced condensers out there – but many of them will land you in the poor house. Top-notch options include Røde’s NT2-A, the Aston Origin, Blue’s Baby Bottle SL, Neat Microphones’ King Bee, and Warm Audio’s WA-47jr.
13. If your vocalist wants some reverb in their headphones, add a send to the vocal chain. This isn’t recorded directly, so the original vocal will remain dry, meaning you can still apply effects later.
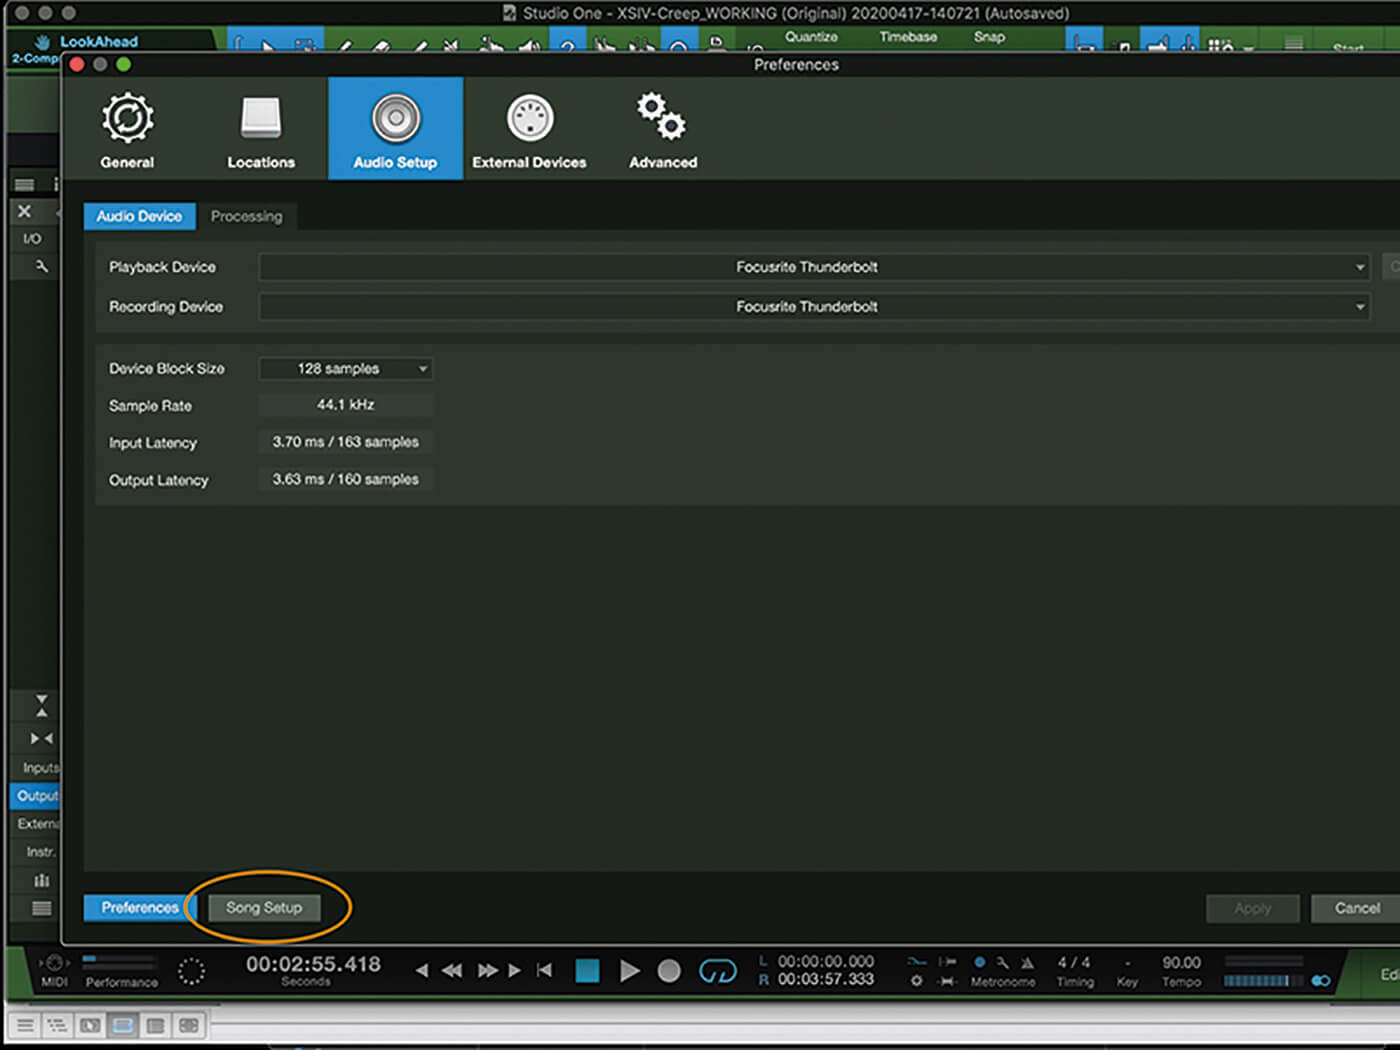
14. Create a cue mix so the vocalist can hear in the headphones. Go to Preferences, then Song Setup.
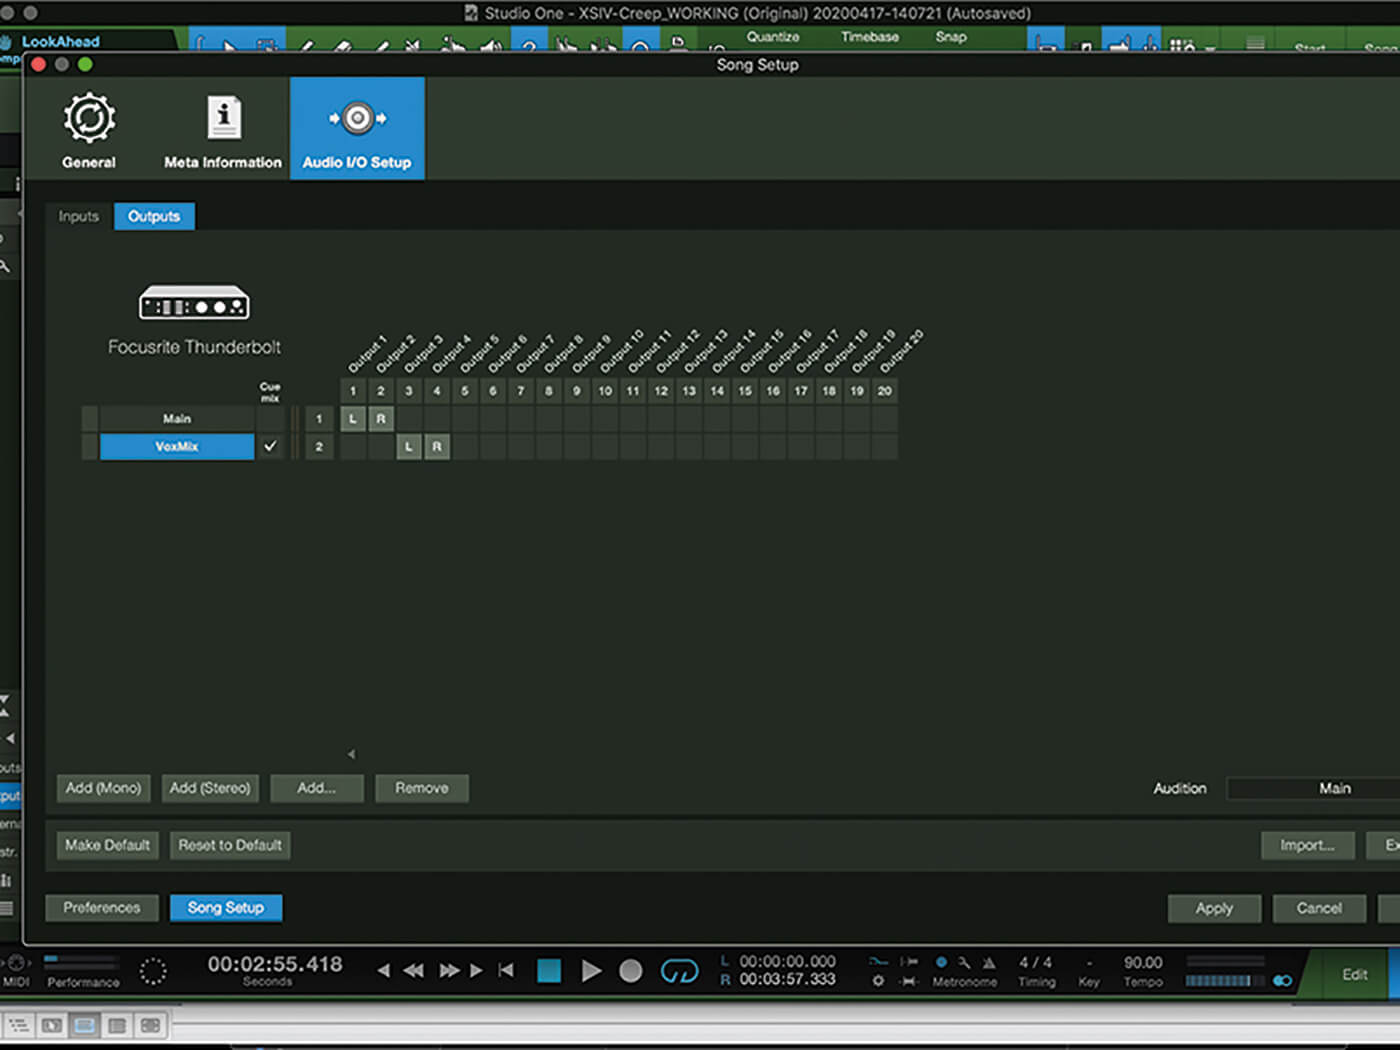
15. Click the Output tab, add a stereo output and rename it something like ‘Vox mix’ or ‘Headphones’.
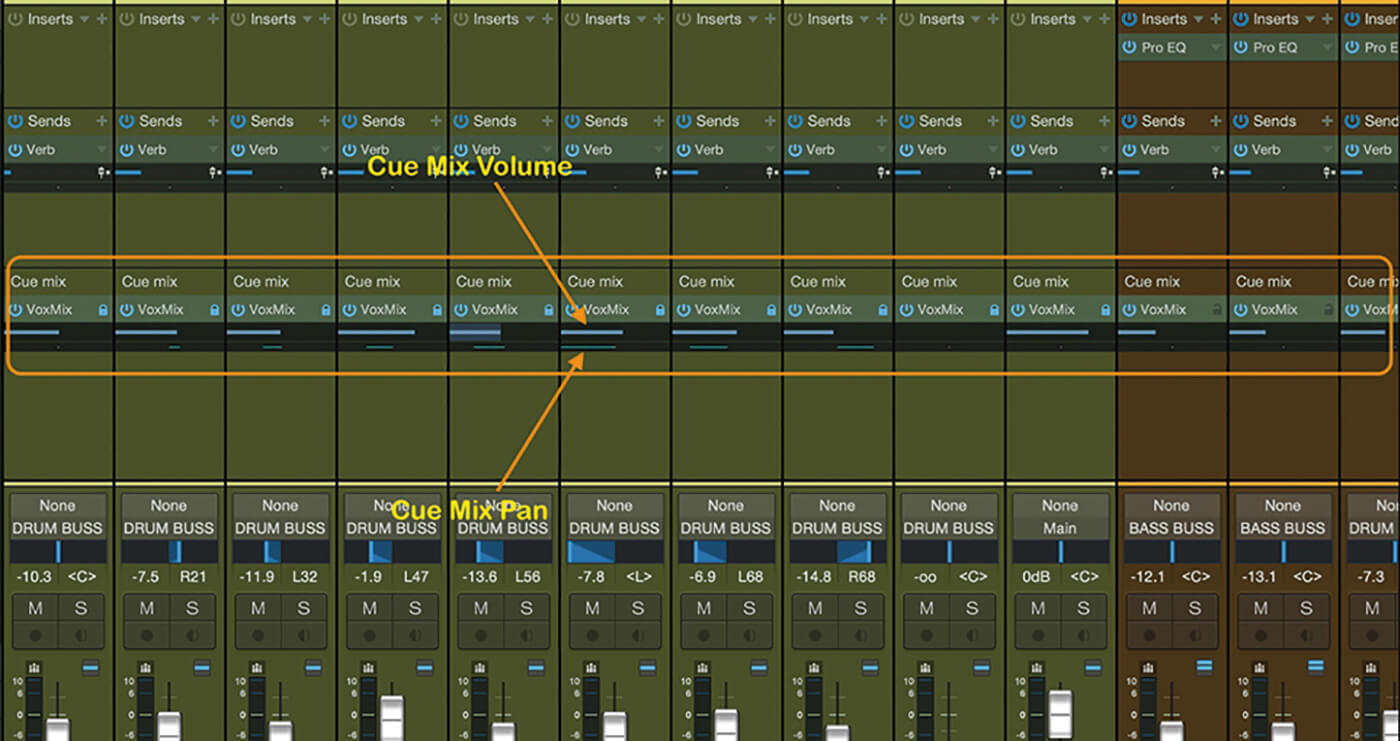
16. Revisit the mixer and you’ll see the vocal mix listed on each track under the Cue Mix label.
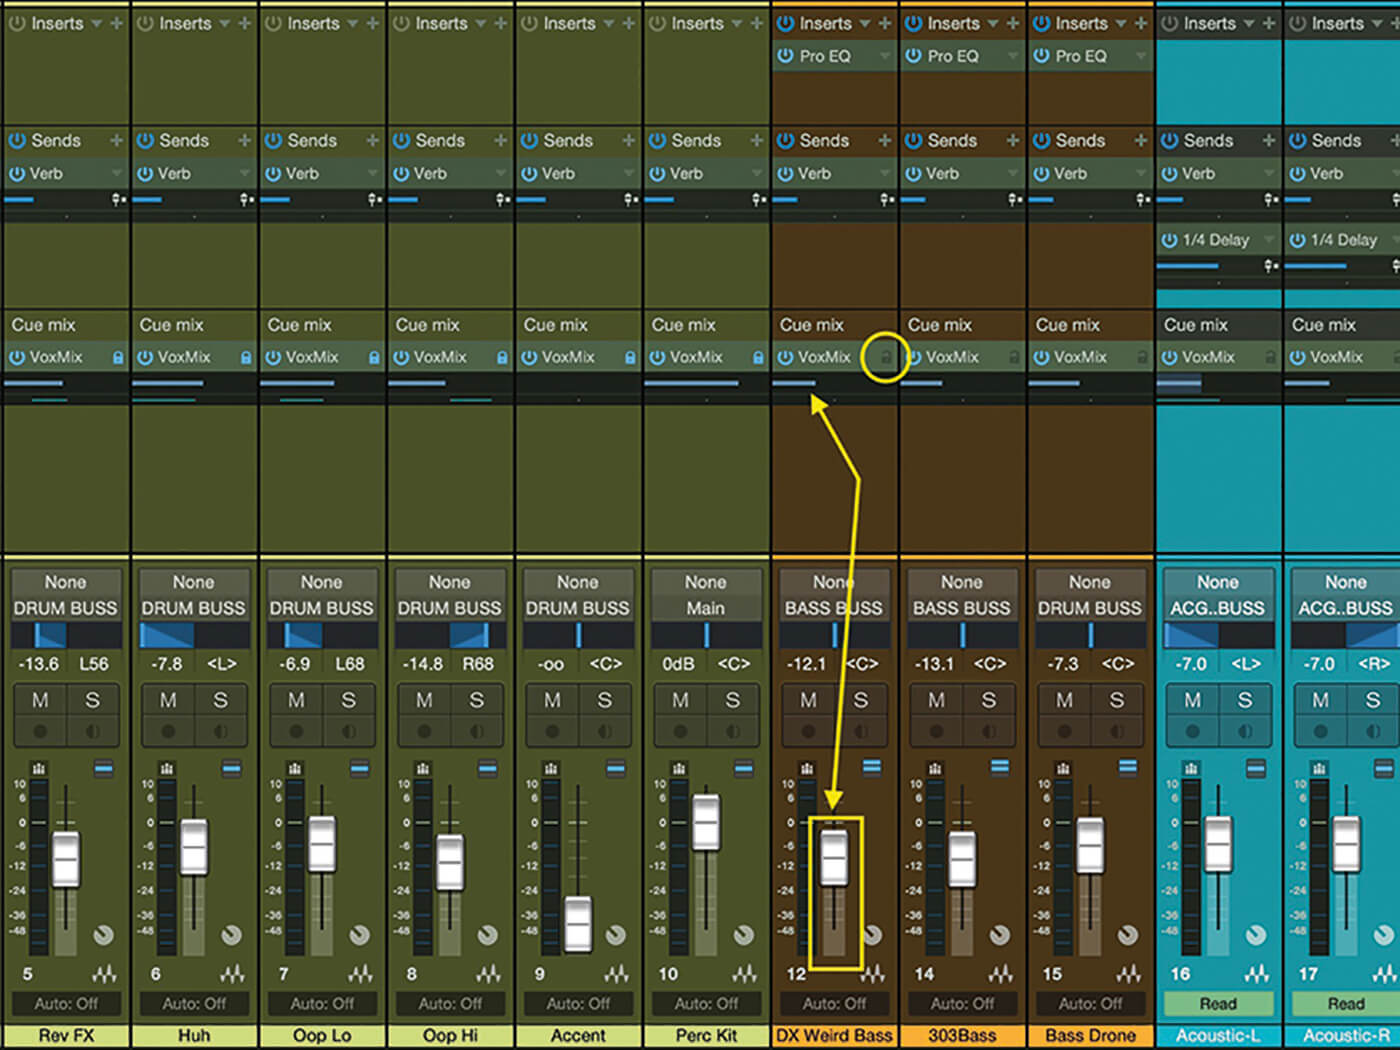
17. Initially, the cue mix volume will be the same as the main fader for each track, but adjusting them will change the headphone mix without changing the main mix.
18. Hit record. Make sure that you’re getting a good level, and that your recording isn’t peaking. If it hits the red, you’ll be in for some unwelcome digital distortion.
For more PreSonus Studio One tutorials and workshops, check here.