Getting the best from Presence XT in Studio One
With a few adaptations, Studio One’s in-built Presence XT sample player instrument can be utilised as a powerful sampler in its own right.
Continuing our look at the built-in instruments in Studio One 4.6, it’s time to turn to Presence XT. At first glance, it looks like just a sampler player… and it is; however, looking a little deeper (and with the right key) we can find some powerful tools that will turn Presence XT into, essentially, a highly usable sampler.
Let’s start with the most obvious use for Presence XT. PreSonus includes a sizeable Presence XT Core Instrument Library for Studio One Professional 3 and 4 users. For Studio One Prime and Artist owners, this is an add-on. The core library consists of 14 GB of sample instruments including the following:
- Acoustic Guitars
- Basses
- Brass
- Electric Guitars
- Keyboards
- Mallets
- Percussion & Vocals
- Strings
- Winds
We won’t dive too deeply into the libraries themselves, but just know that Presence XT – at its core – is a sample player, and these libraries are quite good. They cover all the bases that a composer would need to make quality band-style songs. There are also enough ensemble instruments on offer to get a budding composer started scoring their first film.
Additionally, there is a growing number of third-party companies out there making sample libraries for use in Presence XT. Get to the Presonus Shop by way of the Presonus website or the files panel in Studio One 4.6 to see what’s out there.
So, if you’re not sampling savvy or just don’t have the time or interest in creating your own libraries, then Presence XT is a great way to dive into composing with excellent sounding instruments at your fingertips. But what if you want to use that vintage Farfisa that you have sitting in the corner in your compositions without having to tune it every five seconds? Or your Melodica? Or your washtub bass? Well, there’s a way, which we’ll get into a little bit later. Let’s start by looking at Presence XT as it comes.
Taking control
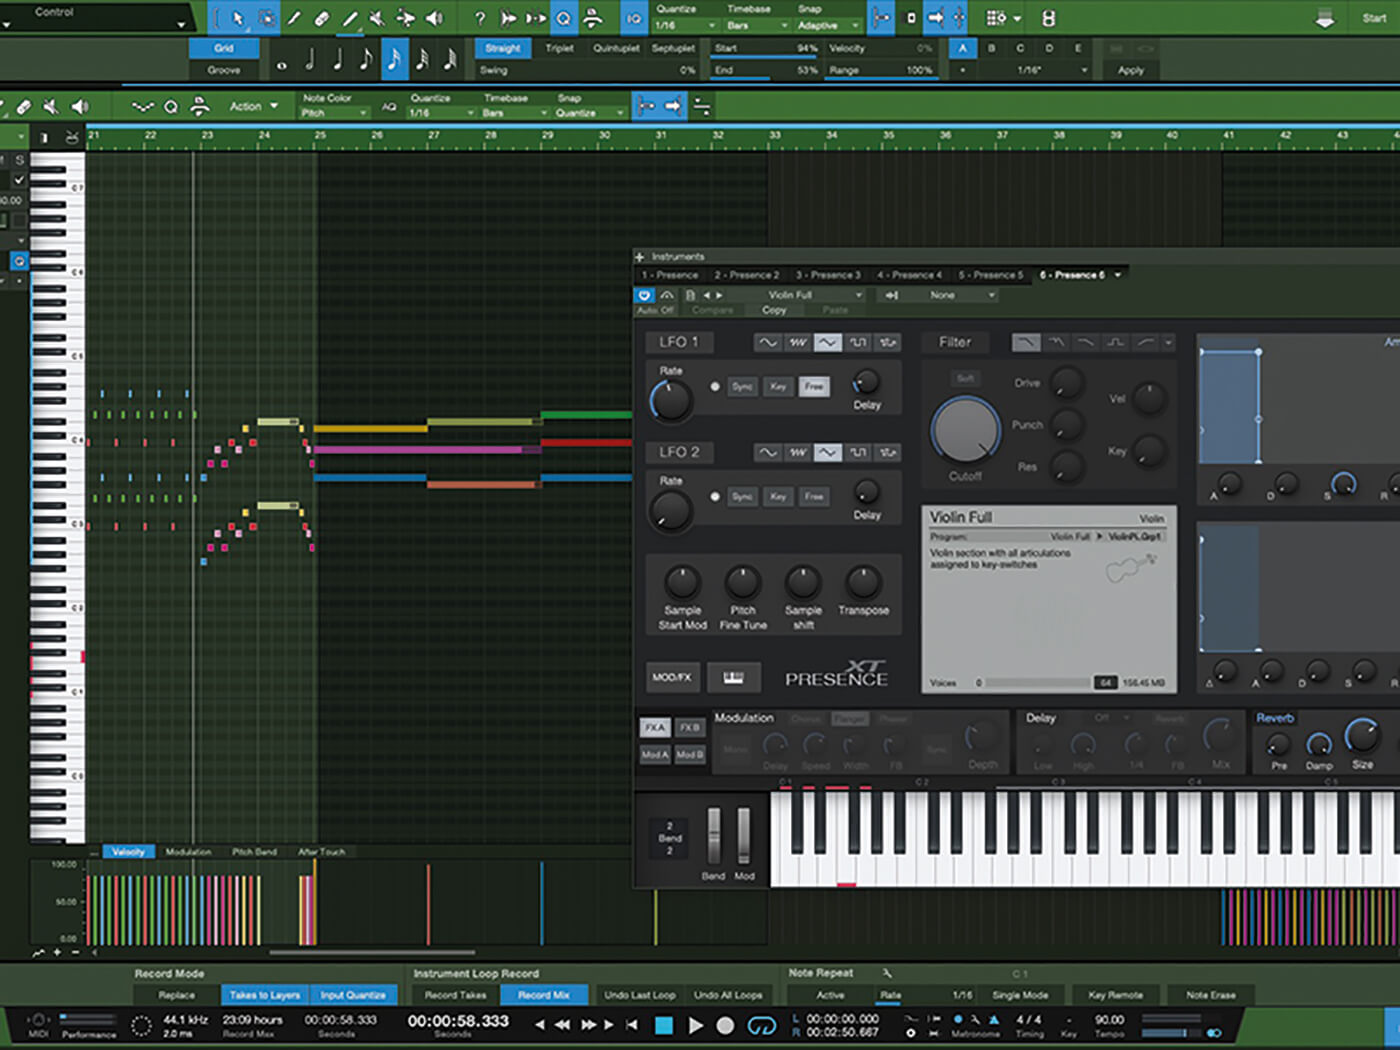
The Presence XT interface is logically laid out with Oscillators, Filters and Envelopes across the top. In the middle below the Filter section is an information display that shows plenty of information about the patch… including what key switches are available within the patch, the number of voices it uses and the size of the patch in MB. Some patches even have controls tied to scripts that will perform certain extra functions. These are also shown in the information display. For example, in the Acoustic Piano patch, the script controls modify the Sustain Resonance Level, Sustain Pedal Noise, Release Noise Level and the Velocity Curve. There are, of course, many other parameters that could be assigned to enhance performance.
Moving down the page, we find the FX and Modulation section. This is where Presence starts getting deep. The FX on offer are very good, with Modulation (Chorus, Flanger and Phaser), Delay (with high and low filtering, delay types, rhythmic delay time, feedback amount and a mix knob) and Reverb in FXA to sweeten the patches. There’s even a Reverb button in the Delay section that will route the delay output to the Reverb. The FXB button leads to other effects like the Gater – for rhythmic effects, a distortion, an EQ and panning.
The really cool stuff comes into play in the Modulation Matrix (Mod A, Mod B). Each Mod button provides 8 modulation slots for routing mod signals all over Presence. We could use velocity to modulate filter cutoff, an LFO to modulate filter resonance, and Env 1 to modulate pitch or any number of other combinations. We could even use aftertouch to modulate LFO 1, and LFO 1 could in turn modulate LFO 2 and so on. This section alone makes Presence XT a powerful tool.
Call my editor
Although the Presence XT Editor is a paid add-on, sound designers who’re not afraid to get under the bonnet and take a look around will find it well worth the minimal expenditure to upgrade. The Editor unlocks a whole lot more power in Presence XT, and serious sound designers can create their own libraries with key switching and scripting to allow a whole new set of performance rules to take over.
We could, for example, record samples of an acoustic guitar with close mics and with room mics. Then, in Presence Editor, we could script controls that would allow us to fade between close and room mics with the turn of a dial. We could also add samples of certain effects like string slides, mutes, etc. and add them to the patch, then use key switches to switch between the different performance styles.
This is deep patch programming that will take time and effort, but if we want to make our own instruments for personal use or even sample libraries to distribute to other Presence XT users, the Presence Editor will give us loads of options and flexibility. We’ll explore that more thoroughly in a later tutorial.
Using Presence XT as a sampler: step-by-step
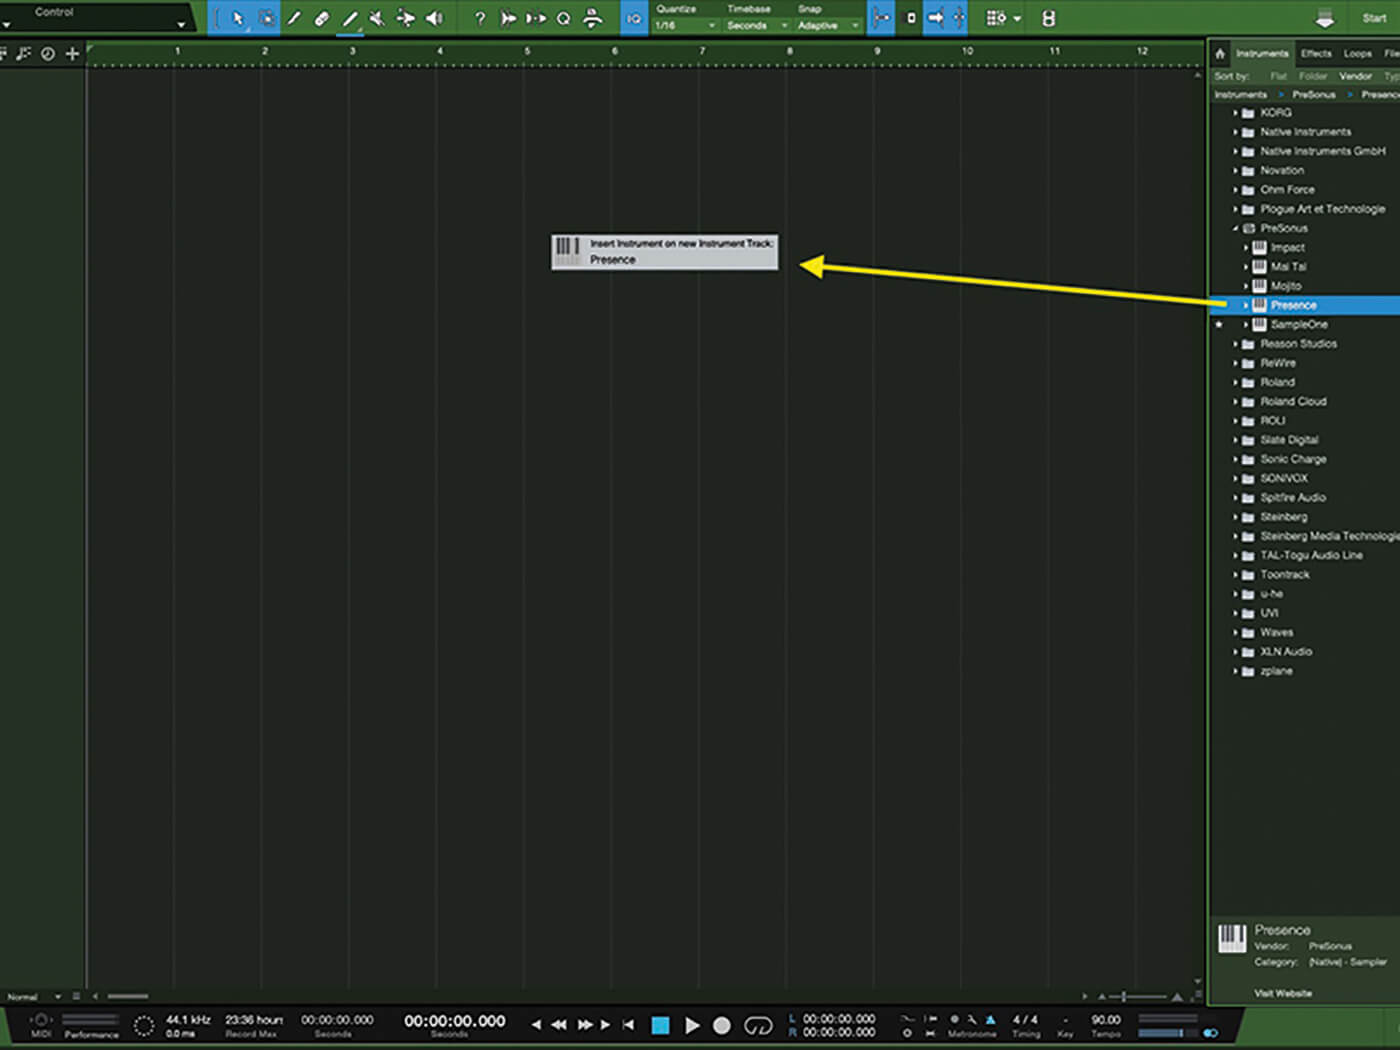
1. To get started we first need to drag Presence XT into the Session area of Studio One.
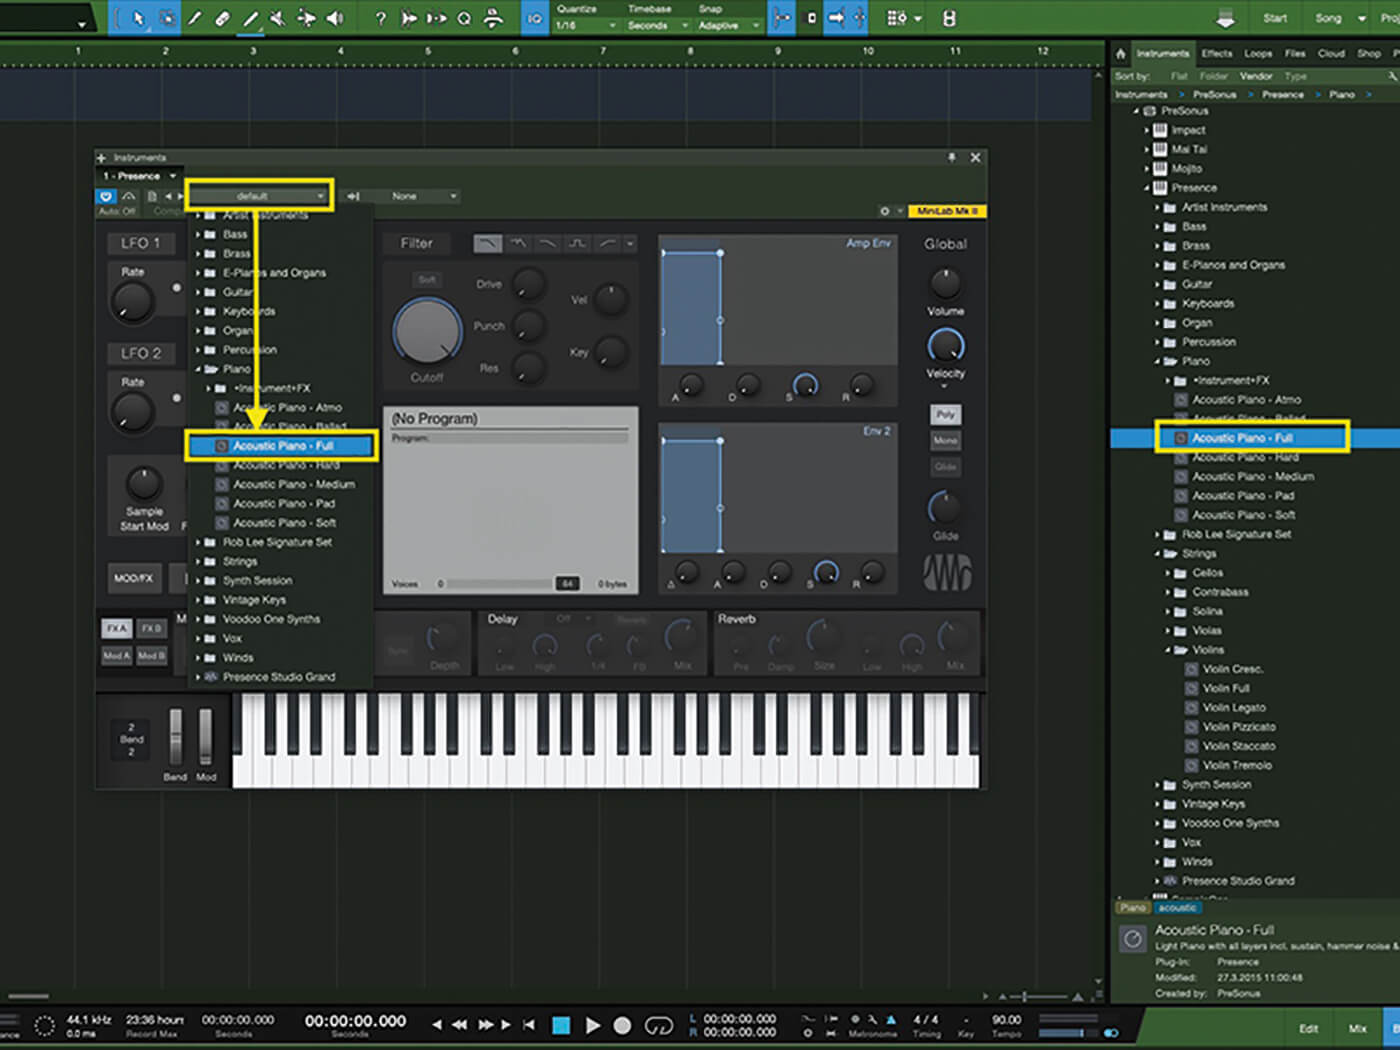
2. Use the Presets dropdown in Presence or browse the list of patches in the Browser (F6). Select Acoustic Piano – Full, then play through the sound. Experiment with the various controls available.
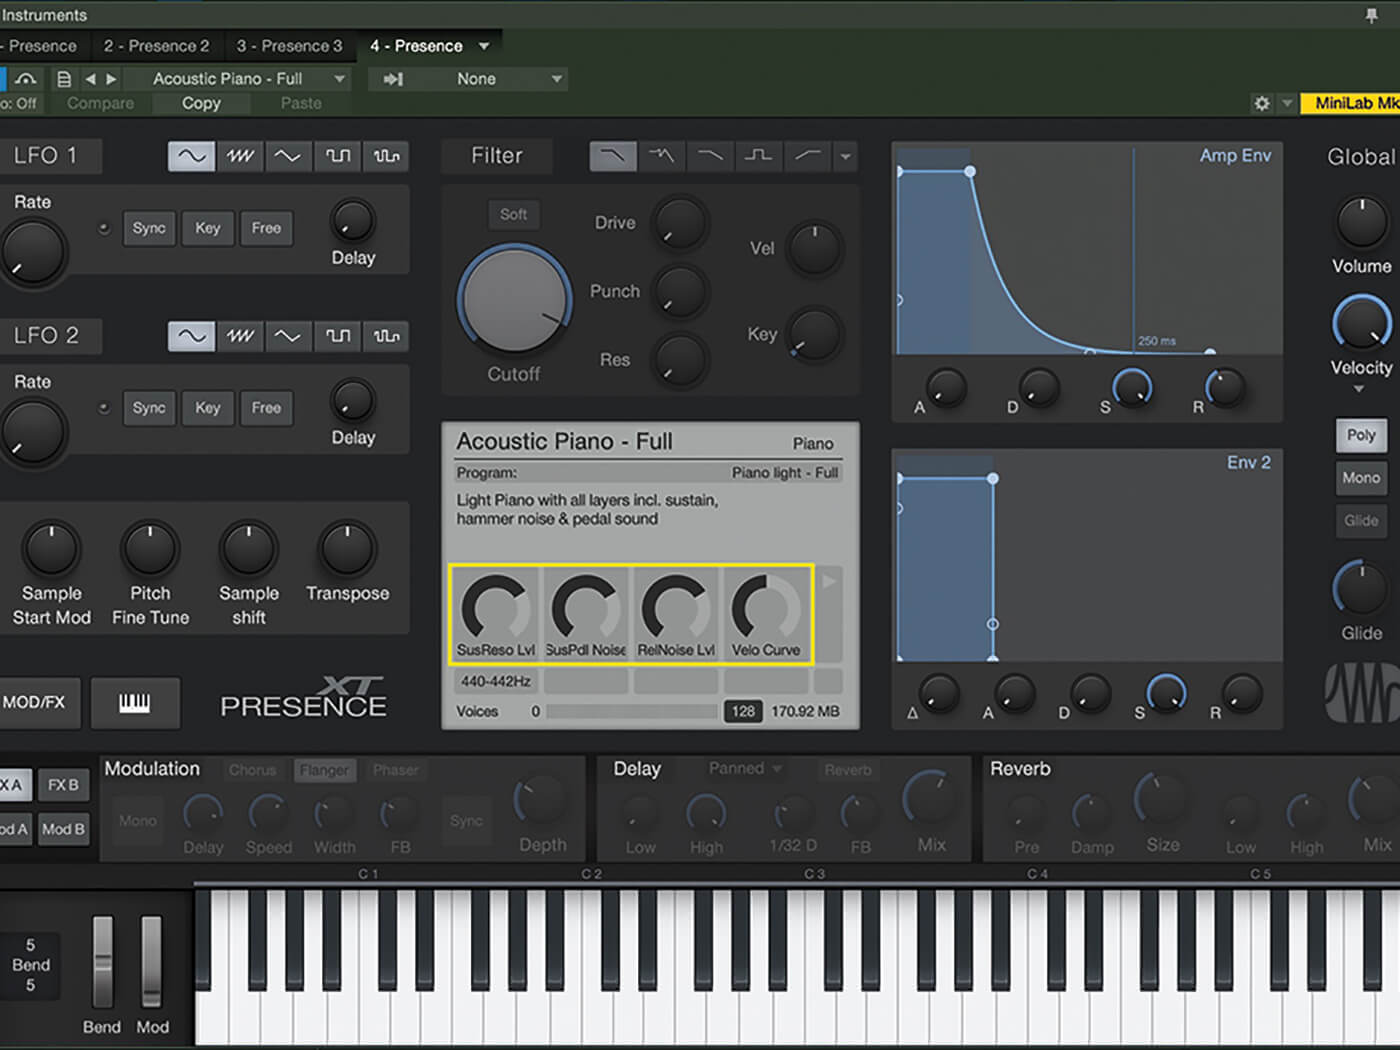
3. Here we see a number of controls in the display panel. As we can see, there are 4 dials visible in this screen to control resonance, pedal noise, release noise and velocity.
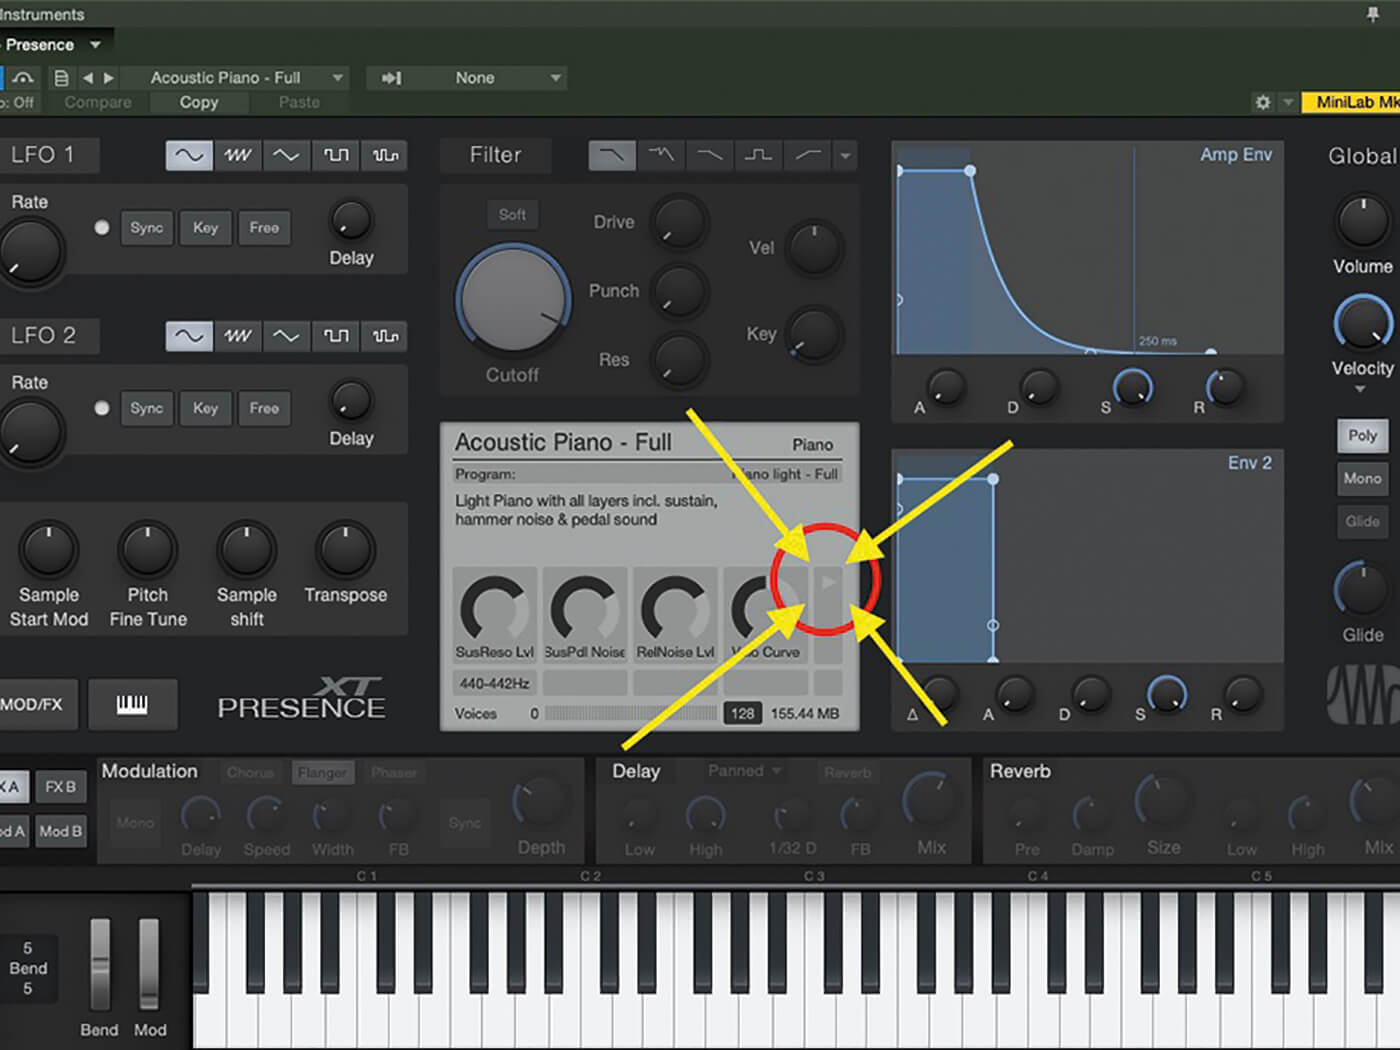
4. Pay special attention to this tiny arrow. It indicates there are more controls on an additional screen. Let’s click here to see the rest of the available options.
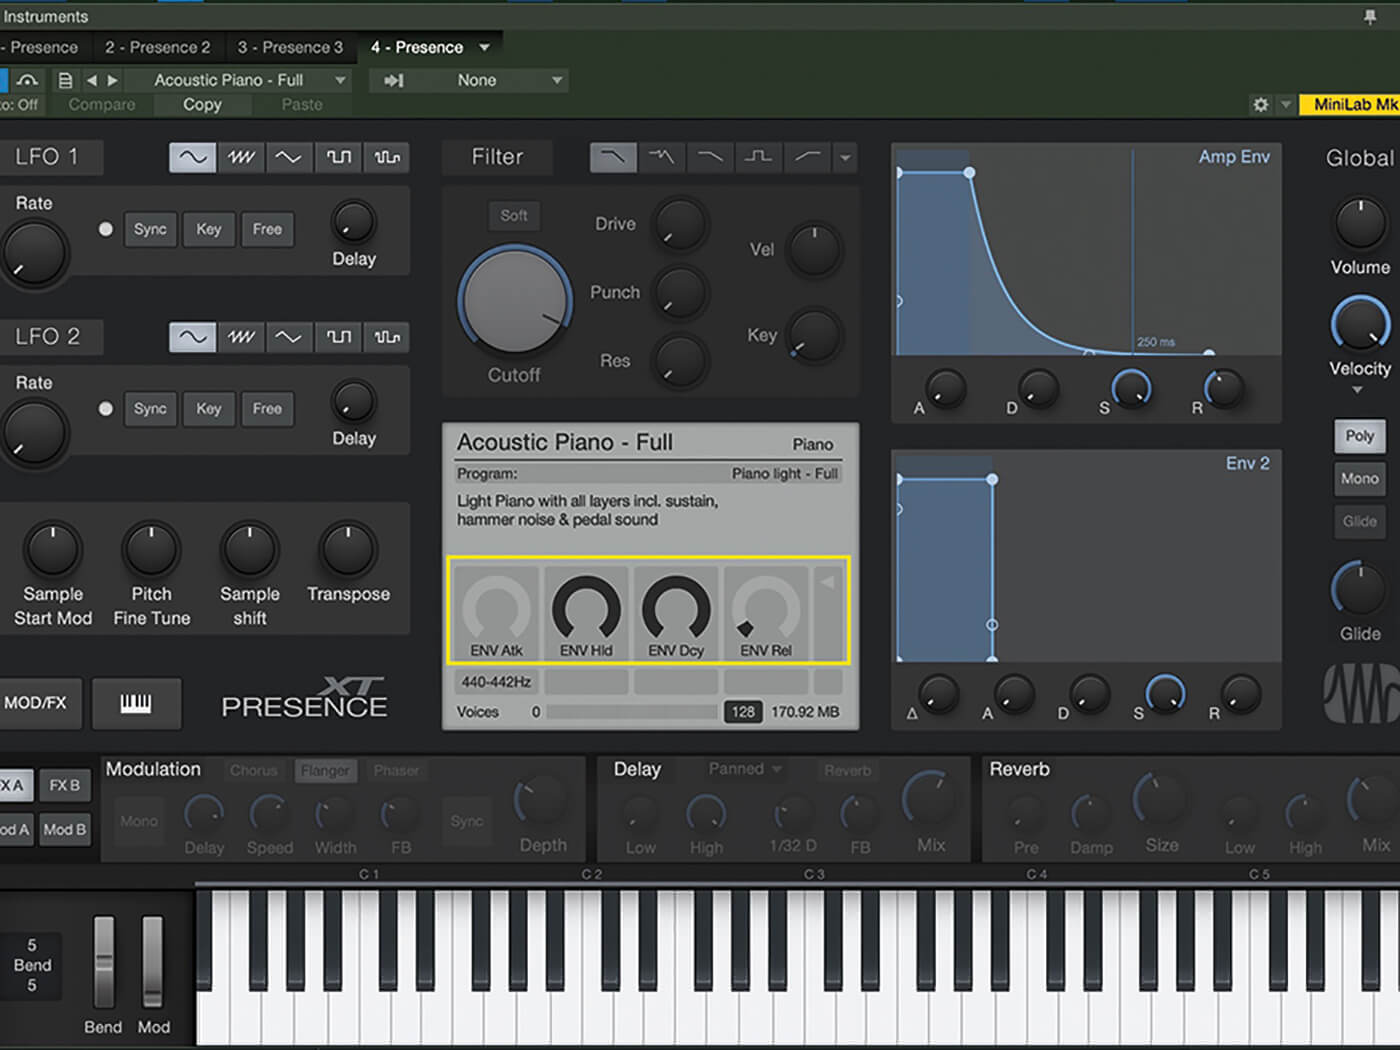
5. As we can see, there are controls for the Envelope attack, hold, decay and release as well as an arrow to move back to the primary controls for the patch. Let’s move back.
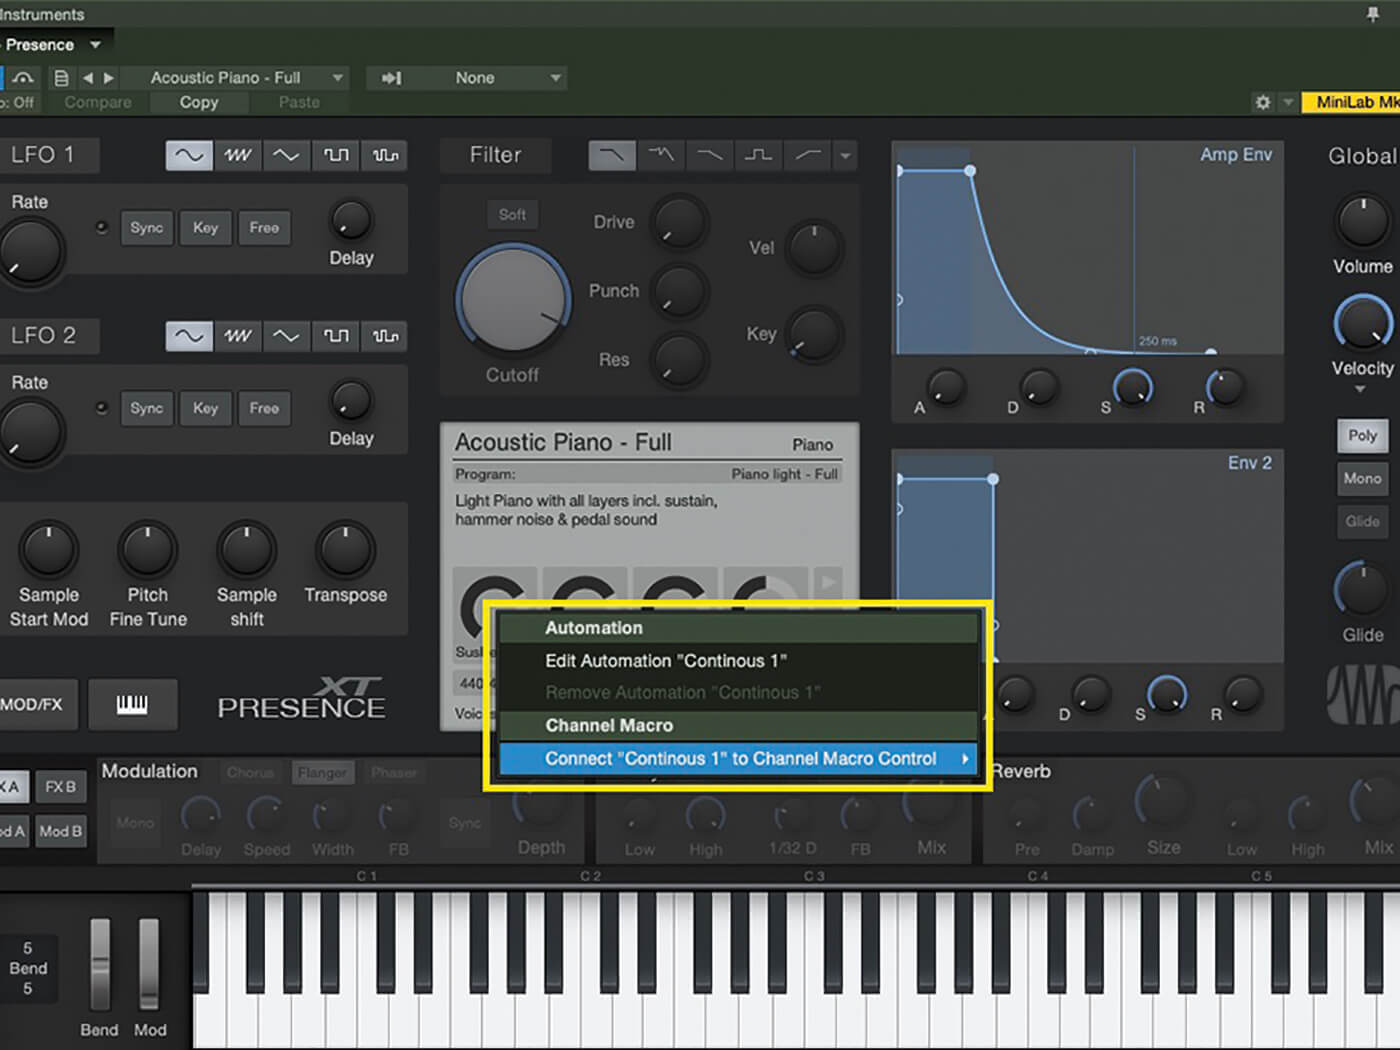
6. Right-clicking on the Release Noise Level dial shows we can automate it or assign it (and other controls) to a channel macro for a dynamic change in sound during a track.
![]()
THE PRESONUS SHOP As mentioned in the article, the PreSonus Shop contains a growing number of libraries from a growing number of sample companies. If you’re not a programmer, libraries from SoundEngine, Sample Tekk, SonalSystem, Patch Hut, Chocolate Audio and more can get you into some excellent sounds for Presence XT.
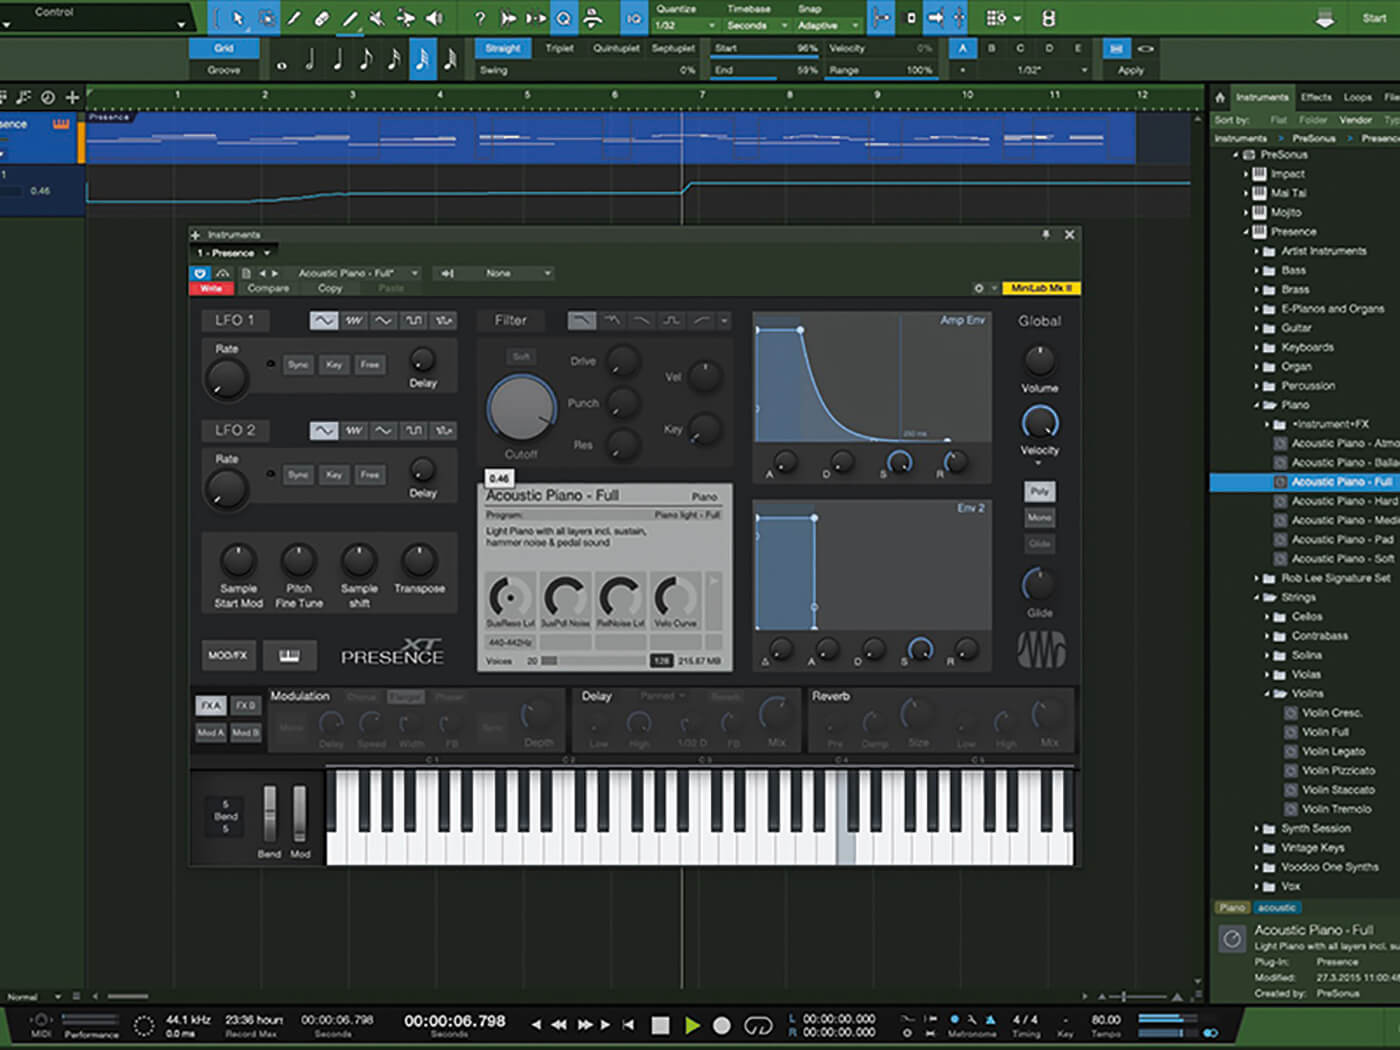
7. Here, we’re automating the Sustain Resonance level to create a bit of a washy feel as the track progresses.
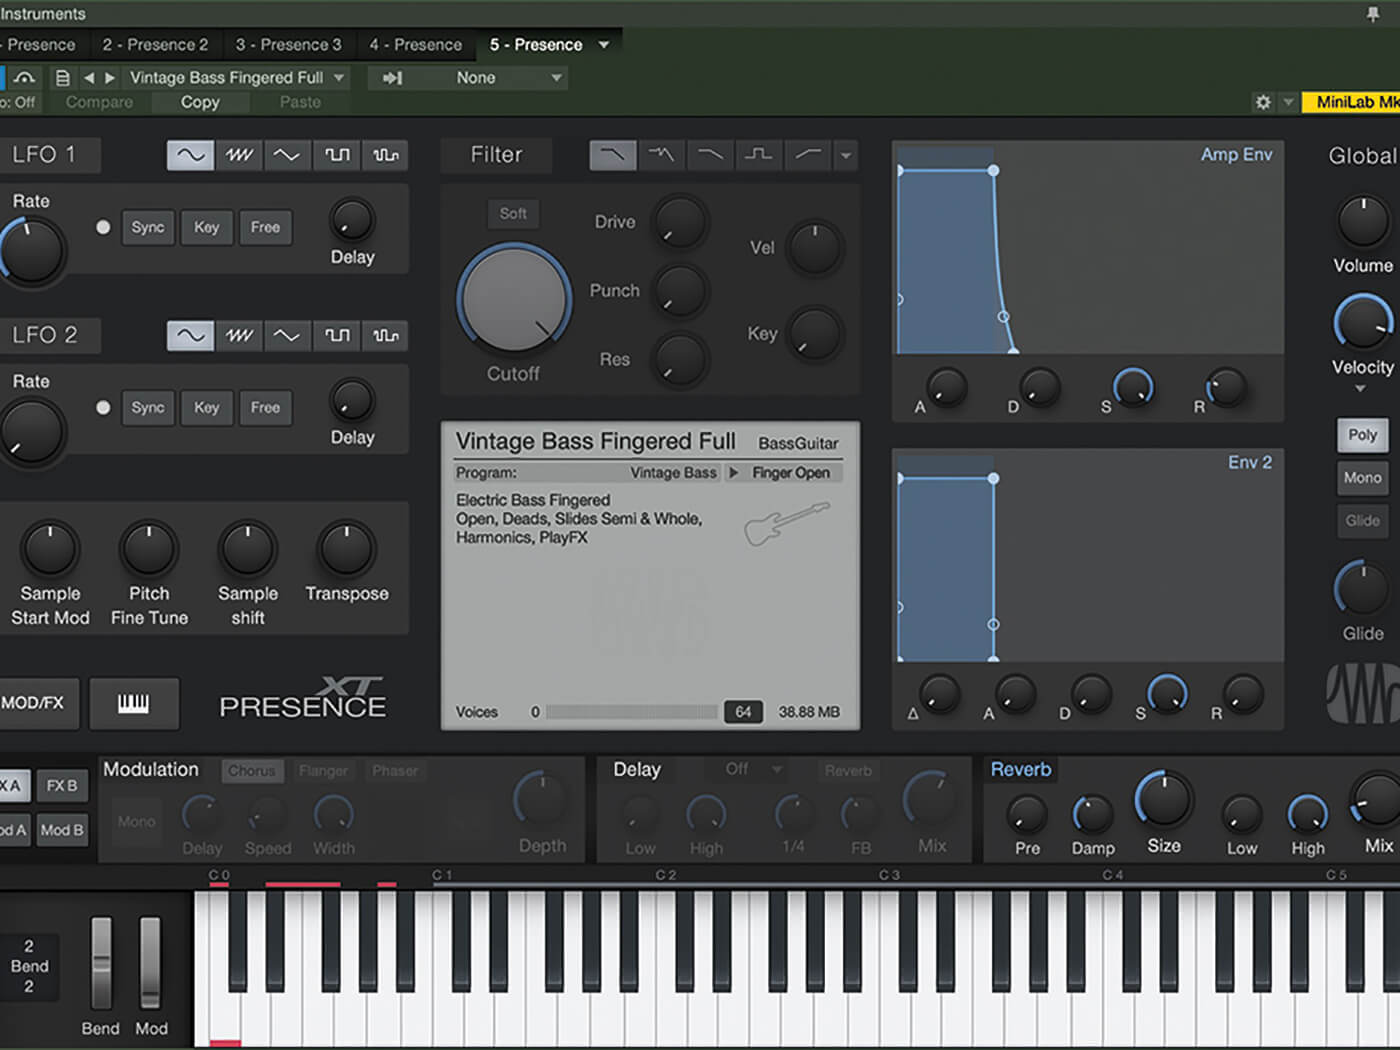
8. Now open the Vintage Bass Fingered Full patch. Turning on the on-screen keyboard with the keyboard button, we see several red notes starting at C0. These are key switches.

9. These key switches change the bass between Open, Finger Deads, Harmonics, Semi-Slides, Whole Slides and Finger Play FX. Let’s record a simple bass part.
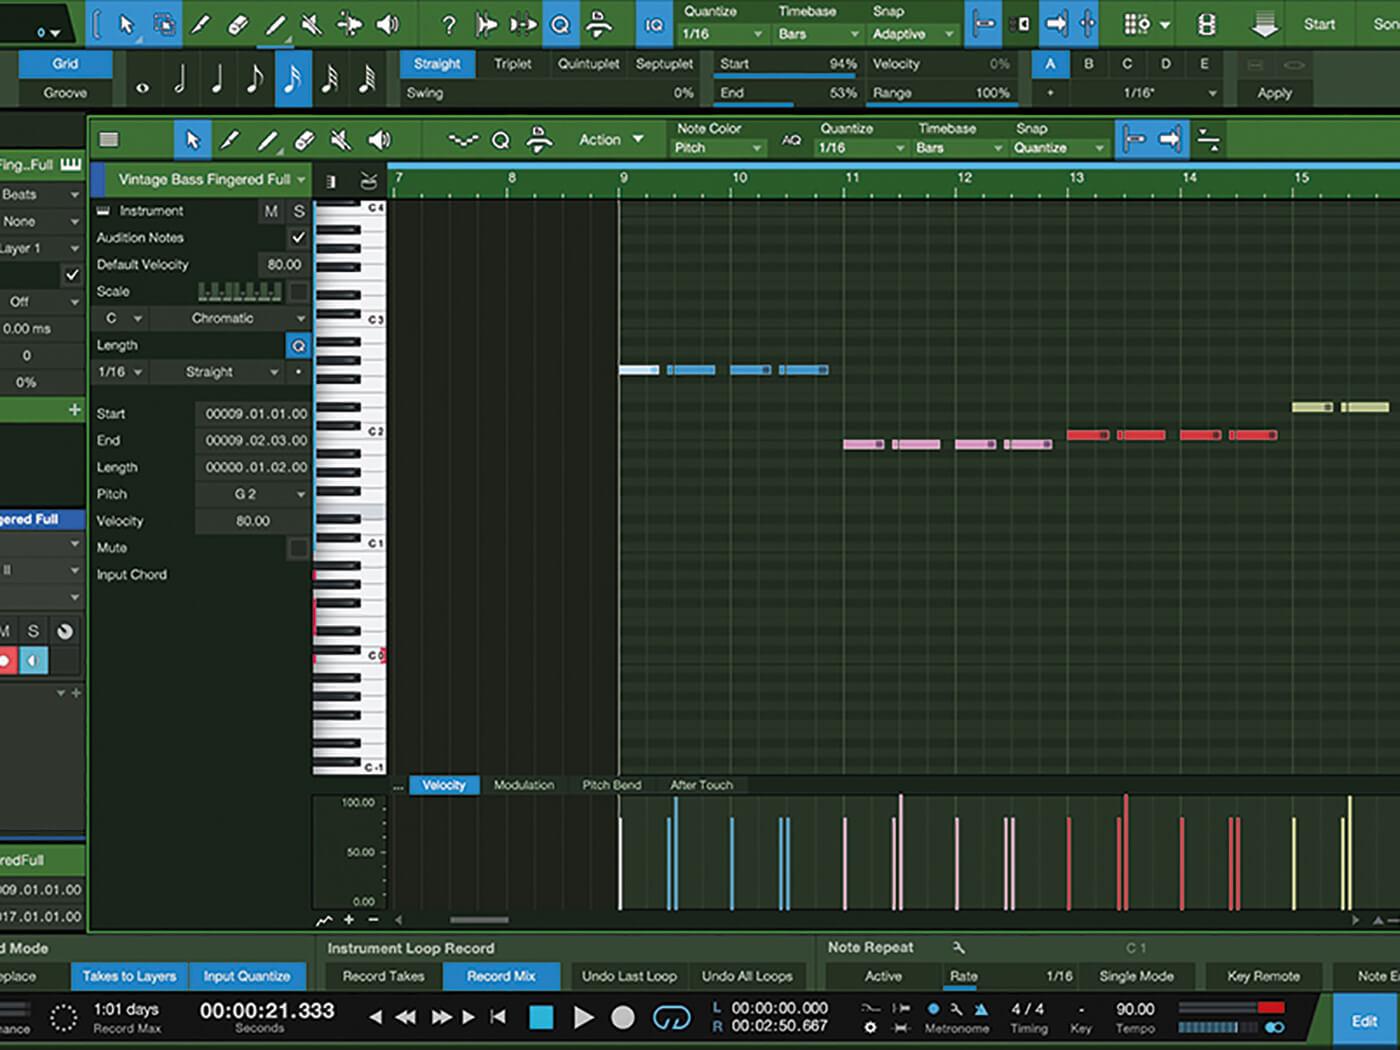
10. Now we have a bass part. It’s not an amazing part, but we can add life and interest to it by adding notes to trigger key switches.
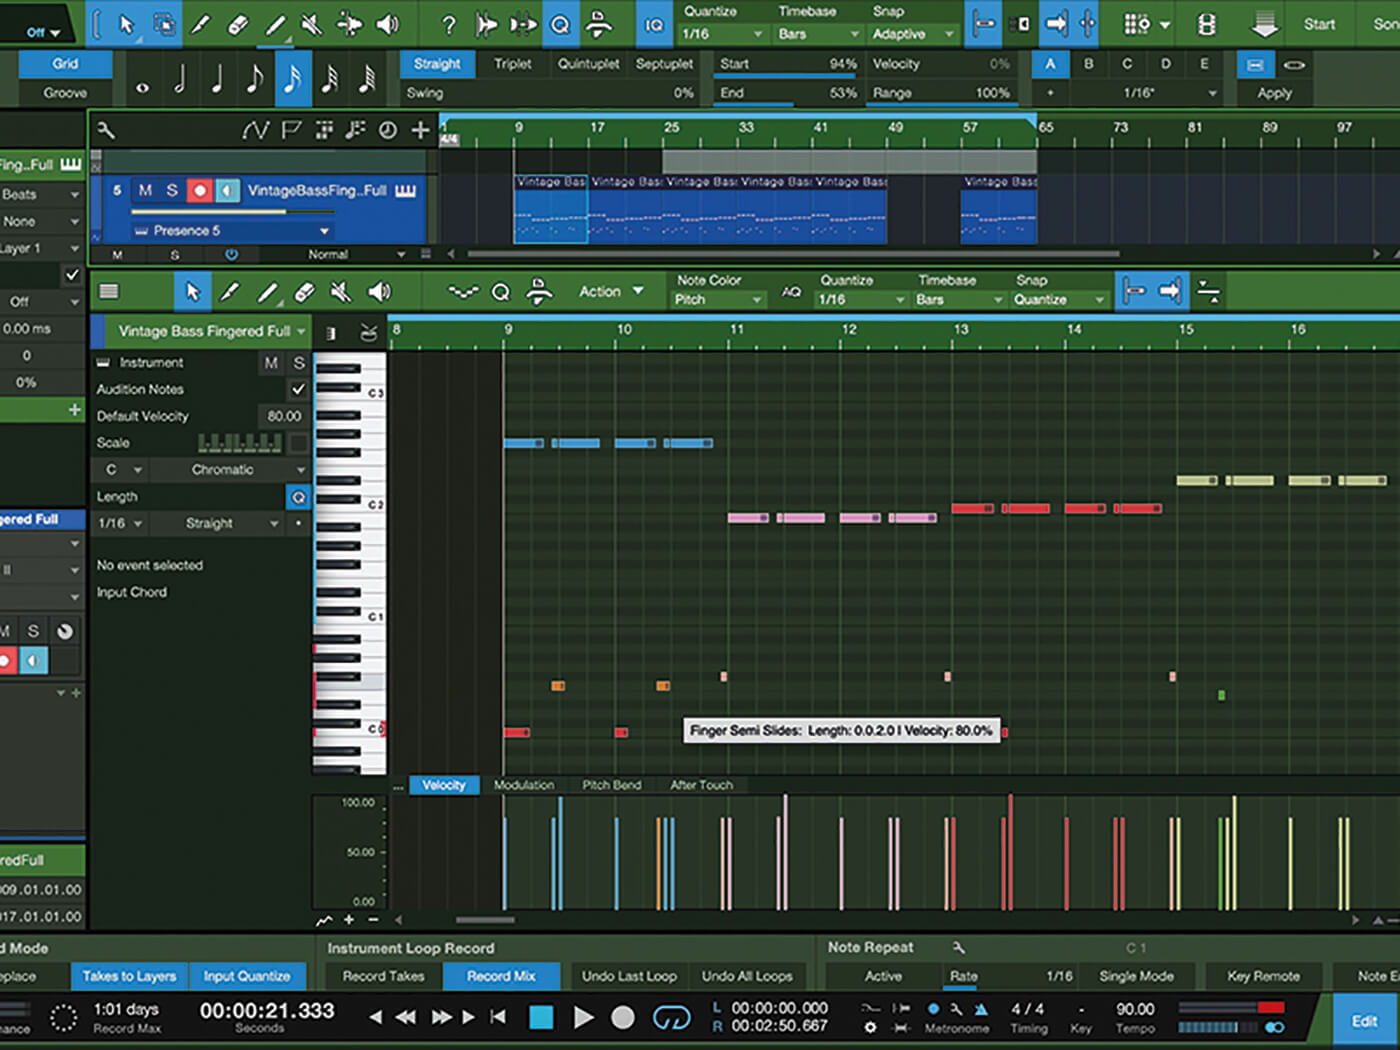
11. As we see, hovering over key switch notes shows what specific key switch it is. This helps speed up the process of adding key switches. We could also add these live.
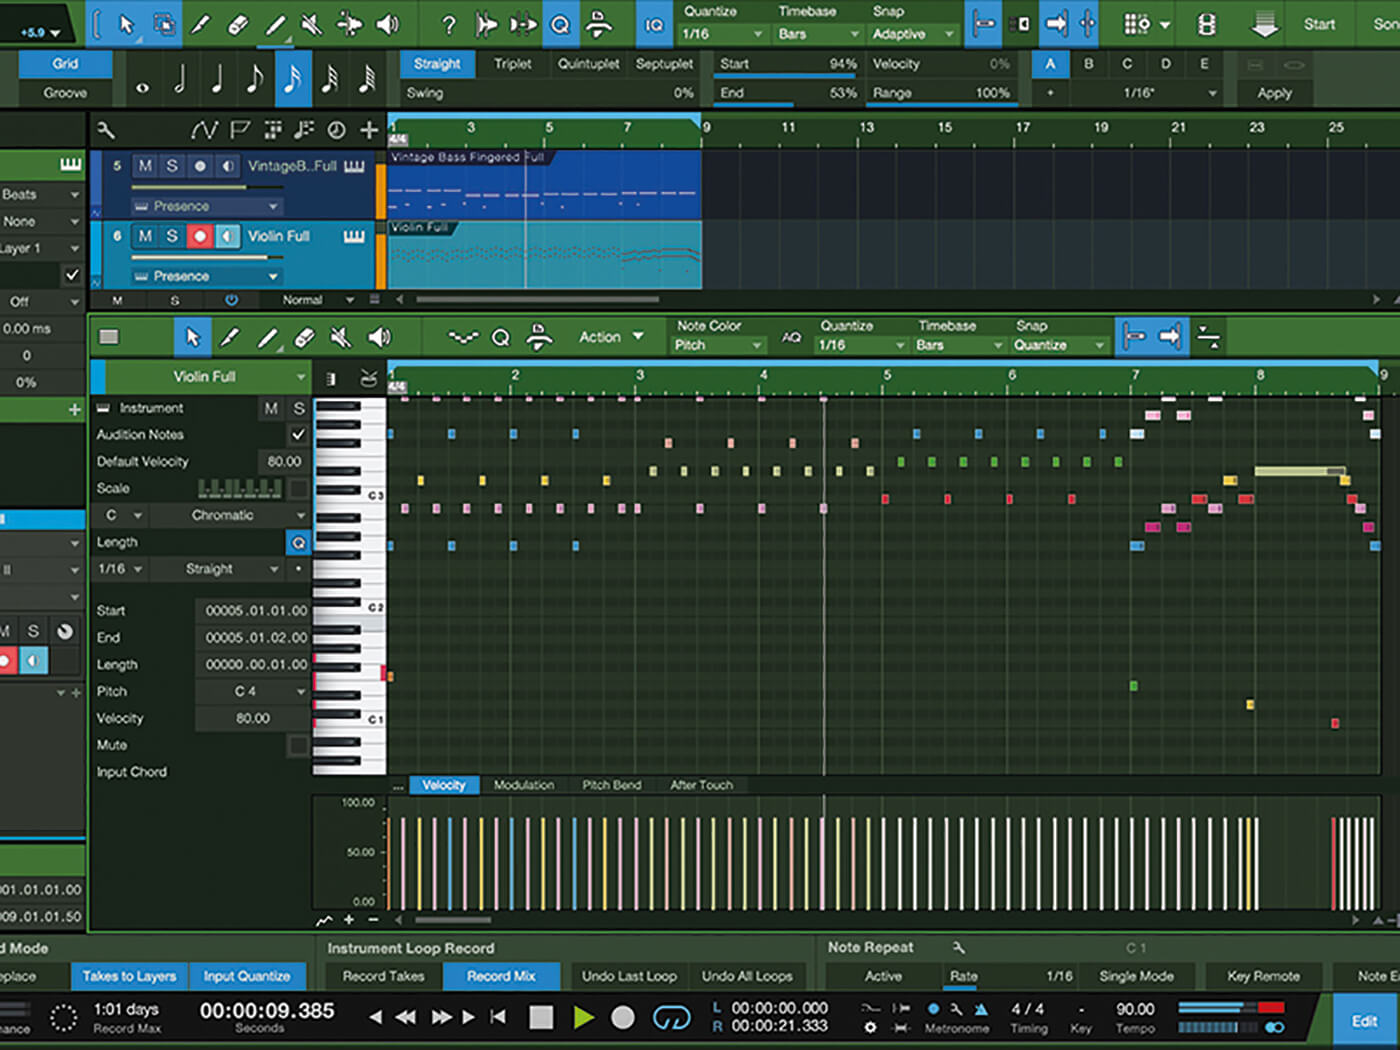
12. Using the Violins Full patch, we can do the same thing. Let’s create a part with some nice movement and then add key switches for some serious interest.
![]()
HOMESCHOOLING There’s a fantastic learning section on the PreSonus website featuring tutorial videos from David Vignola, Johnny Geib, PreSonus’ own Gregor and more. These can help you get more savvy with Presence XT’s capabilities
13. This part sounds okay, but it is a bit boring. To liven it up a bit, let’s add some key switches to enhance the performance with different articulations.
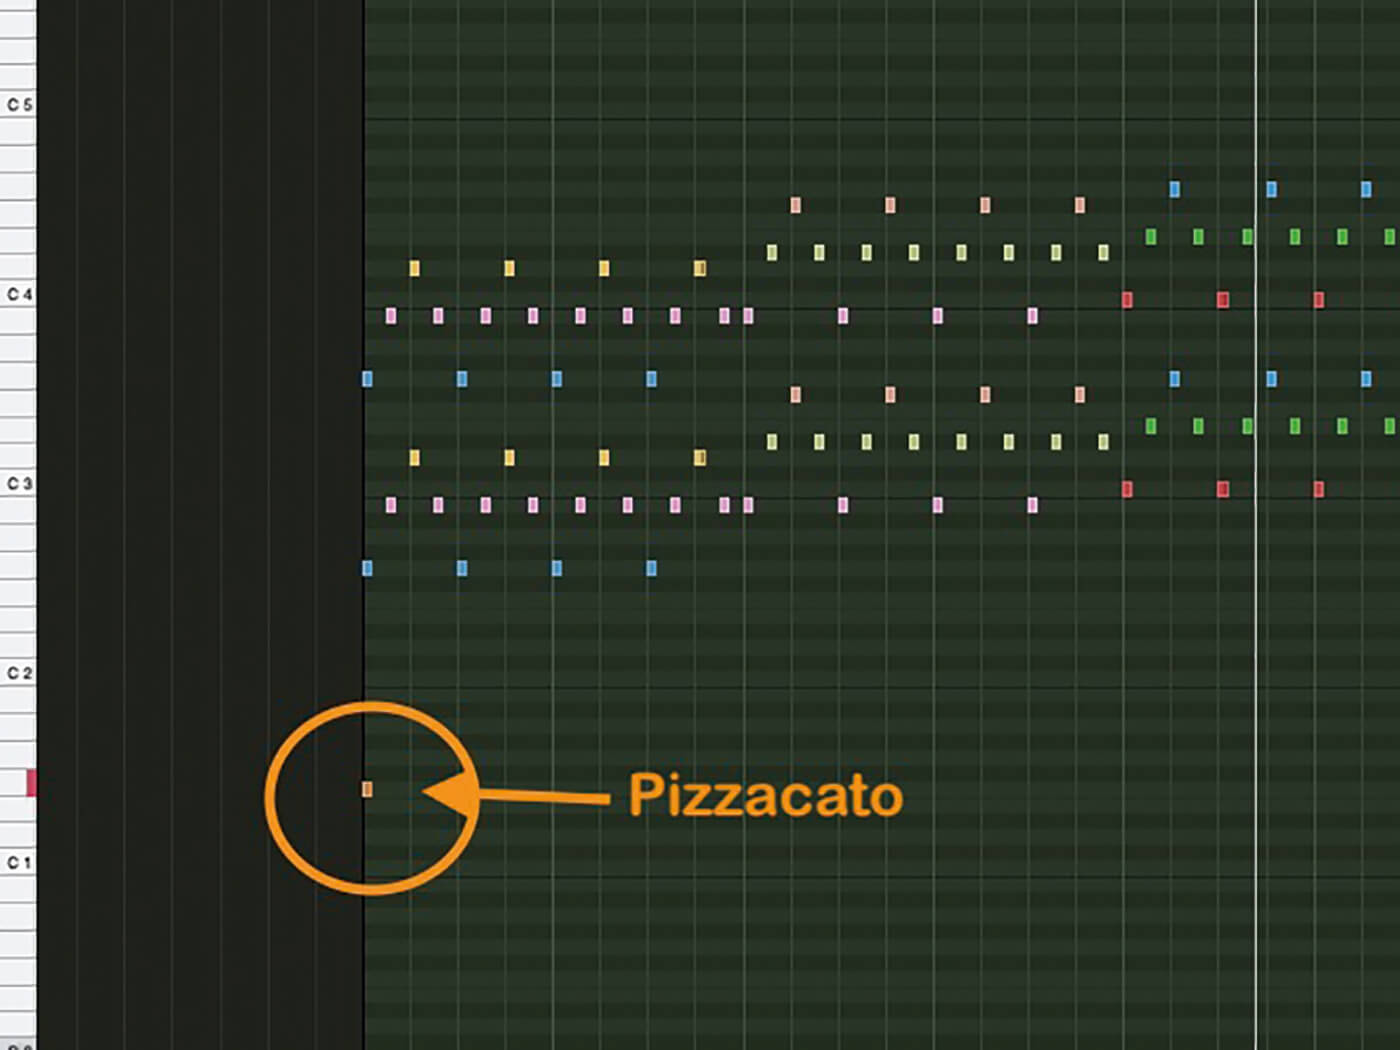
14. We’ll start by adding a pizzicato key switch at the beginning of the arpeggio part. Suddenly, the washy arpeggio has lovely plucked violins to carry it along.
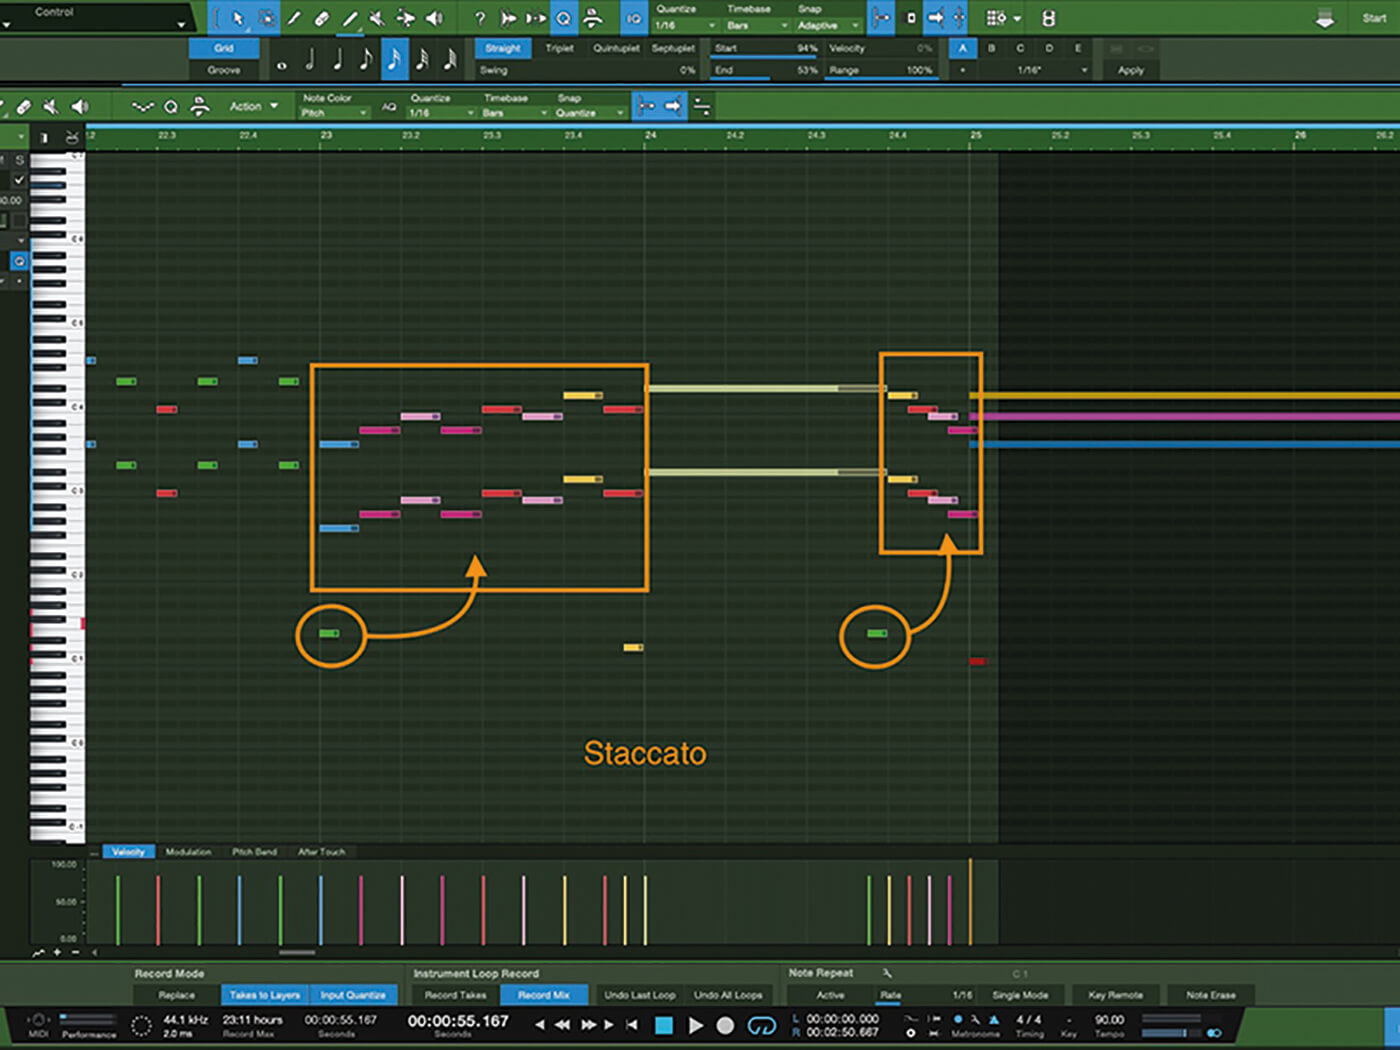
15. Next, we’ll add a key switch for the runs at Bar 23 and Bar 24. Now the runs are played by staccato strings and are much clearer to the listener.
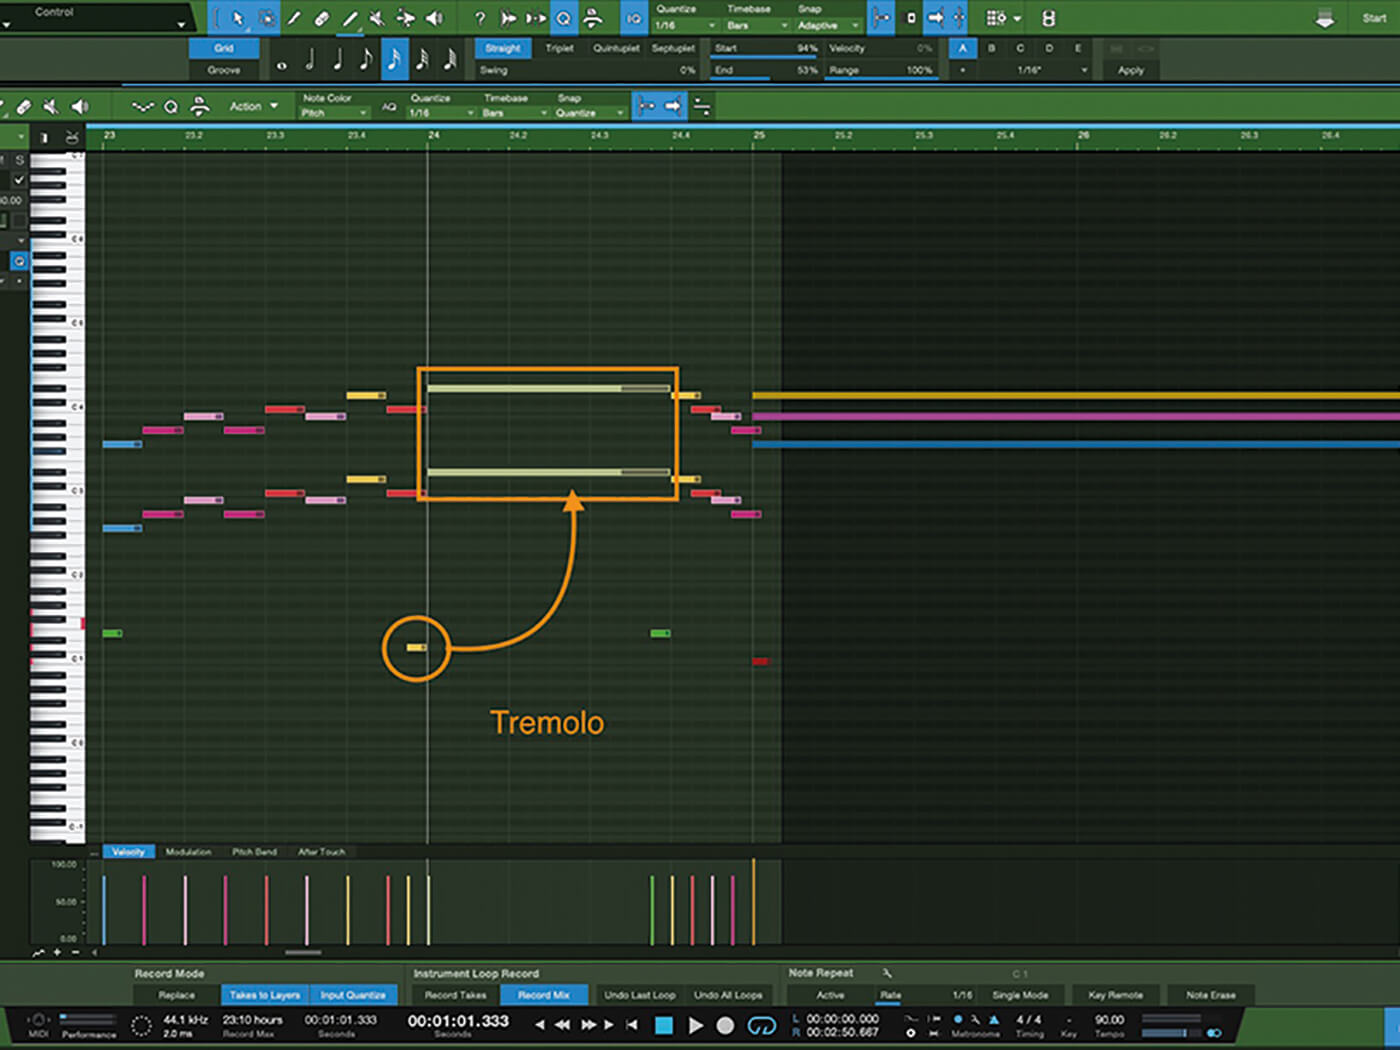
16. Finally, let’s add a Violin Sustain key switch for the chords beginning at Bar 25. There’s much more we can do for interest and realism, but these are a great start.
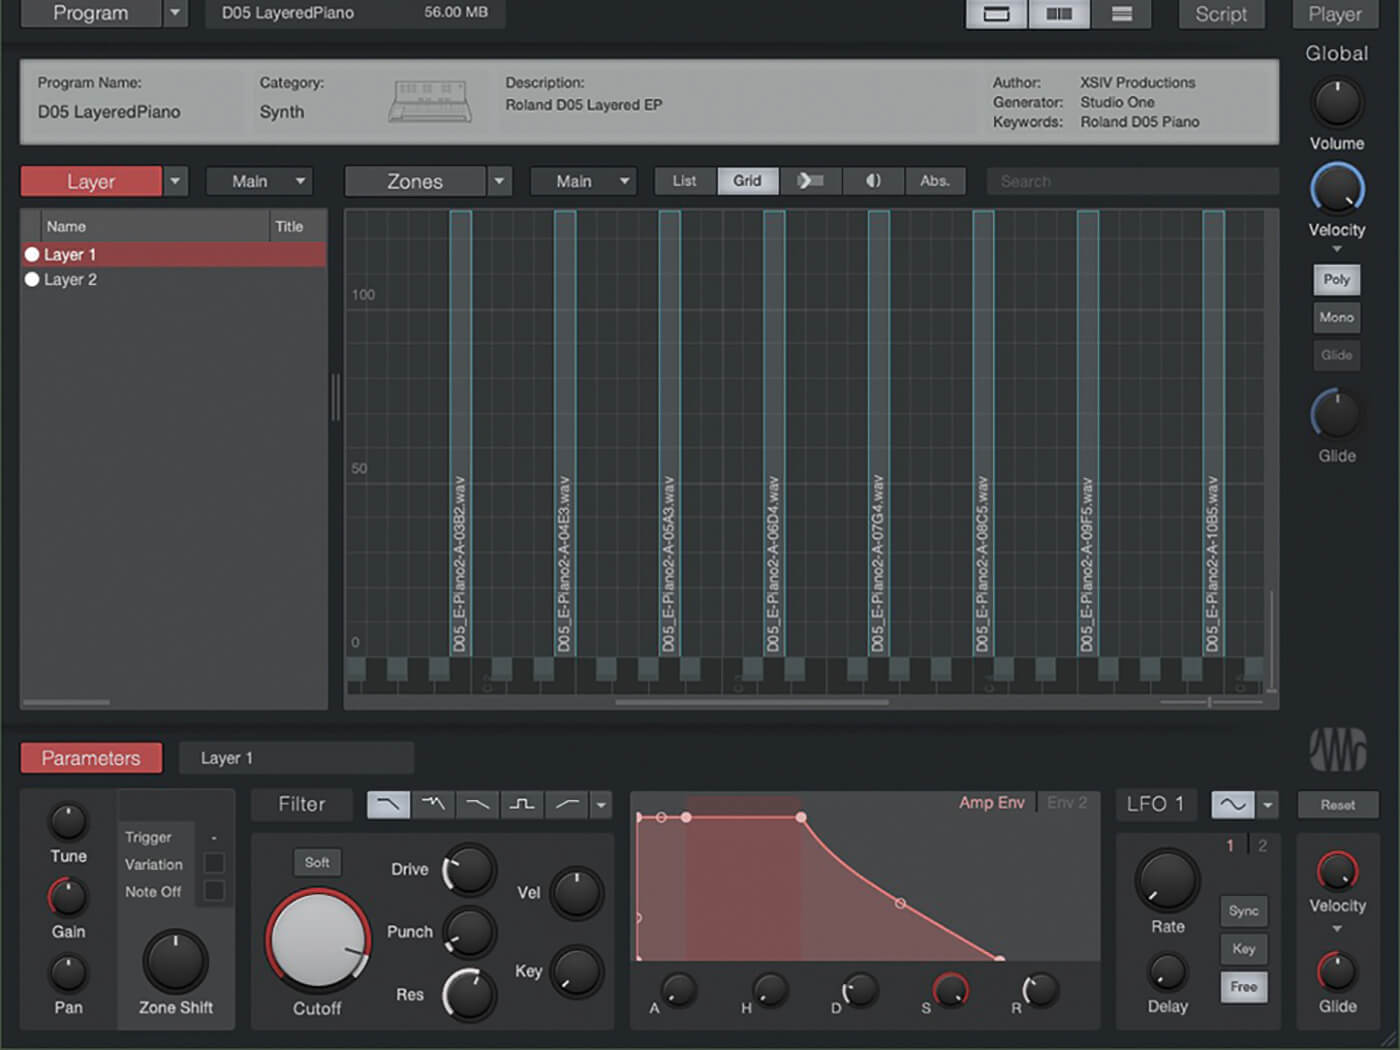
17. If we want to start creating/editing our own sample libraries, the Presence Editor will allow us to sample, edit, map, shape and script libraries just the way we want them.

18. Be warned: This gets very deep. With a basic understanding of sampling, you can start making libraries. To get the most out of scripting controls, you’ll need an understanding of Java Script.
For more PreSonus Studio One tutorials and workshops, check here.