Using Drum Maps in Cubase
In our last issue’s Cubase workshop, we dug into the details of the Drum Editor. This time around, it’s the turn of the Drum Maps which power that Editor…
There are loads of ways to generate drum and percussion sounds in the studio these days – we’re spoilt for choice with all sorts of beat-making methods. However, whether it’s external hardware, plug-in software, or synthesised or sampled drum sounds (or a mixture of the two), nearly all of these drum-sound sources have one thing in common: drum ‘kits’ are stored as patches in which each drum sound is assigned to, and therefore triggered by, a specific MIDI note.
The problem is that there is no common template or specification that governs the specific mapping of drum sounds to note numbers. Where one drum patch or sample bank may assign a kick drum to note C1, another may have a tambourine assigned to that note. This can be a problem for producers when they want to experiment to hear how a rhythm part will sound through different drum-kit banks and/or instruments – the different sounds associated with each note can be comically different.
A similar issue exists if you’re playing drum parts using a controller, because different instruments and sound banks may require you to learn different key layouts, or to reprogram your pad controller. Cubase solves both of these problems with Drum Maps.
Input and output notes
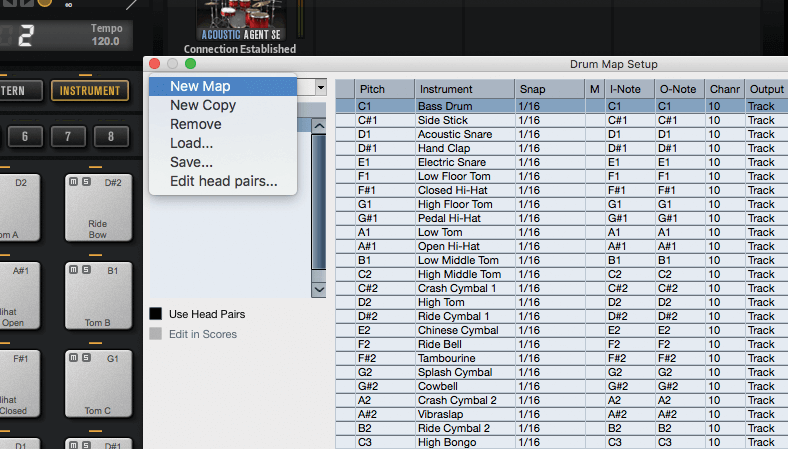
At their most basic, Drum Maps associate a drum-instrument name with a MIDI note, and it is these names that are displayed in the Drum Editor’s instrument list. You can define these names directly from within the Drum Editor (just double-click on an instrument name to edit it), or you can do so from the Drum Map Setup panel.
The notes that you associate names with – shown in the Drum Map’s Pitch column – are just the notes that Cubase uses internally to represent different drum-hit events. The actual notes that create these events and that are sent when these events are triggered, can be different to this internal representation. This is all done via the I-Note and O-Note columns of the Drum Map – they can be a bit confusing, so pay attention to the following!
The I-Note – or Input Note – defines the incoming MIDI note that will create a drum-hit event on a given row of the Drum Editor. So, for example, if you name pitch E1 as ‘Snare Drum’, but assign its I-Note as F1, then any incoming F1 notes will be translated internally to E1 and be recorded as a hit on the Snare Drum row.
Similarly, the O-Note – or Output Note – defines the outgoing MIDI note that will be sent by a Drum Editor row. Continuing our example, if the snare-drum instrument defines note A3 as its O-Note, then all the hits for the snare drum will be sent as A3 note messages, even though they’re stored in Cubase as E1 notes; incoming F1 notes will be translated into outgoing A3 notes, too.
The practical upshot of this is that by spending time configuring Drum Maps, you can save yourself from learning different key or pad layouts for different sound banks. Also, you can make it easy to swap between sound banks and sound sources without making your cool groove sound like a stack of chimney pots falling on a hi-hat.
Output routing and scoring
There are times when you may wish to use multiple sound sources for the playback of a rhythm part – main kit parts from a sampler, say, with some analogue bleeps and bloops from a synth. In these scenarios, you can split your rhythm part across multiple MIDI tracks, but this is cumbersome compared to working on a single part within a single Drum Editor window.
Drum Maps provide a solution to this, too, as they allow each row to have its own independent MIDI routing, as defined by the Channel and Output columns of the map. When these are set to Any and Track, respectively, it’s the source MIDI track that defines the MIDI routing, but any other settings will cause the outgoing MIDI note to be directed to the specified MIDI channel and/or destination.
Drum Map rows have a fourth note value associated with them, shown in the Display column. This defines the pitch that will be used to represent a row’s drum-hit events when viewed in the Score Editor. Also related to scoring are the Head Symbol setting, which determines the note head symbol that a row’s drum hits will use in scores, and the Voices column, which groups drum instruments for common handling of rests and stem direction.
Creating drum maps
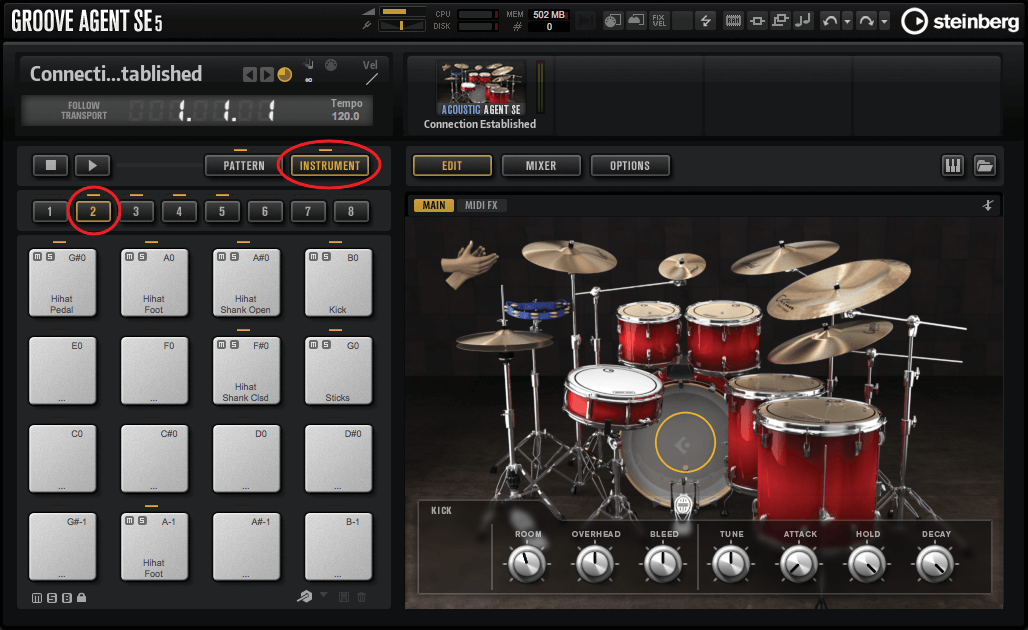
To practise building a Drum Map from scratch, we’re going to use a multi-sampled acoustic kit in Groove Agent SE. Groove Agent follows GM mapping to a certain extent, but diverges for things like hi-hats: Groove Agent has something like 20 different notes dedicated to hi-hats, whereas GM only has three. If you don’t have Groove Agent, then something like Superior Drummer or BFD will work nicely for this walkthrough.
Drum Maps in Cubase: step-by-step
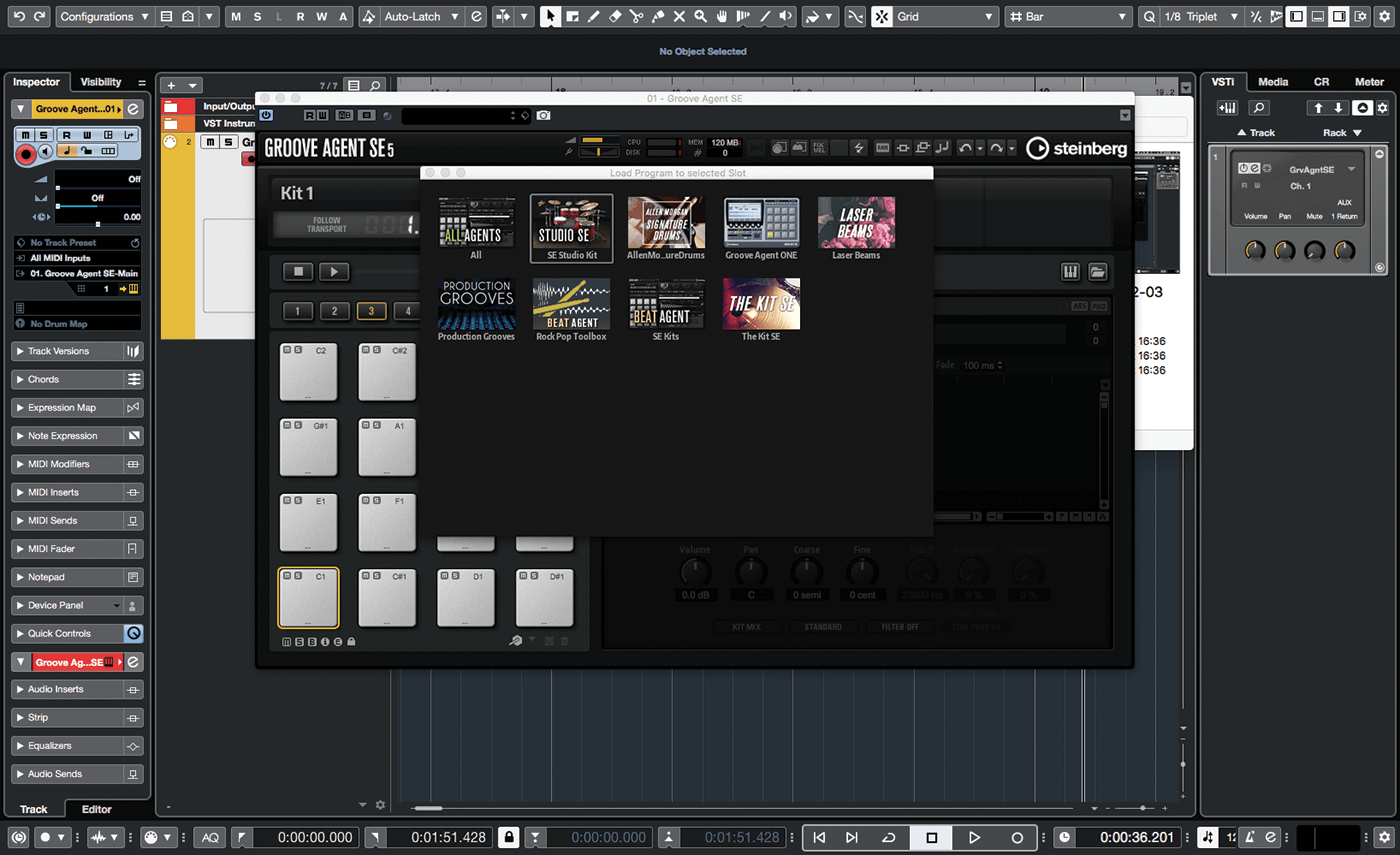
1. In a new project, add Groove Agent SE or another drum-sound source to the VSTi rack, and create a corresponding MIDI track when prompted. Load one of the kits from the SE Studio Kit.
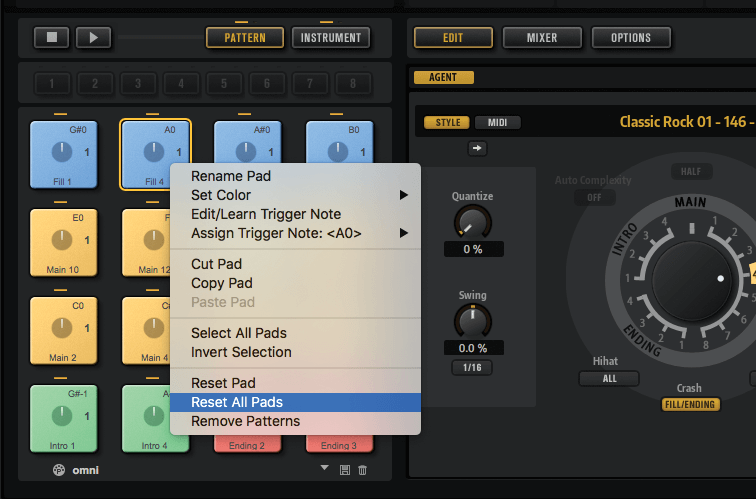
2. Groove Agent kits include patterns that can be triggered by MIDI notes. These will interfere with what we’re doing, so switch the pads to Pattern Mode, then right-click on a pad and select Reset All Pads.
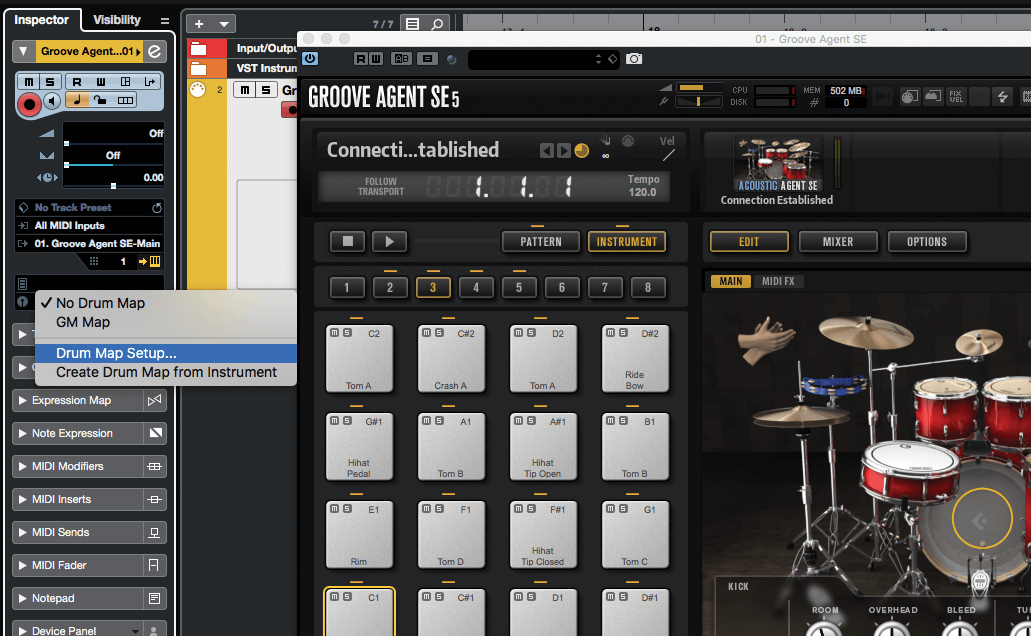
3. Open the Track Inspector and locate the Drum Maps field. Click the field and select Drum Map Setup from the menu. It’s possible to import a Map from Groove Agent, but we’re working from scratch here.
4. Initially, the default GM Map will be shown in the Drum Map Setup panel. Click the Functions menu, located at the top-left of the panel, and select New Map. Give the new Map a name.
5. Change your view over to Groove Agent, switch it to Instrument Mode, and select the first bank of pads that has drum sounds attached to it (indicated by an amber marker above the Bank Select buttons).
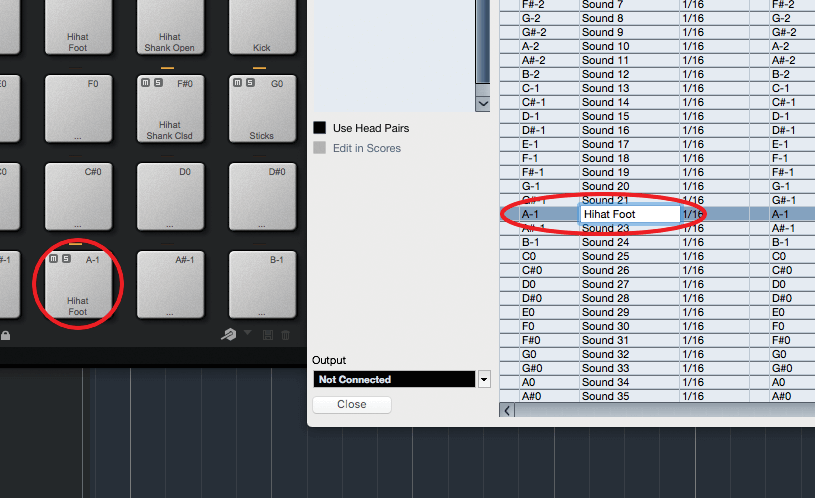
6. Look at the first pad that has a sample assigned to it. Flip back to the Drum Map Setup panel. Locate the pad’s pitch in the Map’s Pitch column, then enter the pad’s name in the Instrument column.
![]()
DRUM MAP TEMPLATES It’s good practice to create a set of basic Drum Map templates for your drum-sound sources and samplers. You can then use these as a quick start point when working with that instrument. For example, I have a couple of templates for NI Battery that I customise for different projects and sample banks.
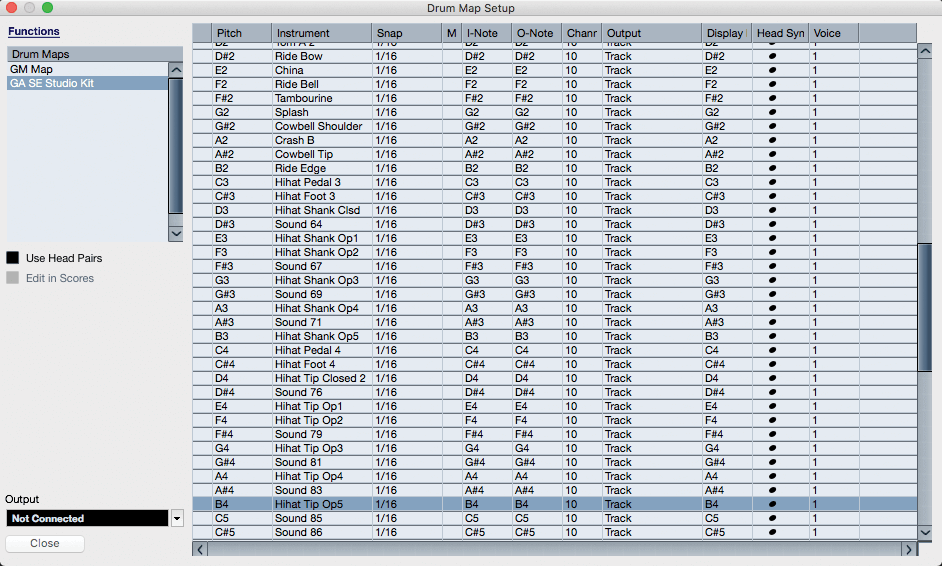
7. Repeat this process for all of Groove Agent’s active pads, being sure to step through all of its active pad banks. Where GA uses a name more than once, add a number to the name in your Map.
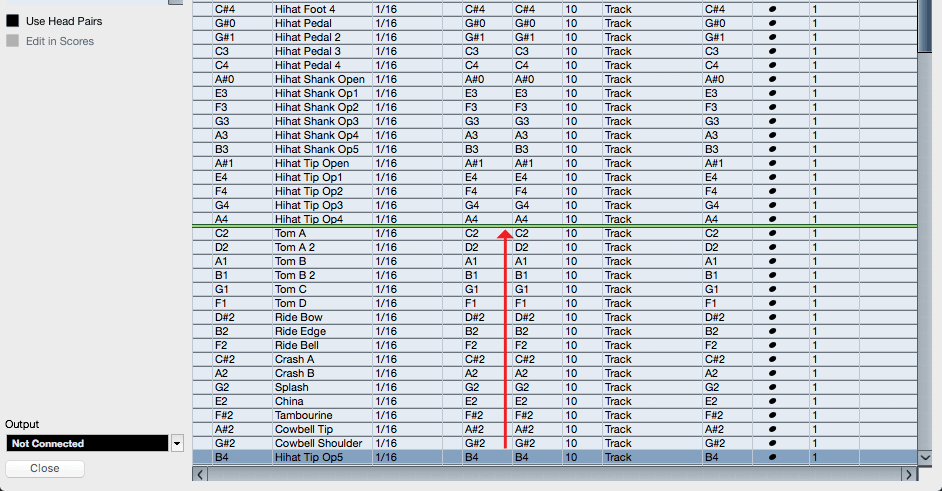
8. You can rearrange the Map’s order by dragging the instruments in the list. Do this now, both to move the unassigned notes to the bottom of the list and to group similar instruments (hi-hats, toms, etc).
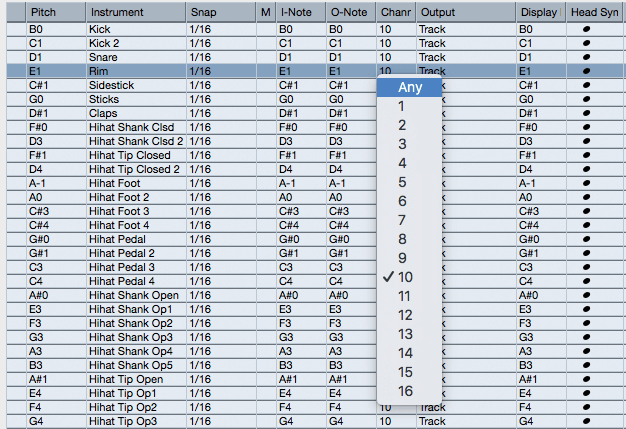
9. Here’s each instrument in the new Map outputs on MIDI Channel 10. Change this for the entire Map by clicking the Channel column of any instrument, holding down Cmd (Mac) or Ctrl (Win) and selecting Any.
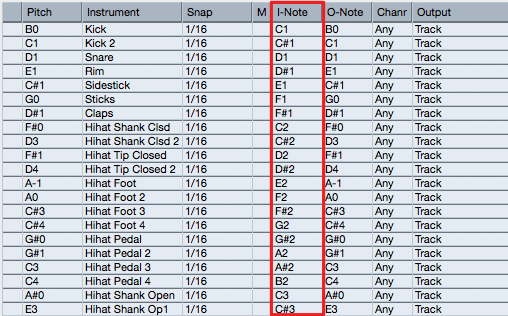
10. Each instrument’s I-Note and O-Note match its pitch value. Modify the I-Notes so that related instruments can be triggered from consecutive keys on your controller. Assign keys that will be comfortable to play.
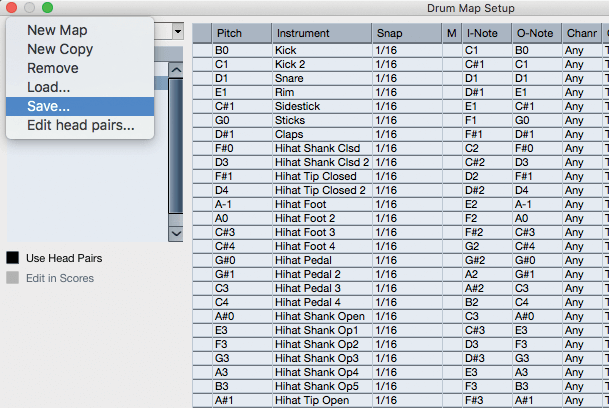
11. Drum Maps are stored inside the active project, but can also be saved as standalone files. Click the Drum Map Setup panel’s Functions menu and select Save and save your Map in a convenient location.
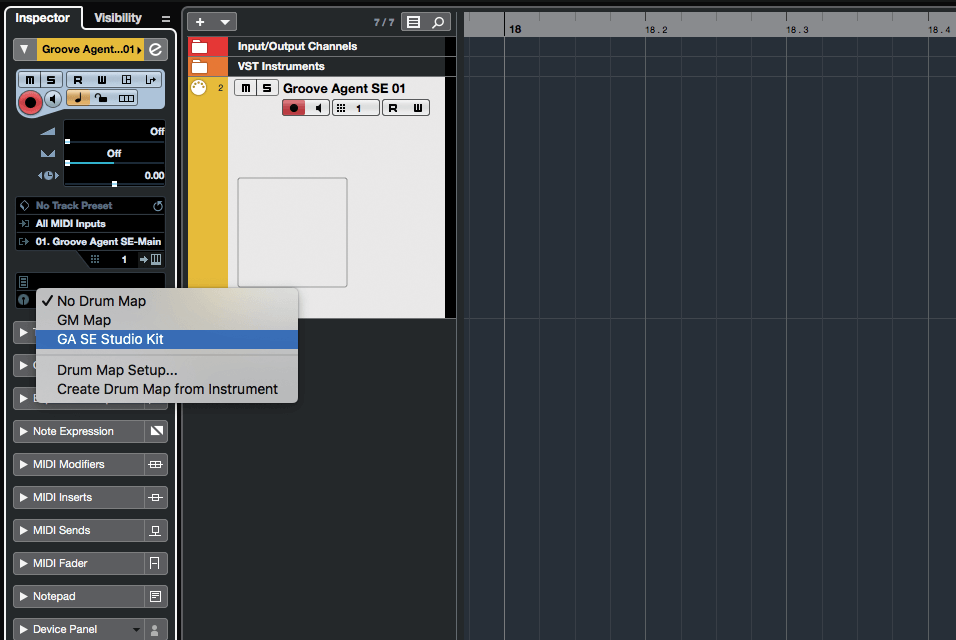
12. Close the Drum Map Setup and Groove Agent panels. Go back to the Track Inspector and click the Drum Maps field, opening the menu. Your new Map is now available in the list, so select it.
![]()
DOWNLOADABLE MAPS Many people post their Drum Maps online, and this can be a good way to save yourself a bit of time and effort in creating your maps. But beware – if the map includes I- and O-Note assignments, then these are unlikely to work with your particular setup and preferred workflow.

13. Play your keyboard and notice how your I-Note assignments determine the instrument that is triggered by any given key. Record or program a hi-hat pattern that uses many of the hi-hat instruments in the Map.
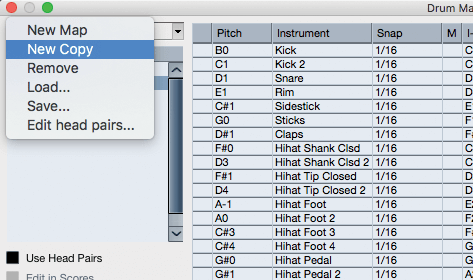
14. Imagine that we wanted to change from the current kit to a GM-only kit, which only has three hi-hat instruments. Reopen the Drum Map Setup panel and select New Copy from its Functions menu.
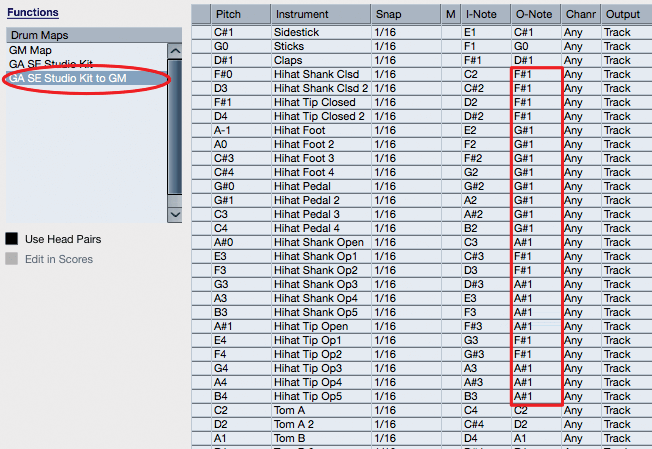
15. Name the new copy by adding ‘to GM’ to the end of the existing name. Change the O-Note on all closed hi-hats to F#1, on pedal/foot hi-hats to G#1, and on open hi-hats to A#1.
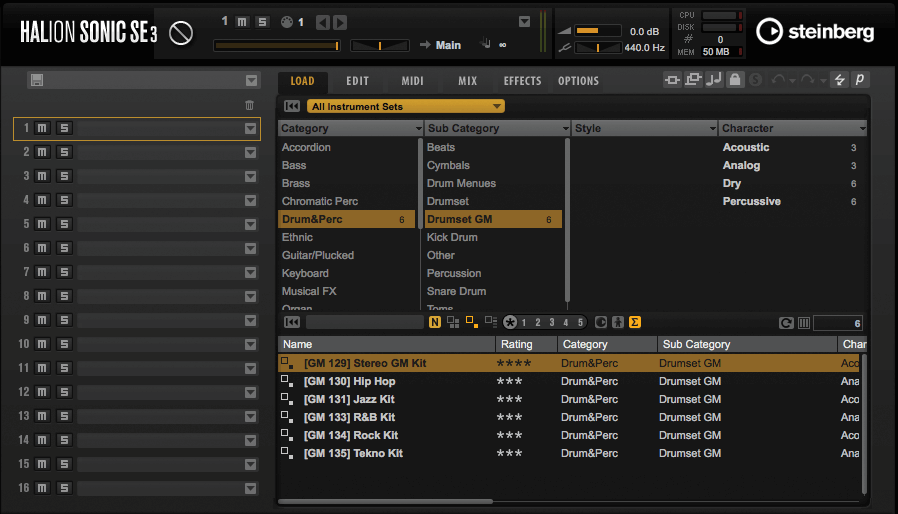
16. Close the Drum Map Setup window. Add an instance of Halion Sonic SE to the instrument rack, creating a MIDI track when prompted. Use Halion’s browser to locate and load a GM drum kit.
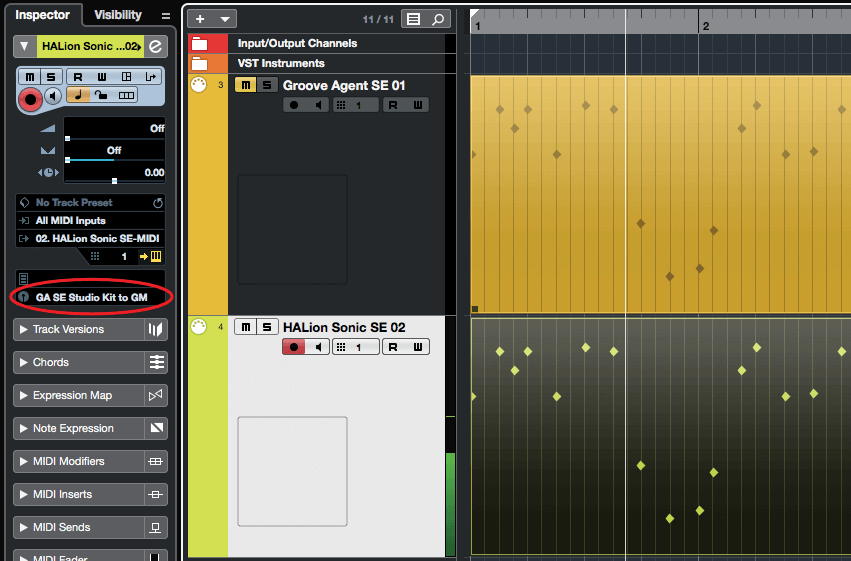
17. Assign your ‘…to GM’ Map to Halion’s MIDI track, and copy your hi-hat pattern to the track. Mute Groove Agent’s track and hit play – your pattern won’t sound as good as it did, but it still sounds right.
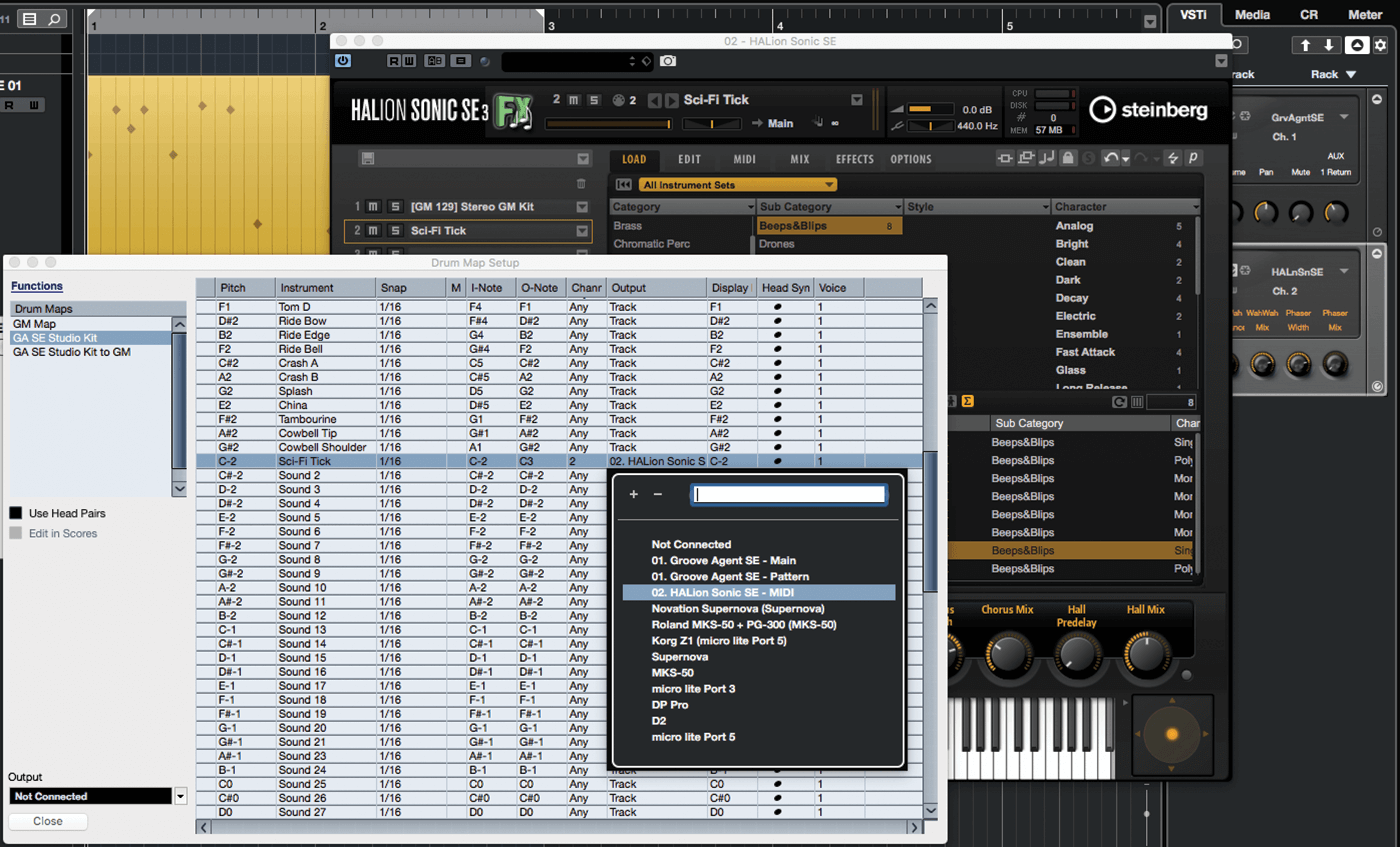
18. Load an analogue sound effect into slot 2 of Halion. Open your map and, in an unused row, create an instrument that’s routed to Halion channel 2. Use the O-Note to determine the pitch it will play.