Crunch and Punch – Using The New Drum Buss in Ableton Live
Live 10’s new Drum Buss audio effect gives us lovely and dirty new ways to process and boost beats – and any other sound, if you so wish. Martin Delaney gets into a groove to reveal Drum Buss’s dirty side… Drum Buss was one of the new audio effect devices introduced in Live 10, and […]
Live 10’s new Drum Buss audio effect gives us lovely and dirty new ways to process and boost beats – and any other sound, if you so wish. Martin Delaney gets into a groove to reveal Drum Buss’s dirty side…
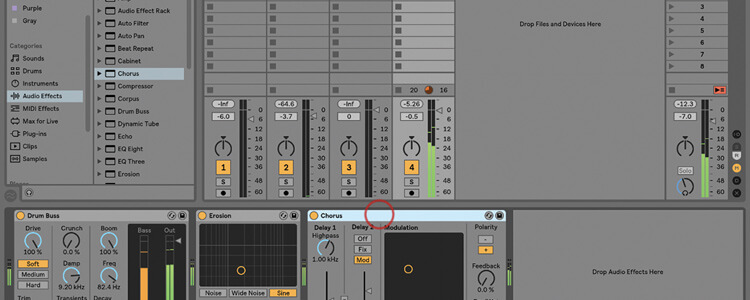
Drum Buss was one of the new audio effect devices introduced in Live 10, and is designed as a one-stop solution for your beat processing needs. It includes distortion, compression, equalisation and transient shaping.
It also has a very cool Boom control, for what Ableton calls ‘low-frequency enhancement’. You could say the most attractive things about Drum Buss are that it reduces dependency on third-party plug-ins for drum processing, and that it introduces some much-needed dirt into Live’s range of factory plug-ins.
Who gets it?
Drum Buss is Live 10 only (in Standard and Suite) and, unlike other Live elements such as Operator, isn’t available as a separate purchase. You can replicate most of what it does with a combination of other plug-ins, but it has a charm of its own, and you’ll benefit from the convenience of it.
Also, it’s controlled more immediately on Push, as a single device with a simple interface. The example set we’ve provided uses audio clips for convenience and compatibility reasons but Drum Buss works just as well on MIDI instrument tracks.
The presets are a good way to get a quick handle on what Drum Buss will do, and it can go a long way with just a few controls. Drive is applied to the input signal, and offers Soft/Medium/Hard variations, the latter adding more bass; and Crunch adds distortion to the upper-mid and higher frequencies.
The Dry/Wet control makes all the difference; it’s possible to come up with a way-too-much setting, then use Dry/Wet to dial back the excess, and make sure the substance of the clean signal gets through. Far from being a ‘set and forget’ plug-in, Drum Buss sounds great if you tweak or automate the controls in real time, whether it’s during recording to capture automation, or in performance.
The example set also includes clips containing a full stereo mix, a bass synth part and a piano part, to encourage you to try Drum Buss with other types of content than drums. Although the name ‘Buss’ indicates it’s intended to process an entire beat, you should definitely experiment with it on individual chains within a drum rack as well.
If you want to apply Drum Buss to a certain frequency range, create an audio effect rack with two chains, add an EQ Three to each, then add Drum Buss to the bottom chain. On the top chain, disable EQ Three’s ‘L’ switch, and on the lower one, disable ‘M’ and ‘H’. Now the mids and highs are preserved, while Drum Buss does its thing with the Lows. Vary according to taste, putting it on the mids or highs instead, as you prefer.
Boom is awesome. It’s a handy, built-in way to get much more out of the low end, without adding other plug-ins or messing around with routing options. It has controls for Level and Pitch and the low end is tuneable, thanks to a simple note display, which updates as you move the Freq control.
When it shows + or – your target note, just click in the box where the note is displayed to force it to the nearest semi- tone; this spans the range from B-1 to F1.
Once again, Boom is a tool that you can set to a fixed value and leave it alone throughout your mix or live set, if needed, or else you can use it as an exciting interactive way to boost specific sections. The Boom Audition button is a useful diagnostic option so you can really check in on what’s happening with the low end, but it’s also a creative tool in its own right.
Once you’ve solo’d that low end, you start looking for other sounds to feed through Drum Buss, and you start thinking about adding more effects, and how you can freeze and flatten the track so you can recycle the resulting sounds. Boom also works on live inputs, so you could use it during performances.
This is great with drums, of course, but it’s also good for experimentation, producing weird, muffled, vocals, and generating long bass tones from background rumble.
Even light finger taps on a table top can trigger sample-friendly tuneable bass notes. It could be another way of isolating the low end of a track for processing, instead of using that EQ Three method I mentioned earlier.
Damp proof
The Damp control dampens the signal after processing, but before passing through the Boom section; the transient shaping works great too, emphasising or de-emphasising the transients of mid/high frequencies, again saving us from having to split the frequencies or use extra plug-ins to achieve the same results.
Drum Buss is a winner whichever way you look at it; it’s awesome for straightforward beat processing, but you’ll get the most out of it once you start experimenting, and using Boom to put a kick in the rear end of your sound, or to create entirely new sounds for sound design and sampling.
Crunch and Punch – Using the New Drum Buss: step-by-step
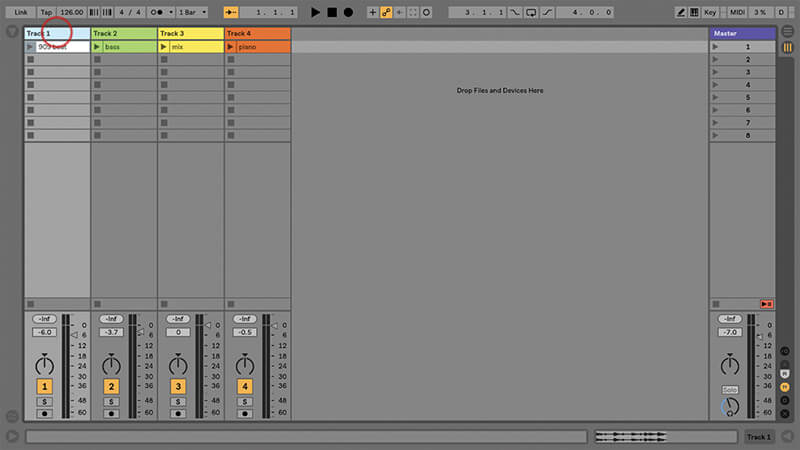
1. As Drum Buss is Live 10-only, you’ll need a copy of Live 10 to follow this tutorial – you can download the demo from www.ableton.com. Our example set on the DVD is called ‘Drum Buss tutorial’.
2. This set contains a selection of audio tracks, with clips containing beats, plus a few bass and synth sounds ready for you to use, organised with one clip on each track.
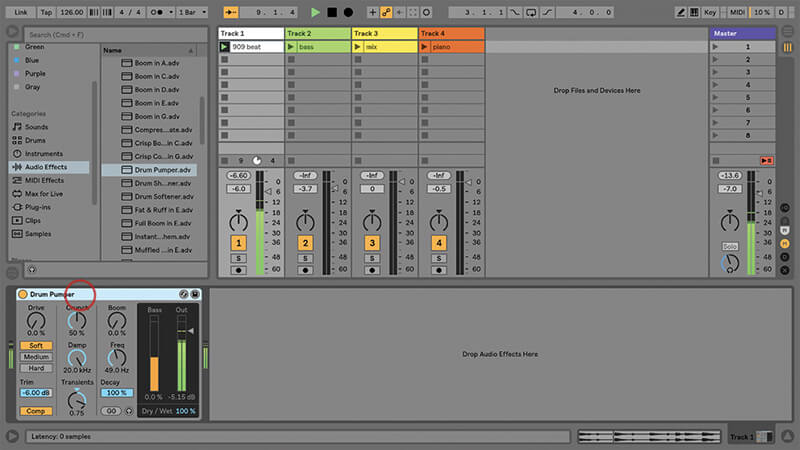
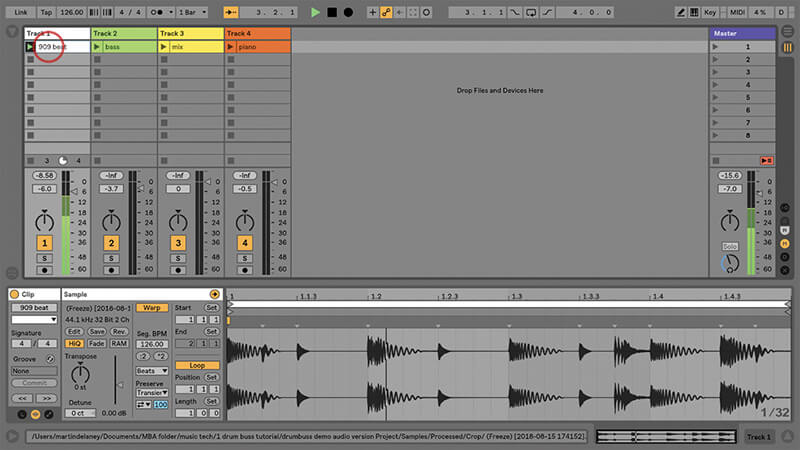
3. Launch the drum beat clip in Track 1, then load the Drum Buss preset called Drum Pumper into the same track. This preset is a good introductory example of what Drum Buss can do.
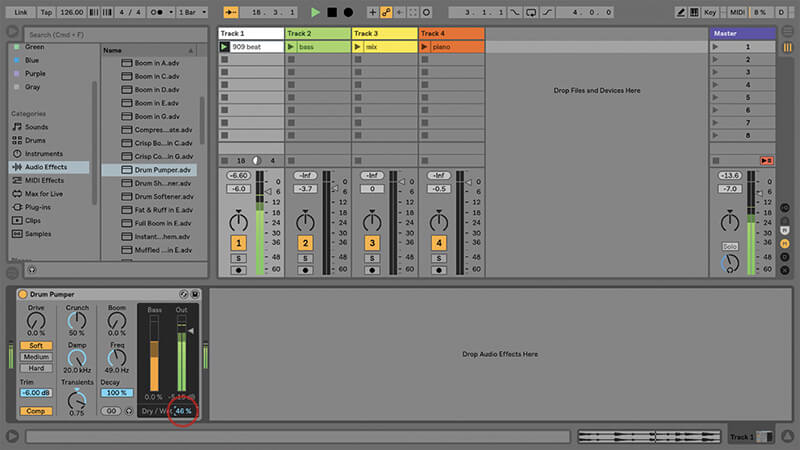
4. It might sound a bit too much, though, a bit too heavy. Instead of fiddling with the other controls, use the Dry/Wet control at the bottom right to blend some unaffected signal back in.
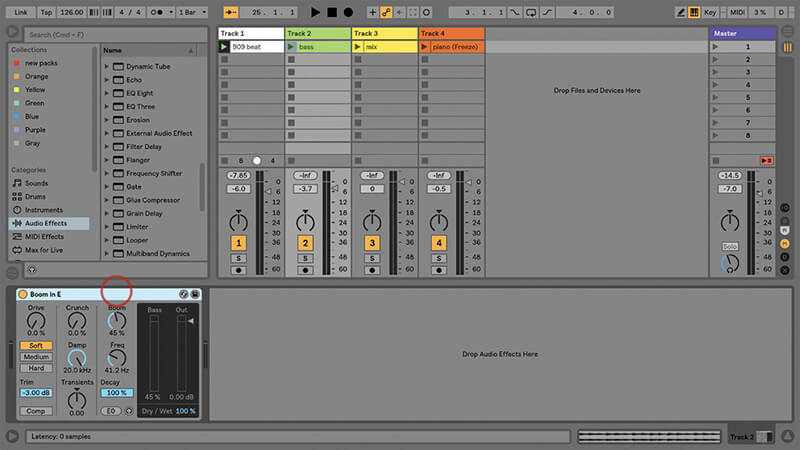
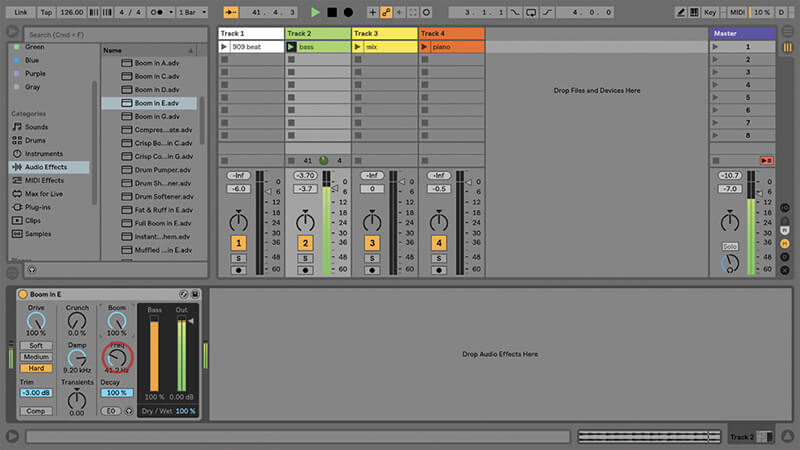
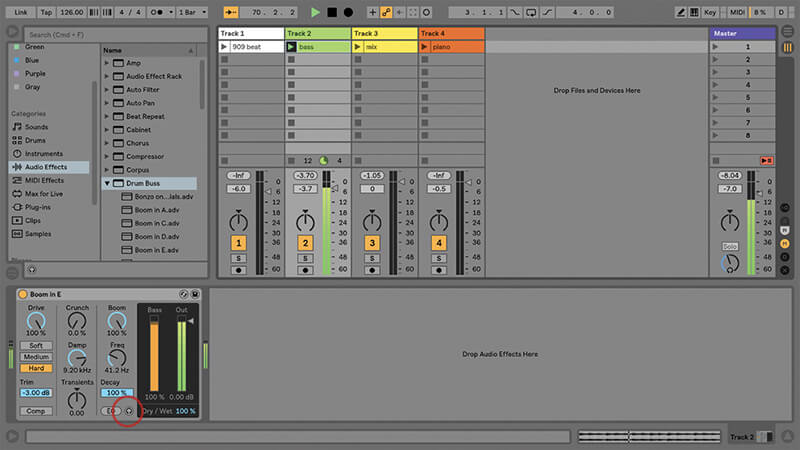
5. The next track, imaginatively titled ‘Track 2’, contains a bass clip. Try the Drum Buss preset Boom In E with that; just because it’s a drum plug-in doesn’t limit us to using it with drums.

6. Raise Drive to 100, and set the distortion to Hard. Reduce Damp to around 9.20 kHz. Finally set the Boom Amount to 100%. If you want even more presence, turn on the Comp switch as well.

Ableton has got grubby with Live 10. The focus with Live used to be on clean instruments and effects. This has changed with Live 10, however, and now we have Drum Buss, the rather fantastic Pedal distortion and the tape-type noise options within Echo. Live, like us, lives in gritty times…
7. This preset is already tuned to E, but if it wasn’t, you’d move the frequency control until the note value shows E- or E+, then click the displayed note to force it to the nearest semitone.

8. Track 3 contains what is effectively a section of a full mix. Again, there’s no reason why you can’t try Drum Buss on this as well – it can add a boosted, crispy, edge to anything.

9. We’ve already got Drum Buss on our bass track, and that tasty Boom control maxed out, but let’s explore Boom some more and see what else we can do with it.
10. What makes Boom interesting for sound design is that it can be solo’d. It’s a great way to create sub rhythms and odd effects. It’s the usual Ableton solo button on the plug-in.
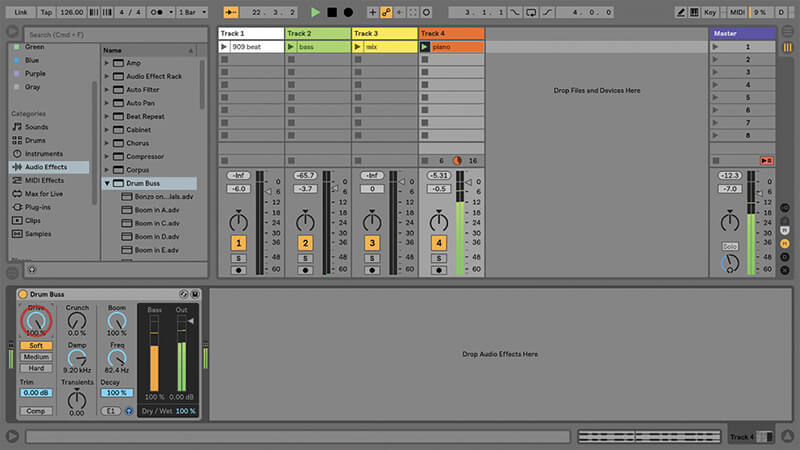
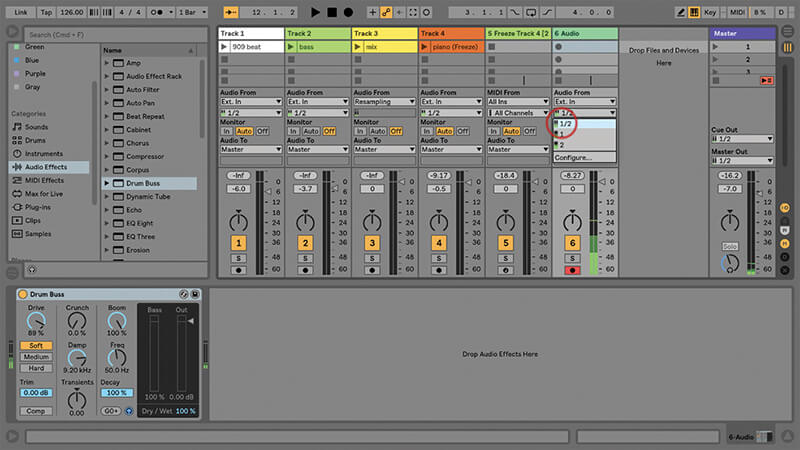
11. Add the default Drum Buss to Track 4, and solo Boom, then set the Amount to 100%, and Freq to E1. Bring the Drive up to 100% so we’ve got more level to work with.

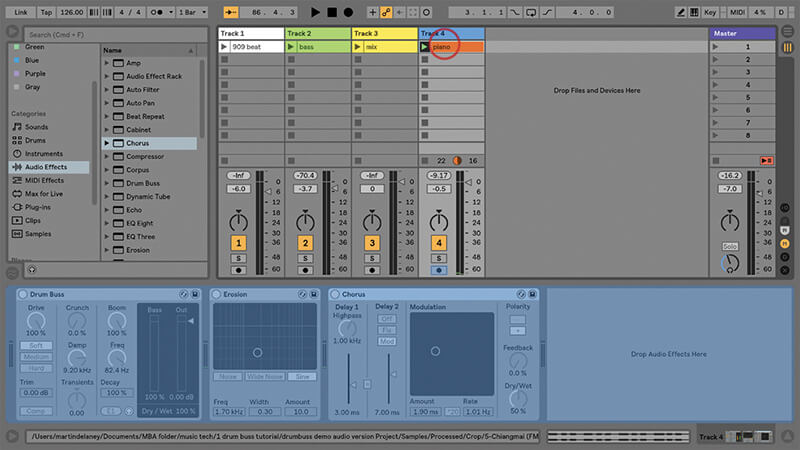
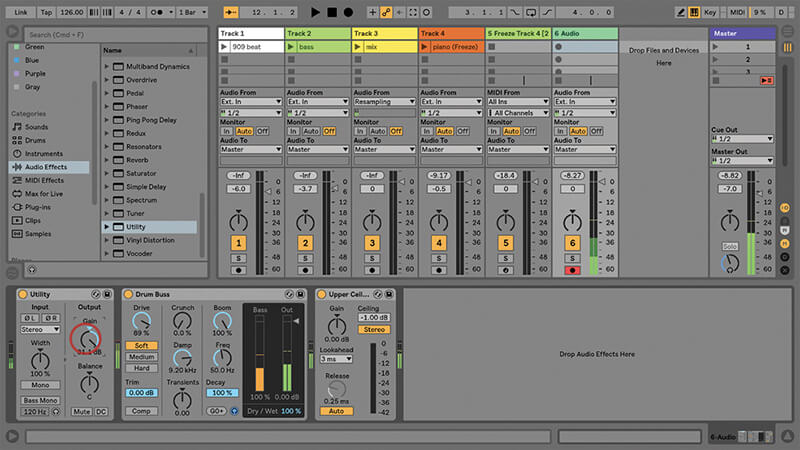
12. Add the default Erosion audio effect to track 4, set Amount to 100 and Freq to 1.70. Sounds pretty cool to me – but maybe even better if you add the Chorus effect after it.
Not Got Live 10? You can get some of the effects of Drum Buss with other plug-ins in Live, namely the Compressor, EQ and Overdrive. Try simply chaining these together with a bit of bass boost at the end. It won’t be quite the same as Drum Buss, though, which adds a touch of Je ne sais ‘Buss’ pourquoi.
13. If that’s still not enough, you could even try freezing and flattening the track containing this clip, with Boom still soloed, so all you’re left with is an audio sample of that low bass part.
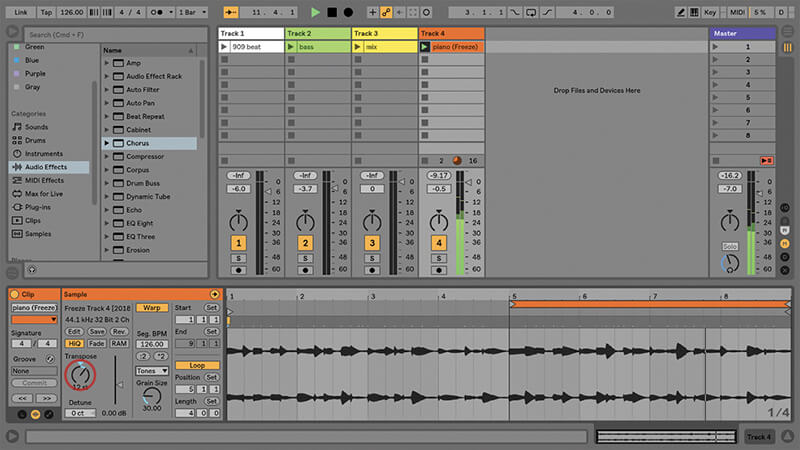
14. Now you’ve got a clip with the Boom only, it might start to sound interesting if you use the audio clip’s Transpose control to pitch it upwards. Try different Warp modes alongside this.
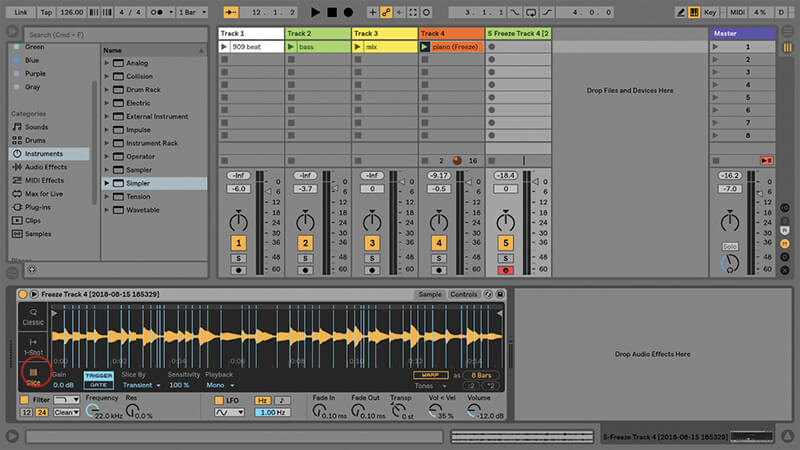
15. If you like to trigger your samples in real time, drop that new frozen, flattened, transposed clip into a Simpler track and play it from a keyboard or Ableton Push. Try Slice Mode.
16. You can even use Boom on a live input. It’s quite a bizarre effect with live vocals, and you probably won’t want to use it all the time, but you’ll get some cool and unpredictable results
17. On a more day-to-day level, you can use Drum Buss with live inputs from instruments, it’s all about the Dry/Wet (and maybe Utility and Limiter to manage levels in and out).

18. Drum Buss is a gritty drum tool, and a dirty bass-noise-maker. It’s convenient to use and can do the work of several plug-ins, within one handy interface.