Weekend Workshop: Create video game sounds with Helm for free
Make 8-bit video game sounds and chiptune arps with the great-sounding open-source Helm synth and some tracker maths.
Helm 8-bit Weekend Workshop
The iconic soundtracks to early video games were generated in real time using hardware sound chips with seriously limited features. Some ingenious techniques were employed to circumvent those limitations. In this Weekend Workshop, we’re going to explore some of these techniques.
Helm is an open-source polyphonic subtractive synth with a stunning interface that sounds as good as it looks. Animated envelopes and modulation meters show you what is going on at all times and a built-in oscilloscope lets you see what you’re hearing. Modulation is a key tool for creating great sounds, and Helm has extensive modulation capabilities that are easy to configure. Beyond that, Helm has three oscillators, nine filter types, plus three envelopes, three LFOs and a step sequencer. These features will make sense soon enough.
This time, we will be creating fairly basic sounds, but you will get familiar with programming patches with Helm and applying modulation in exciting ways.
What you’ll need:
- A DAW
- Helm, which you can download for free, here.
A couple of quick tips as you start using Helm. If you need to change the size of the plug-in window, click the Helm logo in the upper left and select the window size you prefer. For fine adjustments to parameters, you can hold down the Command (or Windows) key on your keyboard while dragging the mouse.
1. Modulation in Helm
Modulation is powerful. Everything from subtle vibrato to bold filter sweeps can be added to your patches using this feature. In this section, we will learn the basics of setting up modulation for any available source or destination.
Setting up modulation in Helm is easy and intuitive. When modulation is active on a parameter Helm’s bright green animation indicates the range and frequency of movement. At a glance, you can see all active modulations by looking for the green animations.
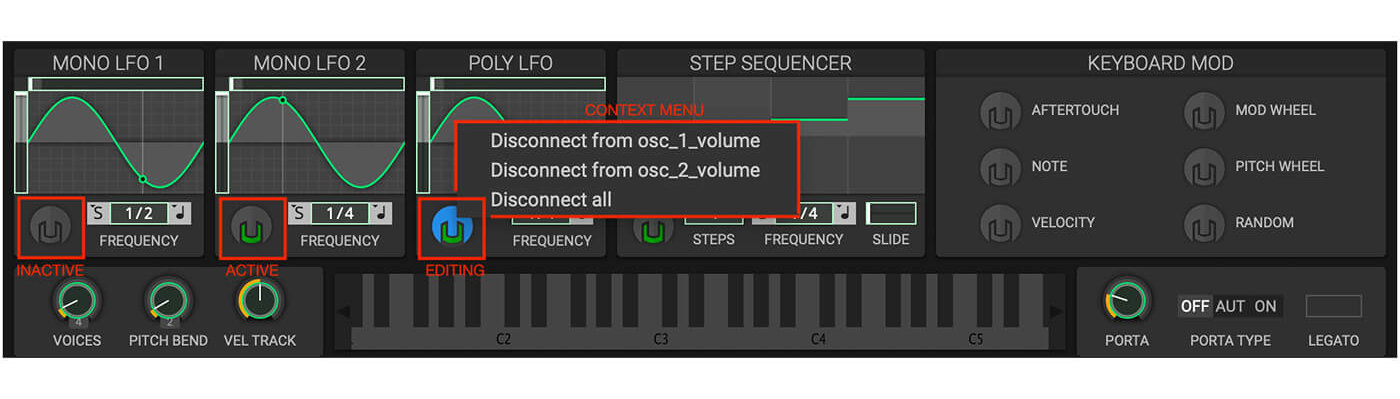
Each modulation source has a Helm icon that indicates when there are one or more destinations connected. The screenshot shows the various states, and also the context menu listing all destinations and a ‘Disconnect all’ option.
Let’s start by loading the Init patch provided by Helm. Right-click on the patch name in the top left of the UI and select Load Init Patch. It’s a good starting point because all filters, modulation, and effects are turned off.
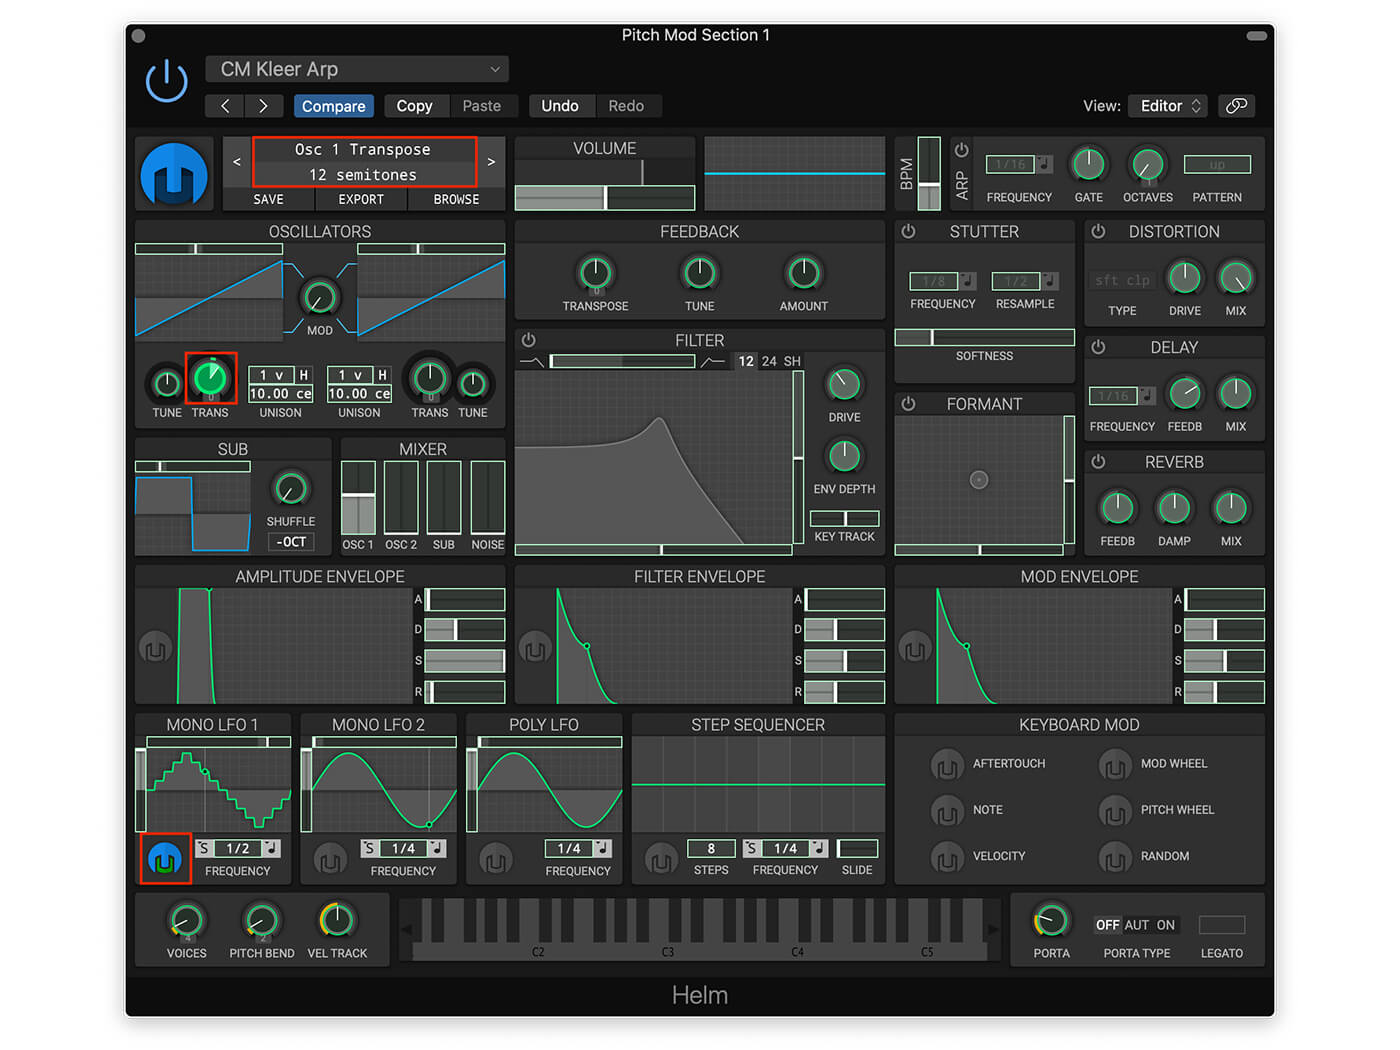
For our first 8-bit sound, first, turn down Osc 2 in the mixer, so we only have one oscillator in play. Then, we want the LFO to modulate the pitch of the oscillator musically. To do this, click on the Helm icon for Mono LFO 1. The icon will turn blue to indicate you are in edit mode. Next, go to the Transpose parameter for Oscillator 1 and drag the modulation amount to 12 semitones. The modulation amount is shown in the Mini Patch Browser near the top of the screen, as shown below.
To create an 8-bit style pitch modulation, click on the LFO shape until the context box reads ‘9 pyramid’. This is a waveform that looks like a stepped triangle wave that creates an arpeggiated sound.
Your results should be similar to the sound clip below. Try cycling through different LFO shapes and listen for how they affect the pitch of your sound. If you want to explore the feature further, try adding more modulation destinations.
2. Basic waveforms
Early video game sound chips were limited to basic waveforms, and that is part of the iconic sound. We will start by creating a square wave based patch that will be the basis for more elaborate patches.
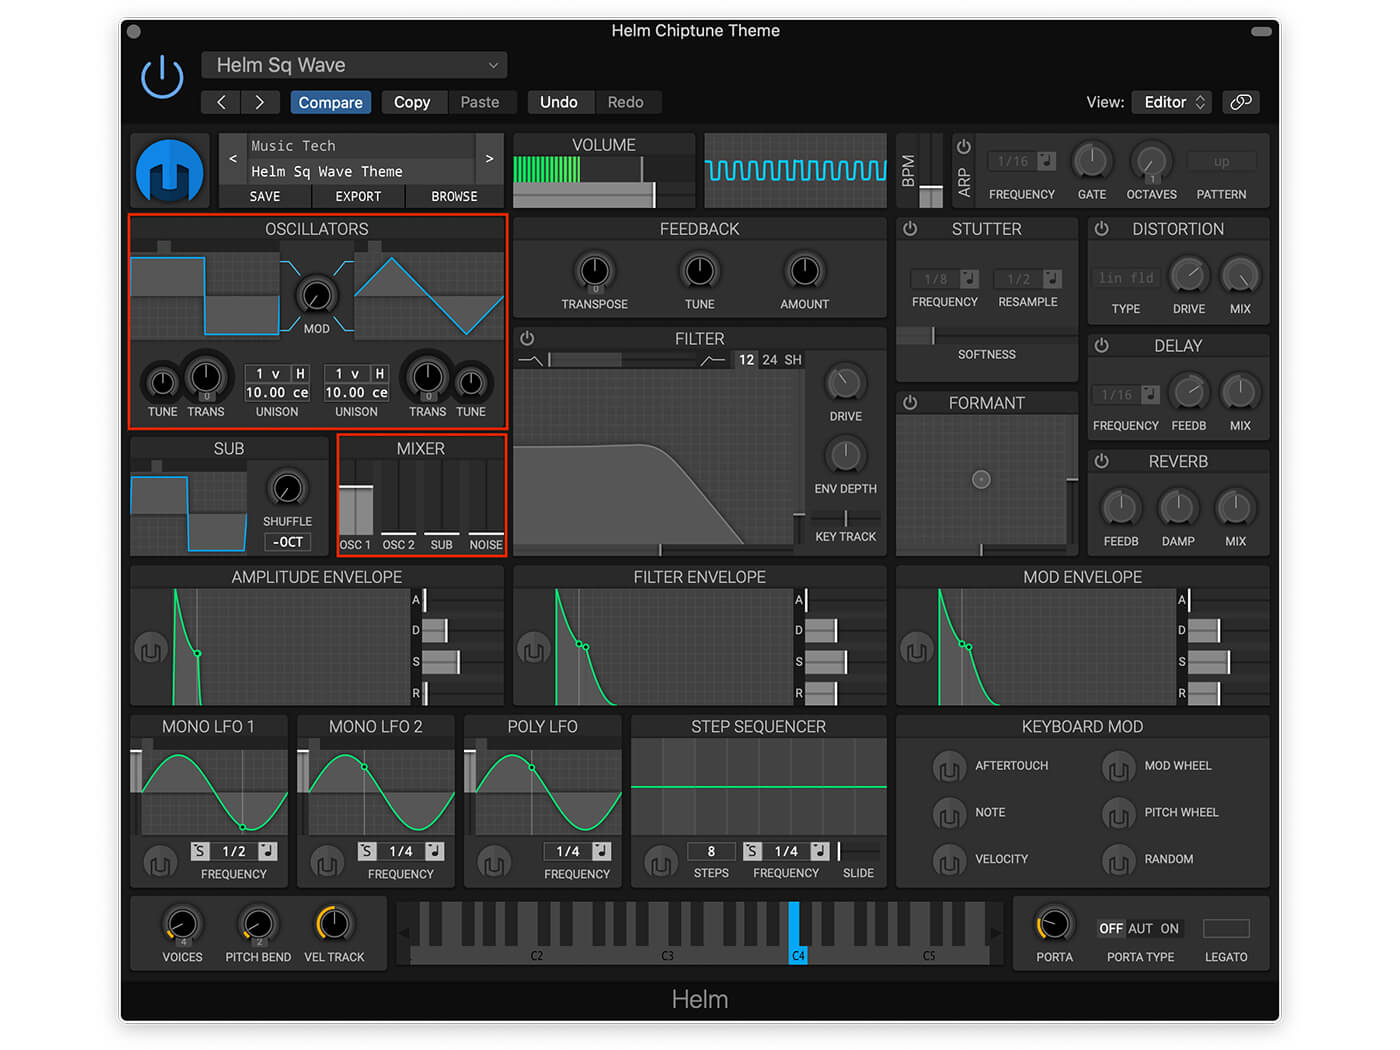
Again, start by loading the Init patch. To stay true to the 8-bit synth sound, we will only be using Oscillator 1. Recheck the mixer that only Oscillator 1 is turned up. Next, change the waveform for Oscillator 1 to a square by clicking directly on the waveform until you see a square shape. Now you will hear an unadulterated square wave when you play a note.
To replicate the dynamics of a typical console game theme song, we will lower the sustain level and add more decay to the Amplitude Envelope. The idea is to create a more percussive sound with a little more release. Adjust the attack to about 0.009 secs (very fast) and the decay to 1.250 secs. Pull the sustain level down to about 0.440 and increase the release to 0.250 secs.
It is amazing how much video game music has been created with this basic sound. Take a listen to the theme music below created with the patch we just created. Now start composing your next great video game theme song.
3. Rapid arpeggios
A frequently used technique in early video games and current chiptune music is rapid arpeggios. With limited voices available, a rapid arpeggio creates the illusion of a chord while only using one voice. There is a lot to explore with arpeggios, so we will cover two examples here and one in the next section.
Duplicate the square wave patch onto a new track and hit the power button for the arpeggiator module in the top right of the UI. Set the Frequency to 1/64 for rapid notes, Pattern to Up, and the Octaves to 2 for a little range.
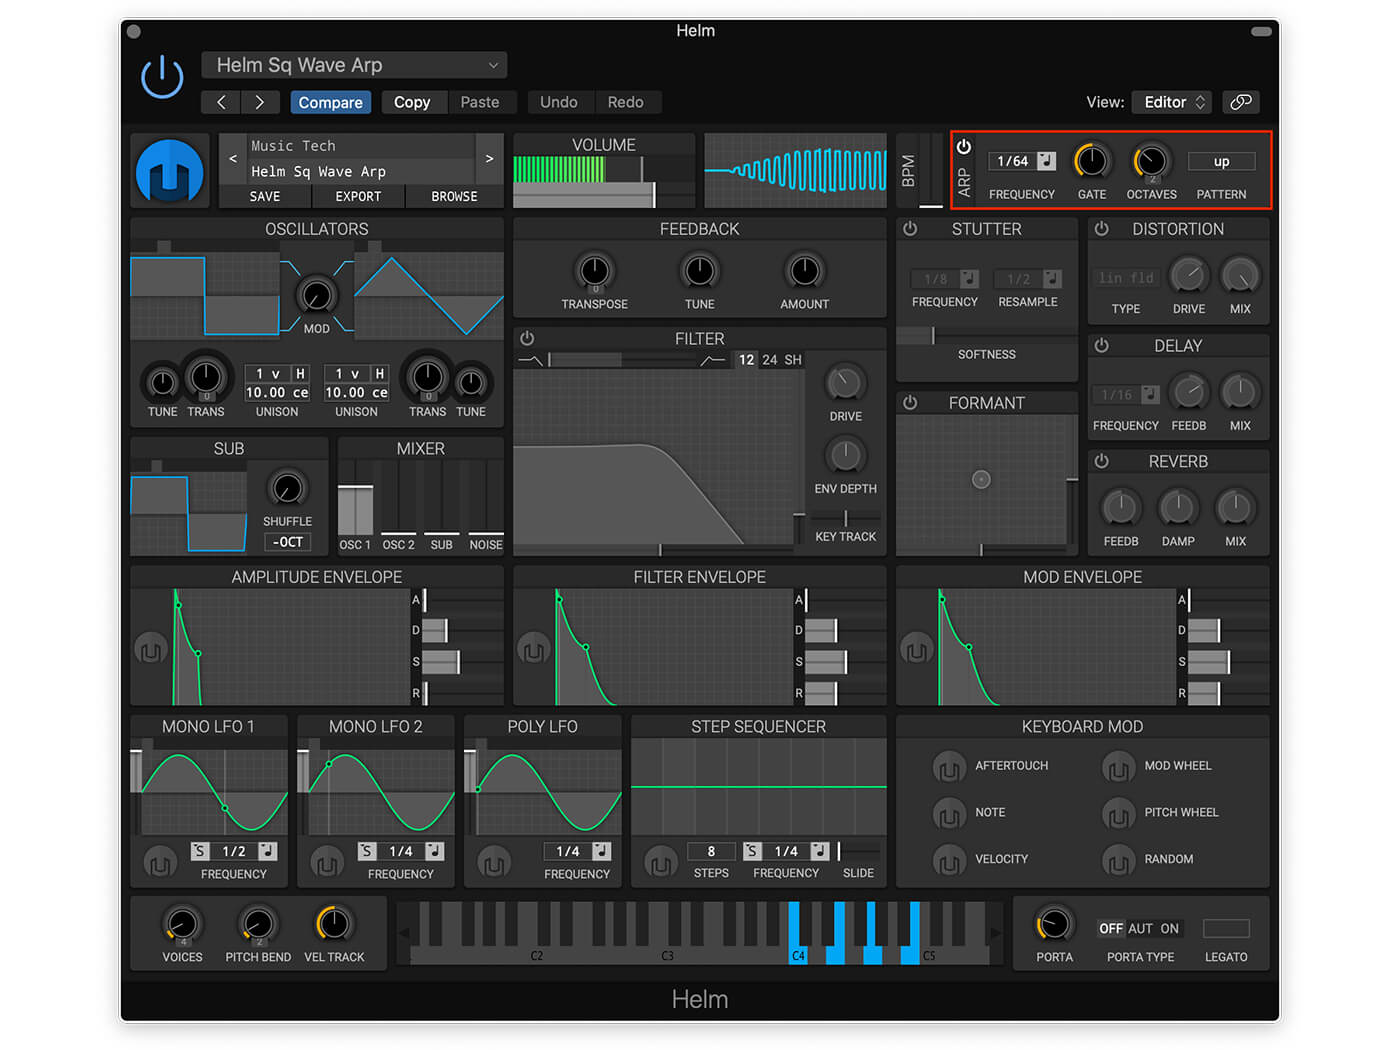
Now play or record a few chords in your DAW, maybe a Cmaj7 and listen to the beauty of a rapid arpeggio. This sound clip uses the arpeggiator settings above with the square wave patch created in the previous step.
4. Power up
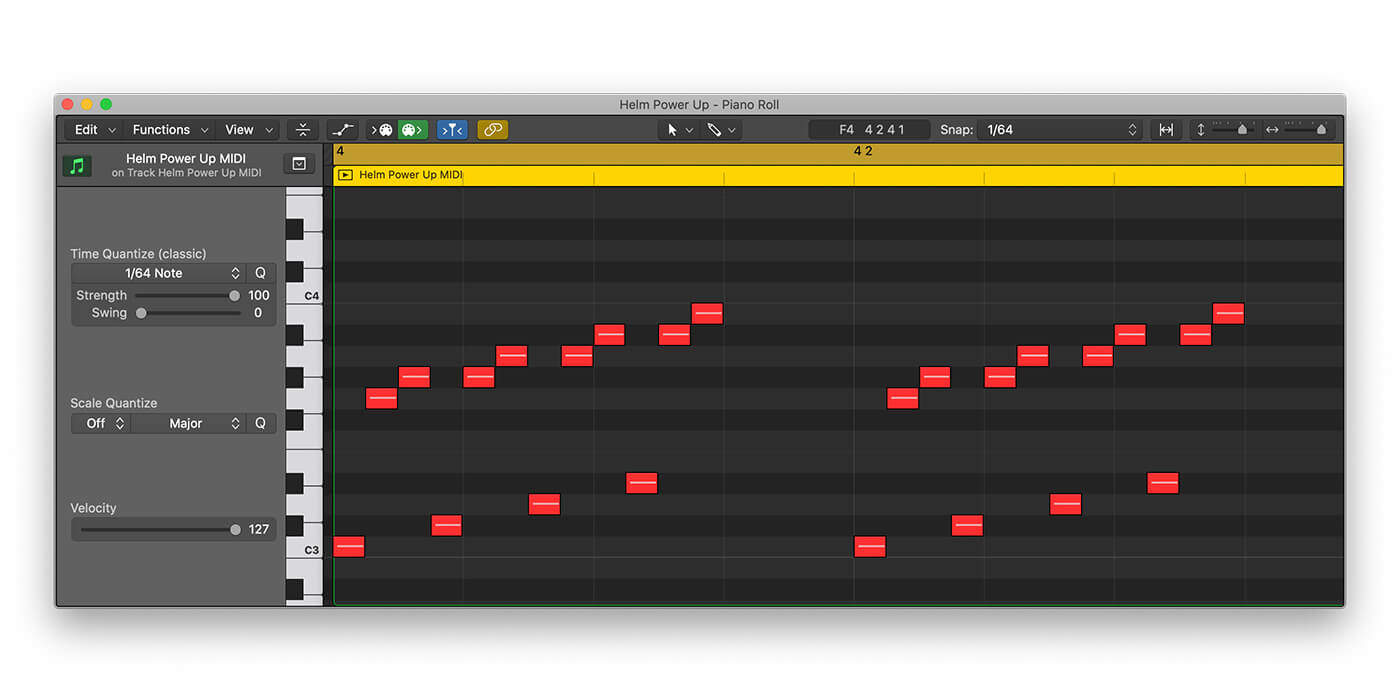
Another arpeggio technique is to simply enter a rapid series of MIDI notes in your DAW. Let’s create a familiar video game sound, by entering a 12 step sequence in your DAW on a 1/64th note grid. Start with the notes C3, G3, and G#3, then repeat 3 times increasing by one semitone each time. Try a DAW tempo around 80 bpm and reduce the Amp envelope release in Helm to about 0.045 so the notes don’t overlap.
This approach allows you to make much more complex arpeggios. Experiment and have fun creating elaborate arpeggios.
Here’s an example piano roll and sound file.
5. The Step Sequencer
For this sound, we will use a third technique for creating arpeggios by using the sequencer module in Helm. The sequencer module is a handy modulation source because the value of each step, and even the number of steps, can be set per patch. This will allow us to dial in a familiar video game sound.
To achieve our arpeggio, the Step Sequencer will rapidly change the pitch of Oscillator 1 to the specific note values we manually enter. Choose the modulation source by clicking the grey Helm logo in Helm’s Step Sequencer module. Set the modulation destination by dragging your pointer over the Oscillator 1 Transpose knob and set it to 12 semitones. The green overlay will indicate the amount of modulation. Click the blue and green Helm logo again to exit modulation editing. Now the sequencer module can control the oscillator pitch.
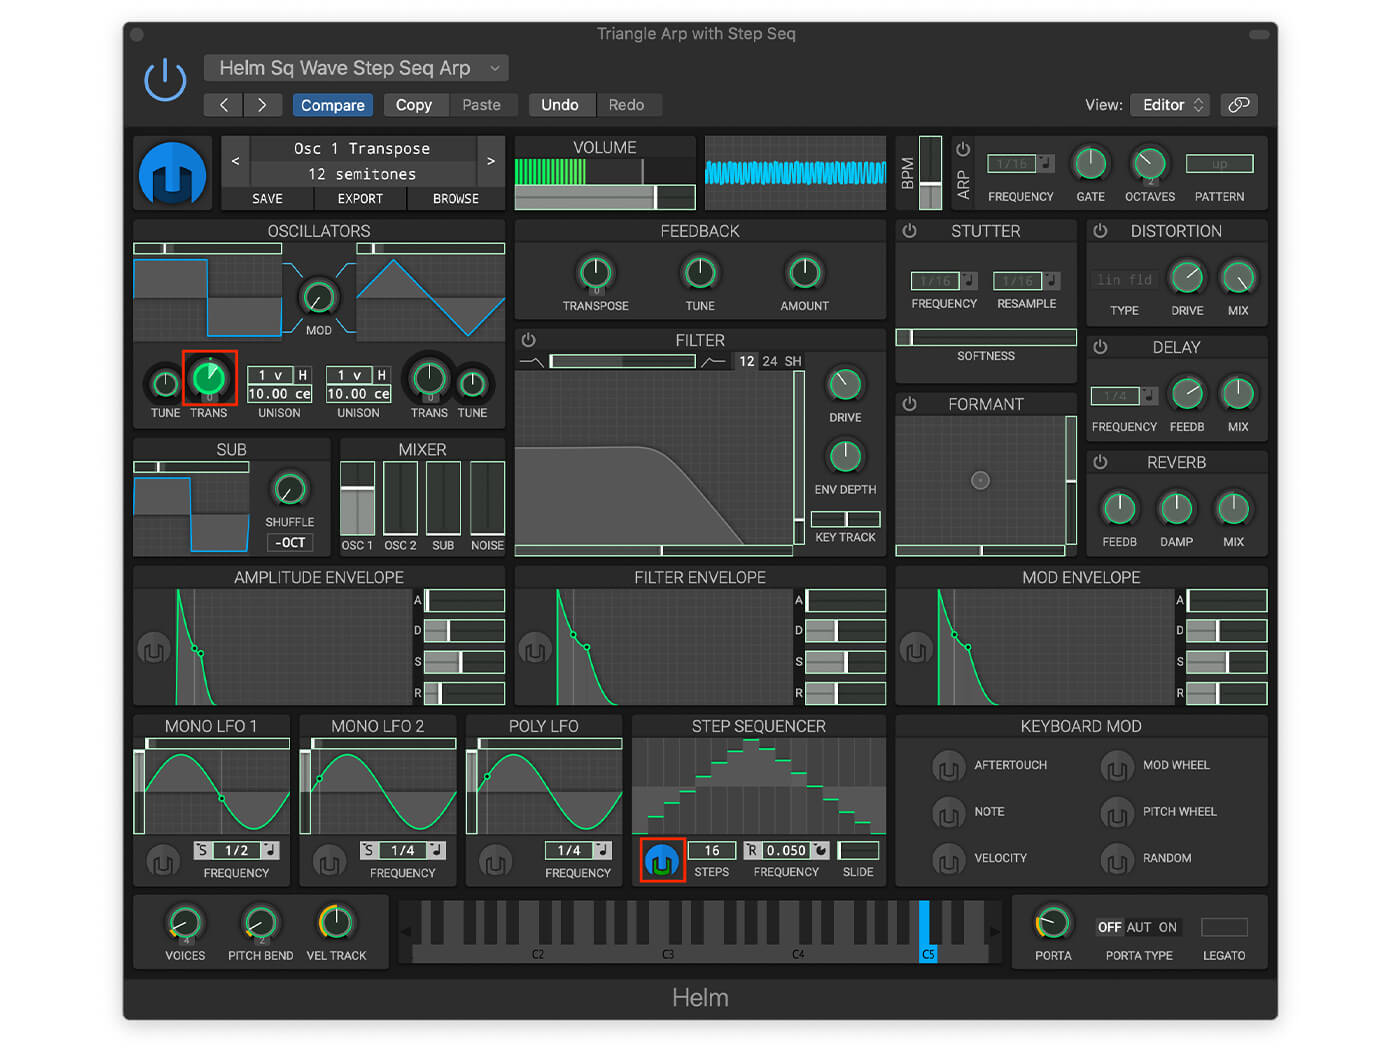
Set the number of sequencer steps to 16. To start the sequence over each time a key is pressed, set the Step Retrigger to Retrigger. Adjust the frequency to 1/64 to rapidly change the pitch. Increase the Amplitude Envelope sustain to 1.000 to keep the level consistent while a note is played. In the Step Sequencer module, draw in levels for each step to create an inverted “V’ shape as shown below.
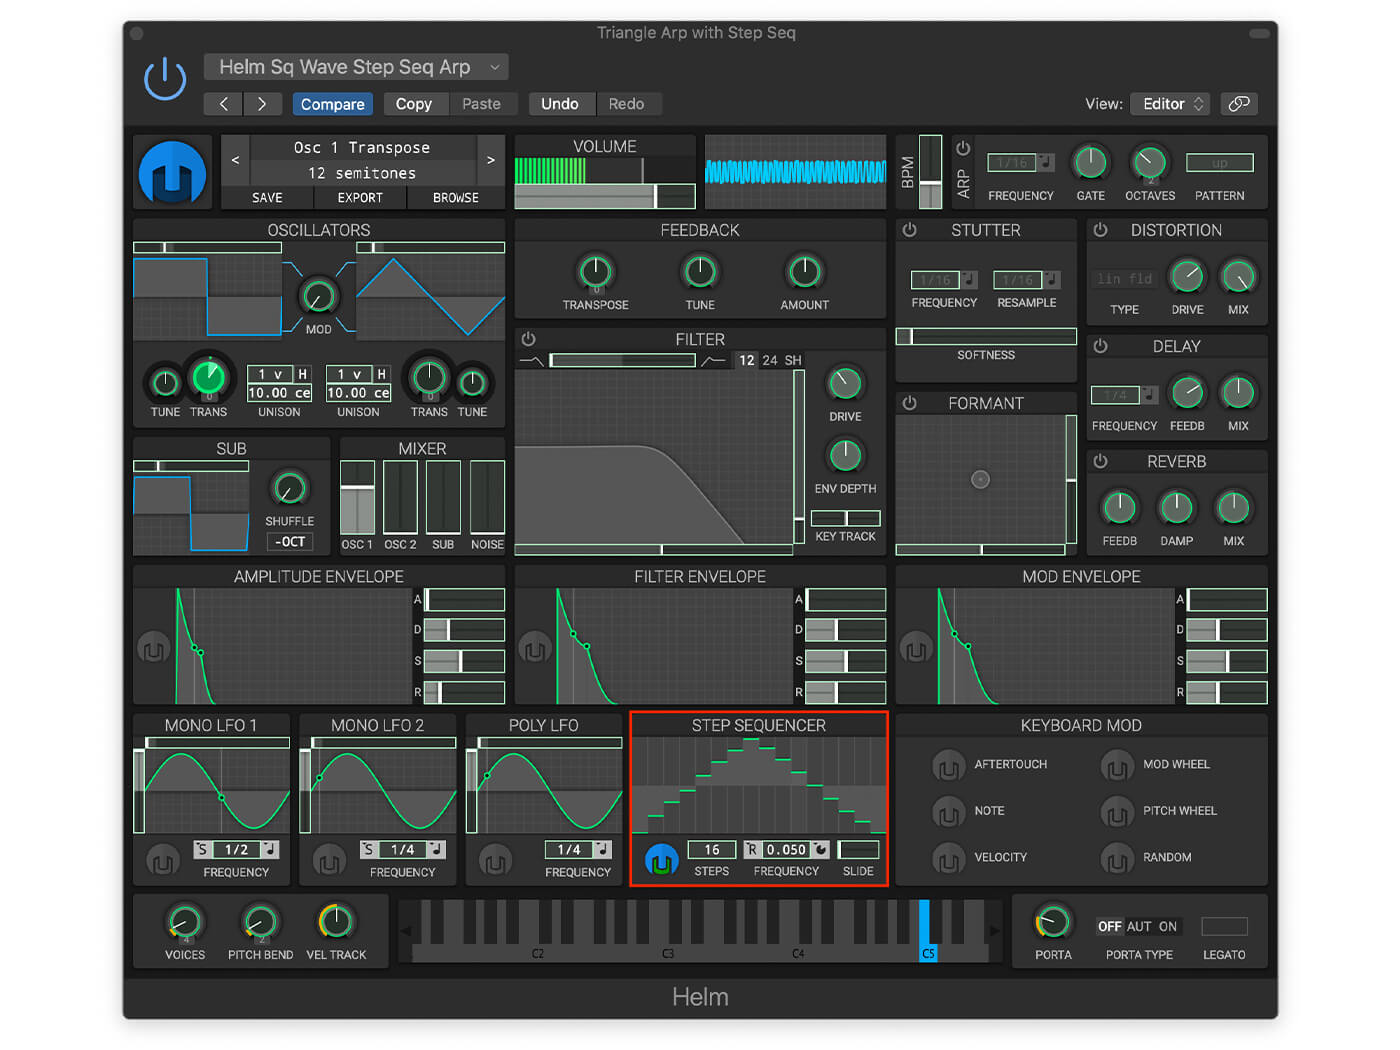
Play a C5 note and listen to the familiar video game sound you have built. Try changing your DAW host tempo to make it sound like this example.
We’ve explored a few aspects of Helm while trying out techniques used to create early video game music and effects. To create realistic chiptunes that sound like 80s soundtracks, try working within the limitations of early game console sound chips. For example, the Nintendo NES was only equipped with two pulse wave channels, one triangle channel that was often used for bass, and a noise channel for creating percussion sounds.
For extra credit, uncuff yourself from 8-bit limitations by adding built-in effects such as feedback, stutter, formant, distortion, delay and reverb. Helm’s oscillators have 11 different waveforms, and the LFOs have 13 waveforms including sample and hold. Give these a try, using the same compositional approach. Finally, you might want to try modulating the frequency of the LFOs and step sequencer for some interesting effects.
Have fun chiptuning!
Anything you do make, please share with the MusicTech Creator Community on Facebook. We’d love to hear how you got on and what other tutorials you’d like to see.
Check out more Weekend Workshops here.