Weekend Workshop: Make evolving granular soundscapes with Ribs
Make a unique ambient pad from virtually anything with this esoteric free plug-in.
Weekend Workshop ribs granular
Granular synthesisers can take your sound design to places that are impossible to reach with other forms of synthesis. That’s because granular synthesis uses samples or live audio, making results unpredictable and heavily dependent on the type of material you put into it. The upside is that with granular, you can morph even the most mundane samples into something spectacular – from otherworldly soundscapes to glitches, evolving pads and bass sounds. However, it’s also easy to make a noisy mess, suitable only for the most experimental of productions. In this Weekend Workshop, we’ll show you how to turn a very simple bassline into an ambient, evolving texture.
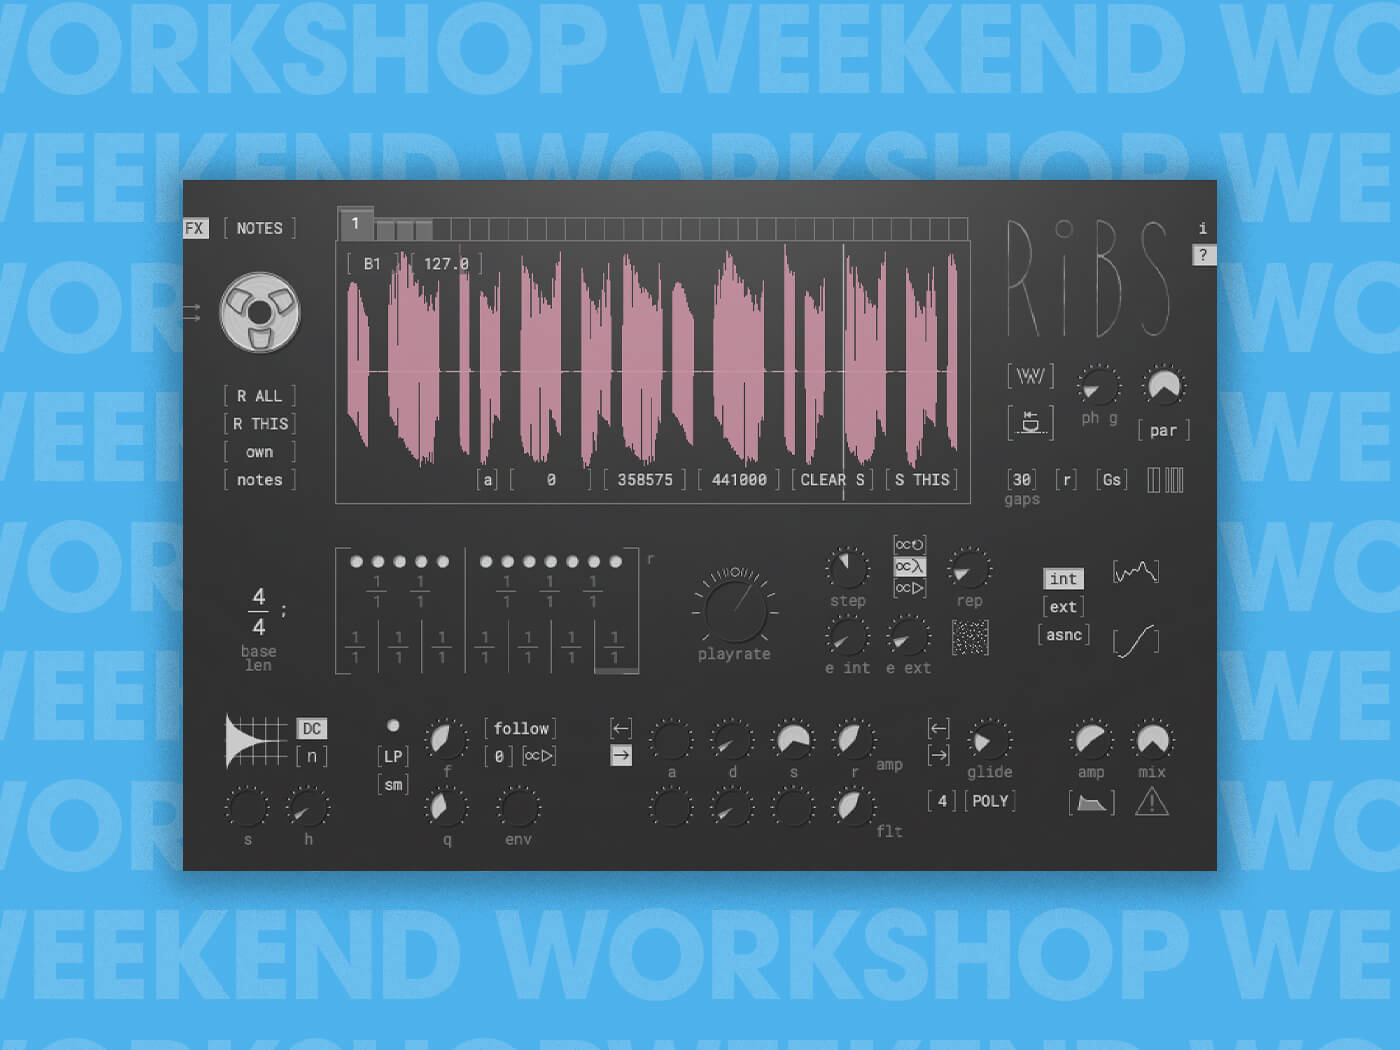
At a basic level, granular synthesis works by chopping an audio source into slices called grains, and manipulating their size, playback speed, order and direction. Granular synth plug-ins work in two main ways: as an insert effect, or as a full-fledged instrument. We’ll be using the freeware instrument Ribs, which can do both.
Ribs was released in 2017 by Hvoya Audio and is the work of a single developer, Eugene Yakshin. It’s available for Windows and Mac in VST and AU formats and, helpfully, being 64-bit, it also works with macOS Catalina. Ribs has all the main features that are standard among granular synthesiser plus some extras, including five filter types with three different modes, 32 voices and a big stack of ‘buffers’ that you can fill individually or together. Don’t worry too much about the bells and whistles just yet, though.
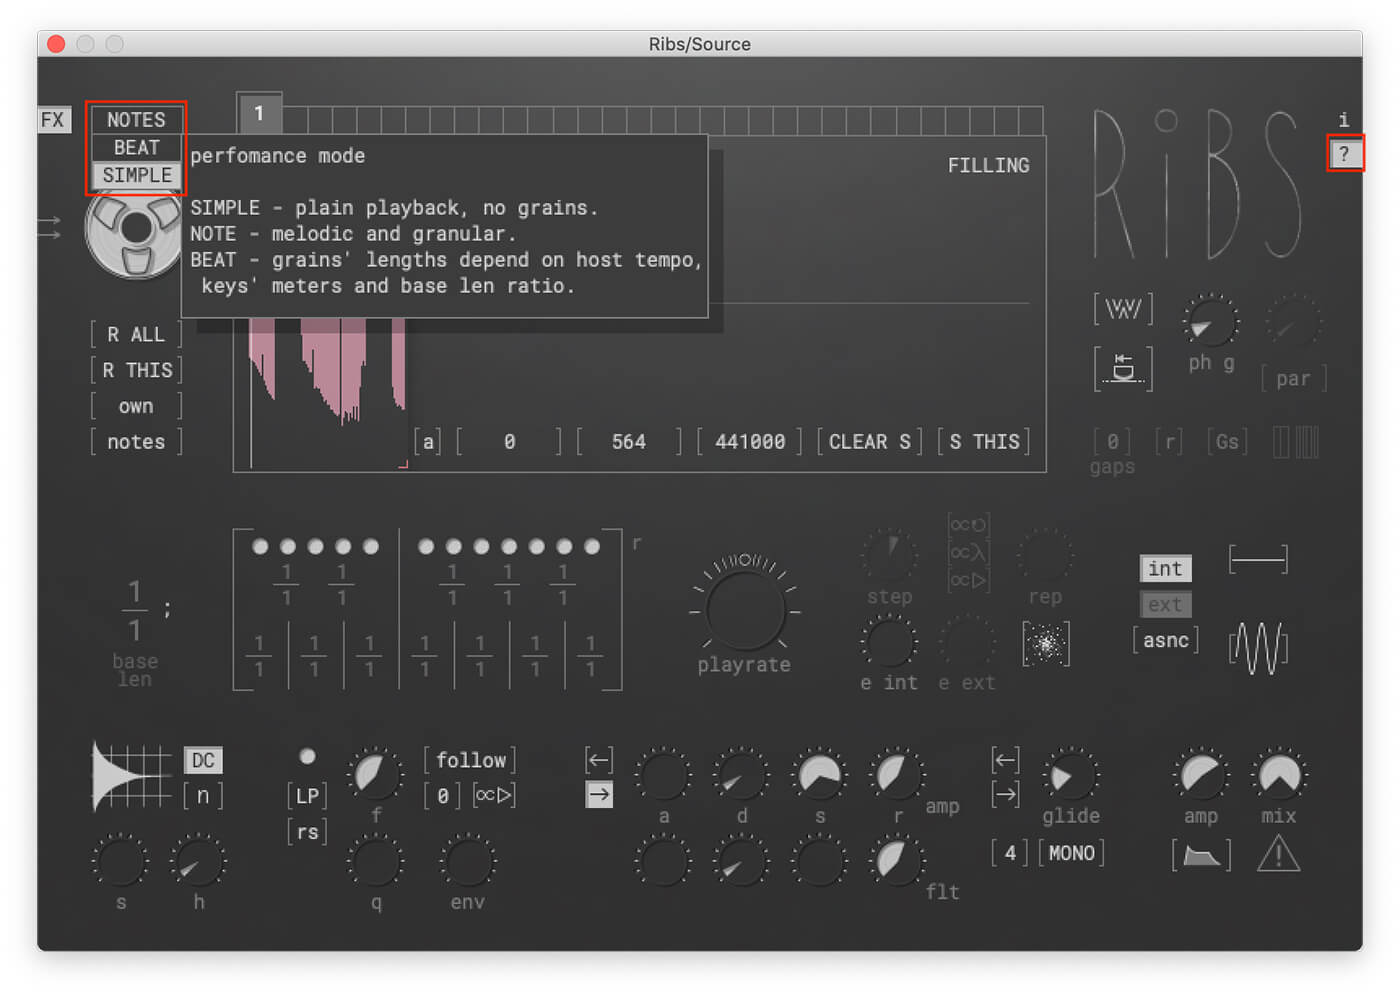
Ribs offers three different operational modes, but in this tutorial, we’ll be showing you how to design an evolving soundscape using just one: the notes mode.
Here’s the sort of thing we’re aiming for:
What you’ll need:
- A DAW
- Ribs, which is available for free, here.
1. Ribs as an insert effect
First, we need to select an audio or instrument track and pick our source material. This can be a sample, a live recording, or an instrument plug-in. Since we are using an audio track, we are going to choose a sample. This means that we don’t have to worry about playing or creating a MIDI event, and we can focus all of our attention on setting up Ribs.
We’ve decided to go with a basic bass loop from our DAW’s factory library. You can start with something similar from your DAW or favourite sample pack; if you’re feeling adventurous, you can go with something else entirely. What is granular synthesis without a sense of adventure?
Once you’ve picked your sample, you’ll want to loop several times to give yourself plenty of space to work. Ultimately you’ll be recording the results to another track; you will want plenty of room to give the sound time to evolve.
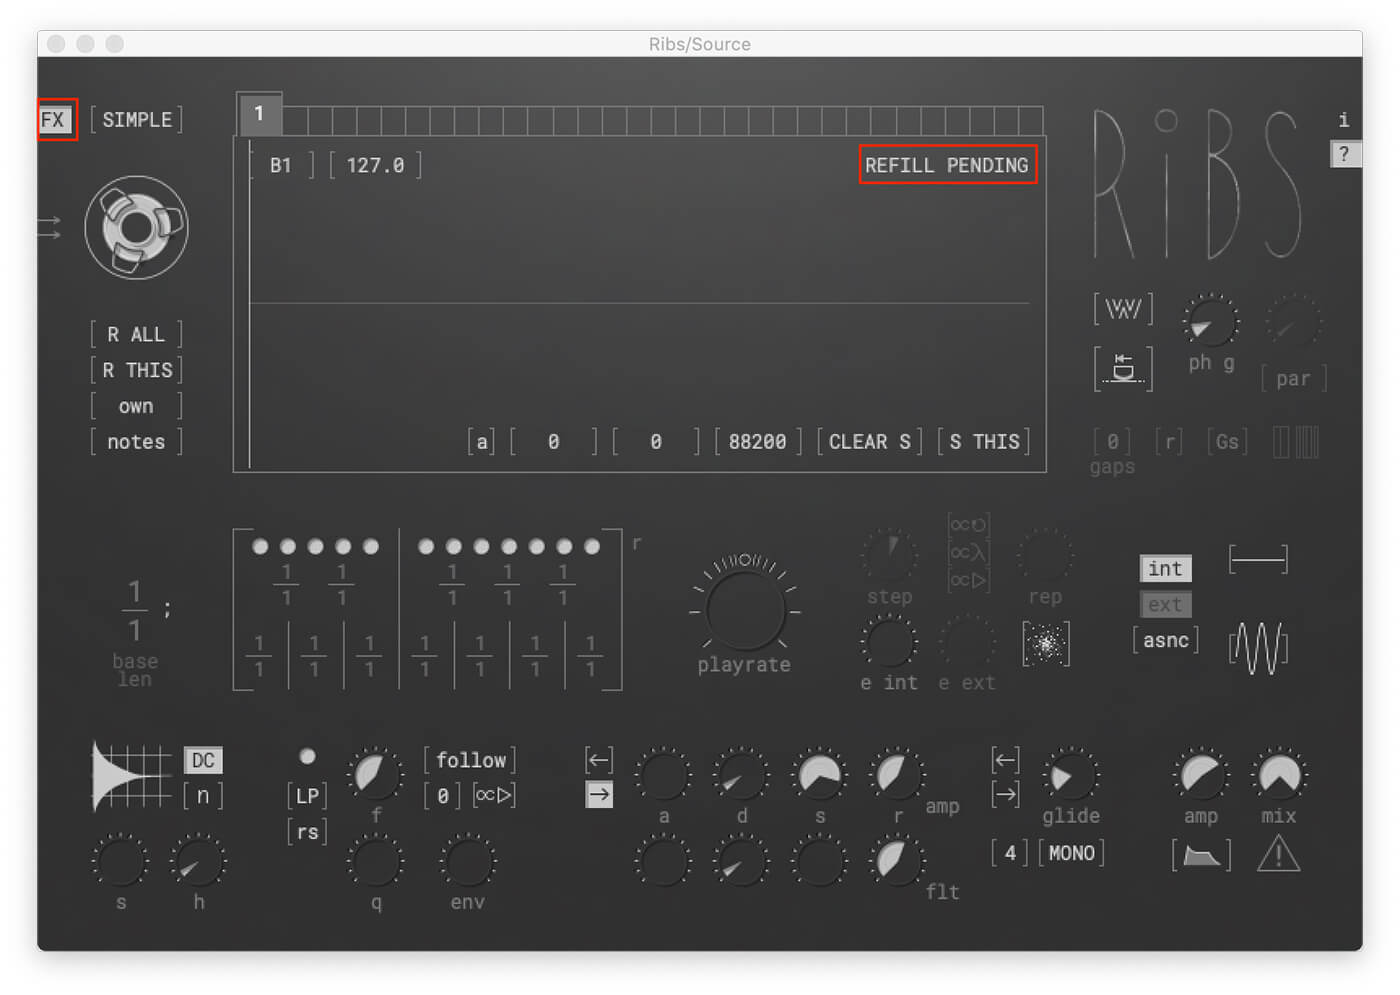
We need to add Ribs as an insert effect on the track, but once we do, you won’t be able to hear any sound. If you look in the waveform display, you’ll notice that it says ‘Refill Pending’. This is because Ribs loads in instrument mode by default. It expects MIDI input to tell it when to fill the audio buffers. Since the buffers are empty and the mix knob is set to fully wet, there is no sound for Ribs to play back. We need to click the FX button and then start playback to fill the first buffer. The FX button will have a white background once it has been enabled. Let’s hit play and see how it sounds.
2. Configuring playback parameters
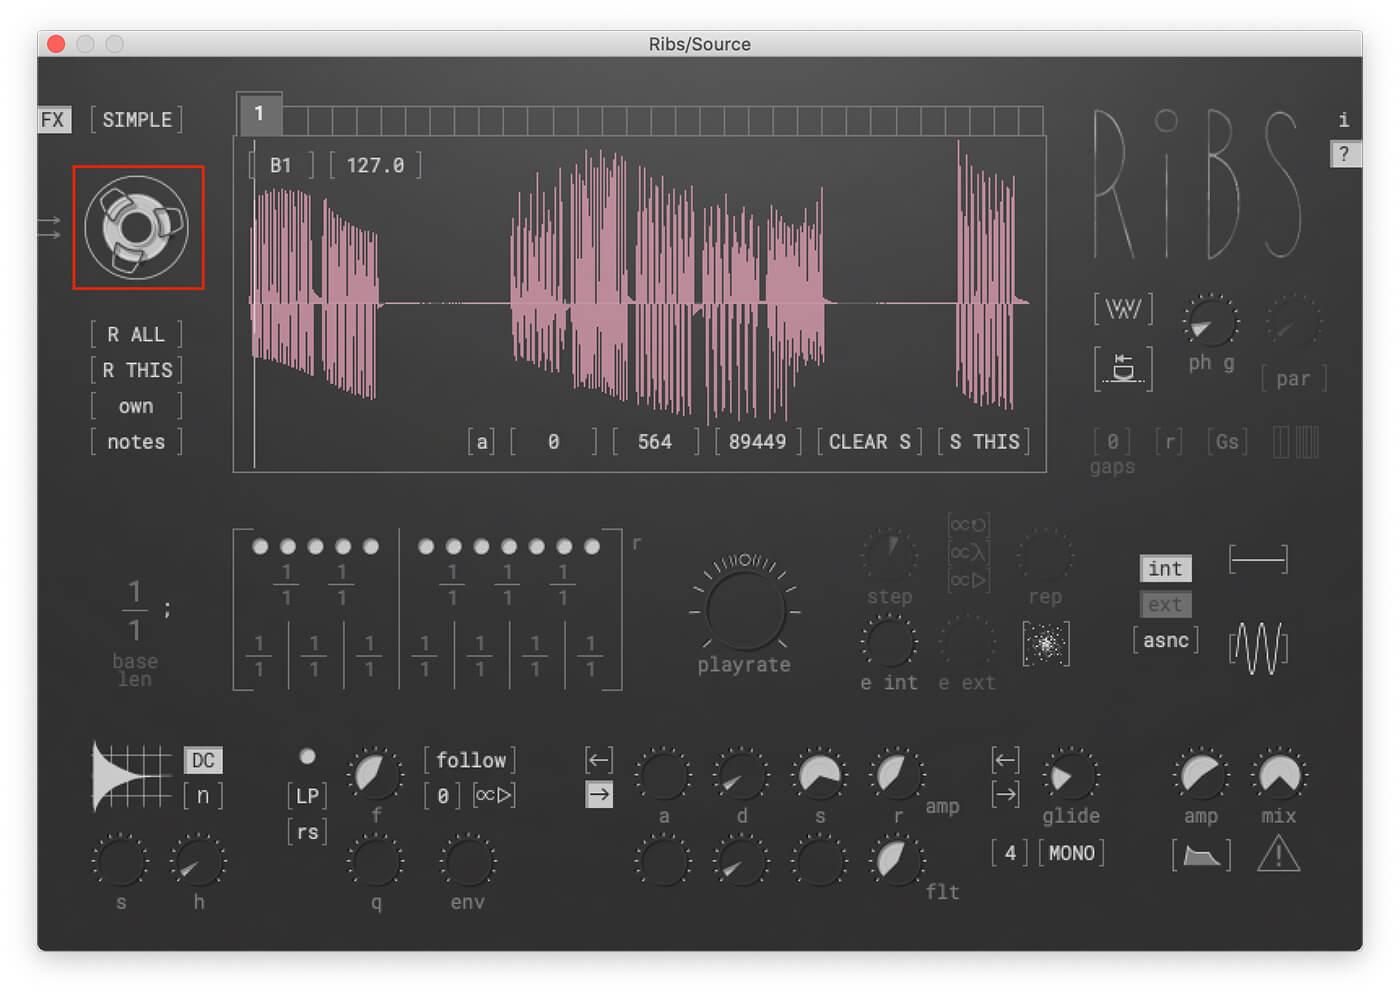
Depending on the length of your sample, you’ll notice two issues with how it sounds. The first issue is related to the buffer length parameter. The sound will cut off early and then repeat itself immediately. We need to adjust the buffer length to control how much of the original audio is loaded into the buffer. By default, we have a length of two seconds, but we can go as short as 125 milliseconds, all the way up to ten seconds at 48k samples. Let’s hit play and start adjusting the dial; the one that looks like a tape reel. We’ve decided to go with the full ten seconds, but you can experiment and find a length that works well for your audio source.
The second issue you will encounter is that the sound has the same timbral and timing characteristics as the original. We need to tell Ribs to operate in one of it’s two granular performance modes. Click the dropdown where it says Simple, and choose Notes. By now, you may have noticed that hovering over any parameter will bring up some helpful tips; these can be disabled with the question mark on the right side. Like the tooltip says, notes mode is useful when you are looking for a more melodic outcome.
With all parameters in their default positions, we end up with a phasey, evolving tone that resembles a classic Reese bass.
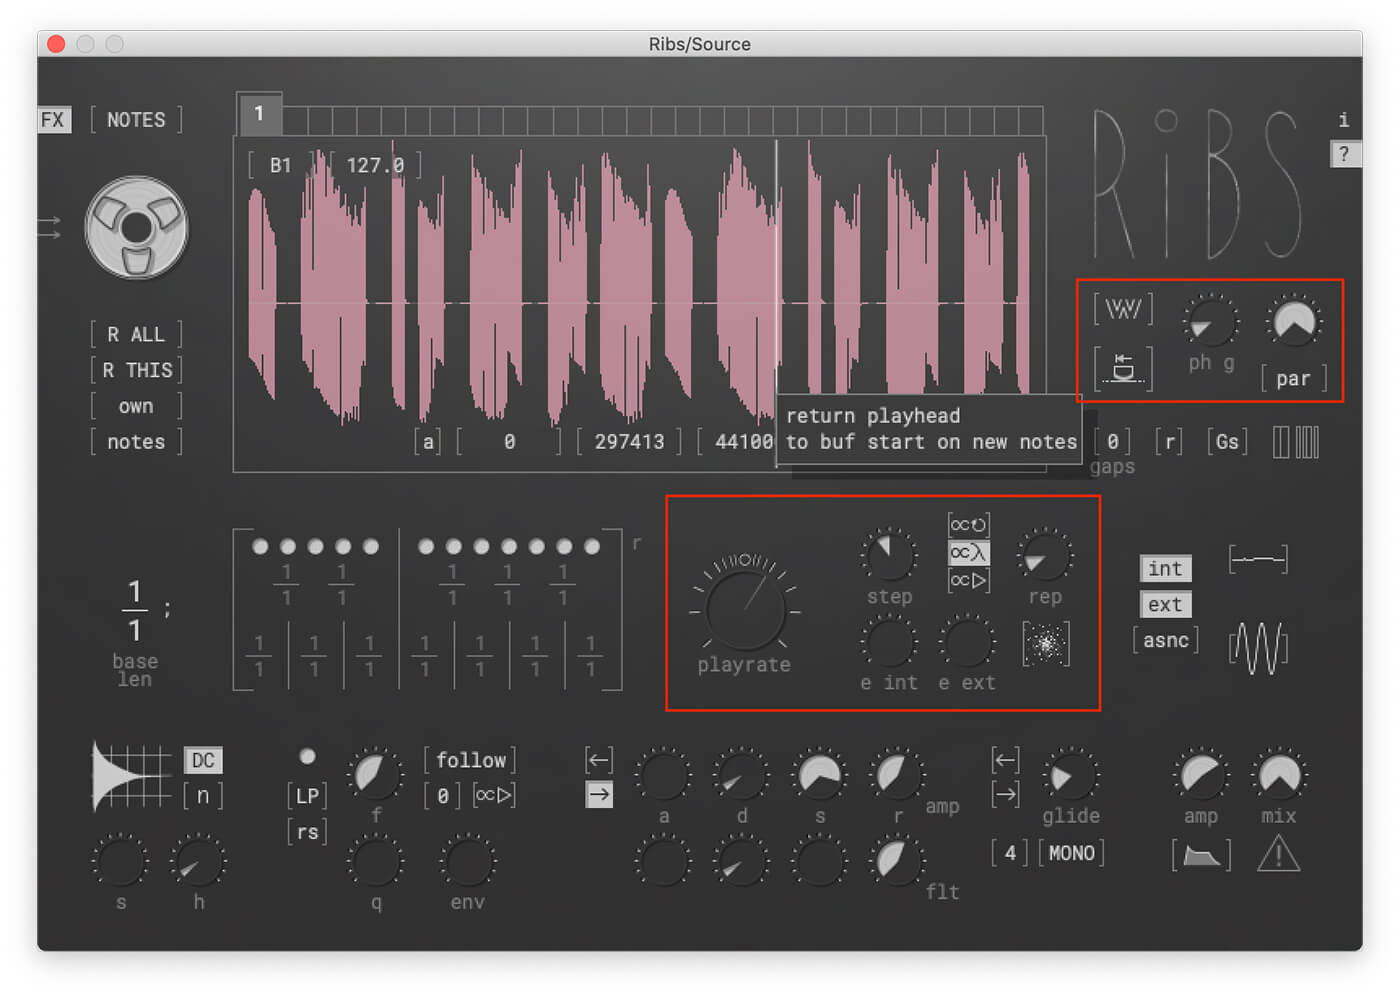
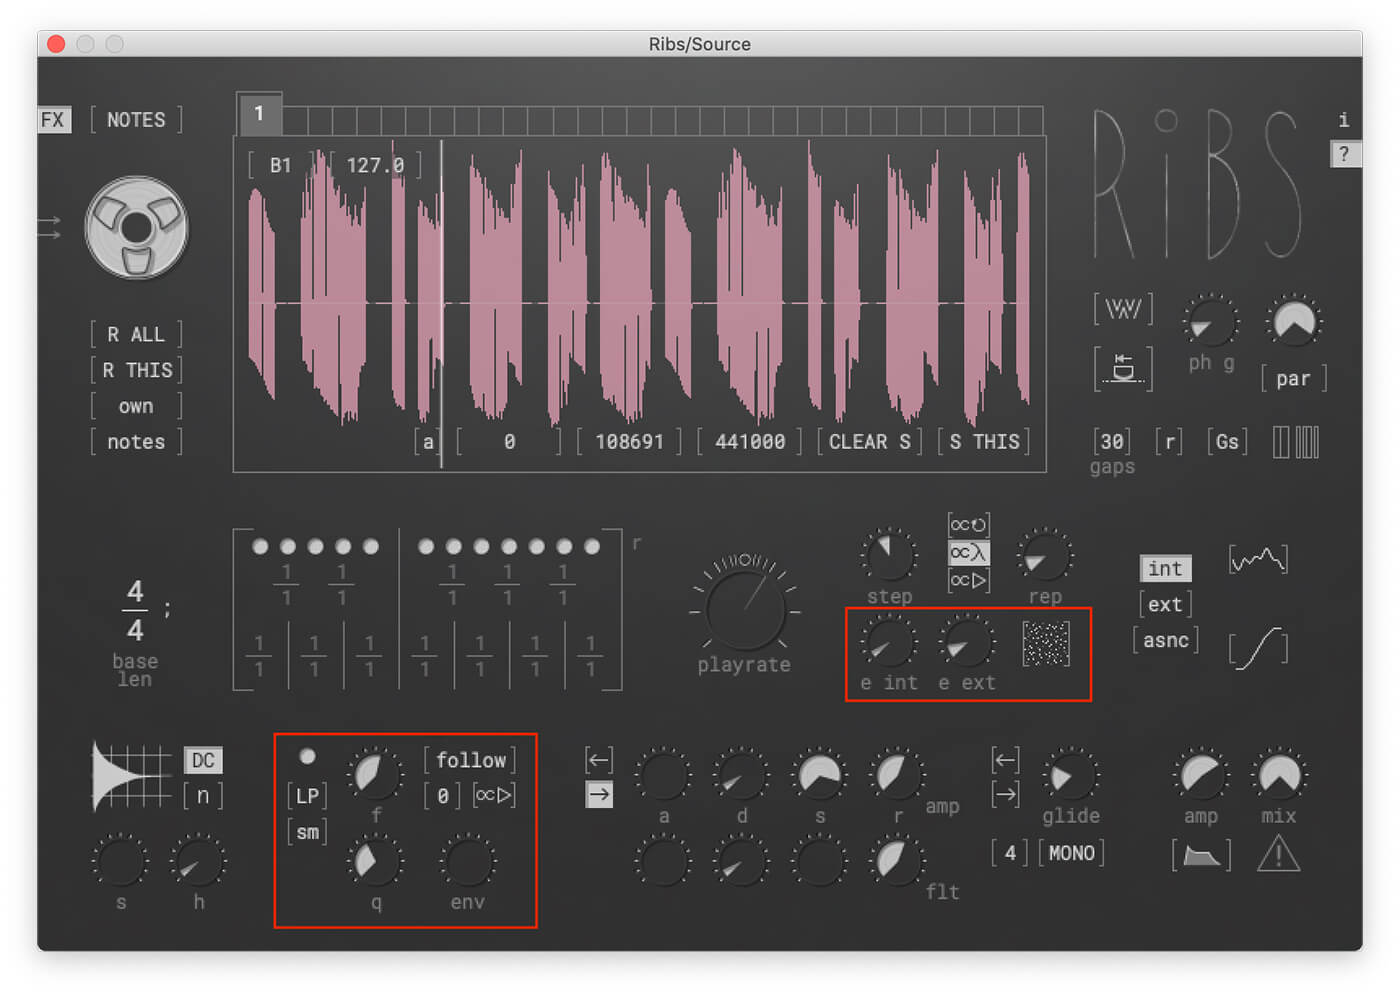
The step parameter, under the waveform display, controls the start position of the next grain of audio. Since the step parameter is set to 1.00 by default, the grain position is advancing forward through the captured audio at a very slow rate. Let’s take this to minus 2.87, so we can step backwards through the buffer at a moderate pace.
Next, let’s bump up the repeat parameter to 14. This is the number of times the current grain will repeat before playing the next one, and it can be useful to maintain pitch when pushing the step parameter to extremes. It also adds a layer of movement to our sound. Try decreasing the playrate parameter just a touch, too; this will lower the pitch.
Another interesting parameter to explore is to the right of the step control. These three boxes allow us to multiply the step value by another parameter on Ribs. We can multiply the step value by the grain length (referred to as base length, denoted on the far left), repeat, playrate, or any combination of the three. All will impact the timing characteristics of the output, but we are going to select grain (base) length.
Finally, we can make adjustments to the window. The ‘window’ is a term used in granular synthesis to describe an amplitude envelope. Generally, this just adds crossfades between grains to eliminate unwanted pops, but it can be any number of shapes. We will leave this set to parabolic, denoted ‘par’ on the right of the interface. That is the smoothest crossfade shape available. The overlap parameter (the rotary control above) changes how many grains are playing at the same time. We’re going to crank it up to 14 to create a large cloud effect. Bear in mind that higher overlap settings are more taxing on your CPU.
The sound is starting to take shape. With the modified playback and grain overlap, we have something that’s beginning to sound a lot more like a pad than a bass line.
3. Grains parameters
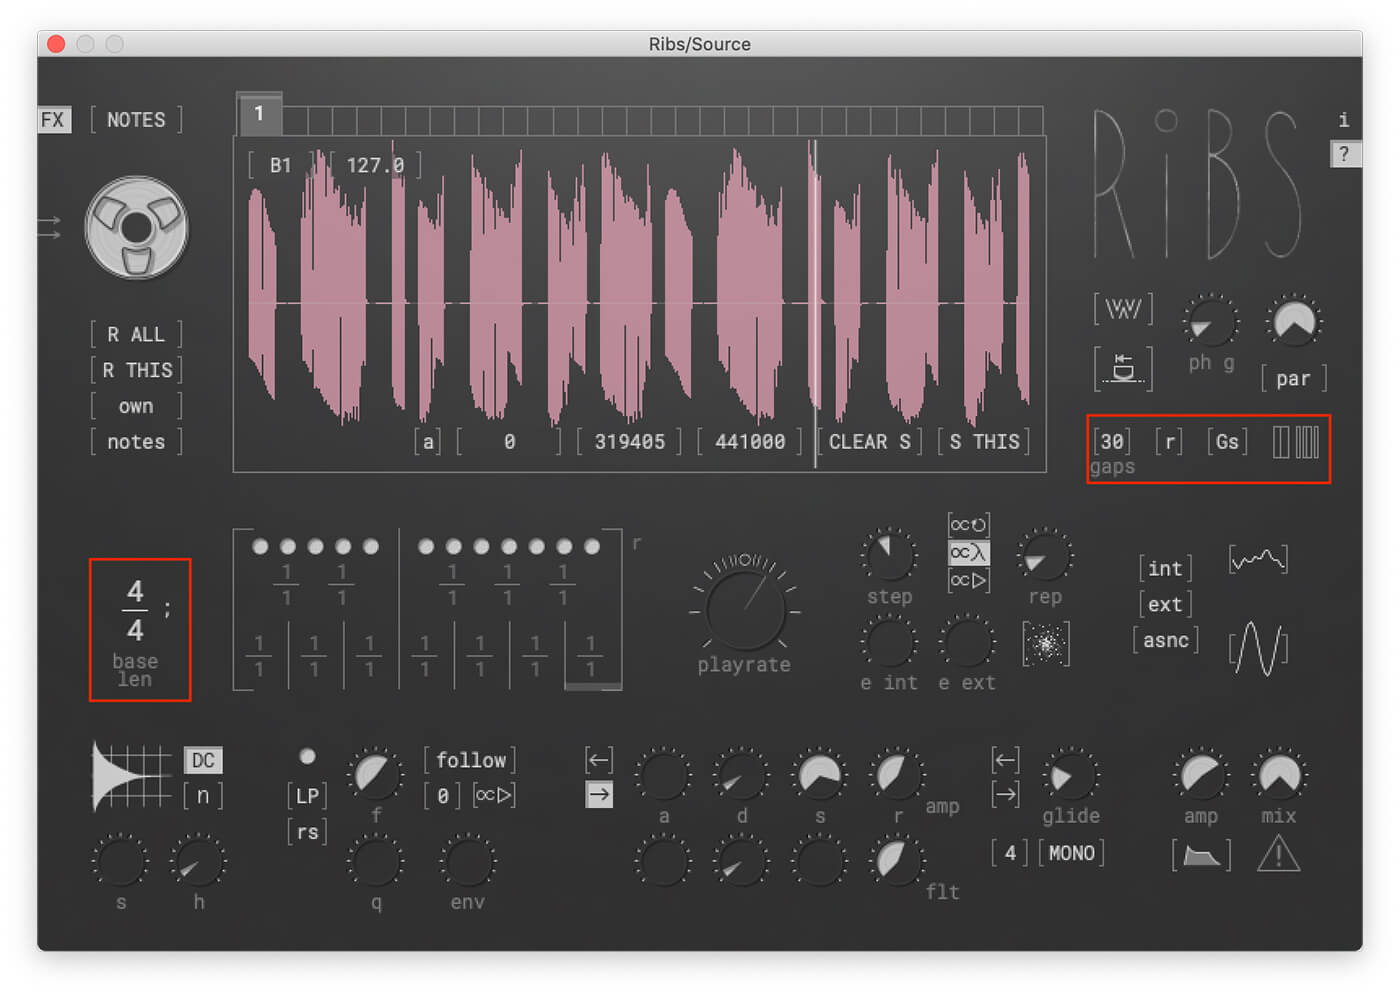
Now we can begin to adjust the characteristics of the grains themselves. Typically grain size is changed in millisecond values, but Ribs sets the length using a ratio between two different controls, ‘Base len nom’ and ‘Base len denum’. The ratio is multiplied by the grain length to increase or decrease the length of the grains. In notes mode, adjusting the ratio also allows you to increase or decrease the pitch by octaves. We’ve found that a ratio of four over four works well for this sound.
We can also experiment with adding gaps between grains. This can increase the width of the stereo image and add interest to the sound. Let’s leave the distribution on random, switch to stereo mode, and turn up the probability to 30. Although we haven’t for this example, you can also fill the gaps with the dry sound; how well this works depends on your choice of source material, but it can add some interesting contrast between the processed signal and the original.
Adjusting the grain parameters has helped to smooth out the sound and fill out the frequency spectrum.
4. Effects
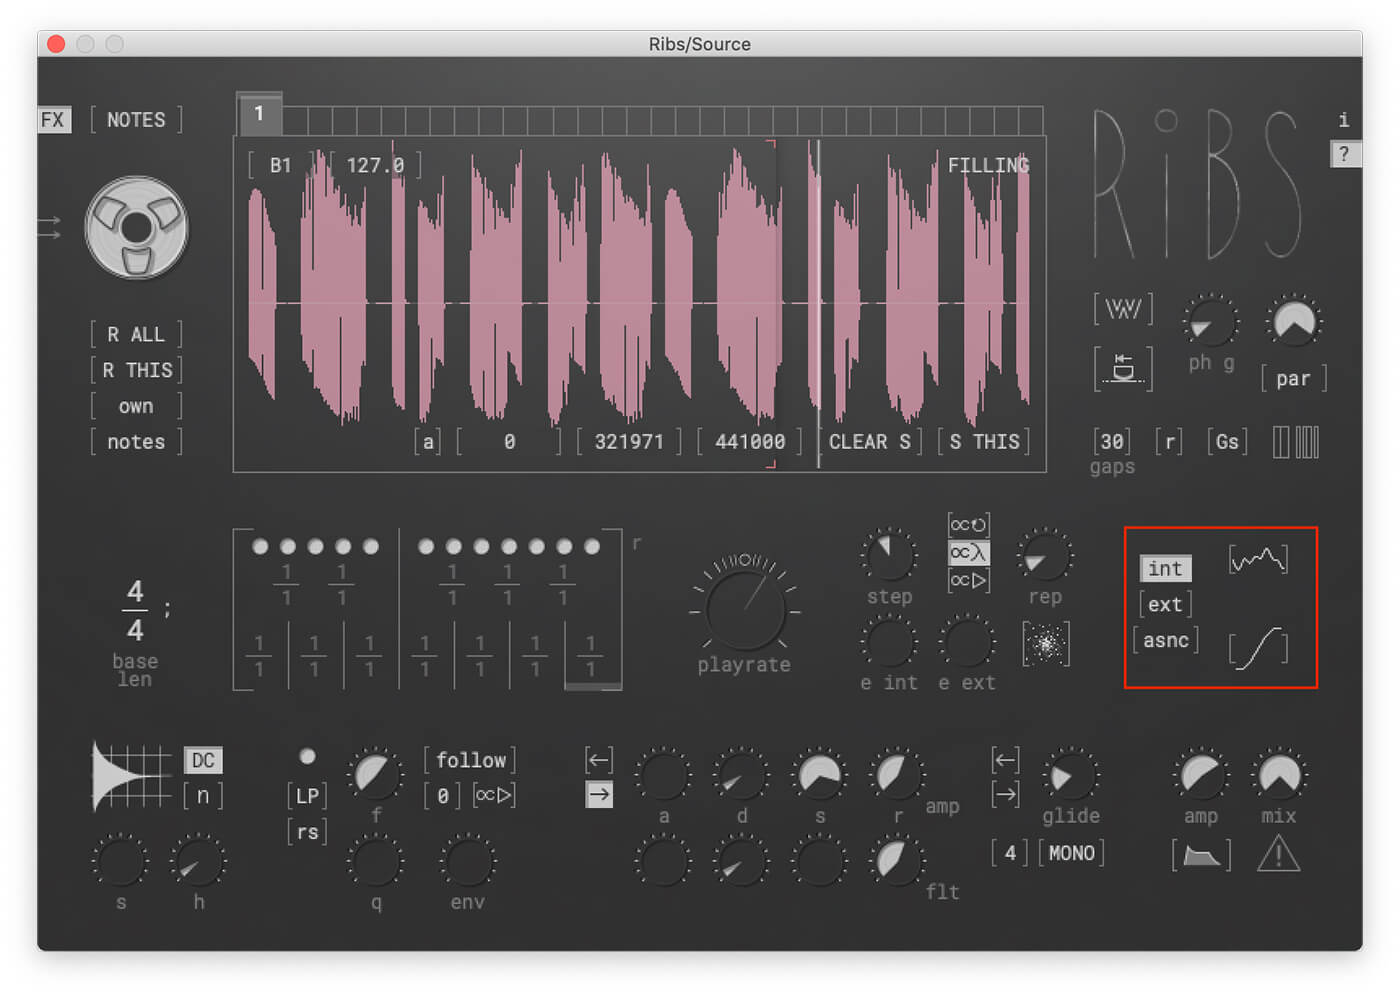
Let’s take a look at the built-in effects, which, like Ribs itself, are quite unusual. The wobble effect can be used to add subtle pitch modulation to your sound, but when taken to the extremes, the impact on the sound becomes very obvious. We can apply this effect to the playrate, grain length, or both. Let’s enable ‘int’ to apply the effect to the playrate. Now we can adjust the wobble amount and frequency to taste. At the moment we only have one voice playing, but with multiple voices activating additional buffers, the ‘asnc’ option allows the wobble to affect each voice asynchronously. This can add even more movement to the sound but pushed too hard, can also create dissonance as the pitch starts to drift.
We can add other errors and artefacts to our sound with the error int and error ext parameters. The internal setting will add errors to the playhead position and produces an extreme effect even at modest levels; the external option introduces errors to the grain start position and is a lot more subtle. We’ve set both of these fairly conservatively, push them too hard, and you’ll end up with a wall of noise. We’ve also enabled the ‘preserve pos while err’ option, which limits the randomisation a little.
Finally, we can tweak Rib’s filter. There are five different filter types, but we are going to leave it on low-pass. Now let’s change the filter mode to simple, take the frequency back a little and bump up the resonance. Let’s see how it sounds now.
5. Final Touches
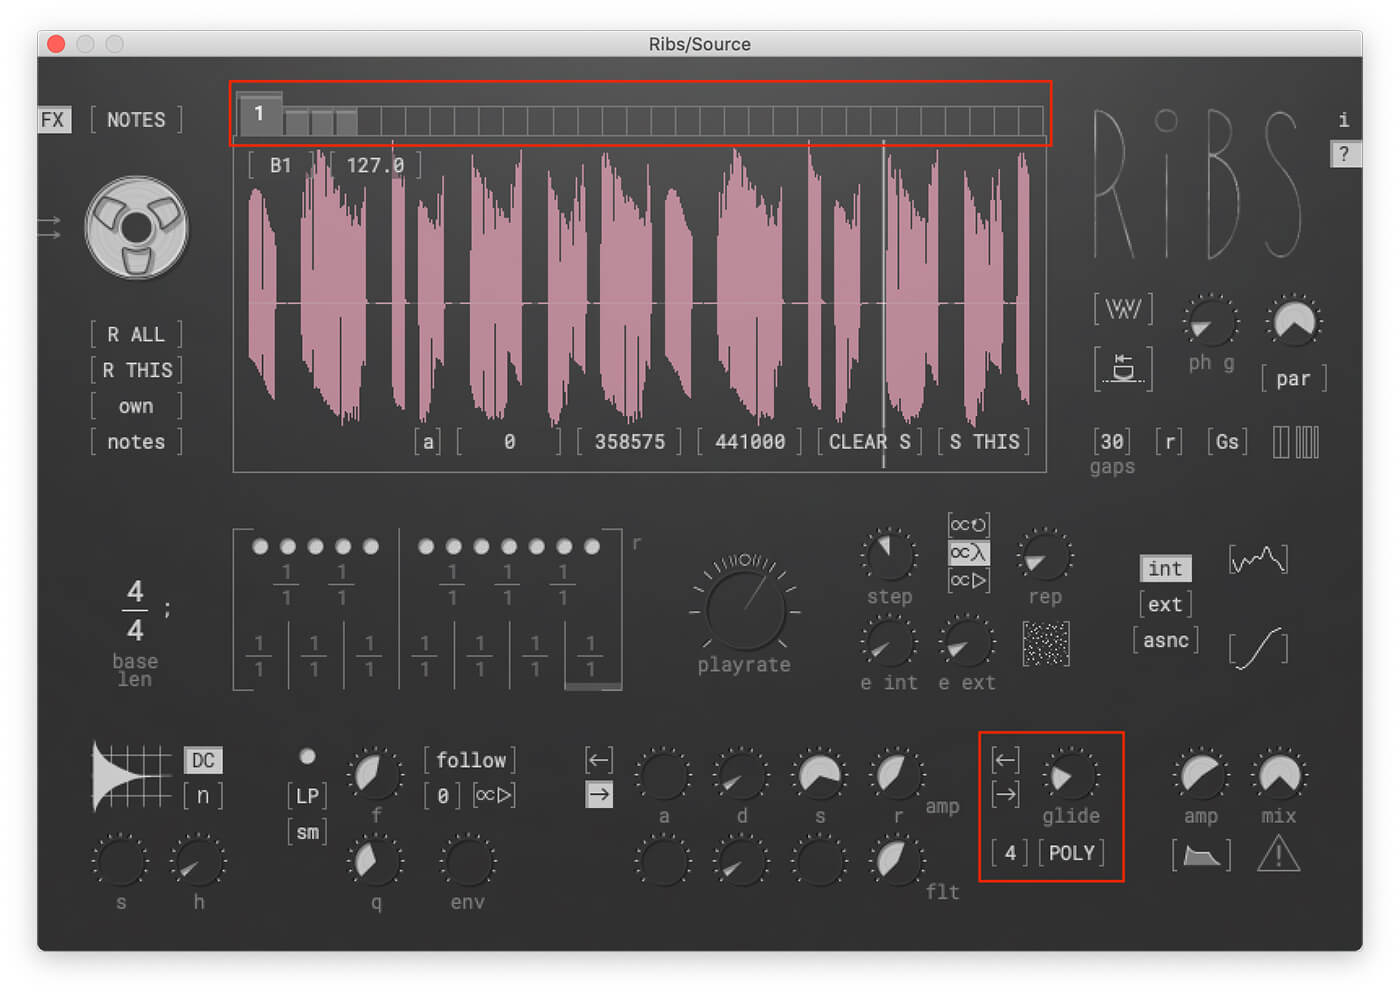
Our soundscape is almost ready; we have just three more parameters to look at. First we will need to enable polyphony (bottom right) for the final step to have an impact. Then we are going to start activating additional buffers. This will allow up to 32 voices to be layered with their own buffer contents. The number of available voices can be changed next to the mono/poly switch. Keep in mind that additional voices will use more resources; don’t enable them unless they are contributing to your sound. We are going to keep the voices at four since we are only going to enable three additional buffers.
Above the waveform display, you’ll notice 31 squares beside the first buffer. Each of these squares is a separate buffer that can be activated and filled with audio independently. Let’s activate three additional buffers. A single click selects and activates a new buffer; a second click assigns an available voice and immediately fills the buffer, provided your playback isn’t paused.
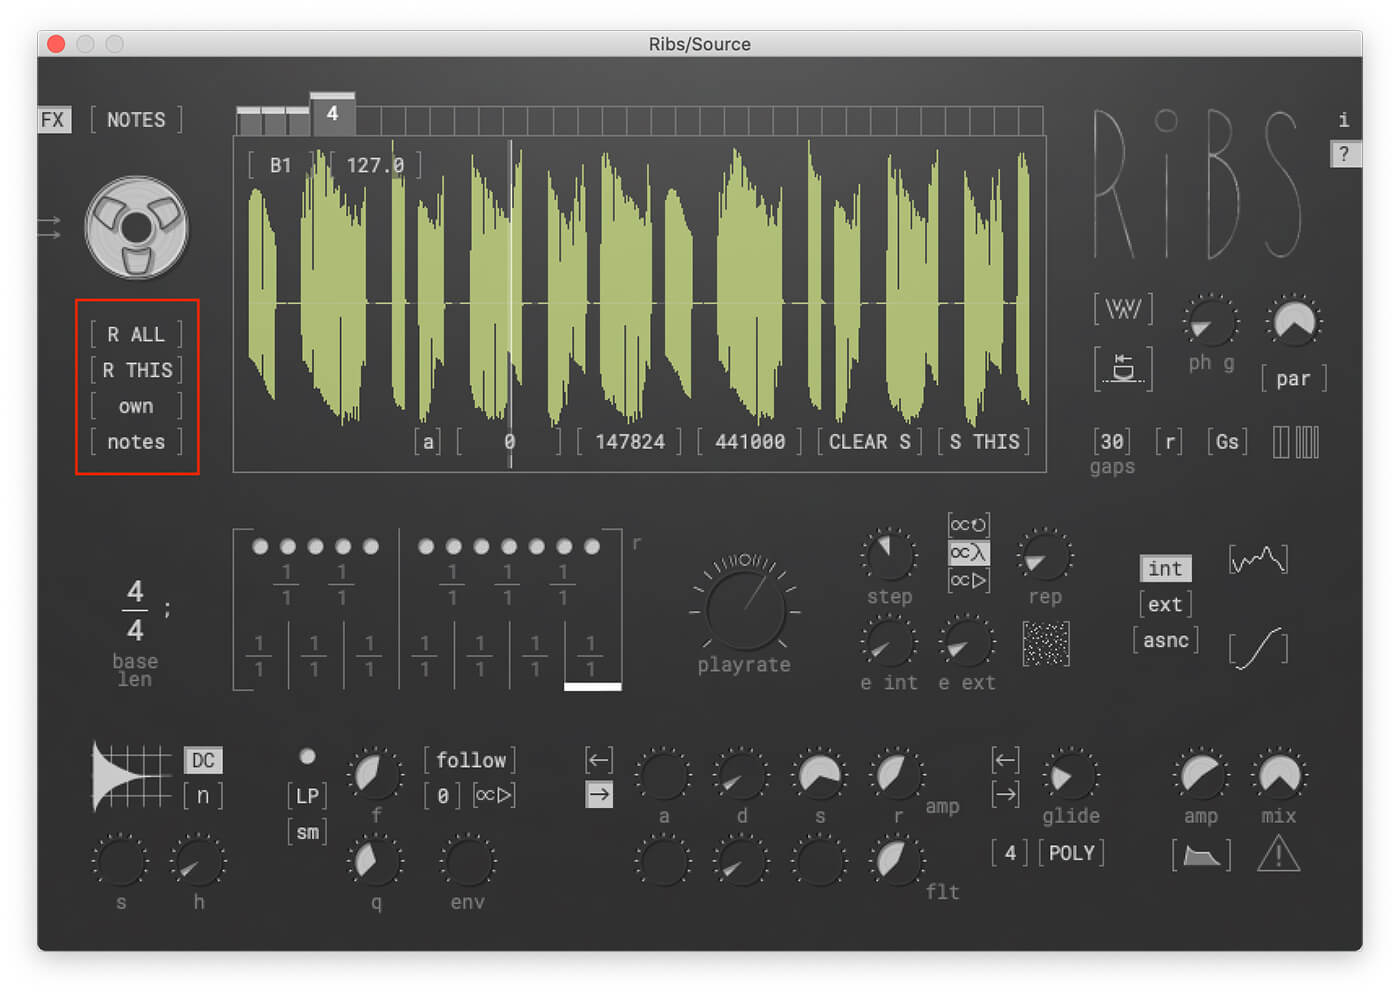
In our finished sound, the four voices layer together well, creating swells that compliment each other. If you find that your layers aren’t sitting well, you can use the “refill this” option on the left side of the UI to refill the selected buffer. It can take some trial and error to find the right combination.
While our Weekend Workshop stops with Ribs, your sound doesn’t have to. There are plenty of ways you could expand on this sound with further processing. You can start by giving your sound a sense of space with reverb. Here’s what it can sound like with some reverb and a filter delay.
One final trick that we discovered by accident is to duplicate the Ribs instance on the same track. This can further smooth the sound but will quickly chew through system resources. Check out how it sounds below.
We’d love to hear what unusual sound you make with Ribs. Share your experiments with the MusicTech Creator Community Group on Facebook, and let us know what other freeware tutorials you’d like to see.
Check out more Weekend Workshops here.