Weekend Workshop: Add musical overtones to beats with Glitchmachines Hysteresis
Create a melodic counterpoint to a drum part without touching MIDI.
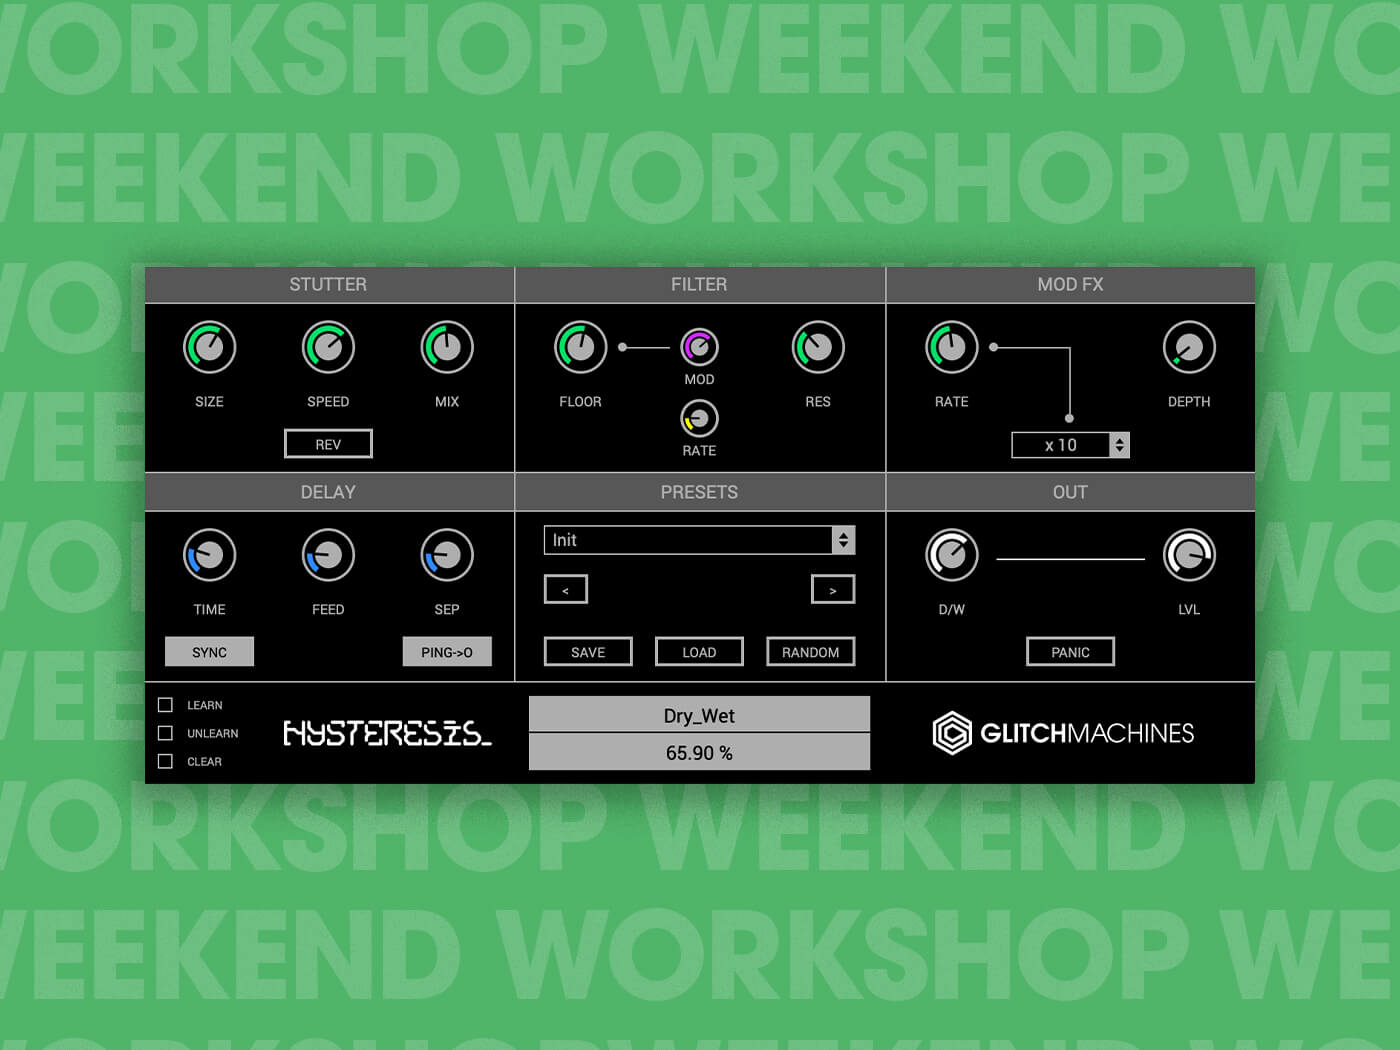
Glitch Machines Hysteresis
Usually, when we want to add melodic elements to a track, we know exactly what kind of sound we are after; we reach for our favourite synth or break out the sequencer. But sometimes we don’t have a specific sound in mind, or we just want to add some interest to a beat. When we want something unusual and a little less predictable, we can reach for Glitchmachines’ Hysteresis.
In this Weekend Workshop, we’re going to be using Hysteresis to add glitchy melodic elements to a drum beat. This sound isn’t meant to replace traditional synthesis or melodies, but to complement an existing beat and fill out the frequency spectrum. Since Hysteresis affects our source material and doesn’t generate any sound itself, we get the benefit of adding material that follows our existing rhythm without creating a single MIDI event.
Hysteresis is a free delay-based glitch effect from Glitchmachines, and unlike Fracture, Hysteresis isn’t a feature-limited version of a paid Glitchmachines. Released in 2014, Hysteresis is available on its own or as part of Glitchmachines’ free bundle which includes all of their free plug-ins and sample packs.
Unlike traditional delays, with Hysteresis, the signal is fed through a series of effects and a second delay channel before being fed back through the original delay’s feedback input. This gives Hysteresis its ability to create a wide range of effects, from pitch shifting and chorus to granulation and FM tones. It is available for Windows in VST format and MacOS in both VST and AU formats.
Here’s the type of sound we are aiming for:
What you’ll need:
- A DAW
- Hysteresis, which is available for free, here
1.Getting Started
Let’s load up an audio track and lay down our source material. While most DAWs do this by default, make sure you are creating a stereo track – Hysteresis does not like mono. We’ve gone with a fairly glitchy but driving beat for this workshop. You can work with our sample or pick something similar from your library.
Audio1 – Original Sample
Now we can load Hysteresis as an effect and check out the interface. The plug-in comprises six distinct sections that all interact with each other in different ways. The signal flows from the initial delay channel, to the stutter effect and filter, through a second delay line (which is under the hood), and then finally back through the original delay. We then have the ‘Mod FX’ module which affects the filter, a preset manager, and output controls.
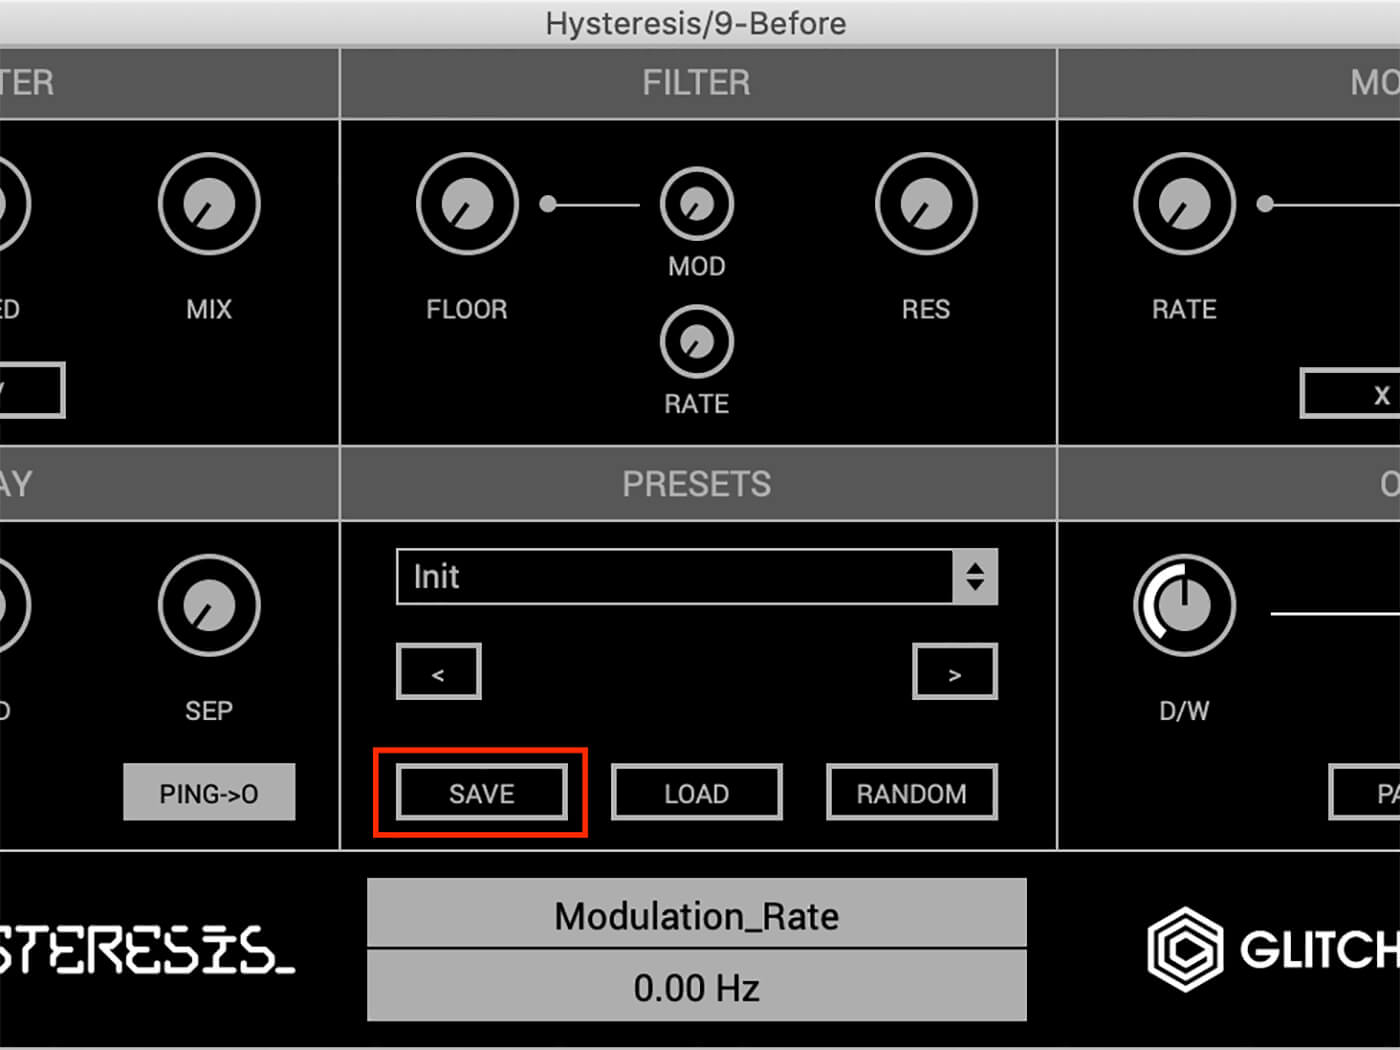
We are going to be configuring each section of Hysteresis, starting with the ‘Delay’ Module. Since we want to start from a blank canvas, we will need to turn down each parameter manually. Unfortunately, the initial patch still has effects enabled; we can solve this by clicking the save button and overwriting the ‘Init’ patch if desired.
Now if we press play, our drumbeat should have a very short delay applied.
2. Delay
The delay module is the real meat of Hysteresis. It is the first and the last step in the signal chain. Here we are presented with standard delay parameters. We can start by adjusting the delay time, which can be set in milliseconds or subdivisions if we are tempo-synced. Enable the sync button and set the value to 64. Notice that the value and name of the parameter being adjusted will be displayed at the bottom of the plug-in.
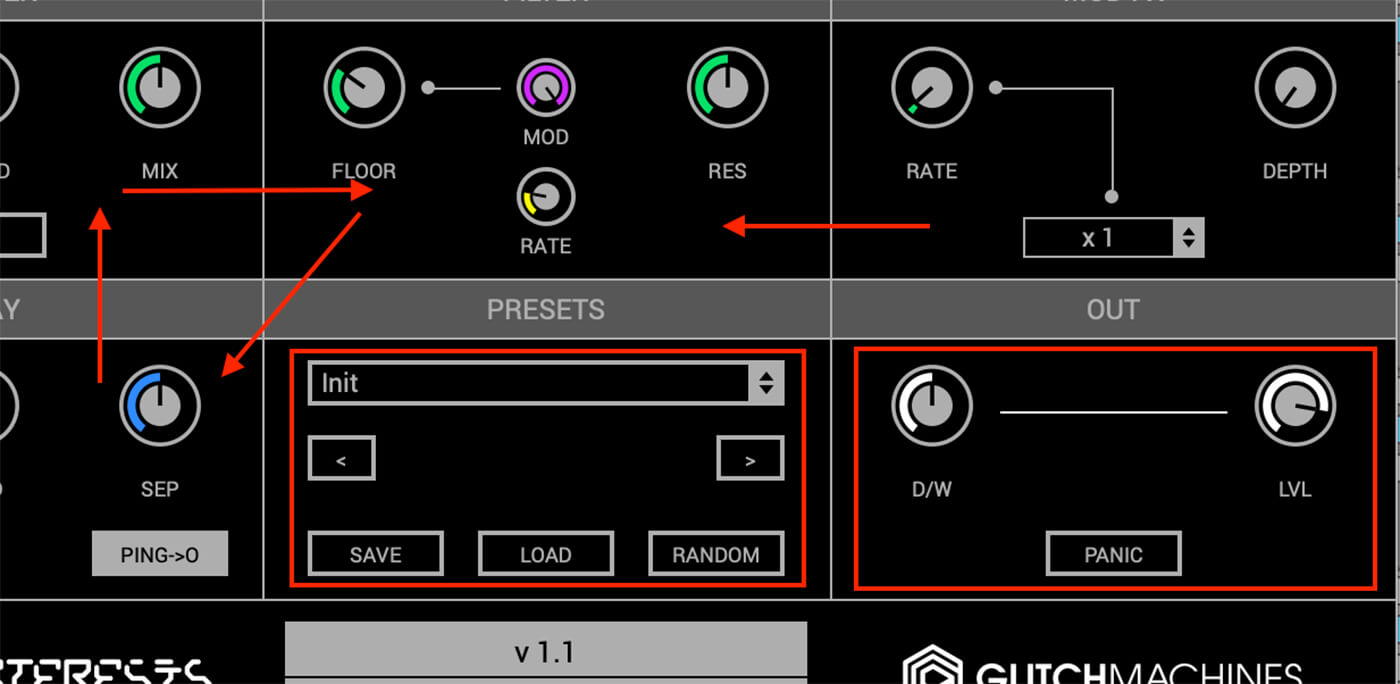
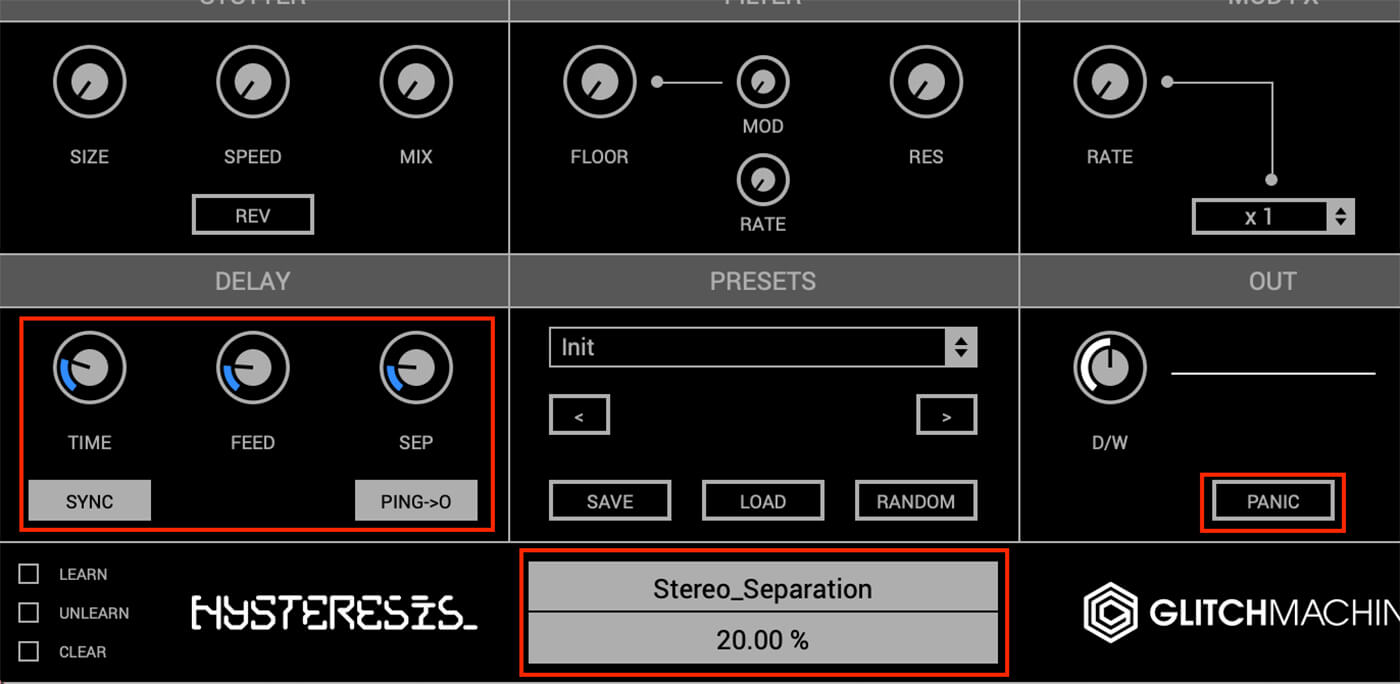
As with most delay effects, we can adjust the feedback, keeping in mind that in this case, the signal that is being fed back will be processed by the other modules in Hysteresis. High settings will cause the feedback to build up, which can result in extreme amplification of the signal. Be sure to adjust in small increments to avoid damaging your ears. If you find yourself in this situation, the panic button in the output section has you covered. Hitting this will reset the feedback parameters in both the ‘Delay’ module as well as the ‘Mod FX’ module, which we will look at later. Set the feedback to around 20 per cent.
Next, we can use the stereo separation parameter to set the timing difference between the left and right channels. At the maximum setting, the right channel delay will be twice as long as the left. We will set this to around 20 per cent to add a bit of width, thanks to the ‘Haas effect’.
Let’s see how our beat is developing before moving on to the next module.
3. Stutter and Filter
Up to this point, Hysteresis has been functioning as a simple delay effect. Now let’s configure the ‘Stutter’ module. This is where Hysteresis can play the role of a simplified granular effect. It allows us to loop slices of incoming audio and alter their size, speed and playback direction. First, we are going to adjust the size of the loop to around sixty per cent. Our delay time and separation parameters will create differences in loop size between the left and right channels, depending on how we have configured them.
Now we can set the playback speed to around 270 per cent and bring the mix up about halfway. We are going to leave reverse playback disabled, but we encourage you to see how it sounds with it enabled.

If we hit play now, we won’t hear any difference in our sound; we first need to adjust the filter to allow our signal through. The filter section of Hysteresis contains a resonant low-pass filter along with a built-in modulator. The filter is applied to the combined output of the stutter effect, which means the dry signal from ‘Stutter’ is also affected. Let’s bring up the floor parameter to about 400Hz and see how it sounds.
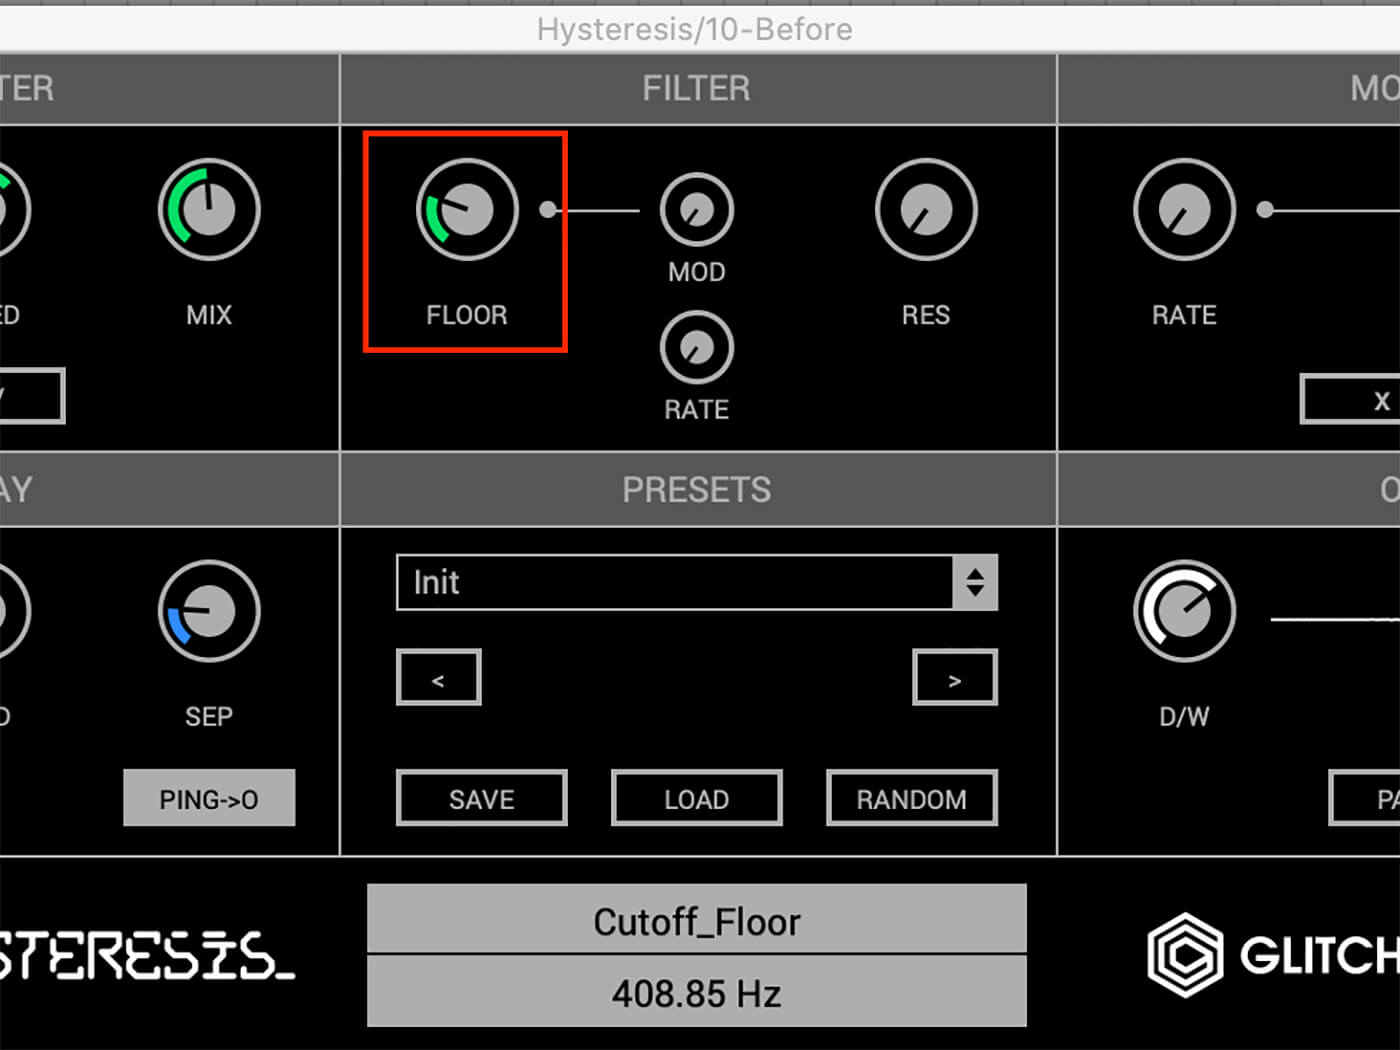
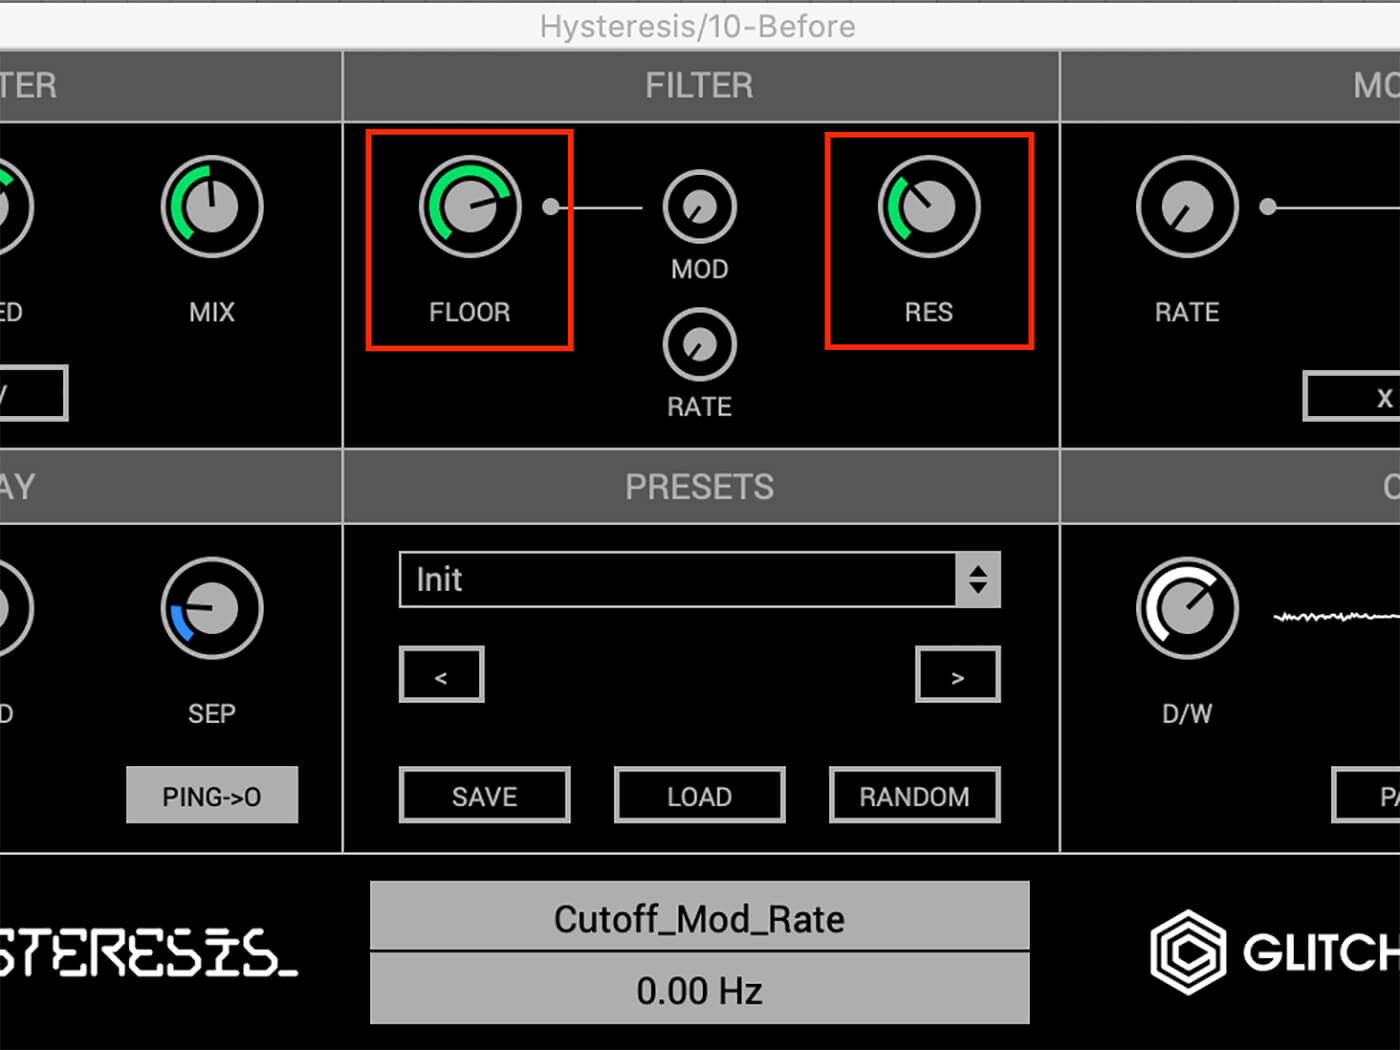
We can start to hear a low melody emerge. If we increase the floor a bit more and bring the resonance up to 35 per cent, the sound comes to life.
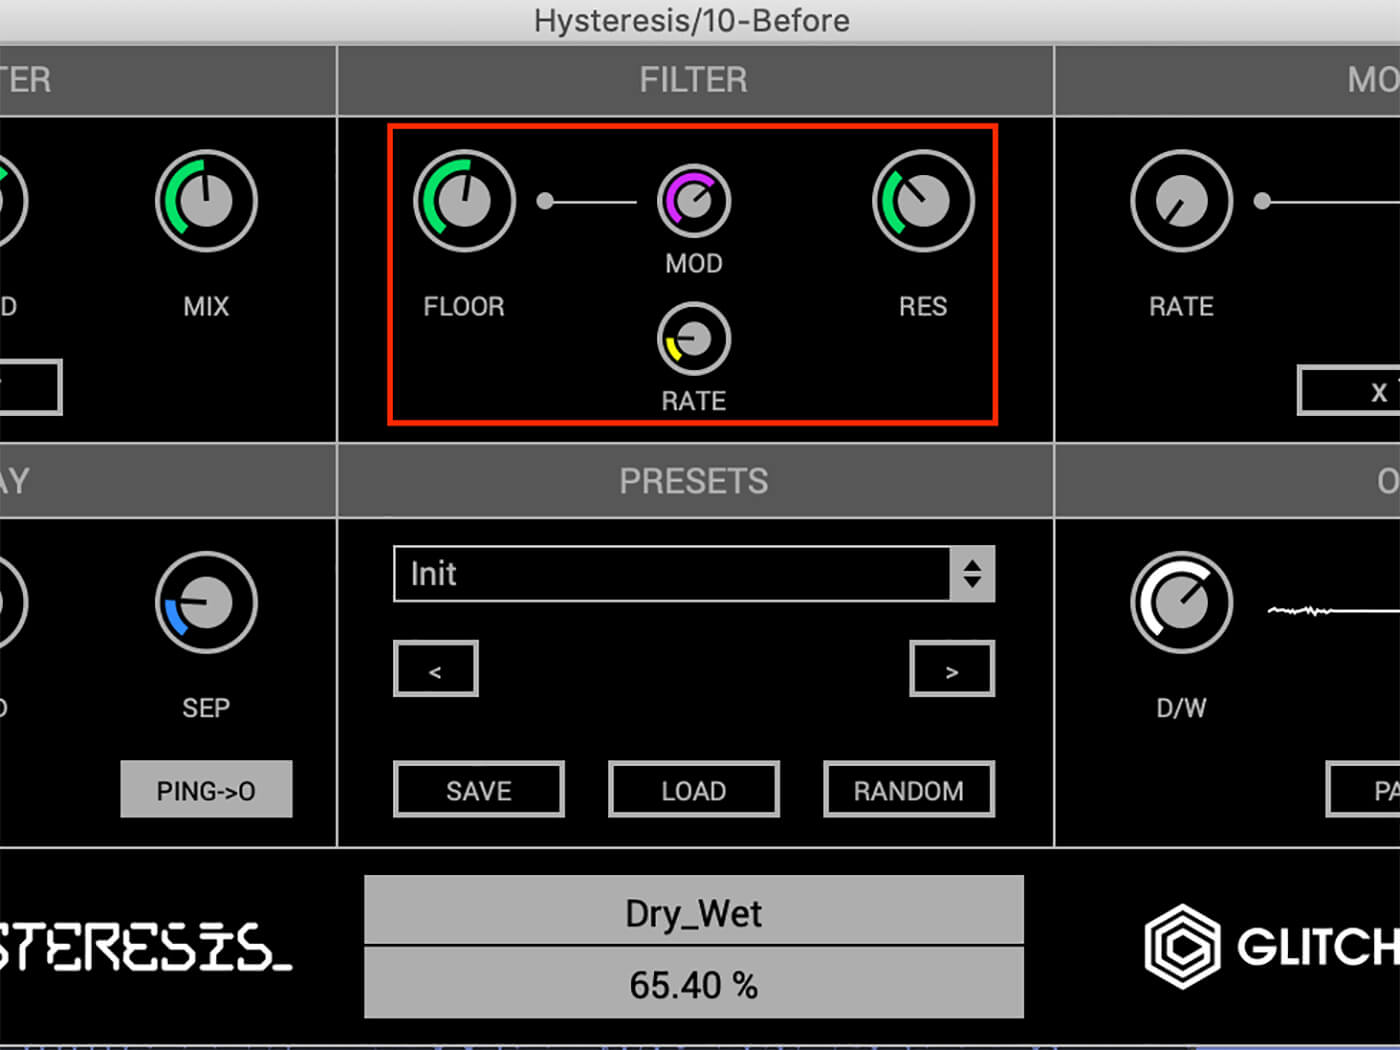
Now we can add some movement to the sound by bringing in the built-in modulator to affect the filter cutoff (floor). We’ve brought the Mod FX depth up to 55 per cent and brought the rate to just under 1Hz. A lower rate sounds best to our ears, but you can set this parameter to taste. Once we bring in the modulator, we will also need to bring the filter cutoff down until we can hear the effect of the LFO. We should now hear some subtle modulation of the filter cutoff. You could go for a more extreme movement by bringing the cutoff down a little bit further and increasing the depth and rate.
4. Mod FX
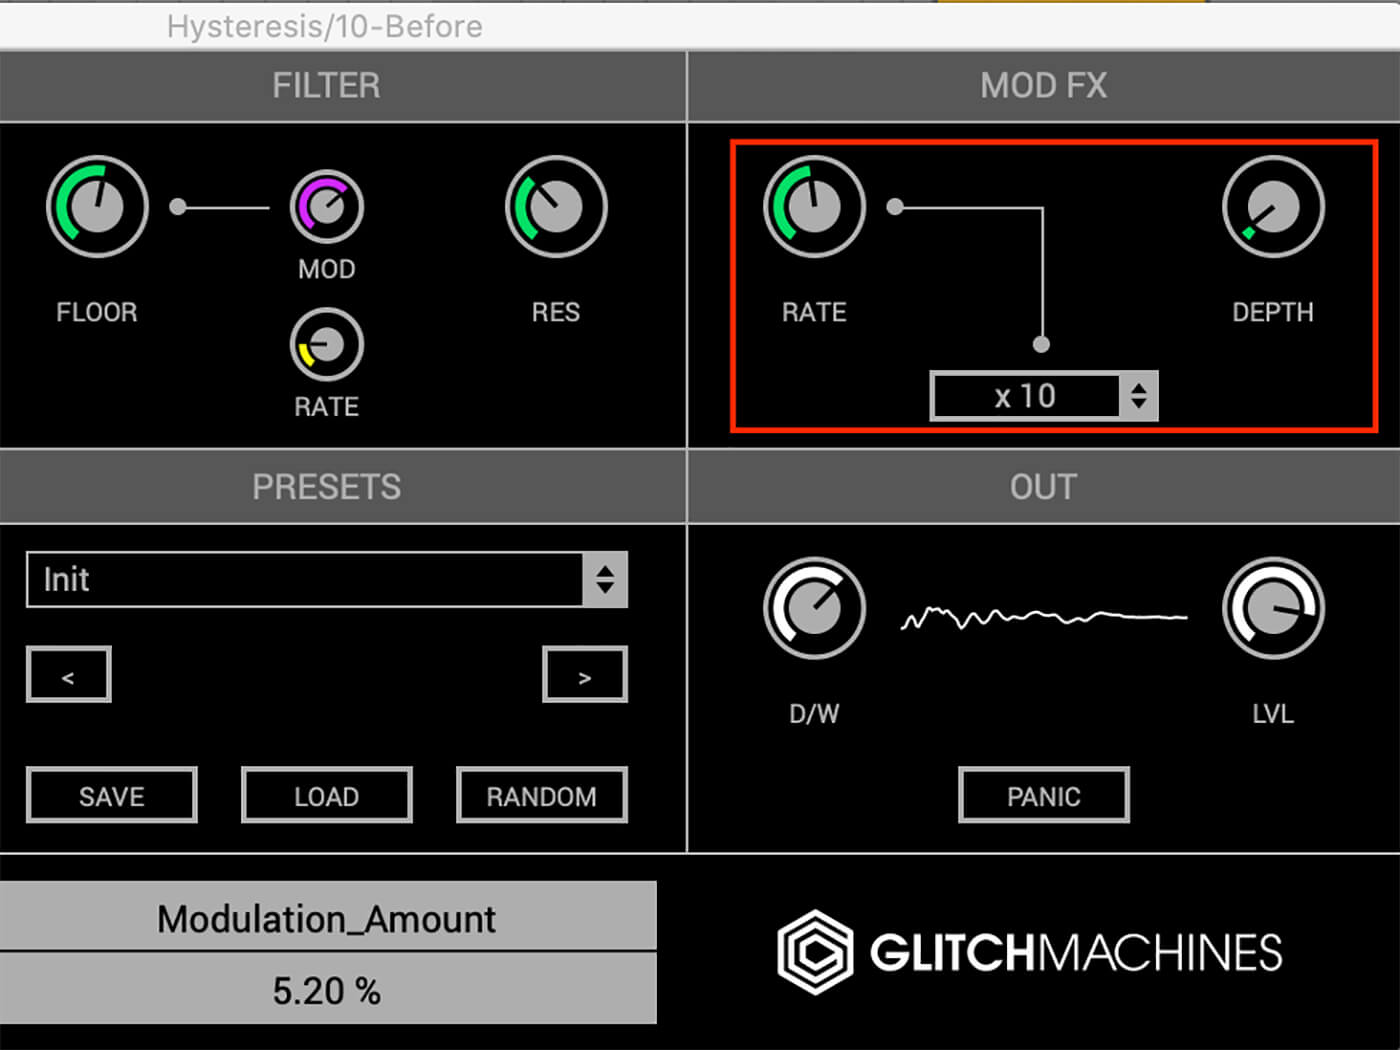
Now that we’ve adjusted the filter and the built-in modulation, we can turn our attention to the Mod FX section. The modulation here is also applied to the filter output but with the additional step of being routed back to the feedback of the first delay.
Let’s adjust the rate. We can get anything from subtle chorus effects to wild FM-like tones depending on where we set the parameter. We’re going to set it around 135Hz. Now let’s multiply the modulation rate by ten using the dropdown menu at the bottom. We still won’t hear anything new until we adjust the depth. As with the delay, the feedback generated by the depth parameter can get quite unruly. If that happens, we will once again turn to our trusty panic button. We want to add some subtle overtones, so let’s nudge the depth to around five per cent and listen.
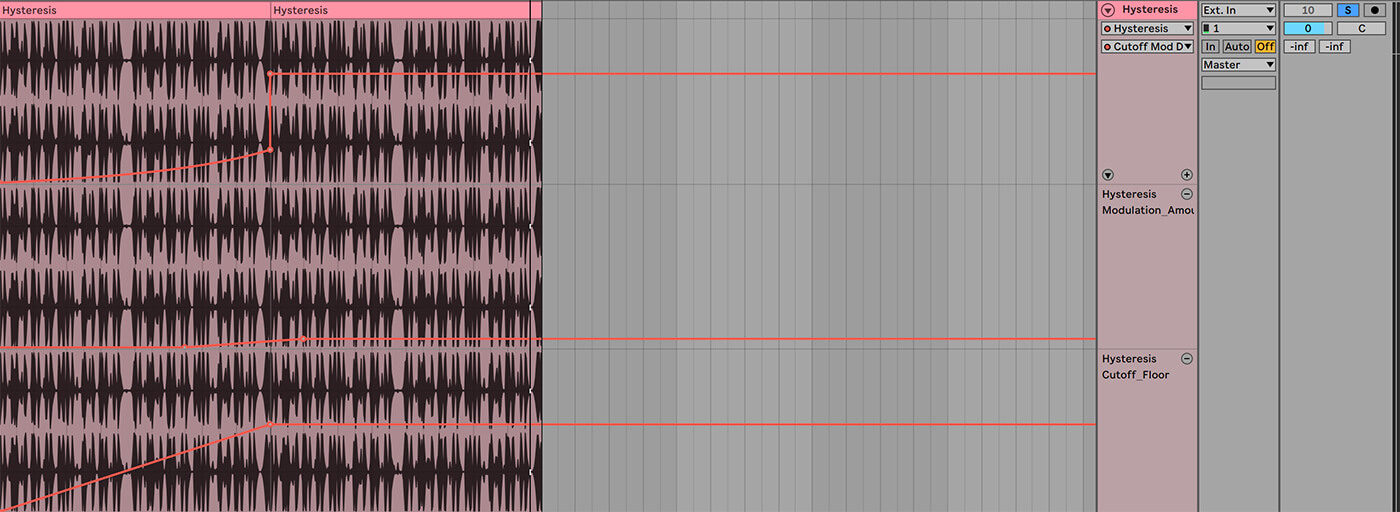
5. Automation
Now we can turn to our DAW’s automation tools to give the sound some final movement. We’ve only automated the filter cutoff, cutoff modulation depth, and modulation amount parameters, but you can take the sound even further by automating other sections of Hysteresis.
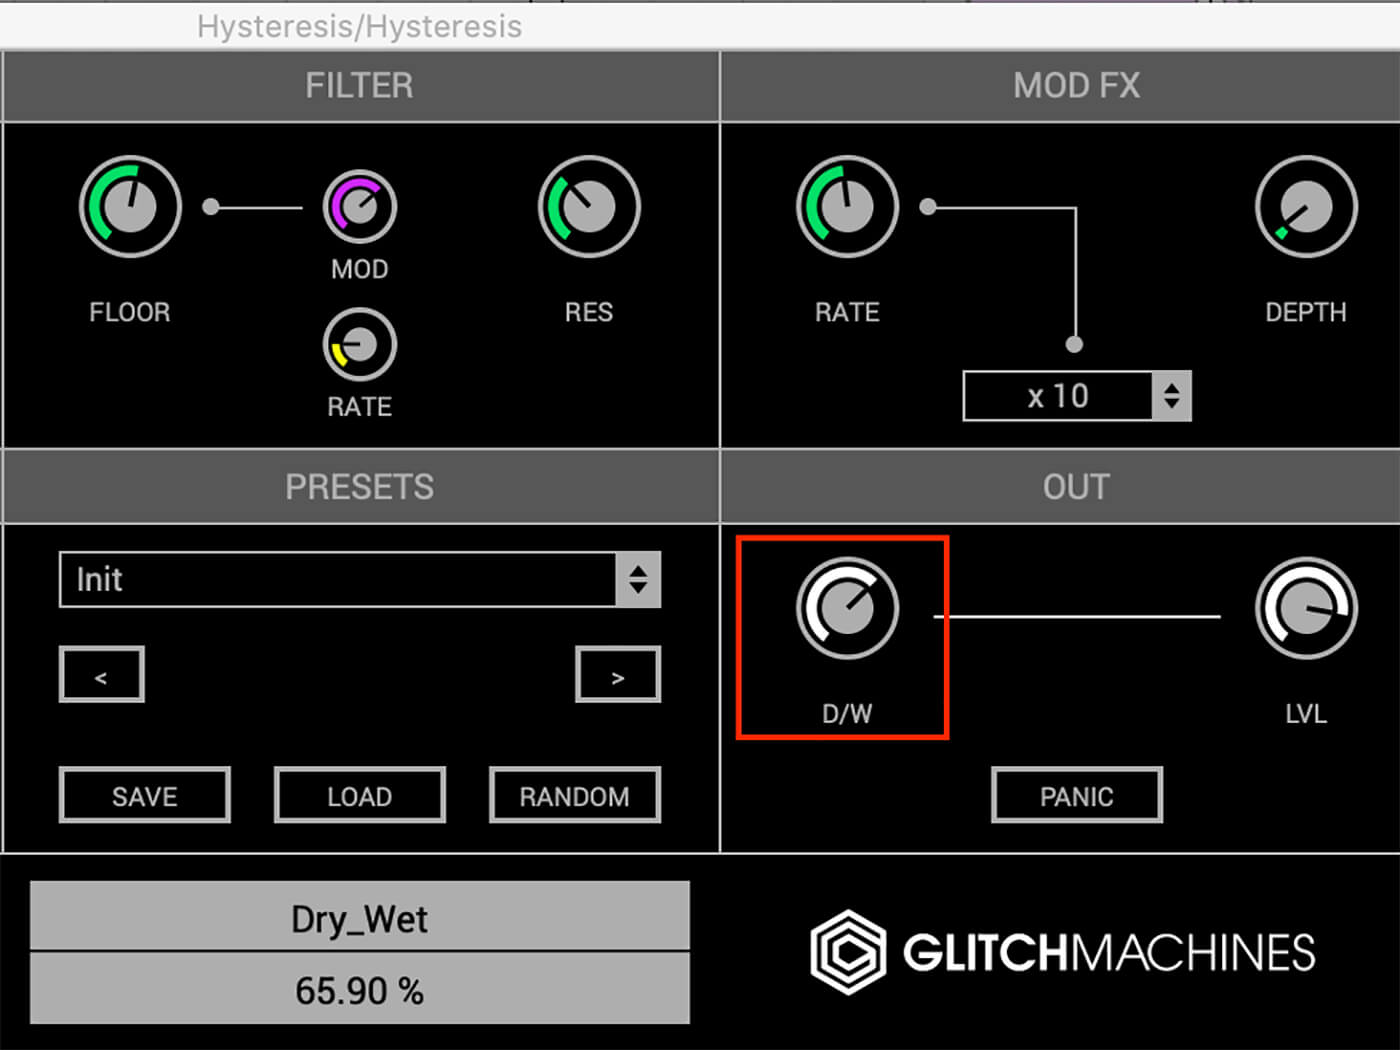
Finally, we can adjust the dry/wet parameter to taste and hear our finished sound.
We’ve only just scratched the surface of what Hysteresis can do. Still, it has allowed us to add a glitchy melody under our beat without any sequencers, and without knowing exactly how that melody would turn out. If you’re feeling adventurous, try adding hysteresis to an existing melody or vocal sample and see where it takes you.
We’d love to hear what sounds you’re able to create using this technique. Please share your results with the MusicTech Creator Community on Facebook. Tell us how you got on and what other tutorials you’d like to see.
Check out more Weekend Workshops here.