Using retro electronic music techniques for texture and character
Harness the power of test machines and tape delay and the plug-ins they inspire.
There’s something seductive about a wall of test equipment. All those big, chunky dials; the industrial design; the sheer impenetrableness of it. Thanks to musicians such as Hainbach, some dedicated software makers, and a distinctly 21st-century drive to preserve the past, electronic music production techniques once relegated to the dustbin of time have been resurrected and updated for modern DAWs.
Not sure what we’re on about? Before the mid-1960s and the arrival of synthesizers, avant garde composers used repurposed industrial test equipment to generate their beeps and bloops. Think Karlheinz Stockhausen, the Forbidden Planet soundtrack, and the BBC Radiophonic Workshop. By combining these raw test tones and primitive oscillator sweeps with electro-acoustic reverberation and recording it all to tape, they could painstakingly compose music. You can use these same techniques – now significantly less painful thanks to plug-ins – to add a unique and, dare we say, haunting aspect to your productions.
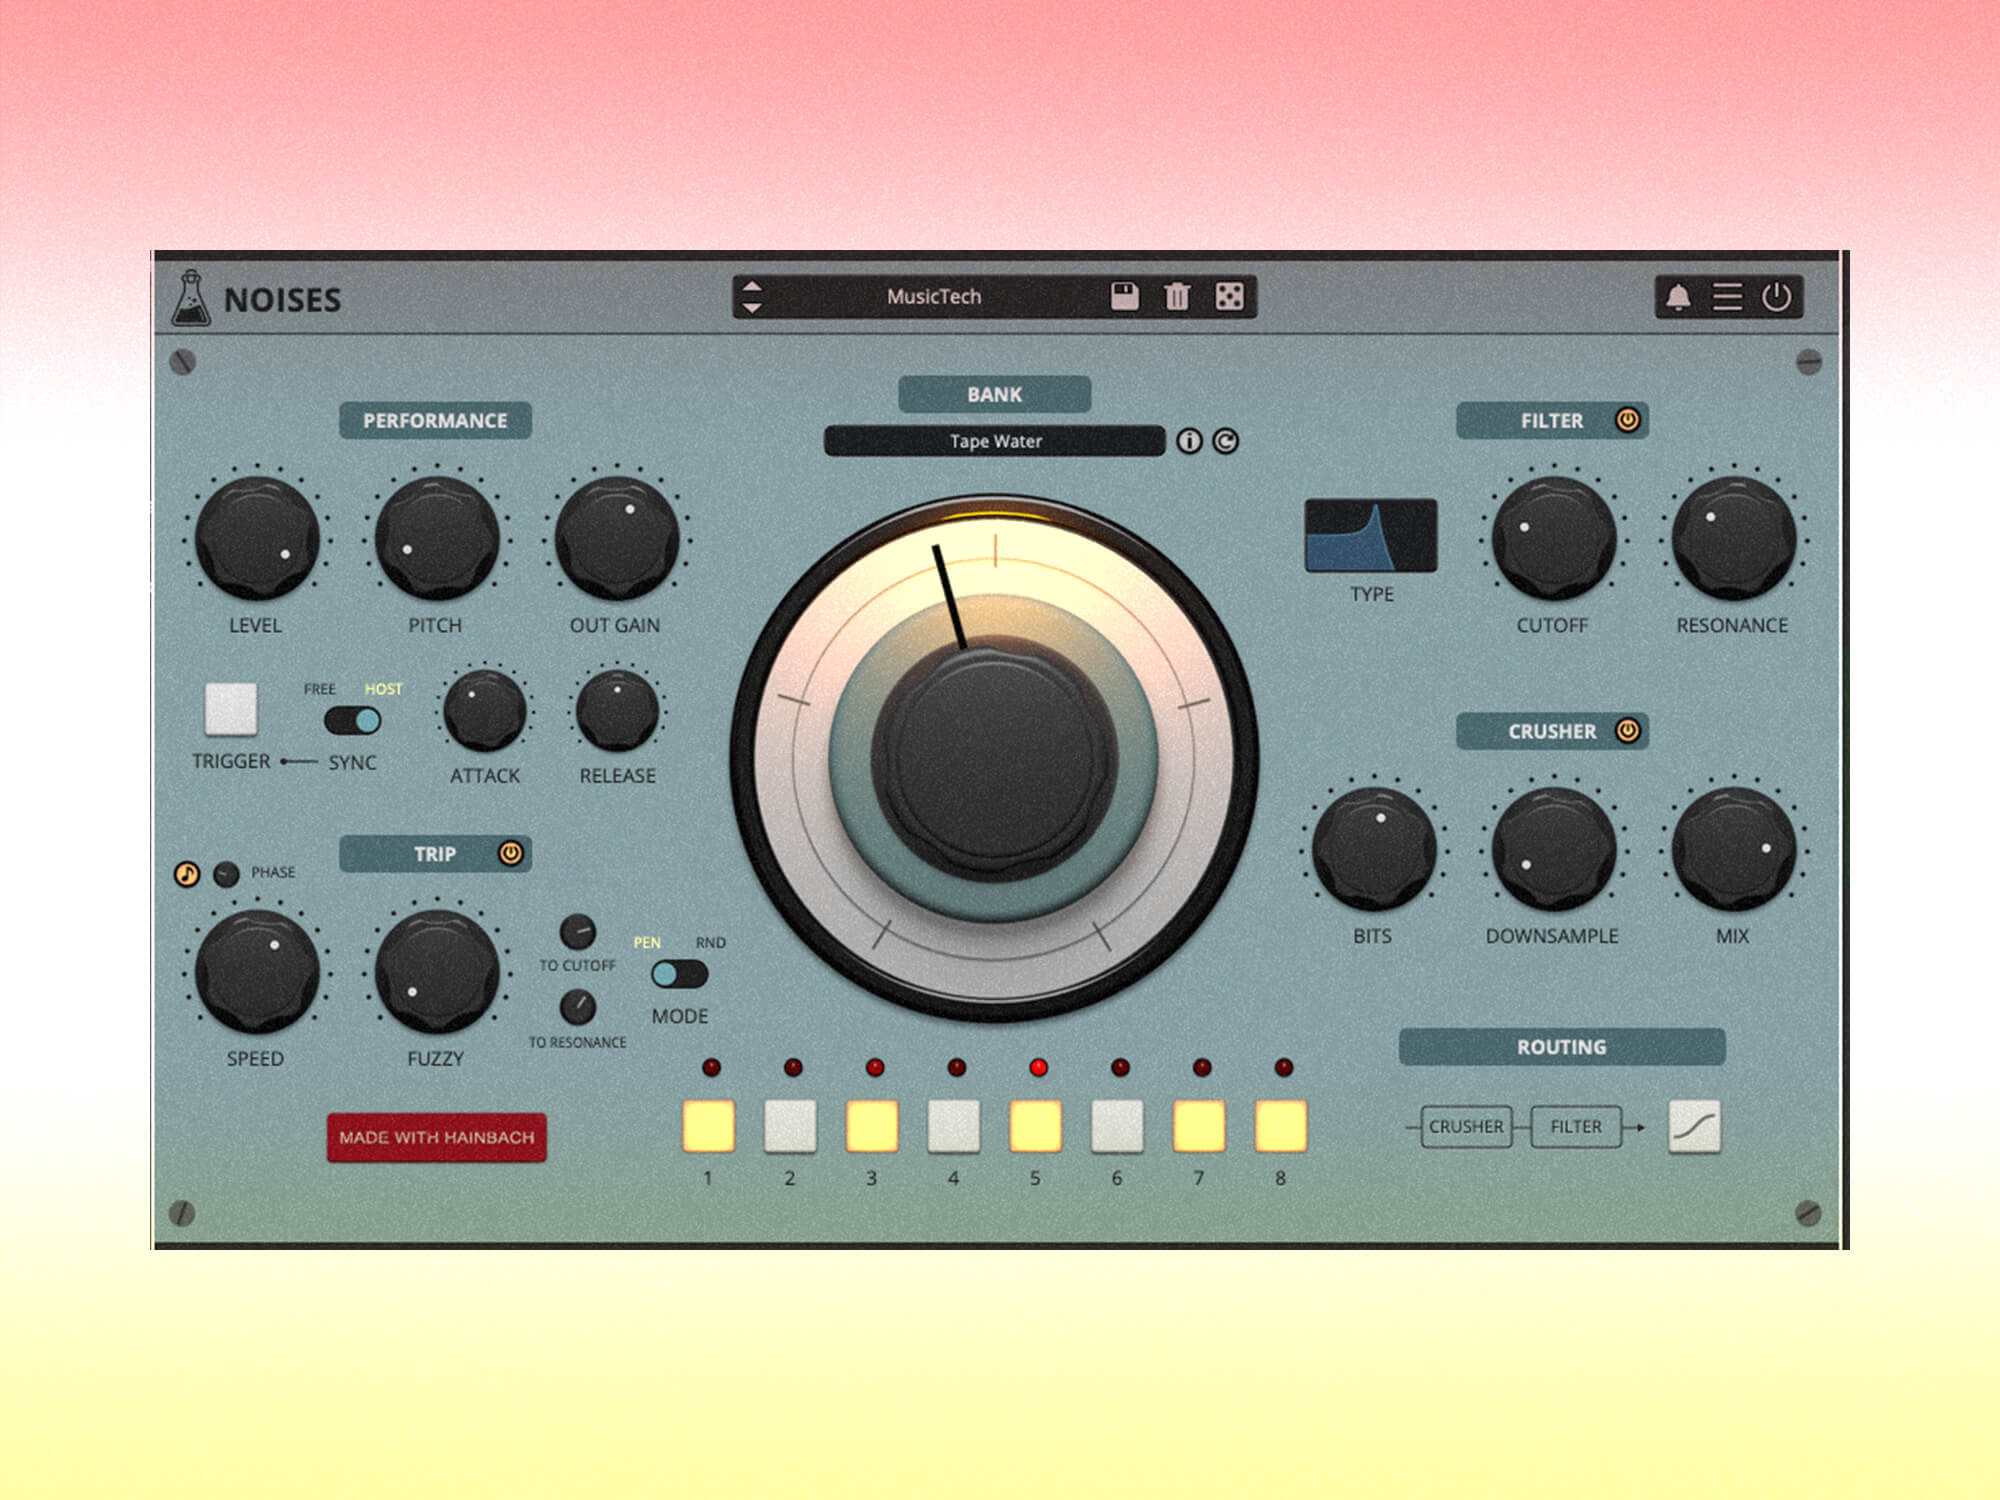
We’re using Noises here, a plug-in by AudioThing and made in collaboration with test equipment meister Hainbach, to inject some old-school character into a modern dub techno track.
Given that it’s inspired by cantankerous old gear, Noises doesn’t behave like you might expect it to. This is part of its charm but also may have you scratching your head in confusion, so a quick overview is in order.
The art of Noises
Noises has 28 banks of noise recordings, each containing eight noise samples. The centre dial sweeps through the eight noises either in a pendulum-style back and forth movement or randomly. This can be triggered by a button when in free-running mode, or synced to DAW tempo. The pitch of the samples can be affected by MIDI notes. You can turn individual samples on and off using the eight buttons below the centre dial. Surrounding the dial are controls for adjusting the pitch and envelope, the sequence, filter and bit reduction.
Setup and MIDI notes
Begin by dropping a copy of Noises onto a new MIDI track. If it isn’t already, initialise the instrument by selecting the Init patch from the preset menu. Next, engage the button next to Trip (the sequencer section) to start the centre dial moving. Hit the Trigger button to hear it running freely.
To get Noises to follow along with your track, sync it to DAW tempo. Slide the Sync switch over to Host. Try pressing play on your DAW to hear it in action.
Next, program in some MIDI notes. As we’re going for textures to complement a techno track, the actual notes are less important than their rhythmic feel. Play around with different note lengths and combinations until you get something that feels good.
Take it to the bank
The initialised patch starts with the Filterbank setting loaded up. Hainbach recorded this from a German EMS B-1-II filterbank. It sounds intriguing but it’s a little on the harsh side. Try some of the different banks until you find one that will complement whatever genre you’re working with. Tape Water has a healthy balance of tonality and high end that will respond well to effects later. The water droplet sounds also recall musique concrete, the classic technique of using tape-recorded sounds to create new compositions.
Take a Trip
The Trip section will help you fine-tune the sequence. First, adjust the speed dial to something that feels rhythmic and purposeful. Quarter notes work well. Next, tweak the phase dial to offset the start point of each noise sample. Bringing it up to about 90 degrees will create a nice groove. You can modulate the filter and resonance as well. Use the To Cutoff and To Resonance dials to have the filter move in time with the sequence. Finally, muting some of the eight samples will give it a pulsing feel. Try turning off numbers 2, 4 and 6.
Performance time
It’s on its way to something interesting but it’s not there yet. The sample playback is fairly heavy-handed. You can use the envelope parameters in the Performance section to smooth it out and get rid of the one-shot feel.
First, bring up the attack dial. This should help the samples fade in smoothly and not sound so staccato. A setting of 1.5 seconds or so works well. Next, adjust the release. As with a synthesizer, the release setting will allow the sound to keep playing and then fade out, even after the initial sample has stopped. This will give you a more rounded and musical response. An even 2 seconds is perfect.
Filter it down
Unfortunately, it still sounds a bit like a hyperventilating dog. This is because the filter is wide open and is letting all the frequencies through. Tamping down on this will smooth things out and make things less chaotic.
Turn on the filter by hitting the button next to the word Filter. Next, change the type of filter by clicking on the filter picture. It defaults to a low-pass 2-pole filter. Try the lowpass 4-pole for a darker and moodier tone. After that, lower the cutoff dial to about 175 Hz to roll off the highs. The resonance is peaking pretty hot. Reduce it to about 40 per cent to take the edge off but not completely defang it – you want some bite for the effects to work with.
Crushing it
While not actually a pre-modern electronic music technique, bitcrushing is a useful way to add grit and texture to sounds. Since it’s here, why not use it?
Start by turning on the Crusher. Next, lower the Bit knob to 12 to give it a crunchy, old-school sampler feel. Reduce the Downsample parameter to 6X to bring down the sample rate, introduce aliasing and sharpen it up. Finally, adjust the mix knob as you see fit.
Change the routing
Noises allows you to change the order of the signal flow between the filter and Crusher sections. By default, it places the filter first and Crusher last. Try inverting this by clicking on the signal-flow diagram in the routing section and see how it sounds. Placing the filter after the Crusher tames some of the excessive peaks and sounds better with the overall track.
Delay
That’s the original sound sorted. Next come the effects.
Since we’ve made a dub techno song, delay seems like the next appropriate step. However, rather than going with an ultra-modern delay, stick with something a little more period-accurate: tape delay.
To create delay effects, producers in the early days of music technology would employ loops of tape held aloft by microphone stands and whatever else they could jerry-rig. By having the tape repeatedly record and then play back the captured audio, they ingeniously created echo effects. While there’s no plug-in that can recreate this setup exactly, any tape-delay emulator should do the trick.
Arturia’s Delay Tape-201 is a recreation of Roland’s famous RE-201 unit with a few extras such as independent stereo delays. Load the delay plug-in onto a send track. Next, try setting the left and right to different rates. Resist the temptation to sync it to tempo, to get a looser feel. Adjust the Intensity (feedback), echo volume, and bass and treble settings until you have an effect that supports rather than overwhelms your groove. Try cranking the input drive to saturate the signal.
Reverberate
For the final effect, try pushing your sound through a reverb. Old-school producers didn’t have fancy algorithmic digital reverbs. In those days, you either piped the audio into a stairwell and recorded the result or you made use of an electro-acoustic reverb, such as a plate or spring. Spring reverbs – literal springs that vibrate and create a reverb effect – are very characterful and perfect for the task at hand.
Drop a spring reverb plug-in onto another send channel. Bedroom Producer Blog’s freeware Dirty Spring will do the job. Increase the decay and adjust the tone until you get a nice patina of dirty reverb around the sound. Try adding some extra distortion with the dirt knob too.
Here’s the song in its finished state.
If you like the techniques outlined here, why not try out some similar plug-ins? SonicLab’s Fundamental was also made in collaboration with Hainbach, and replicates that test-equipment sound in a comparable way. Spitfire Audio’s free LABS is packed with sample sets, many of which employ musique concrete techniques too. Finally, if one plug-in isn’t enough and you want to try an entire environment of classic gear, then Berna3 by Giorgio Sancristoforo is the desktop app for you.
For more guides, click here.