Cubase Tutorial: Become a Power User 10 – Routing Hardware & Software
With more new hardware coming out and lots of classic hardware available Tim Hallas looks at how your DAW can become the perfect hardware/software environment… When working with Cubase, one of the biggest problems that I come across, particularly when working on the older versions I find in schools, is that the variety of sounds […]
With more new hardware coming out and lots of classic hardware available Tim Hallas looks at how your DAW can become the perfect hardware/software environment…

When working with Cubase, one of the biggest problems that I come across, particularly when working on the older versions I find in schools, is that the variety of sounds was not always as comparable with other DAWs. Now we’re in version 7.5, the selection is much greater, but as musicians we are always looking for the most appropriate sounds available rather than just settling for what is available.
I am a bit of a ‘gear-head’ and have in my studio a number of very nice external MIDI devices from the true analogue of my Moog Little Phatty to the most digital and modern sounds of my Roland V-Synth via a whole stack of drum machines and other gadgets I rarely use. They all have their appeal and I use the appropriate one at the appropriate time. So, although Cubase does now have a range of decent sounds within the MediaBay, this month we will be looking at how to incorporate sounds from external devices into projects via MIDI and how to capture the audio back in.

As well as using external devices, many users of Cubase may well be familiar with linking the software to other programs through the ReWire protocol. Both Reason and Live work with ReWire and can be controlled by a master DAW and in this article we look at how to set this up within Cubase. (Hollin or Liam will be able to write in more detail about the Reason or Live side of the protocol, but for now I will focus on the Cubase side.)
The need to link the software to these external devices and pieces of software is less common now that all of the major DAWs are trying to make their programs all-in-one boxes. However, while they try and do that, there’s been a growing number of hardware releases over recent years to tempt us back ‘to the outside’ so it is still important that we understand how to use these features in the software. And you never know when you’ll want that old rack synth in the loft back in your set-up, so here’s how to best marry hardware and software and also to ReWire other software into Cubase.
MusicTech Step-By-Step: Reaching Outside Of The Box

To begin routing MIDI information to an external MIDI track, you need to have a ‘true’ MIDI track rather than a Software Instrument track. Load one of these by selecting Project> Add Track> MIDI. This will bring up a dialogue box to choose how many tracks you want. These are different to Instrument tracks as Instrument tracks are more of a hybrid MIDI/Audio track.

Once your track is loaded you need to route it to the external device that it will be controlling. They can be found in the drop- down box in the Channel Inspector panel on the left hand side. Once the output is selected, choose which MIDI channel you want to output on – from 1 to 16 – so that there is no muddled MIDI data between tracks.

At this stage your external device should be receiving MIDI data, and assuming it is connected to an amplifier of some variety, it should be making sound. You can now provide it with any MIDI data that a software instrument would receive, including note data and automation via Continuous Controller information.

If you are integrating the sounds generated into a project that is running audio and other devices, there needs to be some way of collating all of these sounds which traditionally would have been done via a mixer – and we can do the same in Cubase via the MixConsole and Arrange window in the software by taking an audio feed into the computer.

By adding an audio track into the Arrange window (Project> Add Track> Audio) and routing the input from your interface to that channel you can capture the audio. Connect the output of your external device to the audio input and simply hit record. The computer will send the output of the MIDI to the device and then capture the audio as it is recorded back in.

There is potential that this capture might be minutely behind the project, but I have never noticed it enough to be a problem. If you want to adjust it within the Arrange window, re-align the captured audio with the beat or the original MIDI data until it is back in time with the project.
Music Tech Step-By-Step: Reaching Other Software Via ReWire

The ReWire protocol is a temperamental beast and requires the software to be opened up in the correct order. Start by opening Cubase, but not opening a project. Then open Reason (or other software) and it should say ‘ReWire Slave Mode’ as the audio device. Open your Reason project and then the Cubase project to makes sure that all the conduits link correctly between the pieces of software.

When working with ReWire, although the whole process remains within the box rather than leaving the computer as it does with an external MIDI device, we still need to use a MIDI track rather than an Instrument track. So start by creating one in Cubase by following the instructions above but don’t yet route to the output or channel.

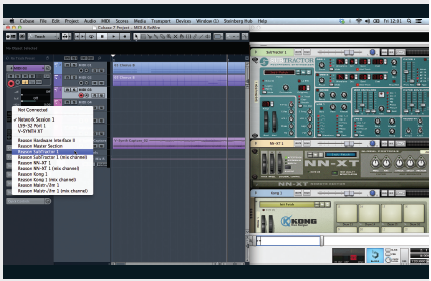
For this I shall be describing working with Reason, but it works similarly in other ReWire slaves. At this point there will be no sound, as although you have the software link, it is not yet turned on to allow sound through. By selecting Devices> *device* Rewire this opens up a dialogue box to select all the outputs available – I’ll come to this shortly. Start with L+R mix.

You now need to assign tracks to instruments between the pieces of software – start by selecting the sound source you want to use in the slave and setting up the instrument. Then in Cubase, the instrument you have just loaded will appear as a device in the external MIDI tracks available. You can now play and record the MIDI data between Cubase and the slave.

If you then want to import the information back into Cubase, it is easier than with external MIDI devices as it can be done inside the box. Decide how you want to capture the audio, either as mix or individual parts for further processing. If the former, export the audio from the ReWire program or by soloing the ReWire mix in Cubase and exporting that and then re-import it into Cubase onto an audio track.

If you want to capture individual sounds, route the outputs of each instrument in Reason into channels on the Hardware Interface. Then in Cubase go back in the Reason ReWire box and turn on those channels that have instruments connected to them. Then within the Arrange window, solo that individual track and export the audio and then repeat the process of export and import above.