Cubase Tutorial: 25 Pro-Tips
Even a seasoned Cubase veteran might struggle to find their feet in the latest version of Steinberg’s popular DAW. Tim Hallas shows you around 25 latest features in this Cubase Tutorial Multi-Wave Oscillators As you will know by now, Retrologue is an emulation of a semi-modular subtractive synth that contains all the traditional […]
Even a seasoned Cubase veteran might struggle to find their feet in the latest version of Steinberg’s popular DAW. Tim Hallas shows you around 25 latest features in this Cubase Tutorial
Multi-Wave Oscillators
As you will know by now, Retrologue is an emulation of a semi-modular subtractive synth that contains all the traditional oscillators you would expect to find. However, it also includes a couple of bonus features, including multi-oscillators that can generate between one and eight waveforms from each oscillator. When Multi is selected the Detune knob lights up and the synth will raise or lower the pitch of each waveform from the centre pitch on both sides to create a much fatter sound. This multi-oscillator is available on both of the main oscillators and could, in theory, allow you to have 16 waveforms in one sound, plus the Sub-Osc and Noise Generator as well if you want them!

Matrix
Both of the new synths in Cubase 6.5 contain a Matrix controller at the bottom of the window for routing signals around the synth. Rather than the usual buttons for sending an LFO to a particular control, you have to do it with the Matrix. For those familiar with ES2 in Logic or Thor in Reason, this will seem very familiar. To use this, the top slot is the signal you want to send; the bottom slot is what you want to receive; the middle slot is anything you want it to go via (eg the mod wheel for manual control). The main thing to remember is that it won’t work without the Depth control turned up (or down for inverted effects).
Note Expression
One of the big features in the major upgrade to version 6 was the addition of MIDI CC (Controller Channel) data editable on individual notes. Unfortunately, this wasn’t receivable by many virtual instruments. Retrologue and Padshop both respond to it happily, so to access this and adjust individual notes click on any MIDI data and access the Note Expression by double-clicking on any note in the Key Editor. Draw in your automation for that note and let the synth do the rest. This is enormously useful for the odd note that needs a synth effect, such as a sudden dive on the filter, but you want the rest of the synth to remain unaffected. It also avoids the issue of moving automation data when shuffling MIDI parts around as it remains with the individual note.
Note Expression In The Matrix
The Note Expression dropdown panel in the Key Editor window contains only a small number of automation controls. However, Retrologue again enables you to use the Matrix to do what you wish. You will notice in the dropdown window that Note Expression is an option as source signal. When this is selected you can use any of the commands to control anything else in the synth. So if you want to have an unnatural pitch slide, select NE-Cutoff as your source, turn up the Depth and select Pitch as your destination – and listen to the synth fly. This can be useful if you have your global pitch range for the synth set, but want a one-off effect on specific notes.

Mod Wheel & Other Controllers
You will eventually find that the Matrix can’t quite do everything that you want. For example, I was trying to route the LFO to the filter cutoff via the mod wheel. However, via the Matrix, Cubase assigns the mod wheel to be an amount controlling the depth of the effect – but I wanted the mod wheel to control the speed of the LFO for some dubstep-style bass lines. To do this, or for any other control, right-/[Ctrl]-click on the relevant virtual instrument control on the screen; the bottom option from the dropdown window is ‘Modulation Wheel’, in which the top option is ‘Enable Mod Wheel’. This immediately assigns the selected controller to the mod wheel regardless of what else is routed to it. If you have a keyboard with many additional knobs and sliders, the same principle can be applied by right/[Ctrl]-clicking on the control in Cubase, selecting ‘Learn CC’ and then moving the desired hardware controller.
Step Modulator
Padshop – the second of Cubase’s new synths – contains a Step Modulator. This can be accessed from the bottom of the screen in the same location as the Matrix. It is the bottom tab, and when selected brings up a largish orange window. There are several controls here, including number of steps and speed. There are several presets available with appropriate settings already selected. As with all other modulation devices in the synths it needs to be routed to the destination via the Matrix section. This should not be confused with a step-sequencer, although it can work as one with appropriate settings; it will modulate the full range of pitches available from the oscillator if the Depth control is set too high.

Grain Position
Padshop is a granular synth and as such can make sounds from any length of waveform by selecting tiny sections of the sound to loop and manipulate. It is worth experimenting with longer samples to get different timbres from the synth. It is very tempting when loading a sound to use just the beginning of it. Try moving the position of playback by adjusting the Position (Pos) controller and moving about in the waveform, and play it backwards by moving the Speed controller into negative numbers. Increase the number of grains to get multiple sounds and increase the Spread and Offset controls to get a bigger range of sounds as this changes the start position for each of the multiple grains.
Noise Generation
Although the synth doesn’t contain any noise-generation facilities it is quite easy to create some pretty crazy and pitchless sounds. Within the main Grain window at the top are controls for Random and Spread in both the Pitch and Duration sections. These enable you to have grains of varying lengths and pitches. The default settings are the shortest length and the original pitch of the waveform. By turning these up to 100% you allow the synth to create grains of totally random lengths and pitches within an octave higher or lower than the original. Obviously, in normal circumstances you wouldn’t have these anywhere near this high, but for electro-acoustic sound design and generating noise other than white or pink it is enormously useful.
LFO Step Modulator
If a more rhythmic feel to your track with a step modulator is something that you want, it can of course be linked in via the Matrix from the LFO. When doing this it creates some very intense rhythm effects, particularly if you set the synchronisation of the project to different Quantize levels. If you set the LFO to 1/8 and the step modulator to 1/16 you get a sort of pulsing effect as they go in and out of sync. This can be enhanced with the Depth control and altered using the Offset control.
LFO Grain
The LFO can also be routed to most of the controls within the Grain window, which can create some movement within the sound. This is routed in the same way as any other control via the Matrix window. The same LFO can be routed to several controls at once, and when used in combination, many bits of the original waveform can be played together in various ways to create some different timbres. The Matrix and Modulation sections can be used in any creative way that you can think of to generate sounds.

DJ-Eq
One of the new effects in the update to Cubase 6.5 is a simple three-band EQ specifically designed for DJs and predominantly created as a quick way to place treble and bass cuts into a track. Remember the classic Fatboy Slim sound with simple EQ filtering on the whole track? This is what it can do! It is pretty simple to operate: the three bands are fixed with the crossovers at about 500Hz and 5kHz. The unit will allow you to cut up to 32dB of any band and boost by only 6dB. As this is really an effect rather than a tool, this is the right way around, as it should prevent too much overloading. Although designed primarily for DJs, DJ-EQ is a quick, rough and ready way to get a sound and works particularly well as an emulation of the basic tone controls found on electric guitars.

MorphFilter
MorphFilter is the other new effect in the latest update and can re-create many of the same effects as DJ-EQ – but quicker! The best way to think of the interface is like a Kaoss Pad, and if any of you have used the filter setting on a Kaoss Pad it will make a lot of sense. There are two filters running simultaneously – by default a low-pass and a high-pass – but it will also do band-pass and notch filters as well. The interface can then be altered by moving the mouse, or any linked hardware controller, around to generate different amounts of filtering – a very simple way to create dance music effects.
Guitar Effects
One of the biggest new features in Cubase 6 was the addition of guitar effects and amplifier emulations. In Cubase 6.5 Steinberg has added a little more to the arsenal of pedals with the addition of a Limiter and a Maximizer. Both of these are in fact dynamics processors rather than effects, but when used correctly allow other effects and the amps to work better. By putting the Limiter on the Post-Amp effects loop it gives you some control over the output peaks. The Maximizer can be used right at the start of the signal chain to boost the input if the guitar part is too quiet, or after the amp to boost the finished signal if necessary.
Meshuggah Presets
In addition to the new pedals Steinberg has also increased the number of presets in the plug-in by 50. The headline-grabbers of these are the few created in partnership with Swedish extreme metal band Meshuggah. As you would expect these are all high-gain sounds presumably based around Mesa-style rectifier amps and are quite good if this is your sort of thing. This isn’t really the sort of guitar style I play personally, but I still had fun with them for a little while. The rest of the presets are still very good and some of the Vox emulations also sound very good when applied to electric piano.
Input/Output Monitoring
Steinberg has also added some basic level meters on both the input and output of the VST Amp Rack. This can be viewed in the Master section of the effect, with the input monitor on the left before the EQ section and the output level on the right beyond the master switch. This appears green when at a good level, changing through yellow to red for too loud. If the signal is very low it appears white at the bottom of the meter. A rough-and-ready level meter can be found in the top corners of the effect no matter which window you are in as a small dot showing the approximate signal level with green, amber and red depending on level.

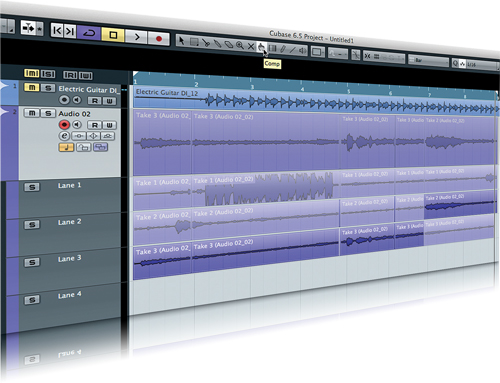
Comp Tool
When Cubase introduced Lanes into version 6 we all thought ‘about time’ as it kept multiple takes of one track together and other DAWs already had something similar. However, although it worked, it was a little clunky and editing between different sections was awkward and convoluted. Fortunately, in version 6.5 Steinberg has listened to our comments and introduced the Comp tool. The Comp tool can be found in the tool bar (its icon is an index finger pointing). When selected, simply drag the Comp tool over the different bits of audio you want from each take and Cubase does the rest. It still splits all of the takes into individual chunks so they can be moved or edited individually, but it saves you having to do it all separately.
Clean Up & Crossfade
When you have got all of your Lanes sorted and you have finished with the Comp tool, you might want to tidy up some of the edits. Because Cubase essentially treats each comp as a separate file, it is perfectly possible to crossfade between them. Simply drag your cursor to select the finished track then press X or go to Audio>Crossfade. Alternatively, Steinberg has added a little tool to help tidy up overlapping events when comp’ing. If you right-/[Ctrl]-click on your selected Lanes and select Clean Up Lanes it tidies up the files so it is clear what is being used and what isn’t, enabling better crossfading.
Converting Lanes To Tracks
Occasionally you may want to convert what you have recorded in Lanes onto separate tracks, possibly to send the project to a collaborator using a different DAW or to apply different effects and EQ to different sections. This is quite easy to do by selecting the Lane header or headers on the left then right-/[Ctrl]-clicking on Create Tracks From Lanes. This creates tracks below the existing tracks with the chunks from your Lane on them. It doesn’t do all the Lanes in your track at once unless you select them all, otherwise it will just do the Lane you currently have selected.
AudioWarp & Quantize
In version 6.5, Cubase has integrated the AudioWarp tools normally found in the Sample Editor directly into the Quantize panel. This enables you to treat both audio and MIDI in the same way at the same time. From the Quantize panel found under Edit>Quantize Panel you will find the basic AudioWarp controls. When you click on AudioWarp followed by Auto it detects all of the hitpoints in the recording. By then clicking on Quantize it will automatically put your piece of audio into sync with the rest of the project. As the audio is warped and not sliced it will follow any alterations in tempo in the project and adjust itself automatically when the tempo track is altered.
Group Quantize
As AudioWarp is now accessible from the Quantize Panel it is possible to apply it to multiple tracks simultaneously (in previous versions you would have to individually select each audio file and run the hitpoint calculations on each one separately). By selecting all of the files that you want to Quantize in the Arrange window and then selecting AudioWarp from the Quantize Panel it will simultaneously calculate the hitpoints for all and apply quantization globally to your project. If you have a particular instrument that you have generated a Groove Quantise Preset from this is an excellent way to get an entire track to sit with it quickly and musically.
SoundCloud Integration
As a great little addition Steinberg has integrated a link straight into your SoundCloud account. This can be found in the Export window as an additional option at the bottom. The section is labelled ‘Post Process’ and SoundCloud is found in there. Simply export your track as normal, save it to your preferred location on your hard drive and, once it has finished exporting, Cubase opens it in your browser and connects to your SoundCloud, assuming you have one, then immediately uploads it without any further need for format conversion and so on.

FLAC Support
Cubase can now support the FLAC file format. For those of you who don’t know, this is a lossless compressed audio format that is free and therefore has no licensing issues. To export a file in this format you will now find it in the dropdown menu of available formats in the Export window. There are some adjustable settings to be found here including level of compression, but it’s probably best to leave these as they are. Importing a FLAC file is the same as for any other supported audio file. Click on File>Import>Audio File and select the relevant FLAC file. As the program now supports the file format it takes very little time to load and doesn’t seem to convert as much info as it does with MP3 and other compressed formats.
64-Bit ReWire Support
Those of you who use Reason or Ableton Live in addition to Cubase will be familiar with the ReWire protocol that enables the two bits of software to speak to one another. To activate this click on Devices>Reason ReWire or Live ReWire depending on which software you have. Previously this limited the amount of data passing between the programs, but with the integration of 64-bit communication, Steinberg claims it will cope with 256 audio tracks and thousands of MIDI channels. This might not affect your day-to-day use of the program, but it is good to know that Steinberg is still paying attention to things ‘under the bonnet’ as well as the more immediate flashy stuff.
Record Time Max
Something that I have discovered only recently (and something that is particularly useful when you’re doing large amounts of tracking) is a large display that appears on the screen to indicate how much time remains for recording. This is a simple white-on-black box that can be found in Devices>Record Time Max. It appears very similar to the Time Display box, also located in Devices, that I have been using for years as a large display for current project location. I now have the two boxes open permanently on my second screen, which certainly helps workflow.
Virtual Keyboard
Something that often remains hidden away in Cubase is the existence of a virtual keyboard. This is very obvious in Steinberg’s entry-level software, Sequel, but for some reason is a little more hidden in Cubase. It can be found in Devices>Virtual Keyboard ([Alt]+K) and makes the keys appear in the transport bar. This is very useful for some on-the-hoof music-making when you are without a MIDI controller or any other means of inputting notes. I personally feel it could be expanded a bit to include a key for sustain as some of Cubase’s competitors do, but it is nonetheless still very useful to have.
�