Logic Tutorial: Working Within The Environment
Despite being largely hidden from view, the Environment is a vital backbone of Logic Pro’s operation. Mark Cousins delves a little deeper in this Logic Tutorial Ask any Logic user what they find most daunting and perplexing about the application and the result will be unanimous – the Environment. To be fair, Apple […]
Despite being largely hidden from view, the Environment is a vital backbone of Logic Pro’s operation. Mark Cousins delves a little deeper in this Logic Tutorial
Ask any Logic user what they find most daunting and perplexing about the application and the result will be unanimous – the Environment. To be fair, Apple has done a tremendous job hiding the Environment from view, and indeed, few users will ever need to use it as part of their daily workflow.
However, if you’re looking for a better way of incorporating external MIDI hardware into your setup or just exploring new and exciting ways in which you can use Logic Pro, you’ll eventually need to turn to the Environment and see what it has to offer.
Although we’ve explored the Environment before, the concept of this Workshop is to provide an ‘essentials’ guide to using this important backroom engine that powers Logic Pro. Rather than detailing every feature of the Environment, we’re going to take a broader overview, focusing on a few key applications that can make a positive contribution to your daily use of Logic. Of course, you can choose to go a lot deeper, but the techniques are applicable and relevant to anyone working with Logic.
Eco Warrior
For the sake of retaining to concept of ‘flow’ behind the Environment, we’re going to start with one of the more challenging exercises, so do bear in mind that this next section is as complicated as it gets. The concept of flow is important to the Environment, primarily because the system works though a series of interlinked patch cables, much like Reason when you turn around the instrument Rack. The other important point to note about flow is that there are two principal paths to be navigated – the route in to the sequencer (or Logic, in other words), and the route out of the sequencer.
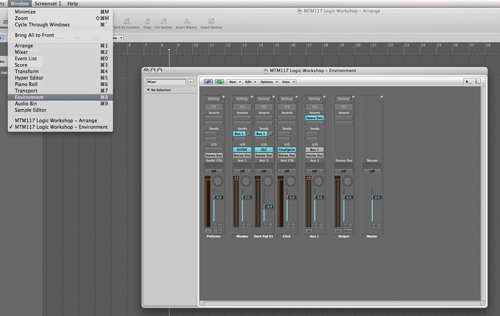
Open the Environment by using the menu option Window>Environment. In this first exercise we’re going to modify the input path to Logic, adding a few simple objects to transform MIDI data as it flows into Logic. Don’t be afraid that you’re going to break anything, though, as none of these changes will permanently affect how Logic works. (See main image)
To keep things simple, the Environment is divided into a series of Layers, each with a slightly different function. By default, the first layer that you’re presented with is the Mixer, which is the complete collection of Audio Objects used within your current Logic Project. We’ll be returning to the Mixer later on, but for now, move over to the Click & Ports layer using the dropdown menu in the top left-hand corner of the Environment window. The Click & Ports layer works as the input path to Logic, with the Physical Inputs to the left and the Sequencer Input on the right.

Cable Guy
Adapting the input path to Logic allows us to achieve a number of funky things with MIDI data as it flows from the physical MIDI input through to Logic’s track lanes (the Sequencer, in other words). An assortment of objects can be found under the New local menu item, each fulfilling a different technical objective. In this first example, though, we’re going to create a Cable Switcher (New>Fader>Specials>Cable Switcher) and rewire the Input View and Sequencer Input objects so that the cable passes through the Cable Switcher.

The cable switcher is useful in that we can create two parallel paths, switching between them by clicking on the Cable Switcher. Create two new objects – an Arpeggiator and Monitor, both from the New menu – and wire them in series, from the second node on the Cable switcher through to the Arpeggiator, followed by the Monitor and then the Sequencer Input. When Logic’s transport is running – and assuming the Cable Switcher is routed in the correct way – anything coming into Logic’s inputs will be arpeggiated.

The World Of MIDI
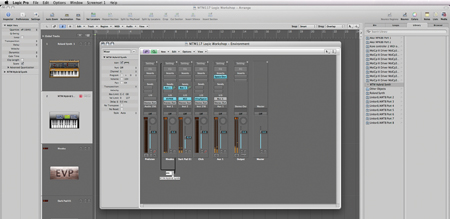
Having looked at the input route into Logic, we now need to consider the concept of outputs from the Environment. A simple, easy-to-understand example of this is a physical MIDI output – created using a MIDI Instrument object in Logic, which is then used to feed MIDI data to an instrument connected to one of your MIDI out ports. To create a new MIDI instrument, move over to the MIDI Instr Layer. At the moment, the MIDI Instr Layer is blank, but what we want to create is a virtual version of your physical MIDI setup.

Assuming that you have some form of physical synth or sampler, therefore, select New>Instrument or New>Multi Instrument depending on whether the instrument works on a single MIDI channel or set of 16 MIDI channels respectively. Click on the new instrument object and use the inspector on the left-hand side of the Environment window to establish its parameters, which include a Port assignment and Icon, among other things. In theory, you can then repeat this for any other MIDI hardware you have in your setup.

Moving back to the Arrange window, let’s now look at how the newly created MIDI instrument gets carried through to your track list. Create a new track (Track>New) and select External MIDI from the three different track types. The library should open (if not, press on the Media button in the top right-hand corner of the Arrangement Window and select the Library tab) and as part of the list of options you should see your newly created Instrument. Of course, you’ll need only to create this configuration once, assuming you save the resulting setup as one of Logic’s default Templates.

Rewiring Instruments
In effect, the objects that reside on each track lane are forms of output. In this case we’ve created physical MIDI outputs but you can, of course, create Software Instruments, all of which reside in the Mixer layer of the Environment (as we saw earlier on in the exercise).
The Environment starts to become even more interesting when we think about interrupting the flow between the sequencer’s track lane and the Software Instruments that reside in our project, either to perform creative tasks (like track layering, for example) or to create technical modifications that might be relevant to a particular software instrument and how it works with MIDI.
To change the way data flows to our Software Instruments we need to get a little creative with our wiring. Reopen the Environment, therefore, moving to the Mixer layer and creating a new Instrument object (New>Instrument). This new instrument effectively becomes our new route into the Mixer page, allowing us to direct and modify the MIDI data as we see fit. Give the object a name (in this case, ‘MTM Hybrid Synth’) so that you can recognise it later on.

In this example we’re going to use the new object as a means of layering two instruments – the EVP88 Piano and the ES2 Synth Pad. To route the data, click on one of the Instrument’s nodes and drag it across to the Software Instrument fader you want to connect it to. When you create the routing, Logic will prompt you to remove the existing Cable and Channel Port setting for the Instrument. Click Remove to execute this. You’ll then need to repeat the process with the next Software Instrument accordingly.

On Track
Having created the routing, we then need to configure the track list so that we can access this new output path. The process is much the same as when we created a physical MIDI output – creating a New Track and then selecting External MIDI as a type. Of course, we don’t actually need an external MIDI connection, but instead, a new route to our Software Instruments. Notice that our newly created instrument (MTM Hybrid Synth) appears in the Library’s collection of instruments, although, of course, this is simply an internal routing. Select the MTM Hybrid Synth track, therefore, and you should be able to play on the keyboard with the output routed simultaneously to the two Software Instruments.
Now that we have this alternative output route configured, we can get even more creative. Just as we customised Logic’s input path, we can look to adding objects into the current output path. The principal tools to play with are the aforementioned Arpeggiator, Transformer and Delay Line, but here we’re going to use the Chord Memorizer. This is a fascinating tool, allowing you to assign unique combinations of notes to each key. Use a different Chord Memorizer for each instrument path and see how you can create complicated multi-timbral chord voicings from a single note.

Going Green
Although it easy to avoid the Environment, it’s worth exploring if you want to get to the heart of Logic’s operation. Whether you’re creating a virtual presentation of your physical studio or looking to explore some of the more weird and wonderful ways you can manipulate MIDI data, there’s an almost infinite amount to be discovered. Once you’ve got to grips with the basics, you’ll find that the Environment becomes your new best friend, opening up new ways of using and customising an otherwise over-familiar working experience.