Back to basics: How to build a bass part in Ableton Live
You like bass, right? C’mon, everybody does! Bass is important, sure, but there are so many tools, so many technical and creative choices to be made about how to use it.
We’re gathered here to have a little chat about why and how to add bass to our tunes – and when I say ‘bass’, I’m including bass guitar and bass synths – any source of low-end rhythmic/melodic instrument parts. Traditionally, bass can provide a counterpoint to other melodic instruments, while fitting in with the beats, glueing both of these elements together (on a good day). In addition to that, bass forms an essential part of a song’s groove, a pulse that can make music feel like it’s pushing or dragging in the right time and place.
All of this is true in electronic music and sound design as well, with all the extra opportunities that come through using synths, filters, effects and any other modern trickery at our disposal. But we shouldn’t be too dogmatic – you can break the rules at any time! A song can be all bass, or have no bass whatsoever. This is a great freedom if you’re working on your own. In a band, if you suggested that there’s no need for bass (or whatever instrument) on a certain song, the player in question could get offended. When you’re calling all the shots, you’re not obliged to included anything you don’t want to include.
Get low
Maybe we don’t even need to talk about this, given that there’s a huge crossover between bassists and Live. So many Ableton Live users are bass players or former bass players. Why this is, I’m not sure. Perhaps it’s because, as I’ve mentioned, the bass player finally gets a chance to call all the shots. Perhaps it’s because so often (in my experience) bassists are the geeks in the band, the ones mostly likely to tinker with gear and branch out into other hobbies like photography. Who knows for sure? (I’m a Live user, bass player, and photographer, so I’m allowed to say all of this). For the walkthrough we’re using samples that we can load into the Simpler sample playback instrument. This limits our sonic options compared to instruments like Operator, but it does keep it Live Intro-friendly. Substitute your own samples or instruments for the ones used here if you prefer.
Bass is about low end, the lower range of the frequency spectrum. I’m not going to specify an exact range because it’s about context and the sounds used. But it is important to work and preview your sounds in the range you intend to use them at. If you happen to come up with a killer sound that works better a few octaves higher, don’t delete it – just save it as a preset and come back to it later.
If you’re using a MIDI keyboard, or pads, to play in your notes, try assigning velocity to Simpler’s filter resonance, so as you play harder, you get a more organic response from the filter, it sounds very nice. MIDI effect devices are your friend, whether you’re looking for an approachable path into programming, or you want something that you can use to get a bit of interactivity in the parts with a MIDI controller, maybe for live performance.
Bass effect
Using the same notes as a starting point, MIDI effects can help you build parts that have variety and very different feels, and can easily be transposed between different scales if needed. I like using racks for bass because, well, it’s like when bass players use bi-amping, where they’ll split their bass signal through different apps and effects to get a clearer or more ‘produced’ sound. It’s like in the studio where you might put a mic in front of the bass speaker cabinet while also taking a direct line from the bass into the mixer, then blending them for the best possible result.
And, as I said, this is one way to look at racks in Live. The only possible downside to using racks to build complex bass sounds is that you can get so carried away – you build a monster preset that sounds amazing in isolation, but then when you put it in the mix, it crushes everything else, and you have to EQ the fun stuff out!
It definitely helps if you can play some kind of instrument, even at a very basic level. The best way to understand bass would be to study piano, where you get to experience the interaction between bass and melody for yourself. Bass guitar itself is a great compositional tool, because it needs a bit of rhythm, and a bit of melody – you can sing a song while playing bass and convey the essence of the whole thing. Even if you pick up the bass and play it unamplified, it’s the best way to work out bass parts that you program in afterwards!
Building a bass part in Live: step-by-step
 1. We’ve provided an example Live set, which you can download from here with some samples you can use for this tutorial. As usual, you’ll need Live 10 to open the project. Install the time-limited demo if needed. We’ll use the Simpler instrument because that’s available in every version of Live.
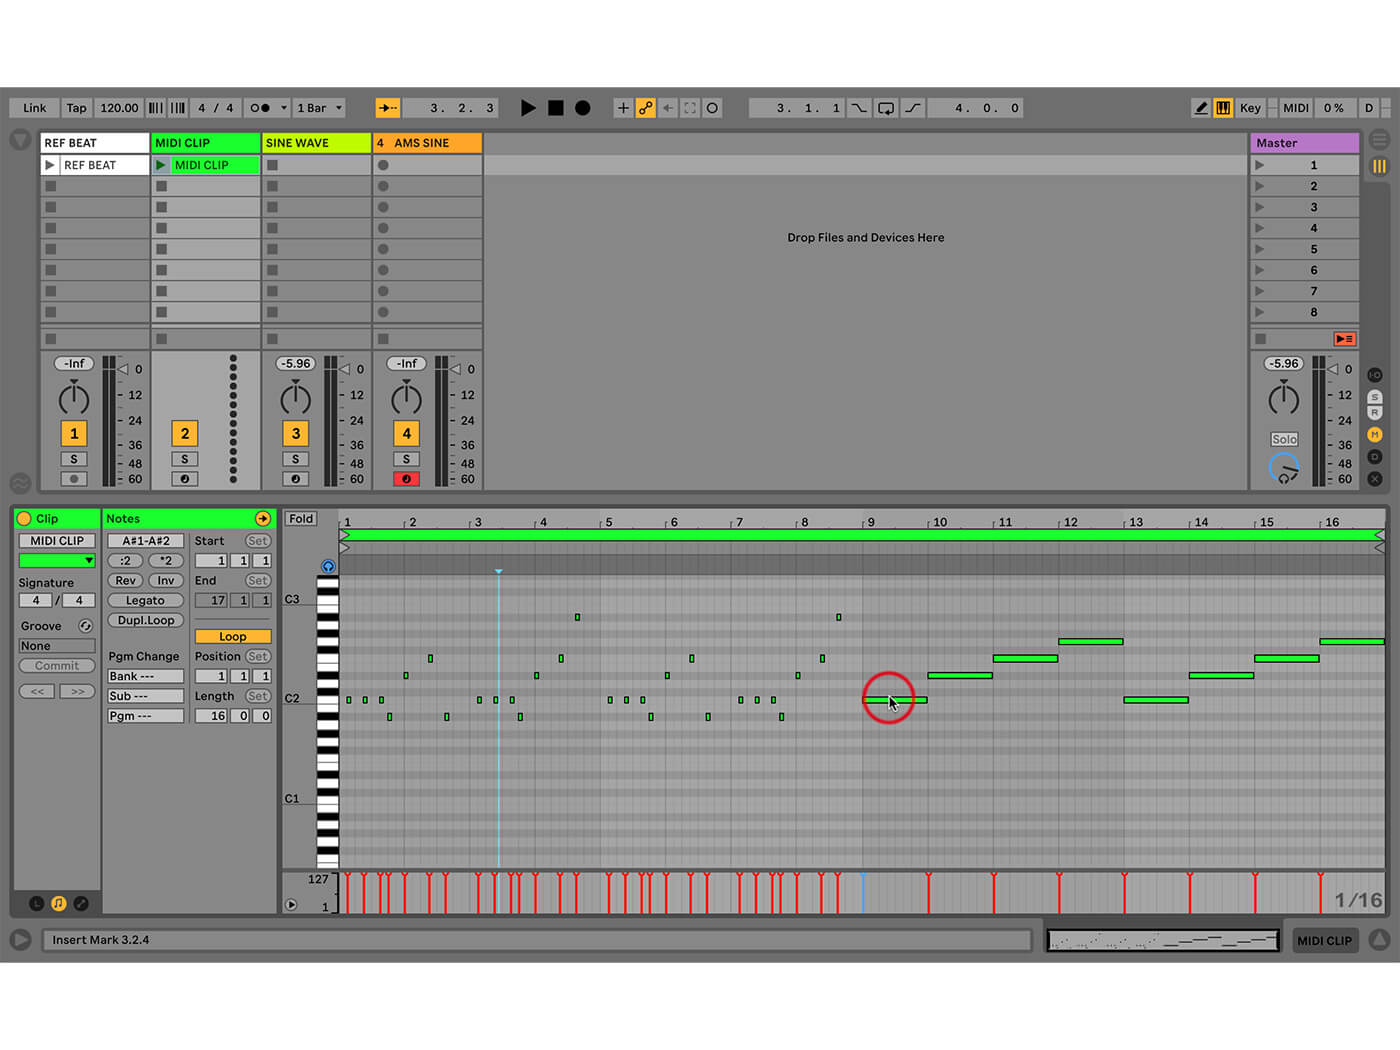 2. We have a reference drum beat, and an example MIDI clip. We’re using a long clip here – 16 bars. The notes in the first eight bars are more staccato and punchy, then the next eight bars are longer and more paced-out, more… legato.
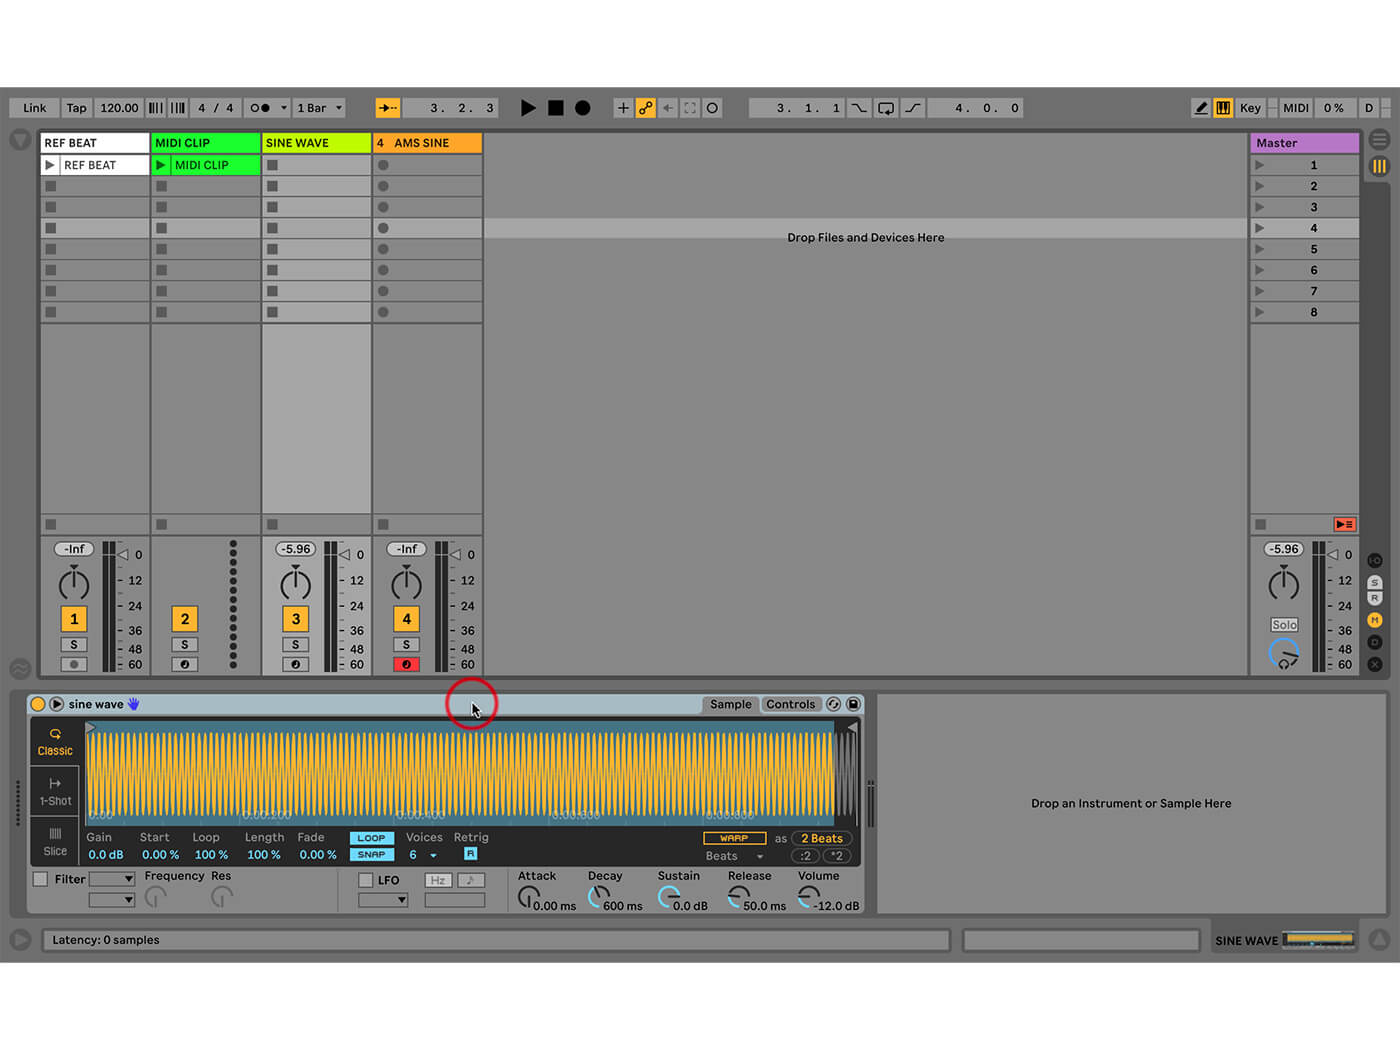
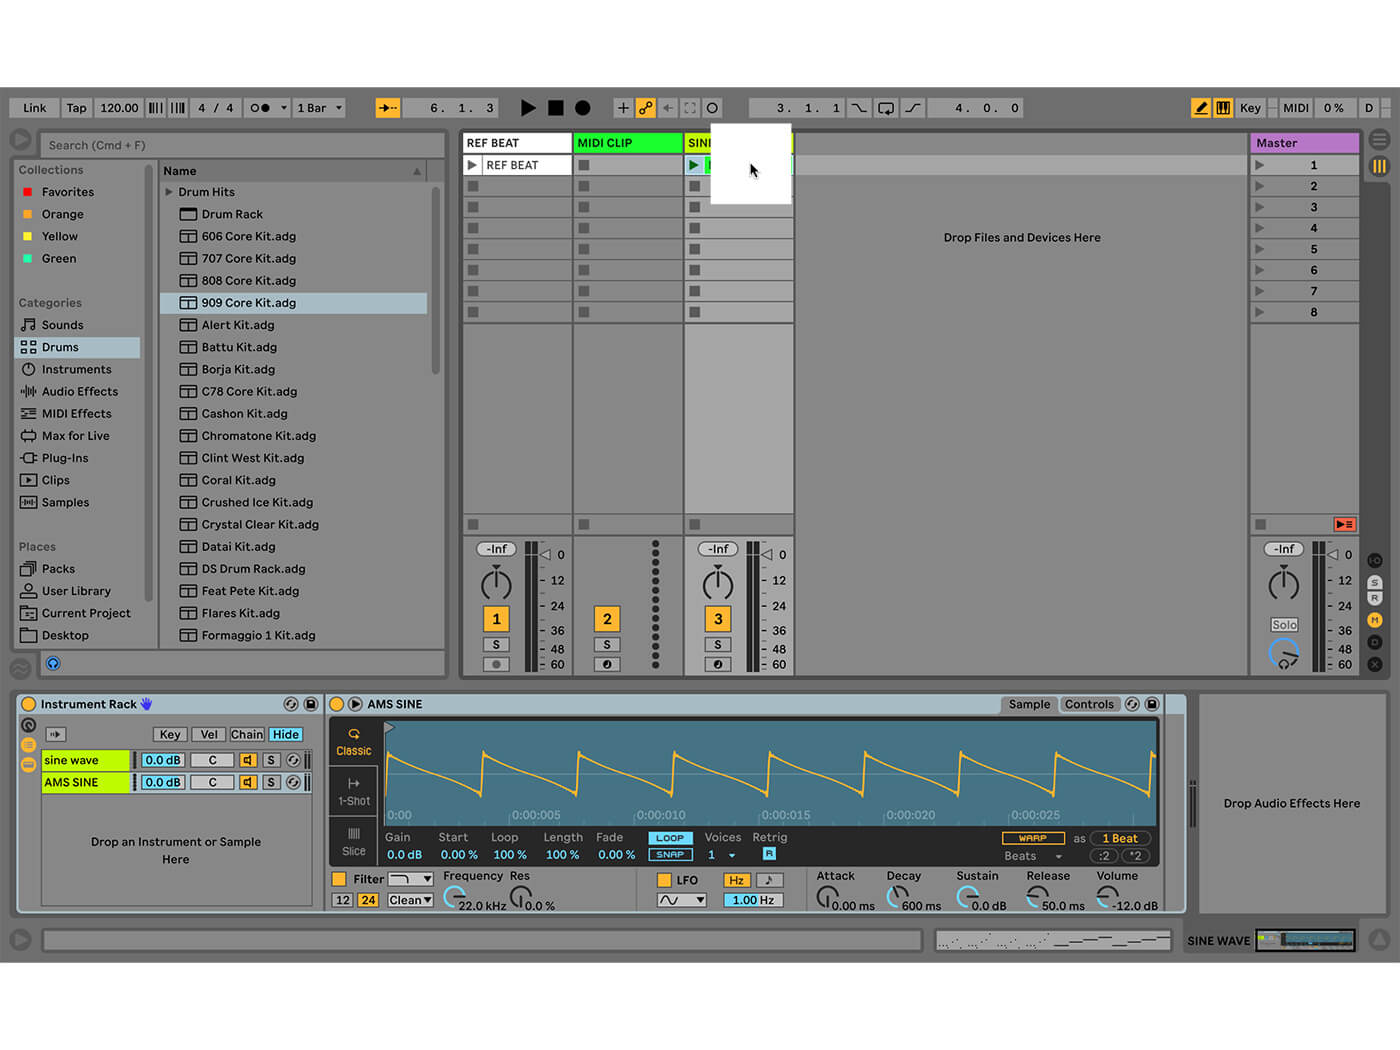 3. Now we really should do something with the sound, because otherwise that MIDI clip isn’t going anywhere! Drag it onto the ‘SINE WAVE’ track and launch the clip, it’s going to sound quite low and indistinct, but that’s okay for now.
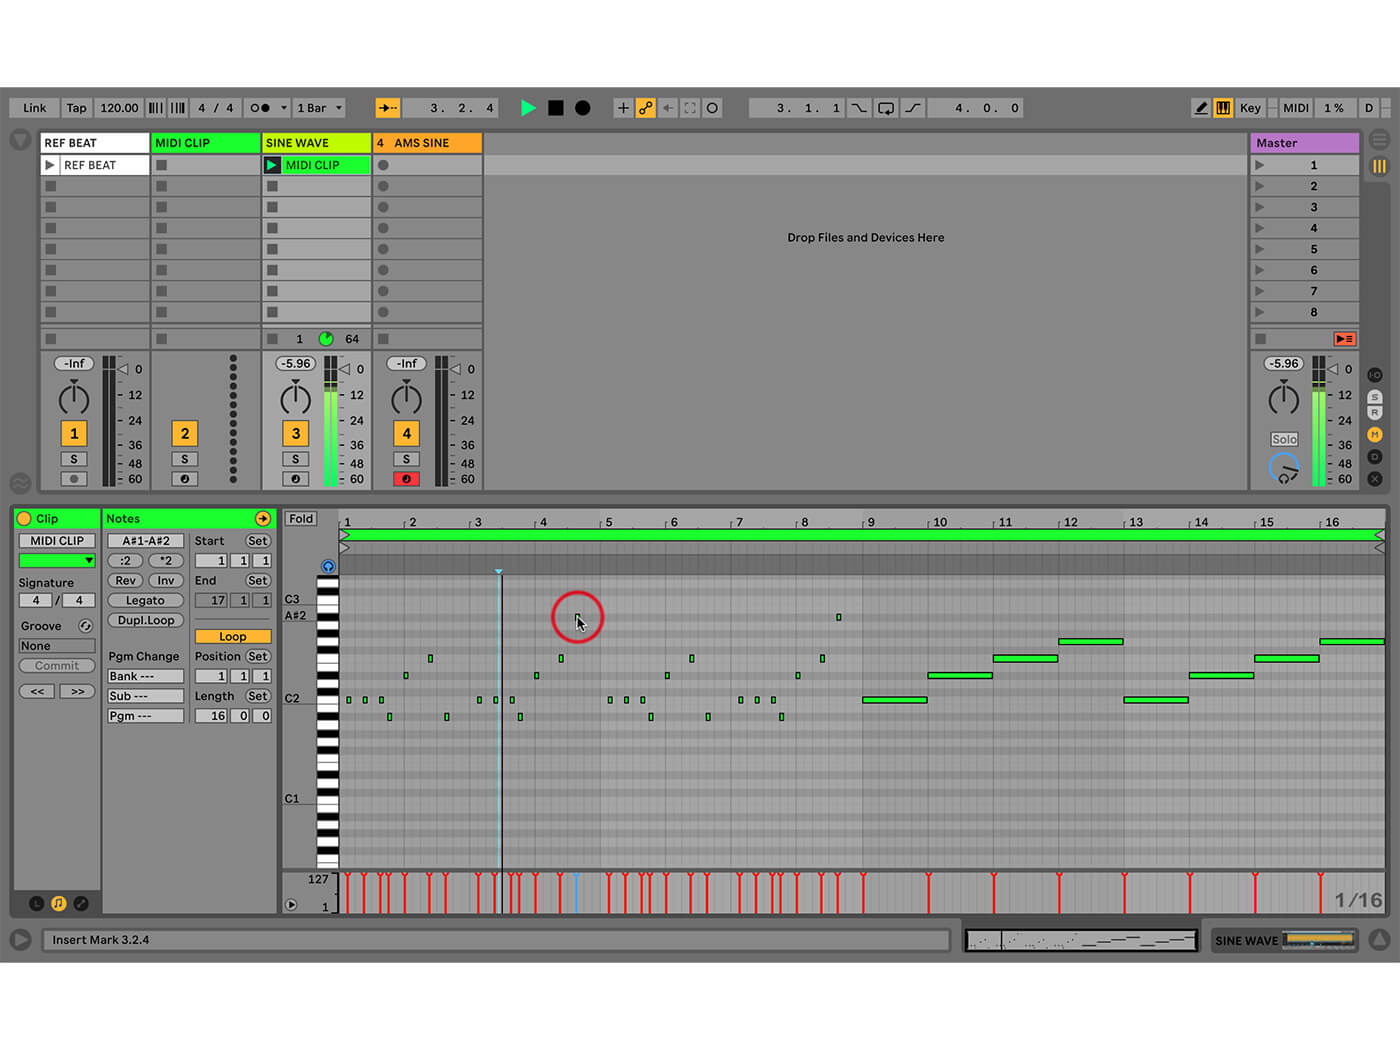 4. As always with sound design, it’s important to keep previewing your work. Play your MIDI keyboard, or pads, or use the virtual MIDI keyboard with your computer keys. Alternatively, make a MIDI clip as we’ve done here, and keep that looping as you experiment.
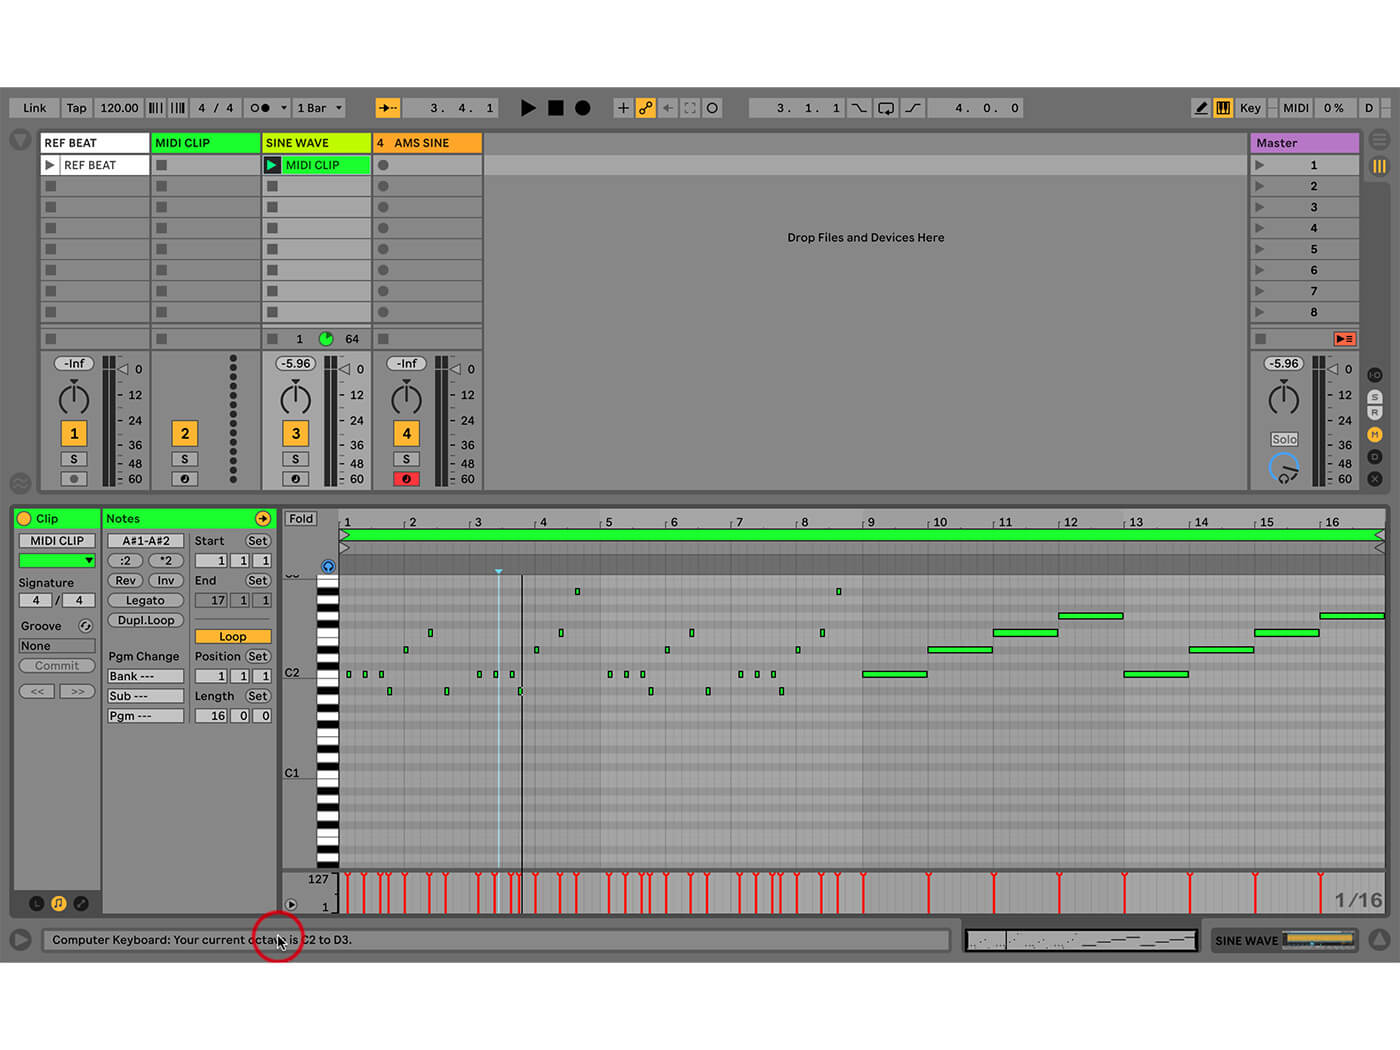 5. While we’re on that topic, make sure the notes you’re feeding in are in an appropriate register. For bass you should be playing in the lower range on your keyboard; this does matter when you’re designing a sound for a specific purpose!
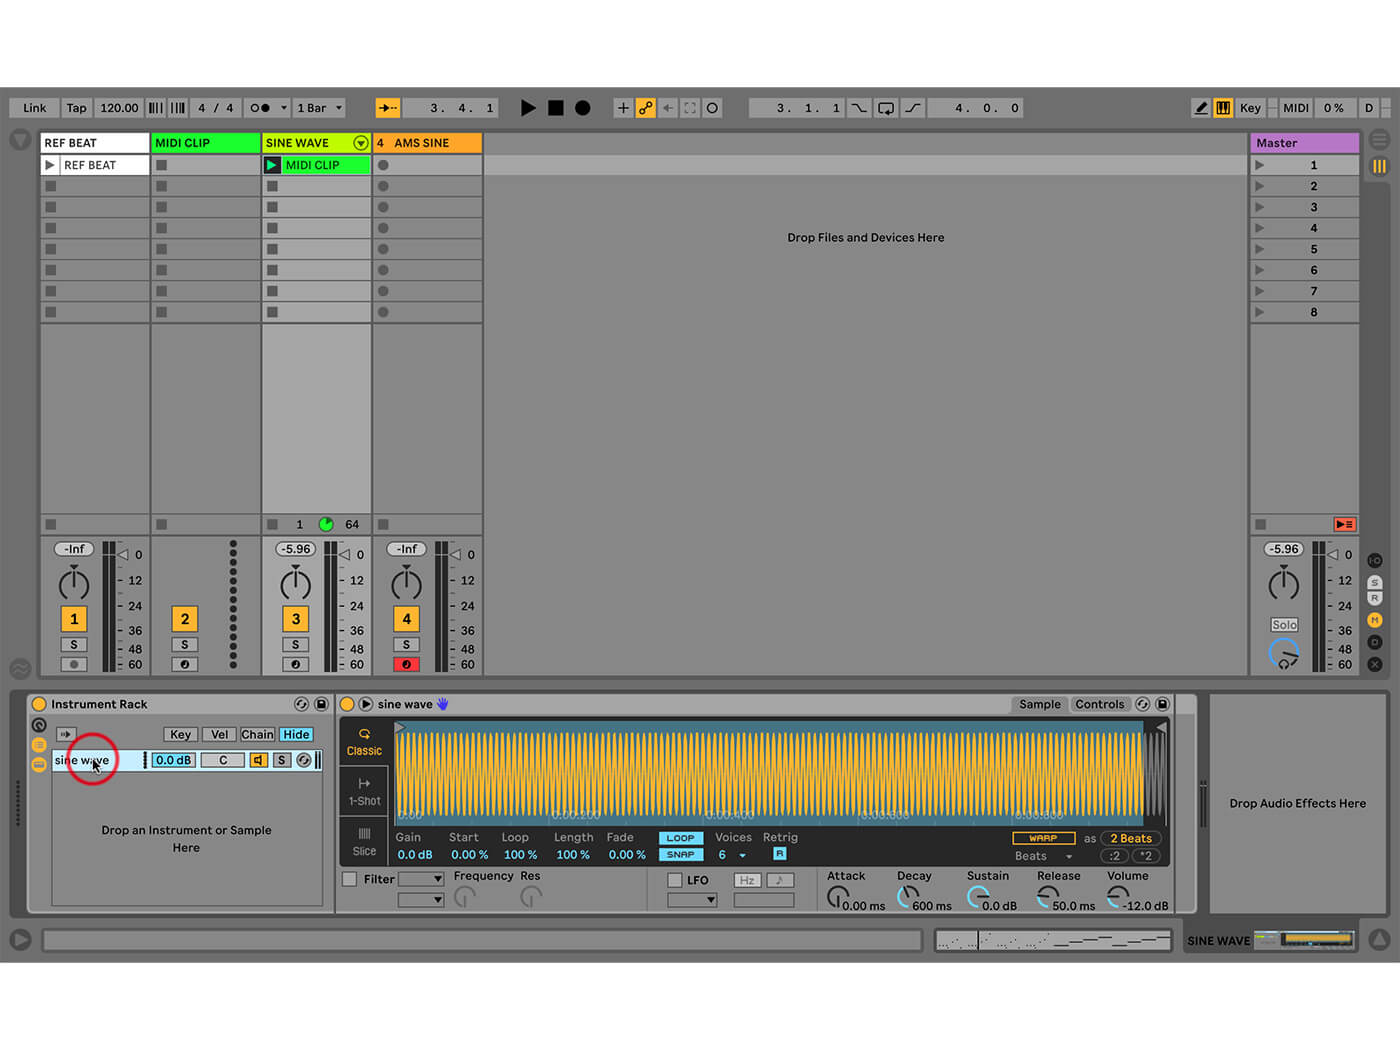 6. Use Command-G to put that Simpler into a rack. Go to the track ‘AMS SINE’ and preview that sound with your keyboard. Then drag that Simpler into the drop area of the rack you just made (substitute your own sounds if you prefer).
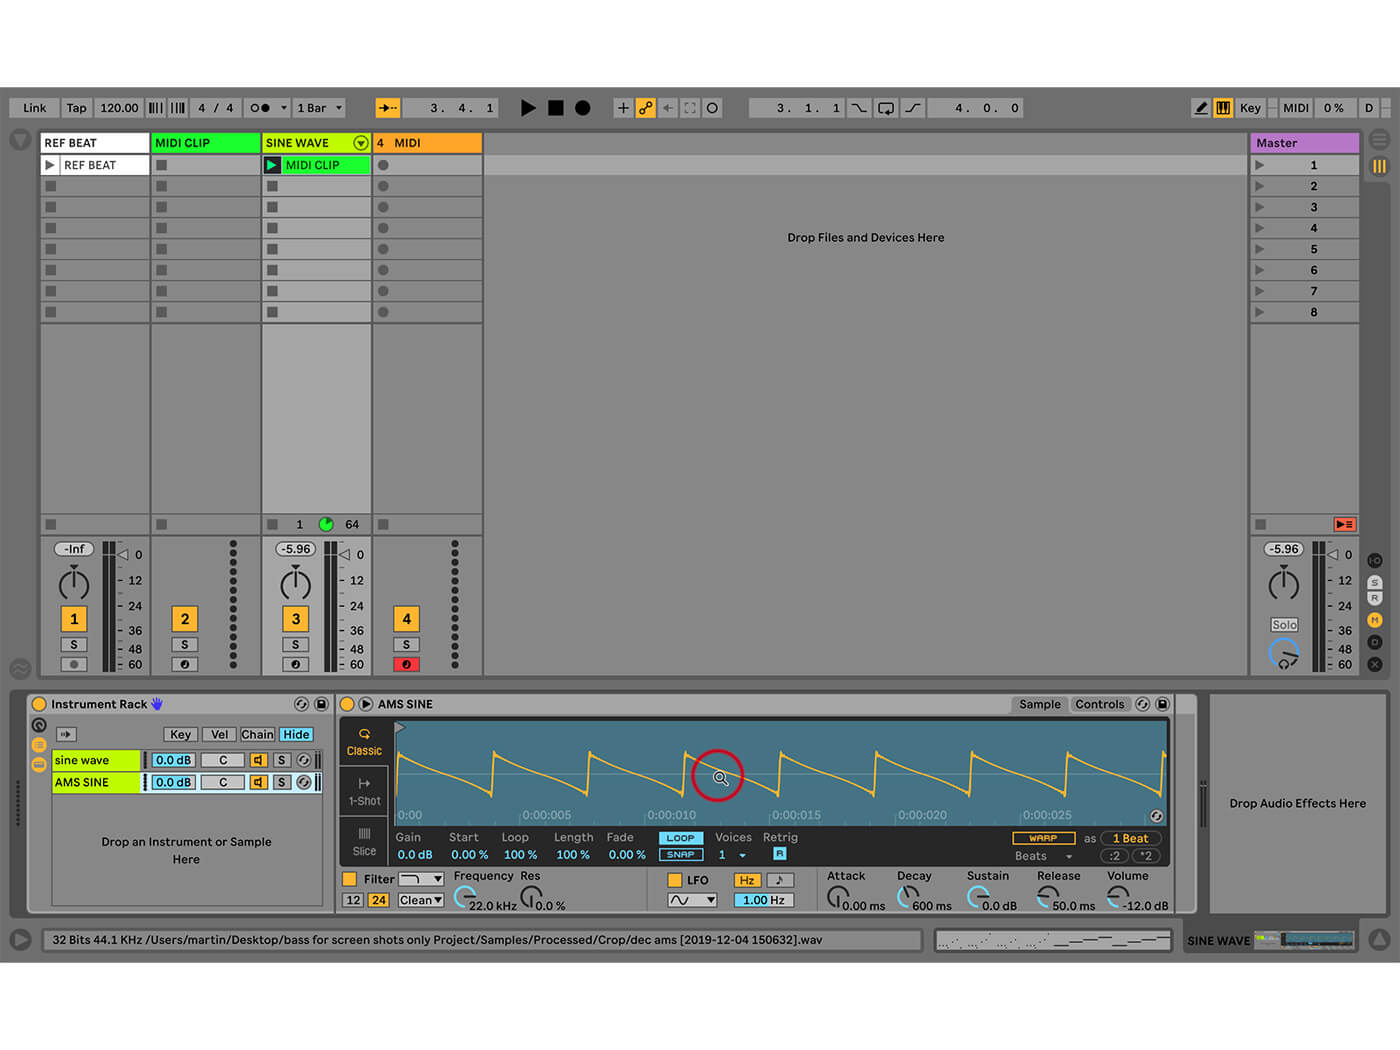 7. We’re working with samples I prepared already, just to save time. Some waveforms are easier to cut and loop than others, sine waves are not so easy to cut without getting a bump in the sound, whereas saws for example, are a bit easier.
![]()
PUSH THAT BASS 1 Push is an effective programming tool bass. You have the pads for real-time input with a variety of note layouts, velocity and pressure sensitivity, as well as a choice of step sequencer configurations, so you can move fluidly between different note entry methods on a single interface.
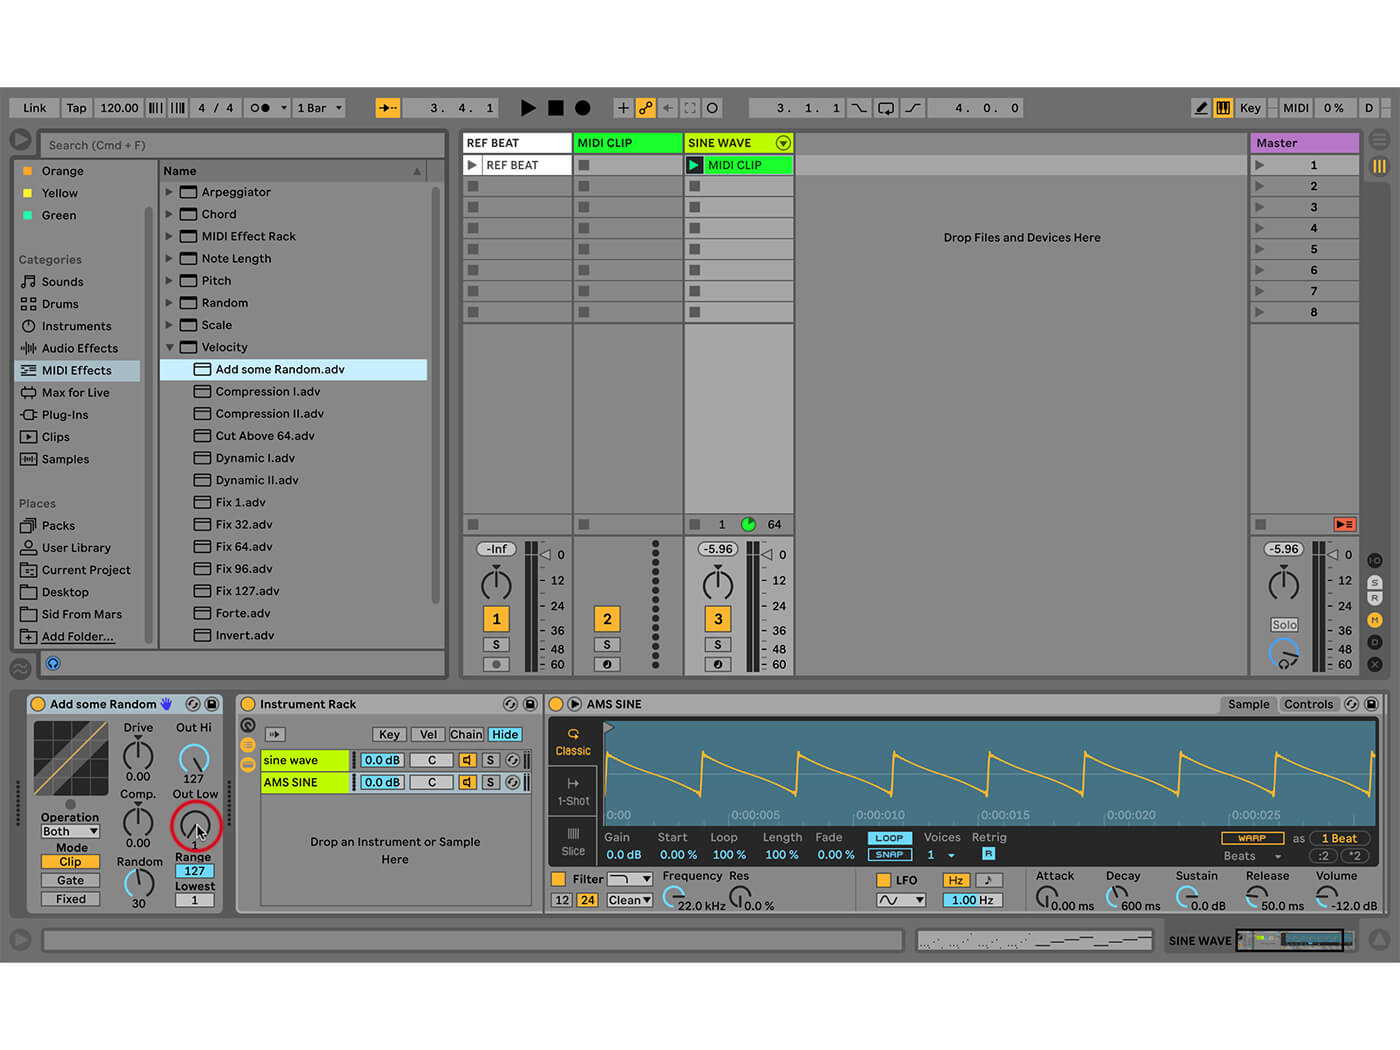 8. Load the MIDI Effect Device presets Velocity/Add Some Random, and Note Length/16th Notes. Velocity is great for ‘humanising’ programmed notes, you might want to experiment with the controls to get the best possible fit for your bass part.
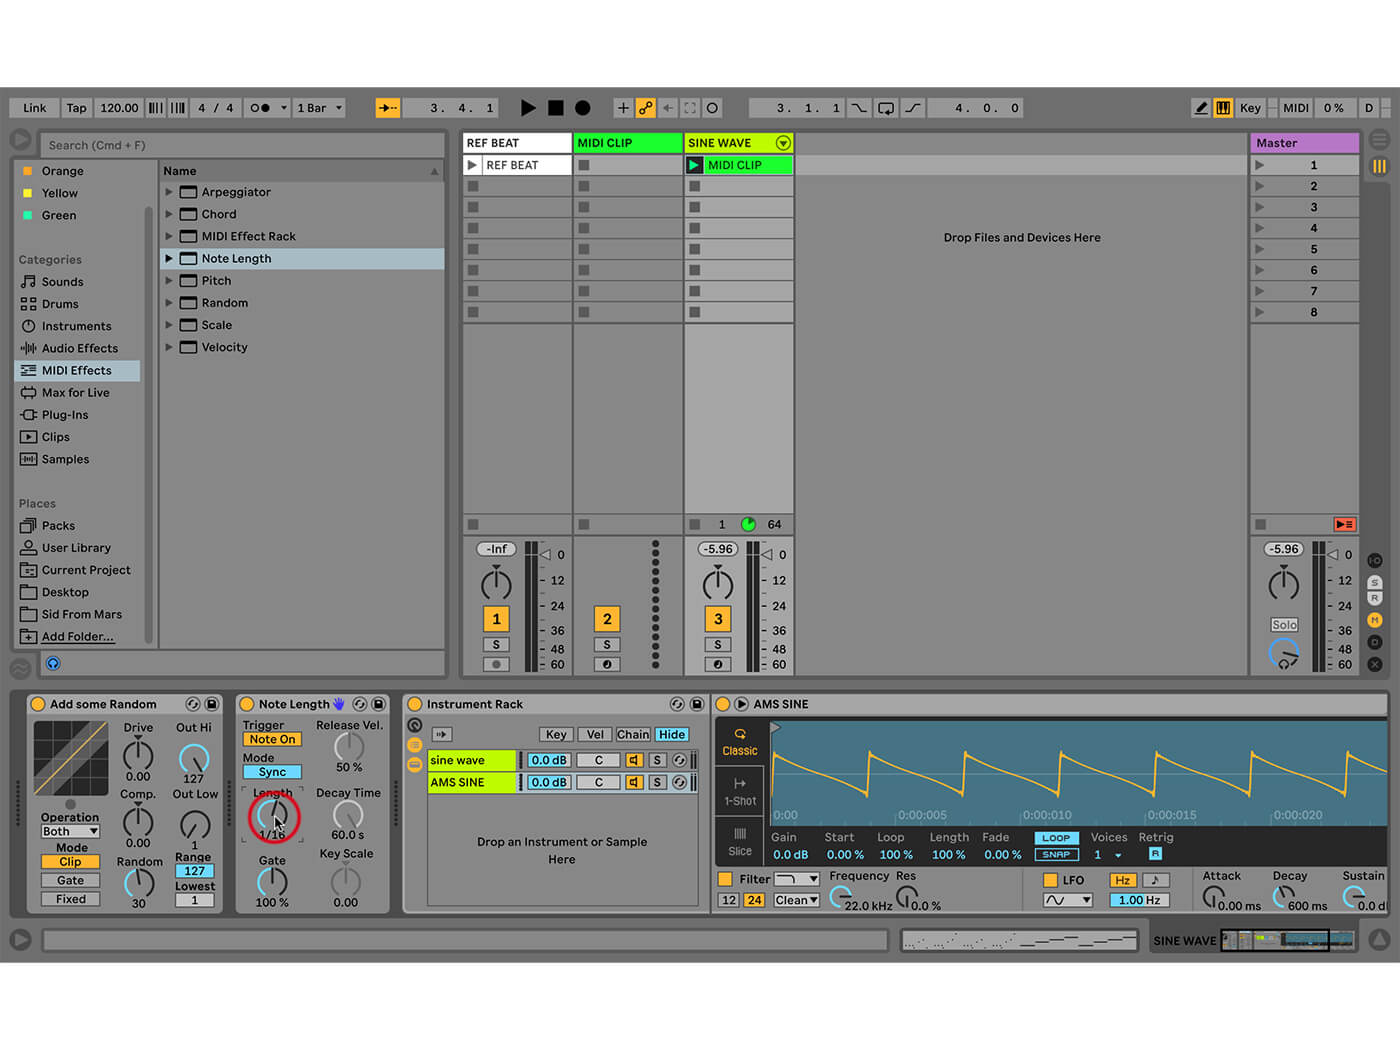 9. Note Length is a great way to globally change the note lengths of a clip or track, especially if you’re trying to tidy a recorded part. It’s a great quick fix to make a part sound more regular and programmed, if that’s what you want.
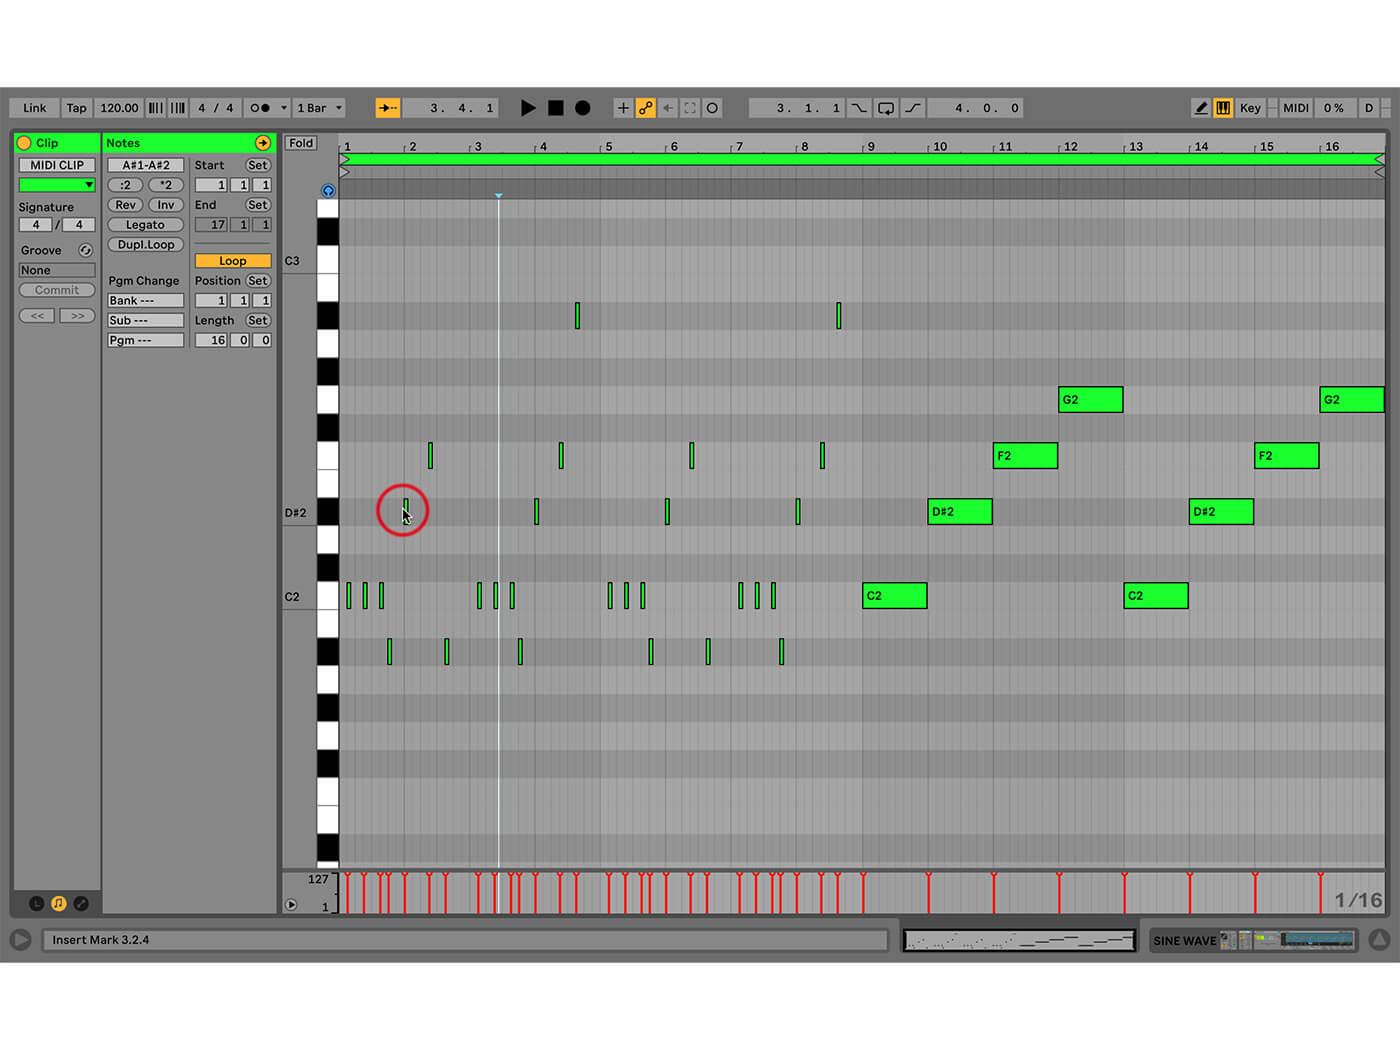 10. Bass can be bouncy and lively, or it can buckle down and get more propulsive. It can change the entire direction of a song. Think about this when programming. Shorter notes give a punchy feel, longer notes are more fluid. Listen to some ‘real’ bass players.
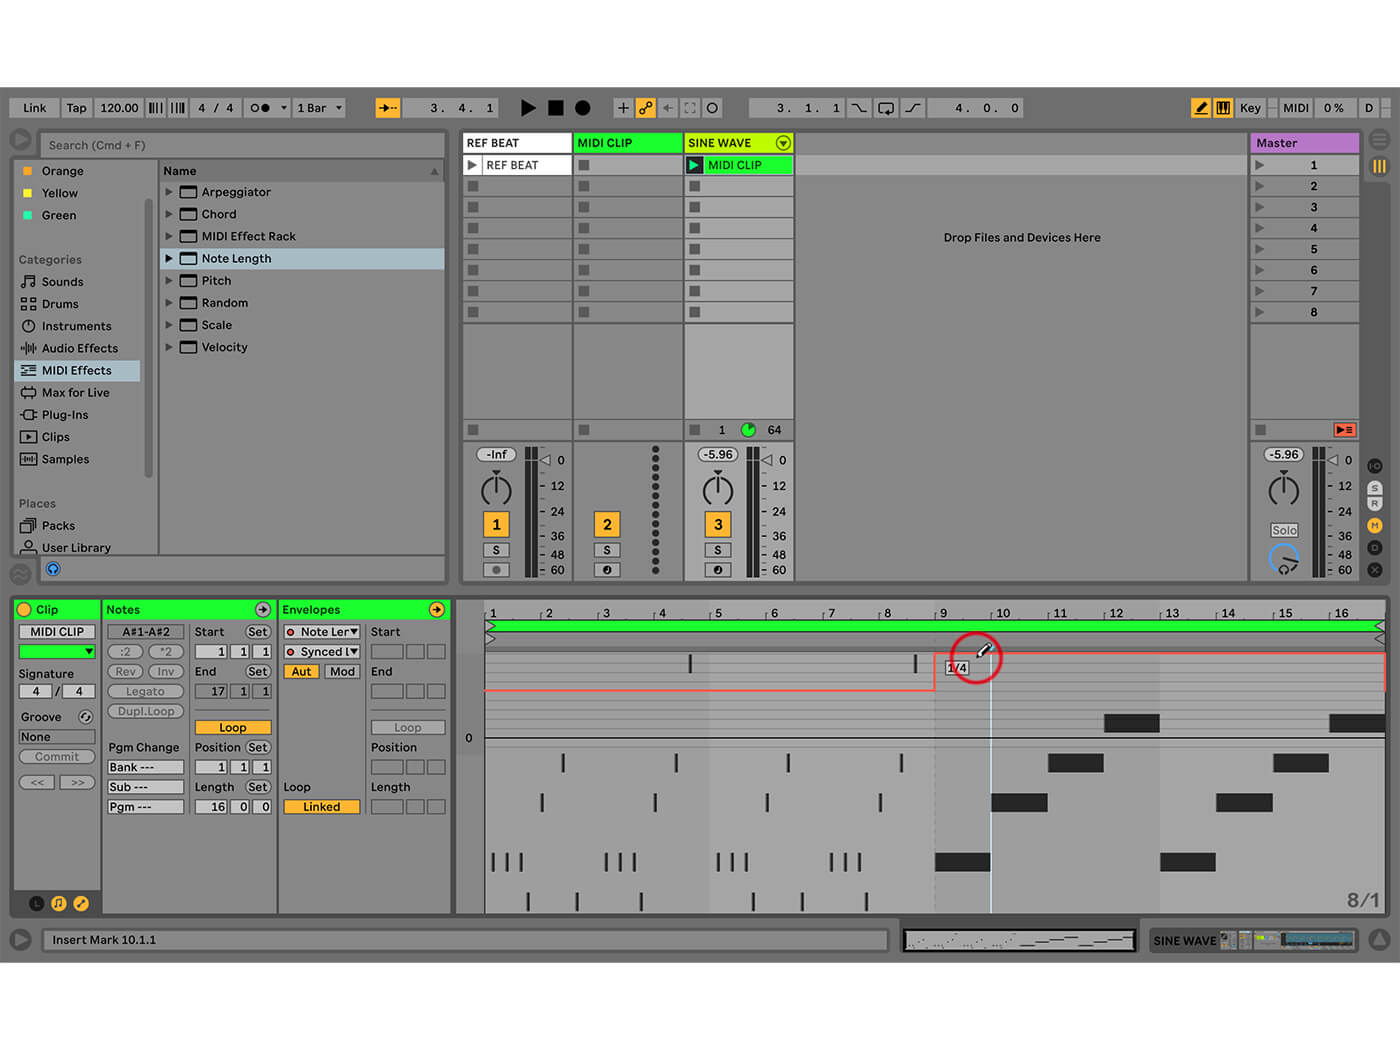 11. You can achieve these effects by drawing or recording MIDI notes at different lengths for different song sections, or if you want to keep it interactive, use the Note Length effect to vary through the song – perhaps try it with clip envelopes for automation.
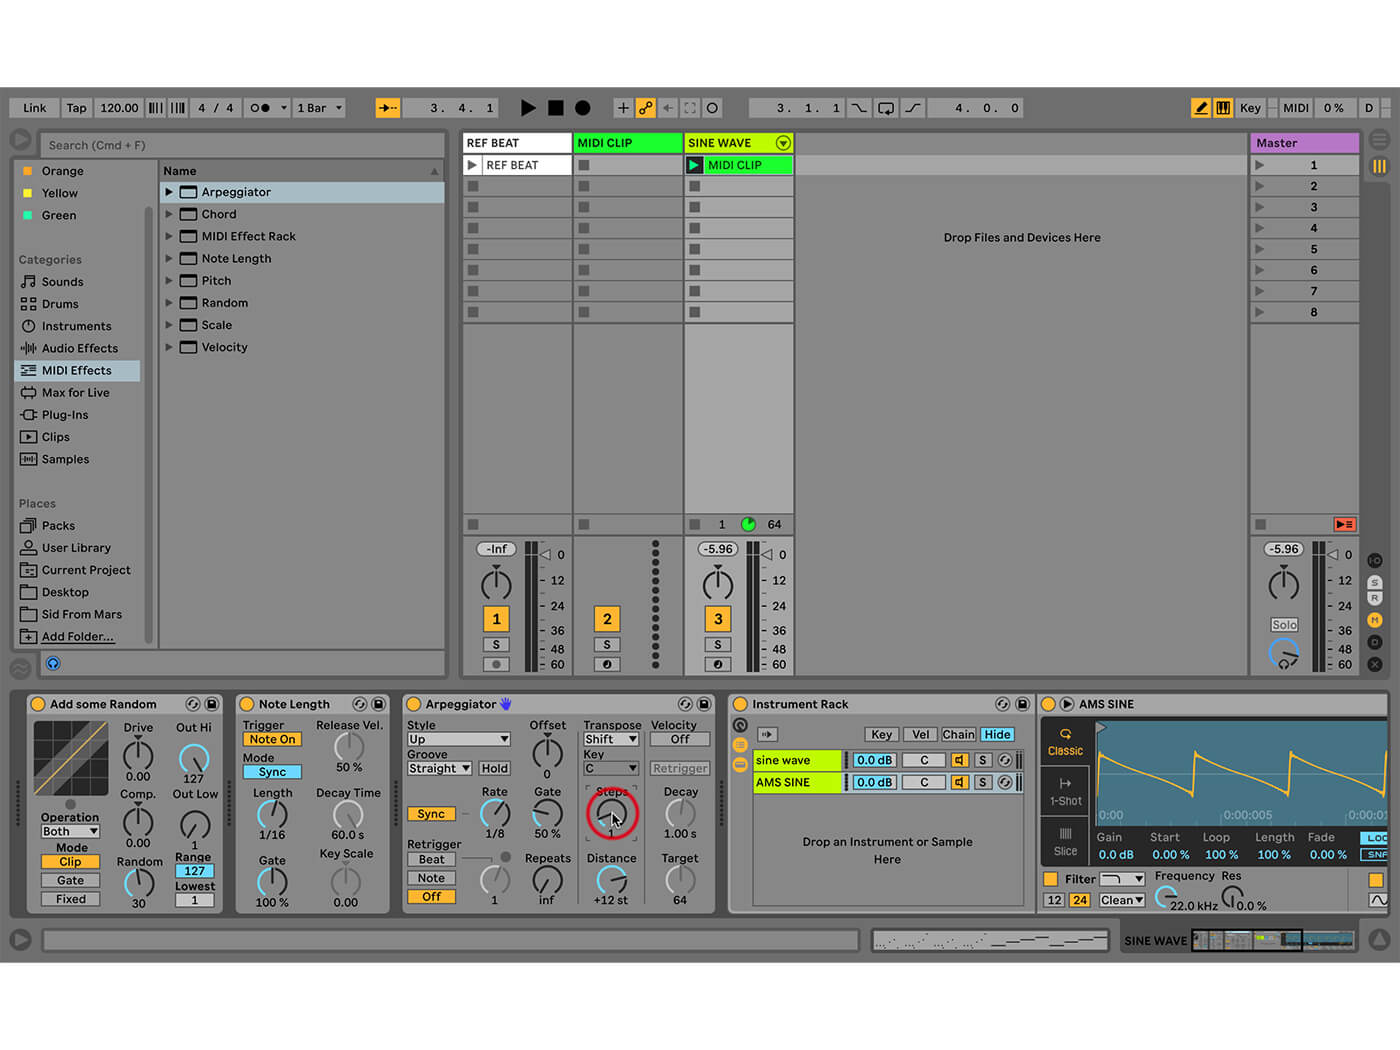 12. The Arpeggiator MIDI effect device is another invaluable tool for creating parts in a hurry, or adding extra moment to an existing one. Drag it into our track and set Steps to 1. You’ll hear higher notes added to the longer notes in the clip.
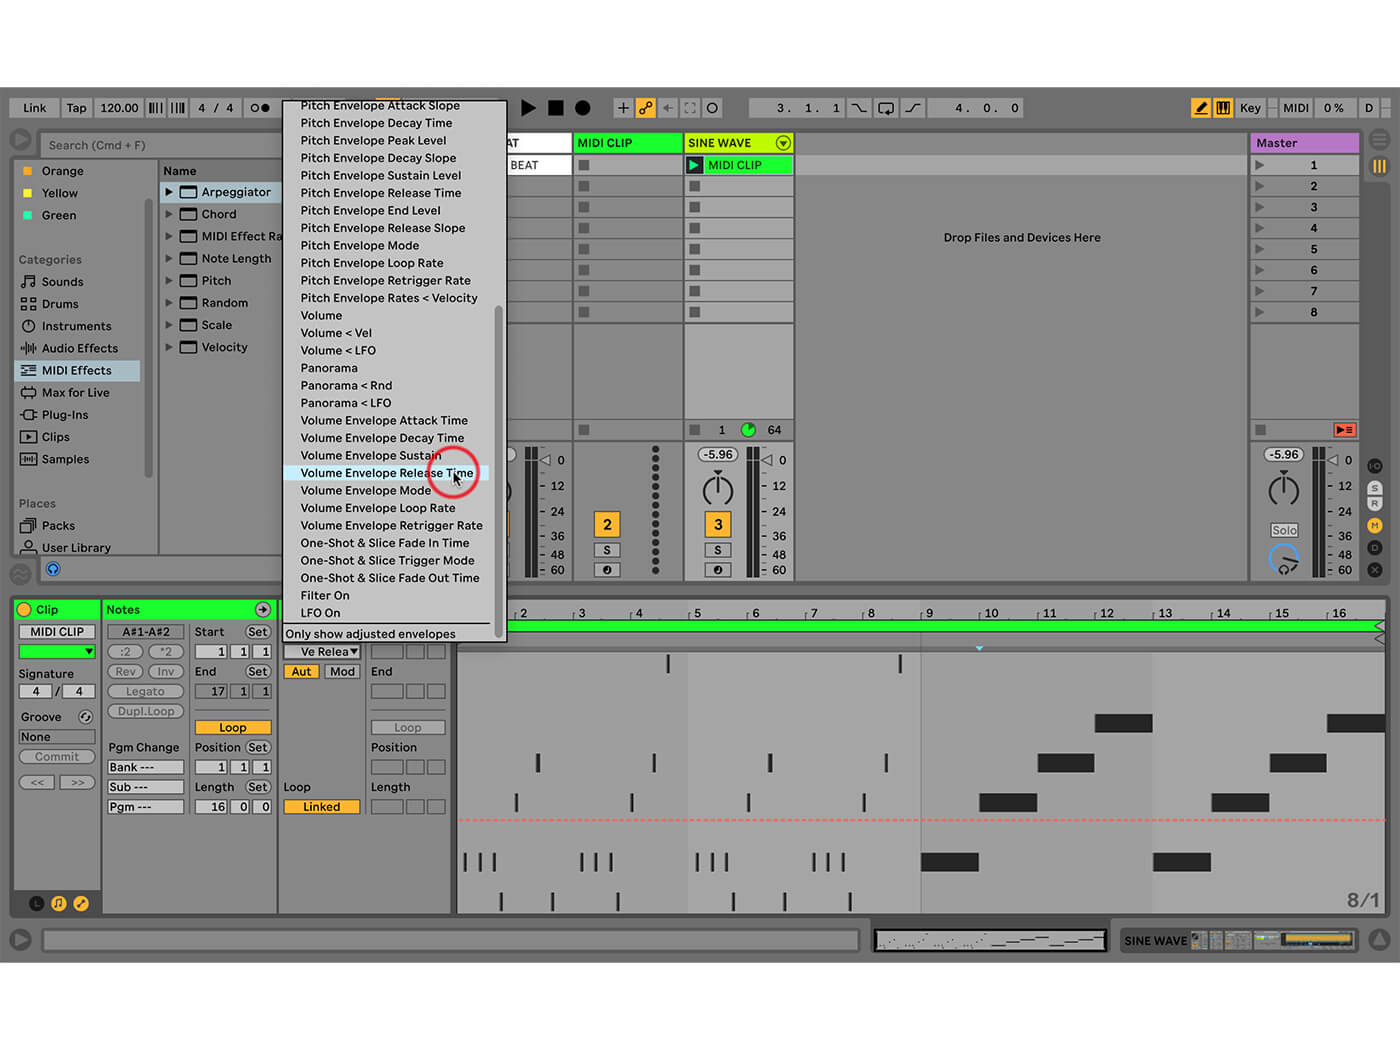 13. You could also try automating the release time of the sample in Simpler – that’ll sound quite different than automating the Note Length MIDI effect – both are valid, depends on what you want to do, and how your sample is setup.
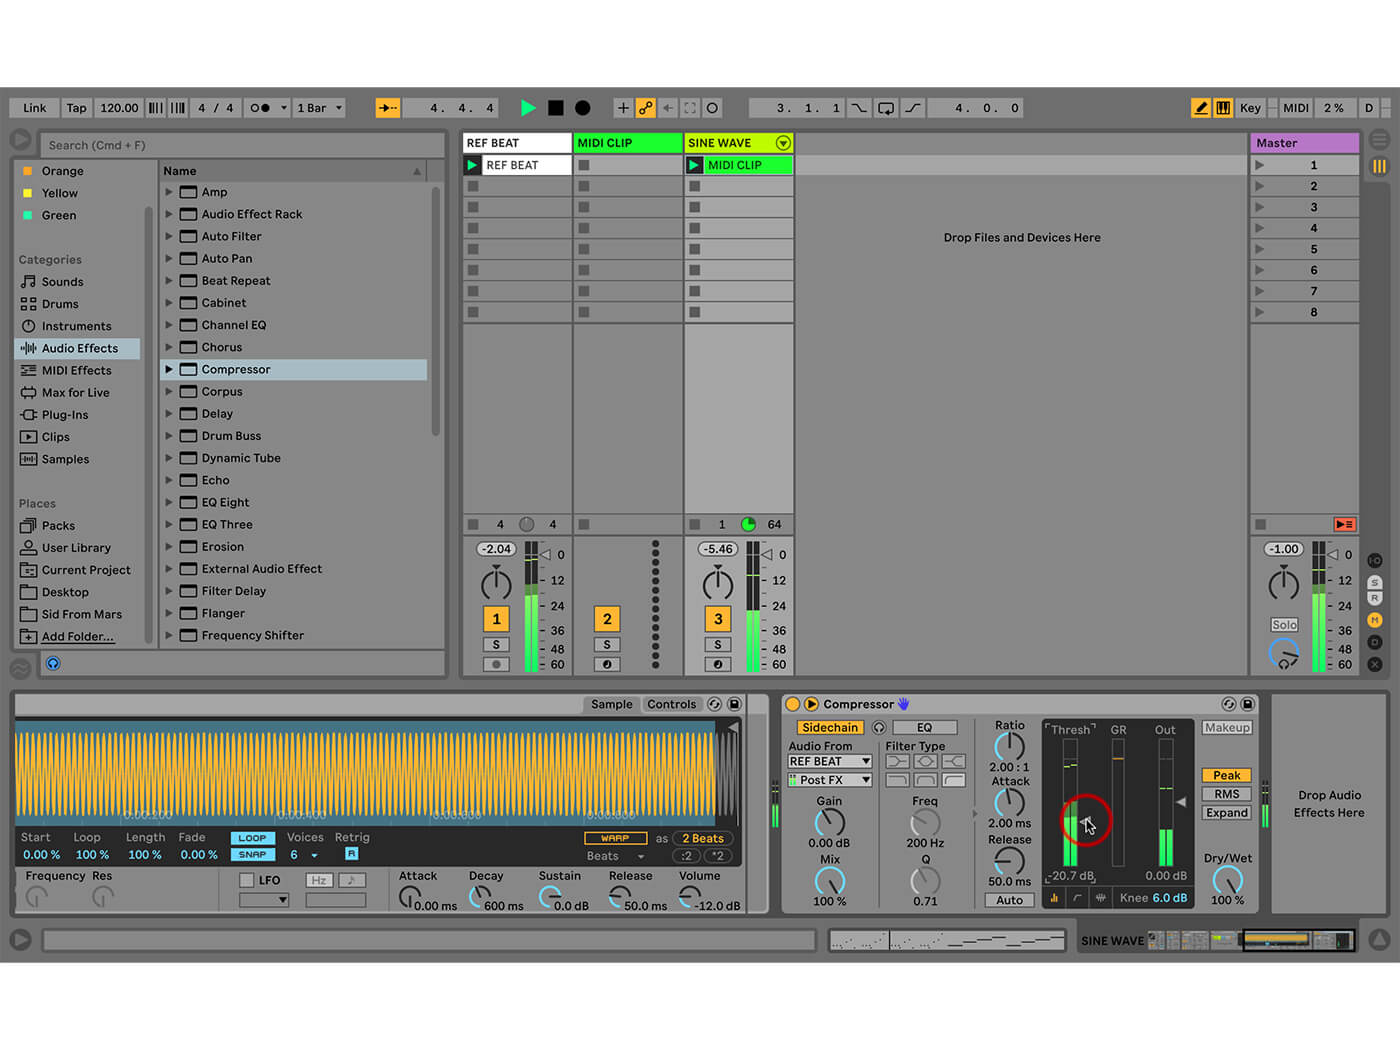 14. Loud strong bass is desirable, but swamping your mix is not. If the bass is clashing with your kicks, it might sound like the kick volume is changing through the song. This can be avoided by sidechaining with a compressor on the bass track.
![]()
PUSH THAT BASS 2 Push’s hybrid approach works just as well live as in the studio, and of course you get mouse-free access to Live’s instrument parameters, MIDI effects such as Arpeggiator (very good for bass), and Compressor (also very good for bass!).
 15. That’ll make the bass ‘duck’ (reduce volume) whenever the drums hit, so the kick is always present, and the bass stays more flexible and moves around it. Sidechaining is a time saver for mixing (it works better with a MIDI beat that the audio example here).
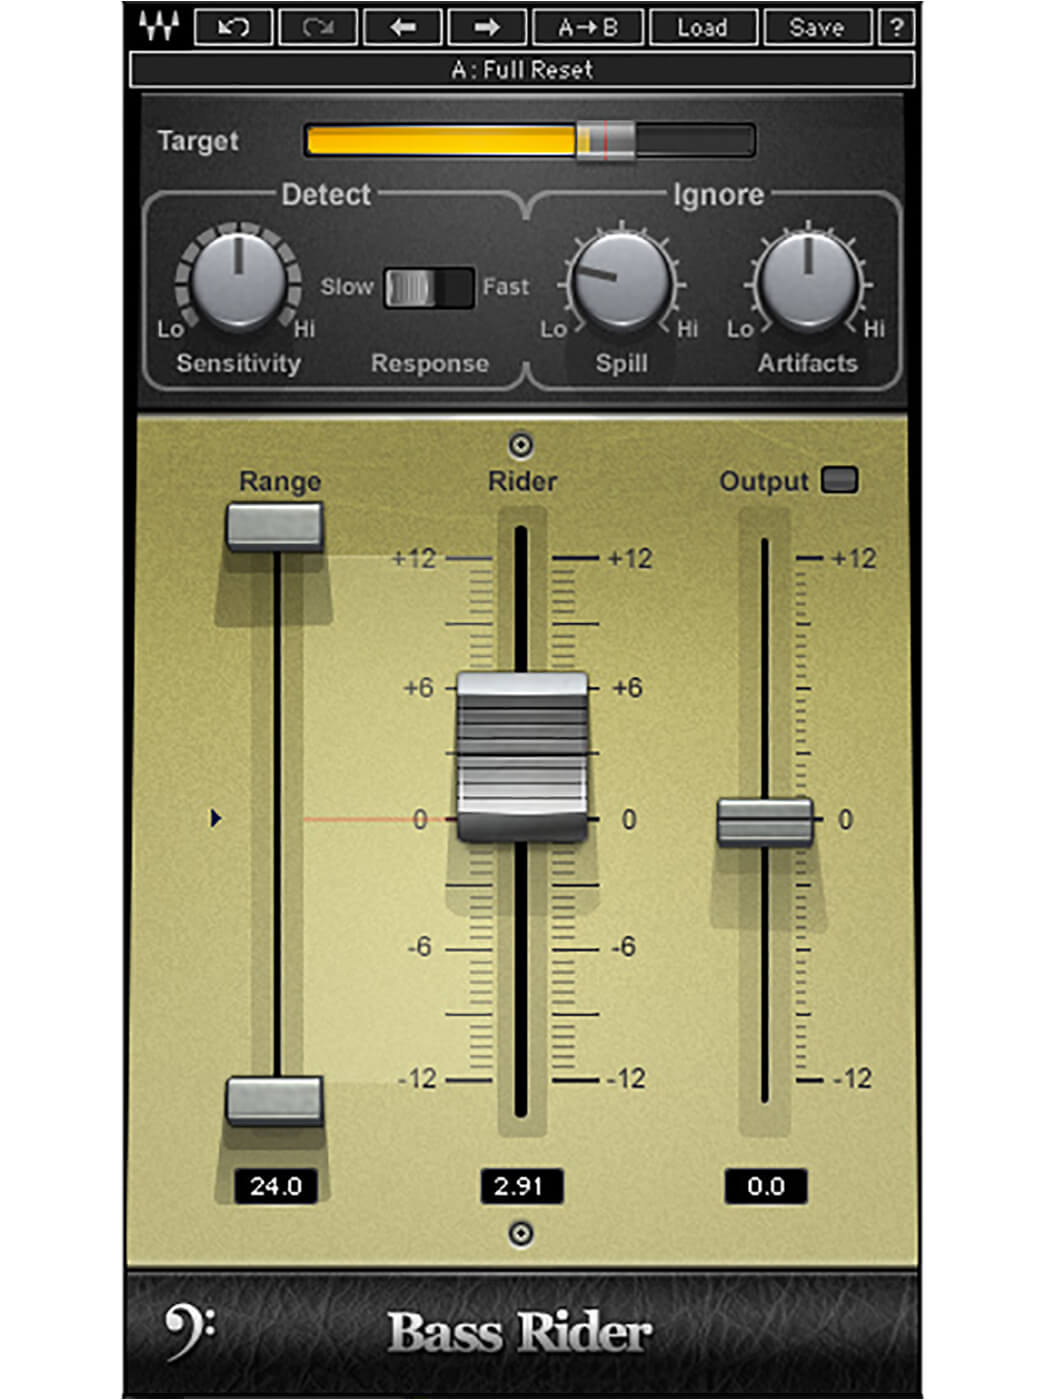 16. Compression, in general, is a great tool for bass, especially with recordings of bass guitars. It can keep the levels punchy and in-line throughout a song and makes mixing easier. See also related tools like the Waves Bass Rider plug-in.
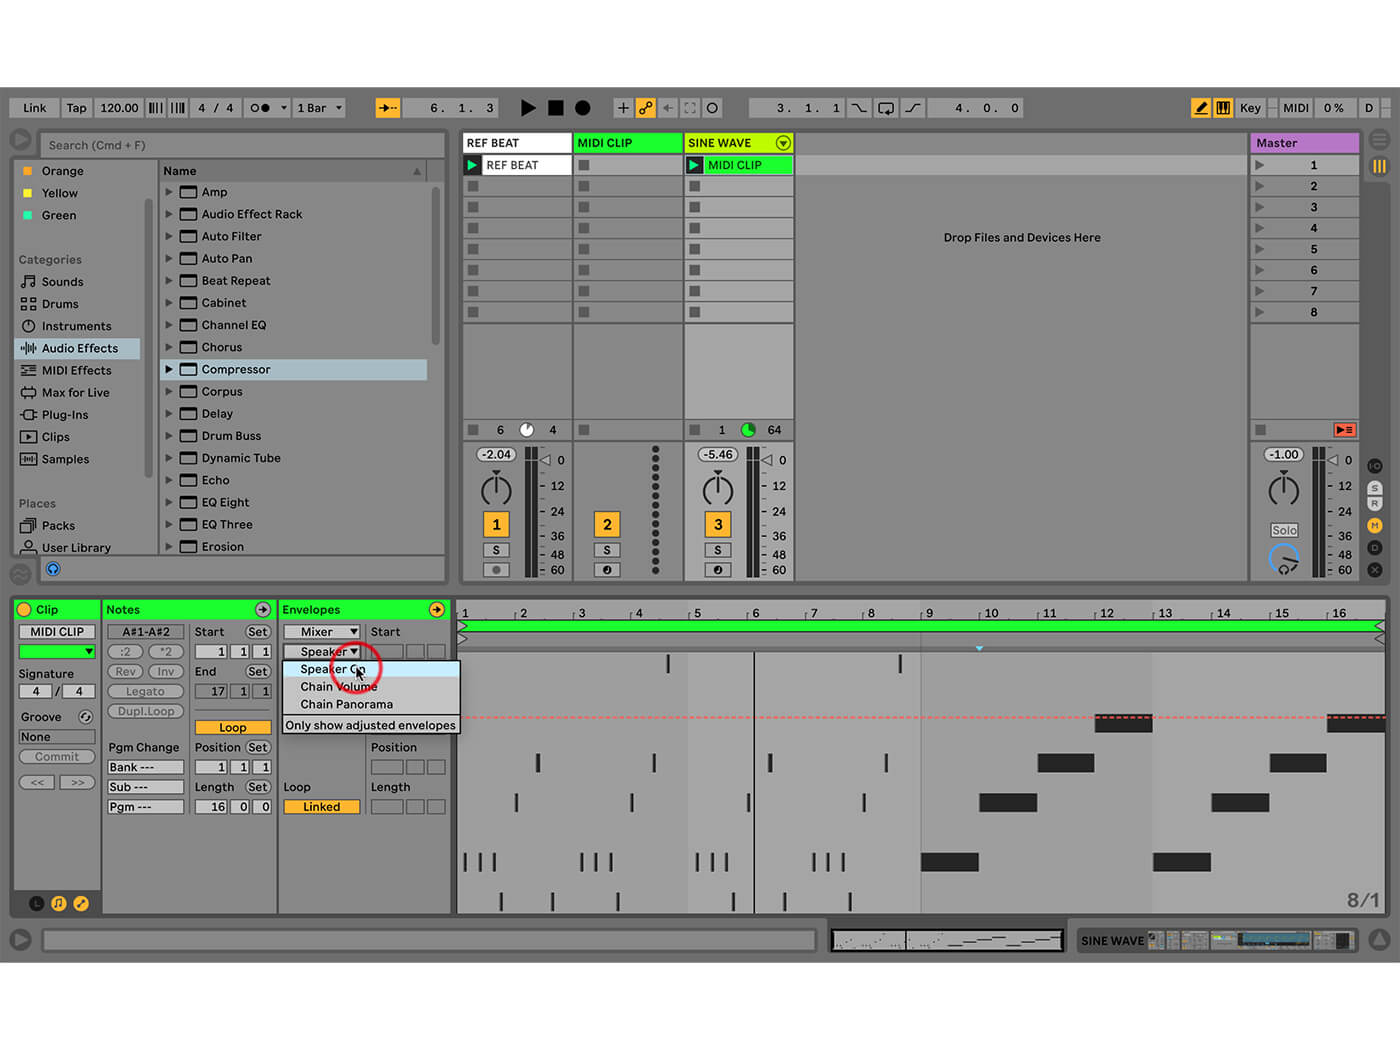 17. Another thing you can try with real-time control, or through automation, is automating the sub – the sine chain we added first in the rack. This gives you another level of dynamics as you can drop that in and out, or even solo it, though the song, especially in breaks.
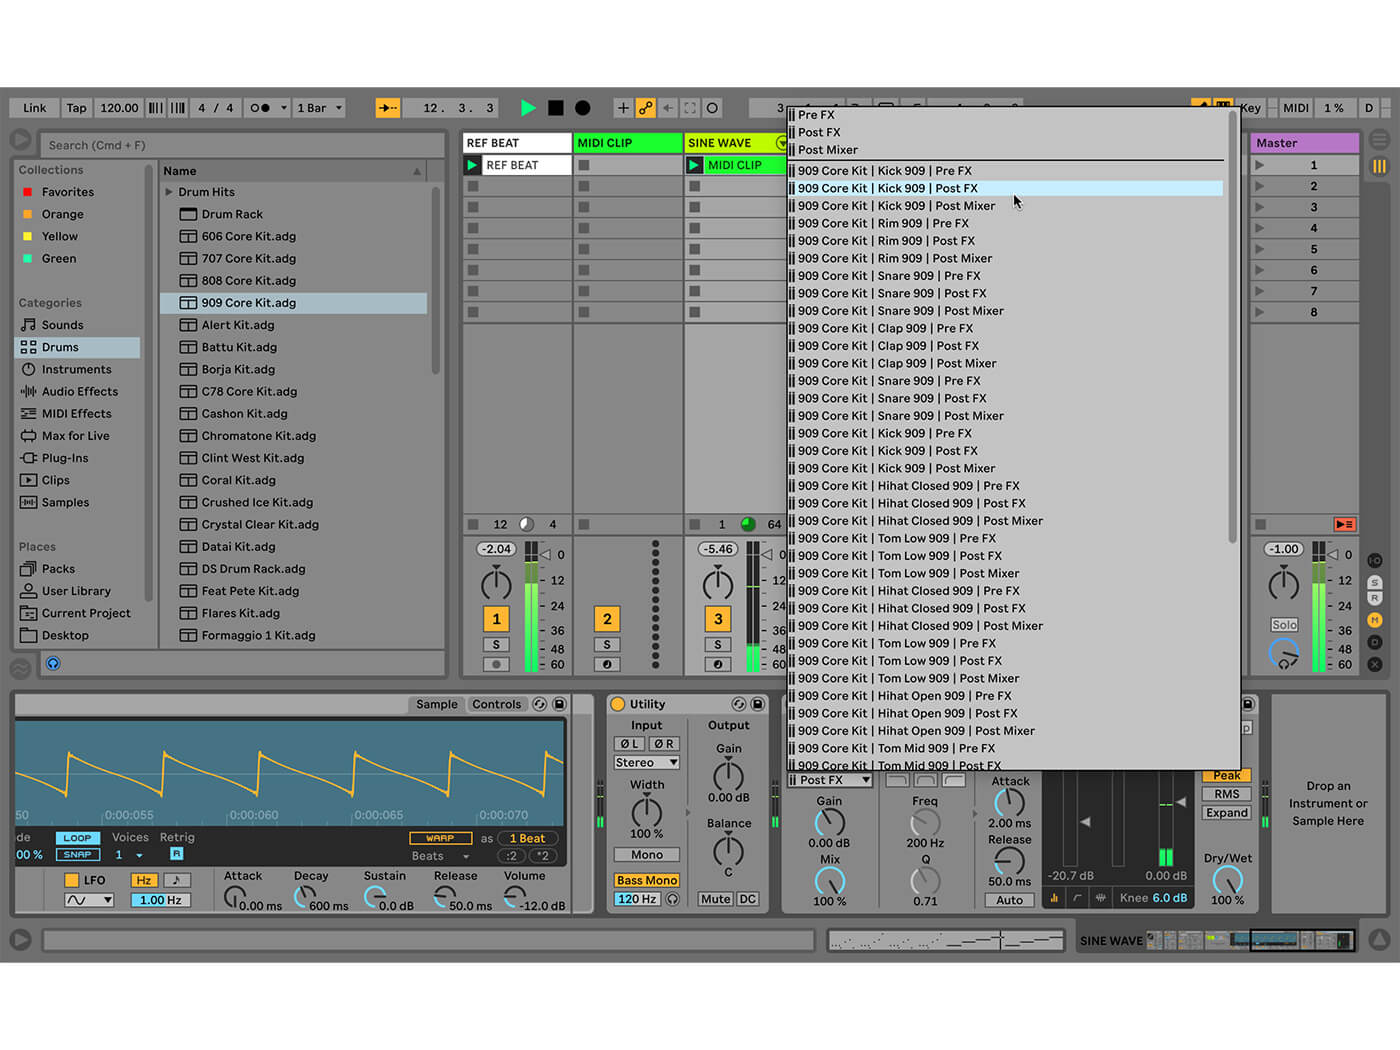
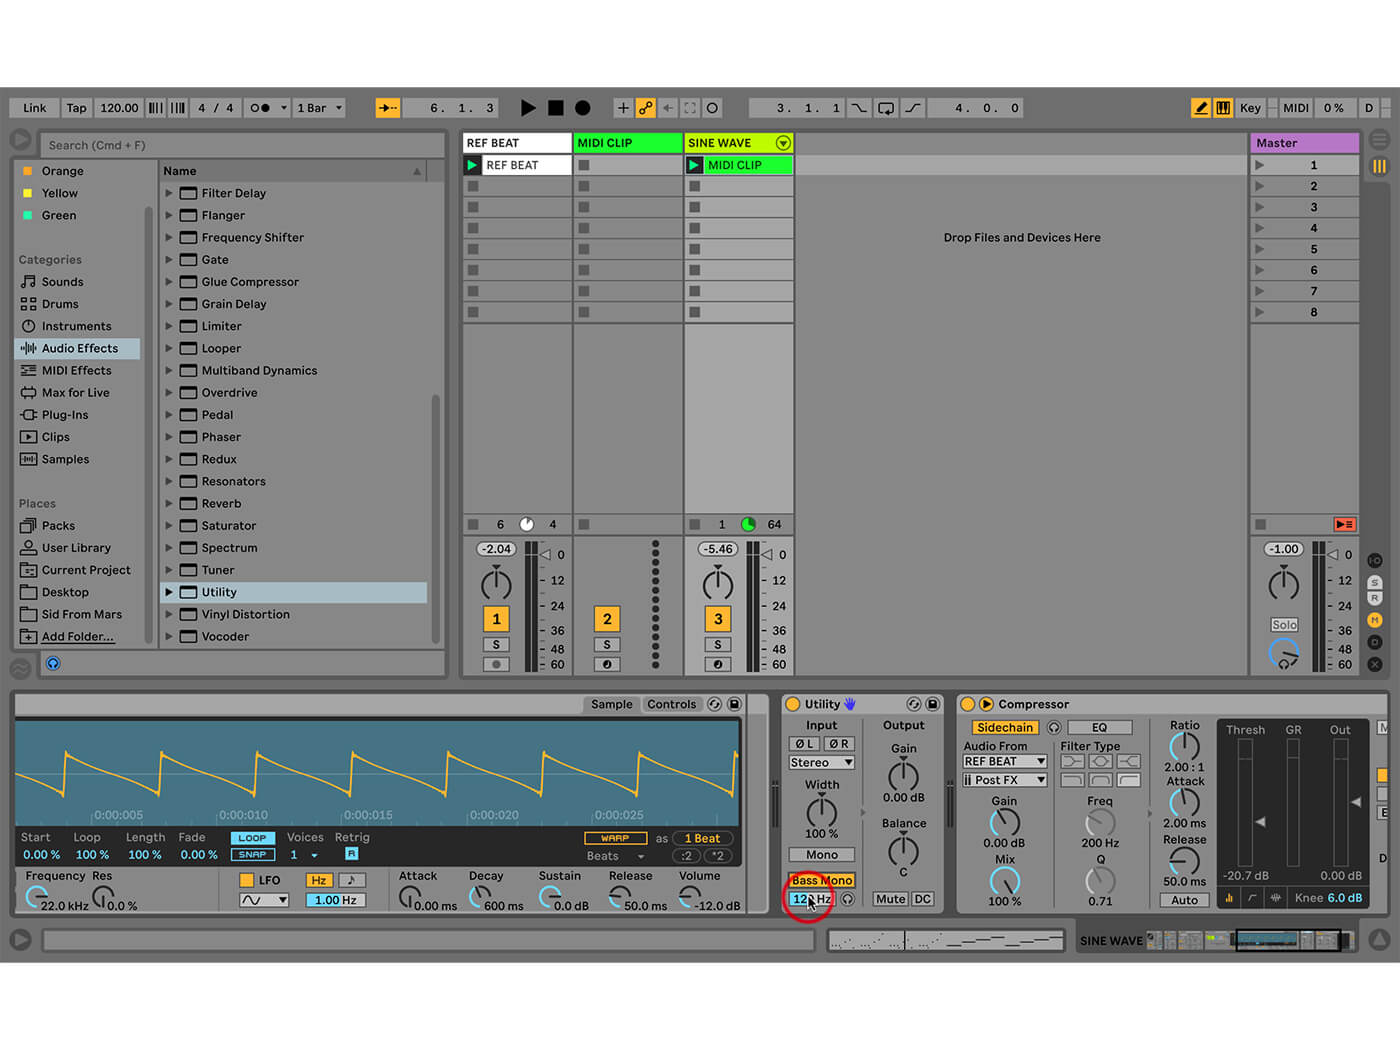 18. Utility is a great tool in Live for working with stereo width. In racks, for example, it means you can expand the higher frequencies in one chain, while reducing the lows in another track to be totally mono. Just set a frequency here and it’ll ‘mono-ise’ everything below that.
Check out parts one, two and three of our back to basics tutorial. For more Live workshops, check here.