How to work with Chord Pads in Cubase
Last time, we looked at how Cubase’s Chord Track creates a harmonic guide track that can modify the pitching of MIDI, instrument and audio parts. Now we’re focusing on Cubase’s other chord-based tool: Chord Pads
Unless you’re a drummer or work purely with inharmonic sounds, chords are likely to be at the heart of every piece of music you create. Cubase recognises this by way of its Chord Track, which serves a number of purposes. It allows producers to rapidly sketch out the harmonic structure of an idea, while retaining the ability to modify and refine that structure as the idea is developed; it creates a visual guide to the chord and scale/key that’s in force at any point in a project and it can force other tracks to conform to the current chord or scale.
These abilities are extremely useful once you get to grips with them, but there’s a common misconception that the Chord Track is intended to create an actual audible output. It isn’t! If you monitor the output of the Chord Track, all you get is sustained chords that are held until the next change on the Chord Track. Cubase does, however, provide a tool for creating audible, played, chord-based parts: Chord Pads.
In our previous Cubase workshop, we show you how to use Chord Tracks.
Pads panel
The Chord Pads panel is displayed in the lower zone of Cubase’s project window, under that zone’s Chord Pads tab. From here, you can set the number of pads, configure each pad’s chord and voicing characteristics and play those chords by simply clicking on a pad.
Chords can also be triggered from an external controller, such as a keyboard or pad controller: when the Chord Pads are active, a keyboard graphic is shown at the top of their panel. This indicates which MIDI note each pad is assigned to, along with any further control keys that are in use (which we’ll come back to in a moment). The keyboard graphic also shows the actual notes that are sounding when a pad is triggered.
In terms of where they lie in the MIDI signal path, Chord Pads sit between Cubase’s MIDI input and the track(s) the input is routed to. This means that by default, when the Chord Pads panel is open, their effect will be applied to all incoming MIDI signals. This in turn means that any Instrument or MIDI track that’s monitor-enabled will receive the output from the Chord Pads – and will record this output if record-enabled – rather than monitoring/recording the unadulterated MIDI signal that arrives at Cubase’s MIDI input.
This default behaviour can be changed so that only those tracks whose MIDI input routing is set to ‘Chord Pads’ will receive the signal from the pads. In this configuration, the MIDI input to those tracks will be transformed (that is, notes assigned to pads will be transformed into chords) irrespective of whether or not the Chord Pads panel is open.
Players and voicing
In music theory, chord names convey information about the notes that comprise a chord, but they say nothing about how those notes should be distributed. For example, the notes of an Em7 chord are E, G, B and D. These could be played as E1, E2, B2, D3 and G3 (a typical keyboard voicing), as E1, B1, D2, G2, B2, and G3 (a typical guitar voicing), or as any other combination of those basic constituent notes.
Traditionally, it’s left to the musician to determine the most suitable distribution of notes and this determination is driven largely by two factors: the first is the instrument being played or emulated and when it comes to chords, this is likely to be either a guitar- or a keyboard-based instrument.
The other factor is the preceding chord, as in most circumstances, a musician will try to move their fingers as little as possible when changing between chords – things sound better that way. They do this by selecting chord voicings that require the least movement from the previous chord and voicing.
Cubase emulates this behaviour with ‘Players’ and ‘Voicings’, which are collections of rules that determine how Chord Pads will voice their chords. Three Players are provided – Piano, Guitar and Basic – and you can also define your own.
Player modes
Players have three modes that determine how the notes of the chord will be sounded: all at once, in a pattern, or where only certain notes – or ‘Sections’ – of the chord will sound. When in Section mode and working with an external controller, the active chord is set by the trigger keys, but it doesn’t sound until you also press one-or-more ‘section’ trigger keys. In this context, a ‘section’ is simply a note within the scale and the keys that will trigger each section are shown on the keyboard graphic at the top of the Chord Pads panel. Section mode is great if you want to do more than just play block chords.
The best way to see how all of this fits together, and explore a few deeper details, is to jump in and start playing…
Using Chord Pads in Cubase: step-by-step
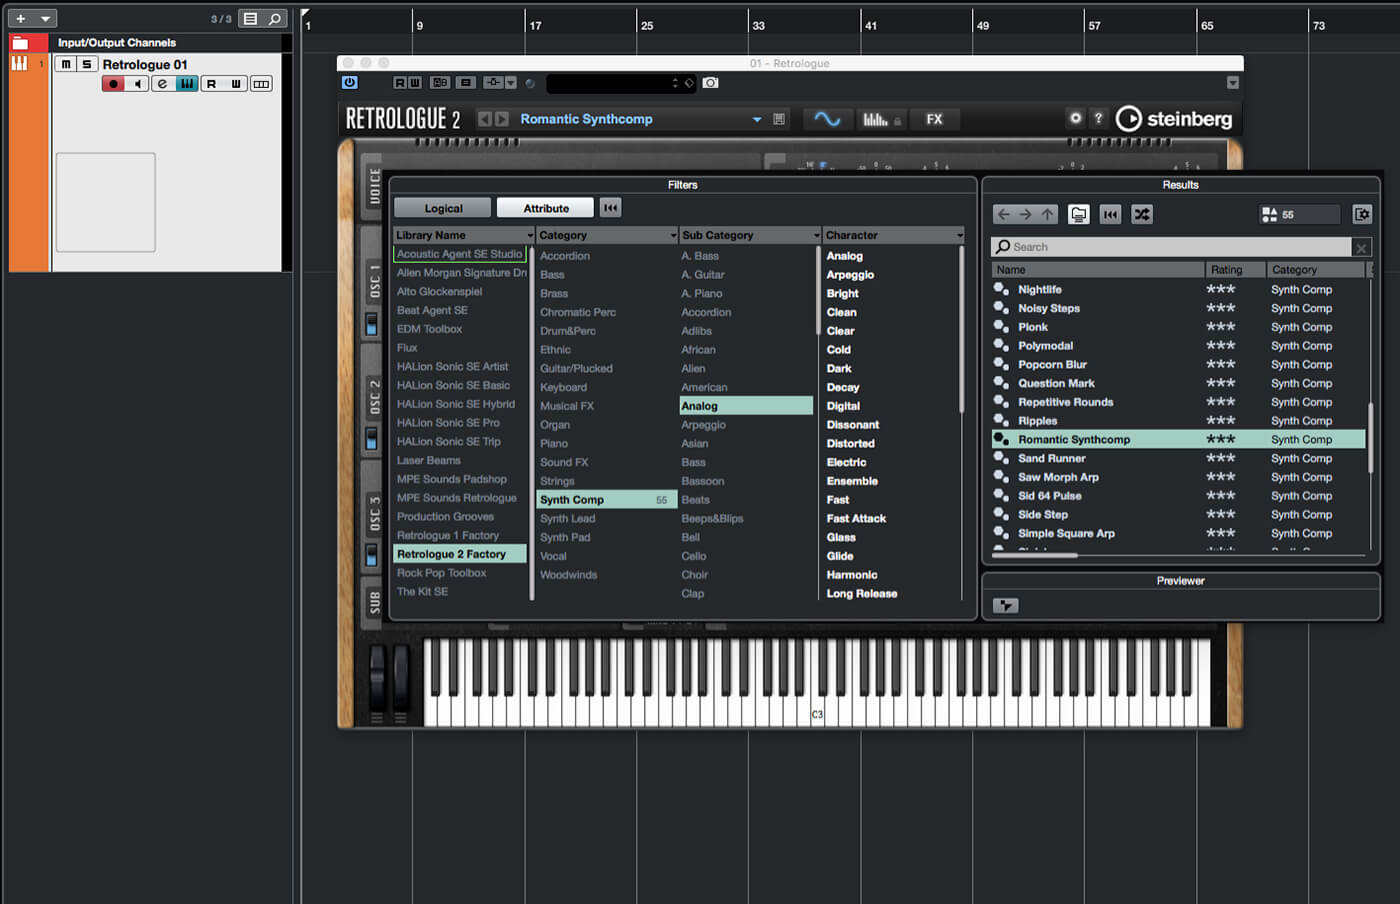
1. Fire up Cubase and create a new project. You’re going to need a keyboard or pad controller connected, so get that set up, too. Add an Instrument track using whatever synth you like, and load a polyphonic patch into it.
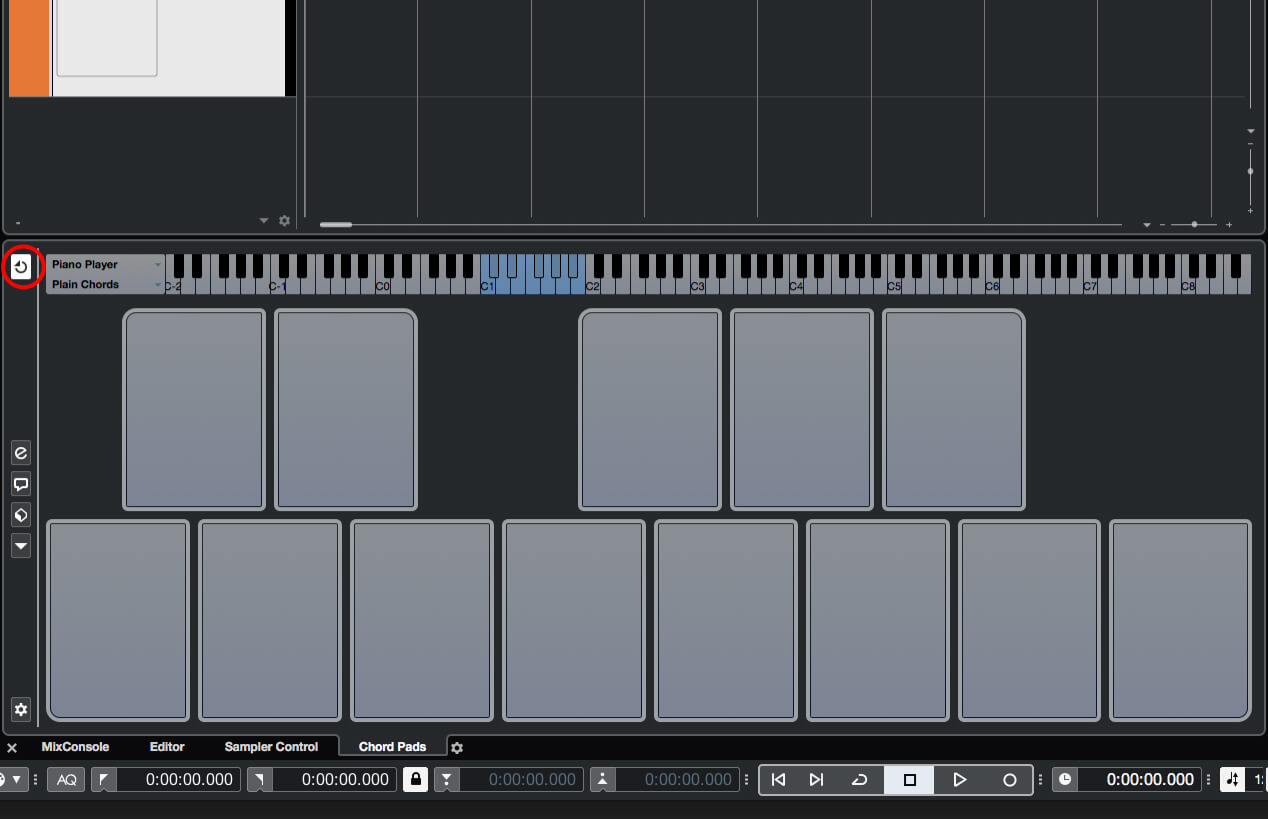
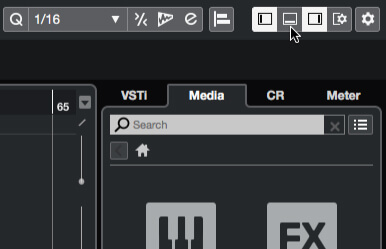
2. Open the Lower Zone of the project window by clicking its button, located at the top-right of the project window. Select the Chord Pads tab of the Lower Zone to open their panel. Set the panel’s Output Mode button to On.
3. Notice the keyboard graphic above the pads that shows the pad trigger notes in blue. The number of pads can be changed, as can their arrangement and other settings, from the Set Up Chord Pads popup – click the panel’s cog icon to open this.
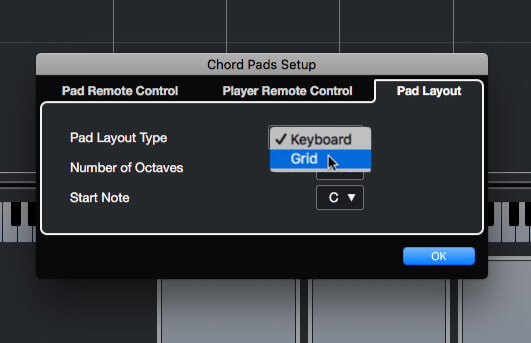
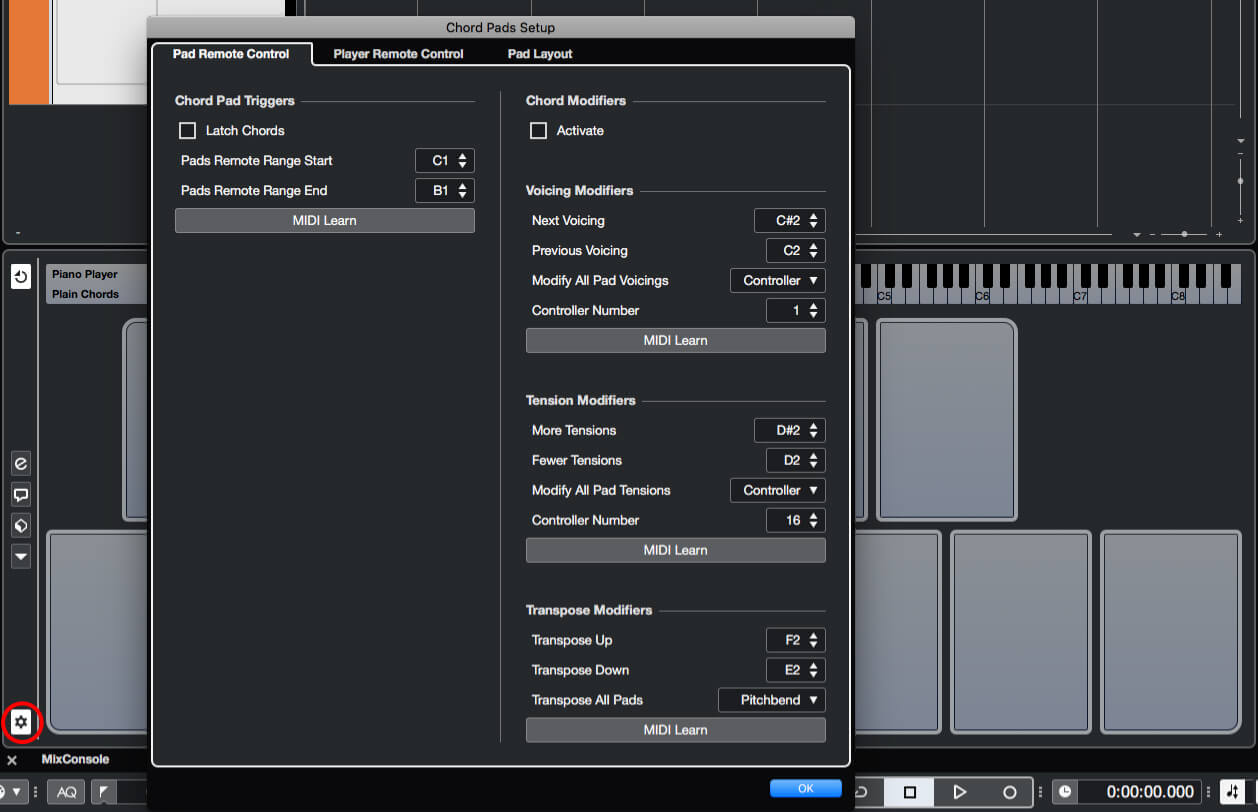
4. If you’re using a pad controller and would prefer the Chord Pads to be in a grid layout, open the popup’s Pad Layout tab and change the Pad Layout Type setting. You can also modify the number of pads here.

5. If you do alter the number of pads, you’ll also need to alter the key range assigned to trigger them. This is done on the Set Up pop-up’s Pad Remote Control pop-up, where you can also configure other modifier keys and/or controllers.
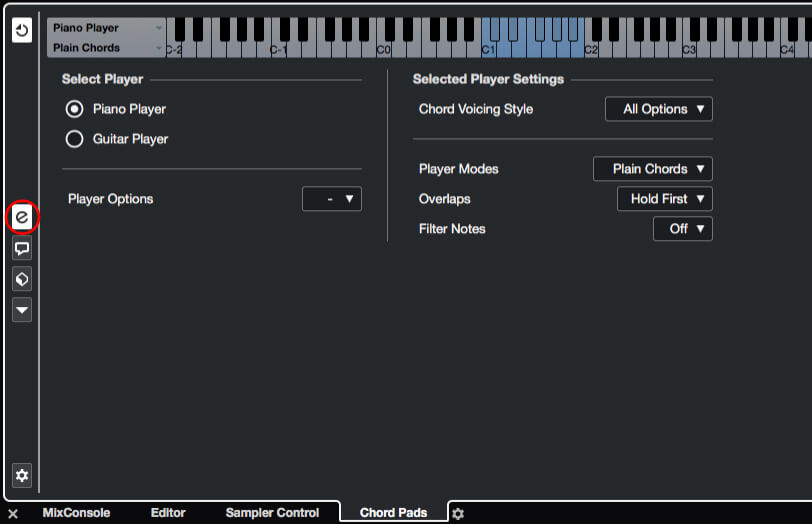
6. Close the Set Up pop-up and then click the edit icon at the left of the Chord Pad panel. This switches the panel to Player Setup mode, from where you can configure the player characteristics and create new players.

PLAYER SETUP Be sure to spend some time getting to know what the different Player Setup options do and how they interact with each other. A good place to start is creating your own custom player, which is done from the Player Options drop-down on the Player Setup panel.
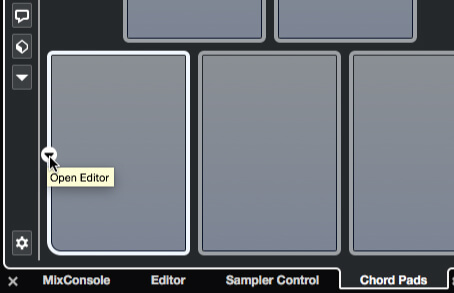
7. Click the edit icon again to return to the pad view. Hold the mouse pointer over the left-hand edge of the first pad, and click on the small arrow that appears there. This opens the Chord Editor panel.
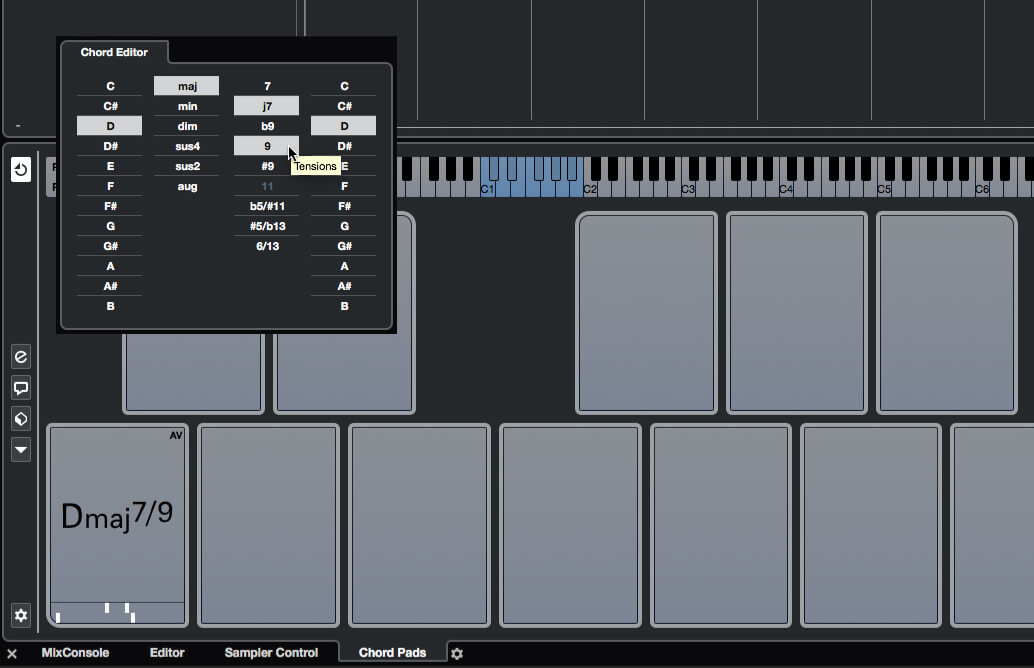
8. The Chord Editor consists of four columns for defining the chord’s root note, type (major, minor etc,) tensions (7th, 9th, 11th, etc,) and bass note. Click the desired items in each column to construct a chord. Click away from the editor to close it.
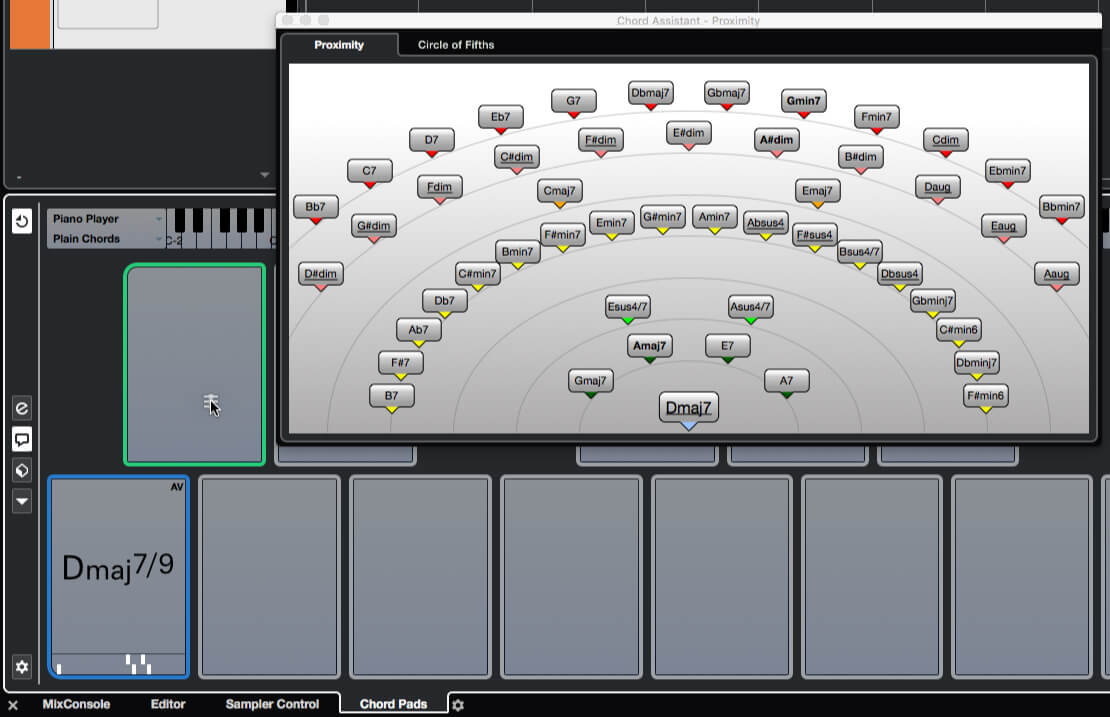
9. Click the Chord Assistant button. This opens a panel that helps you to choose chords that complement your first chord. Clicking chords in the assistant lets you hear how they sound. Drag a chord from the assistant to the second Chord Pad.
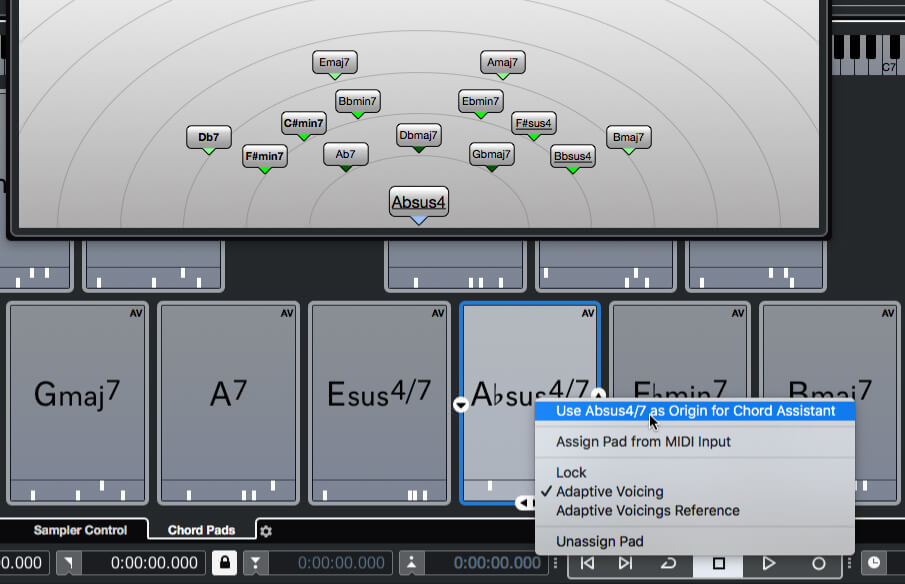
10. Repeat the process to assign chords to the remaining pads. You can centre the Chord Assistant on a different chord by right-clicking on a pad and selecting ‘Use [chord name] asOrigin for Chord Assistant’ (the current origin is always marked in blue).
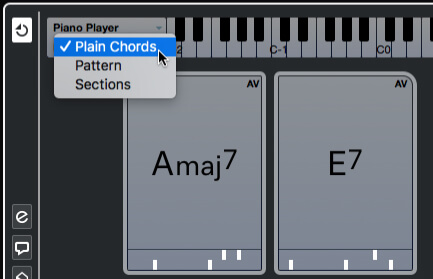
11. Close the Chord Assistant. Use the two drop-down menus to the left of the keyboard graphic at the top of the panel to set the current Player and Player Mode. Select Piano Player and Plain Chords, then experiment with triggering chords from your controller.
CHORD TENSIONS Basic chords – triads, to give them their proper name – are made up of three notes. Chords that add notes over-and-above the basic triad are often referred to in music as extended chords: 7ths, 9ths, 11ths and so on. Cubase refers to these additions to a chord as ‘tensions’.

12. Change the Player to Guitar Player and play the pads again, noticing how the voicing has changed. Notice, too, that the chord voicings are affected by the previously played chord – this is called Adaptive Voicing and can be enabled/disabled on a per-pad basis.

13. Change the Player Mode to Sections, noticing some notes on the keyboard graphic take on an amber colour (circled in image). Hold down a chord trigger and then press and hold each amber key in turn, noticing how each triggers a note from the chord.
14. Close the Chord Pads panel by selecting a different tab in the lower zone, or by closing the lower zone entirely. Now play the chord trigger keys on your controller, and notice that the chord pads are no longer active.
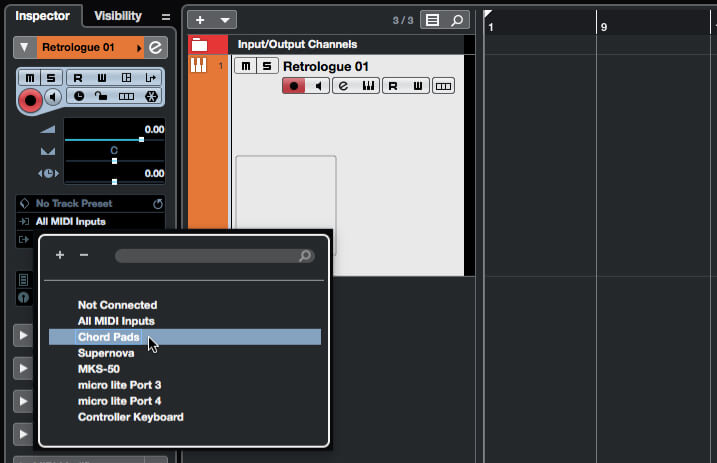
15. Open the track inspector for your instrument track and change its MIDI input routing to Chord Pads. Now play your keyboard or pad controller and notice that the Chord Pads are now active on the instrument track once more.
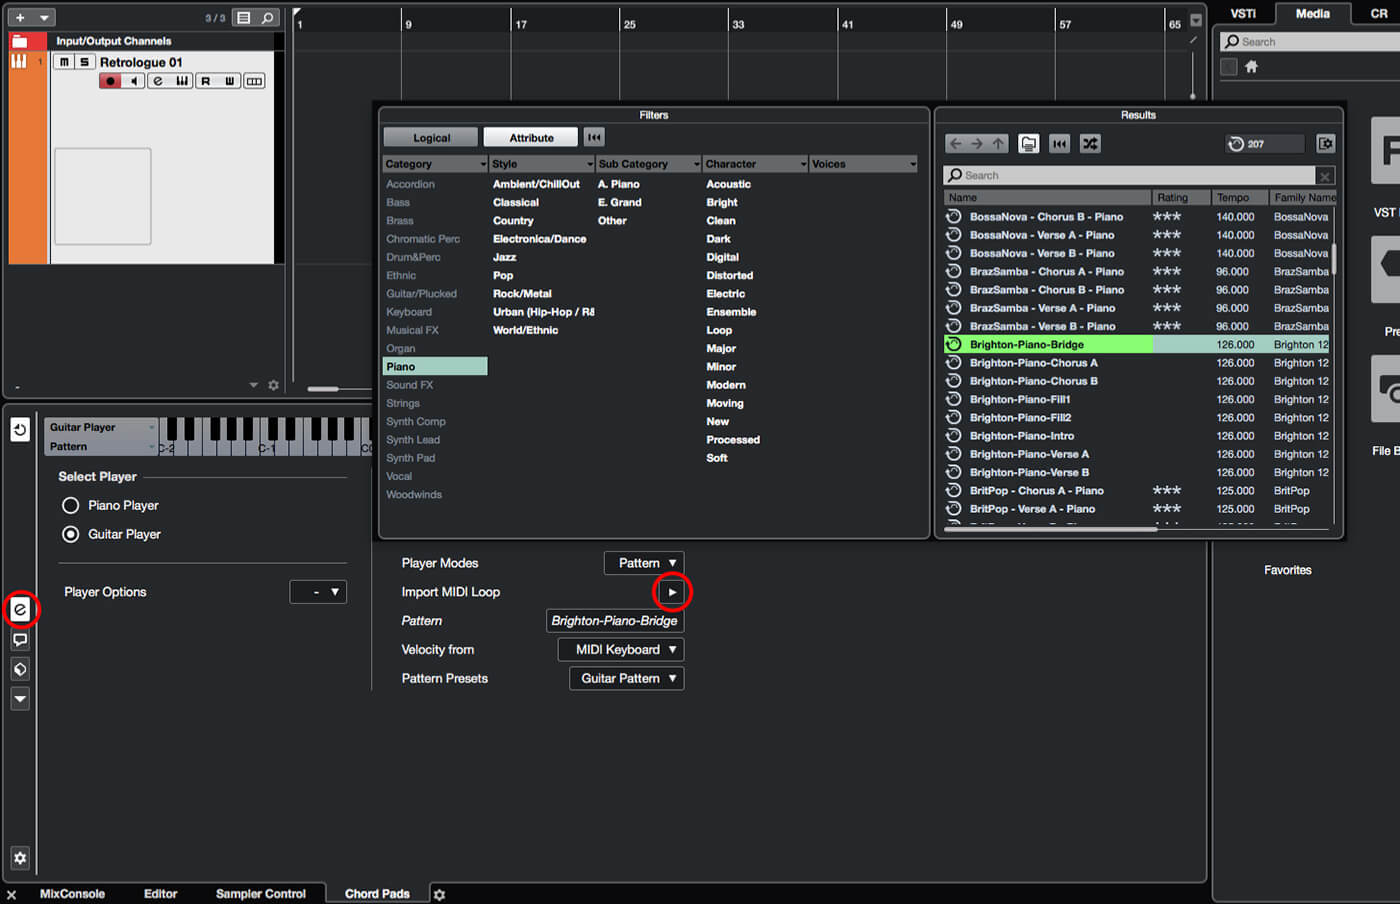
16. Reopen the Chord Pads panel and switch to its Player Setup view. Change the Player Mode to Pattern, then click the Import MIDI Loop button (also marked). Browse for and select a loop and then trigger some chords to hear the pattern.
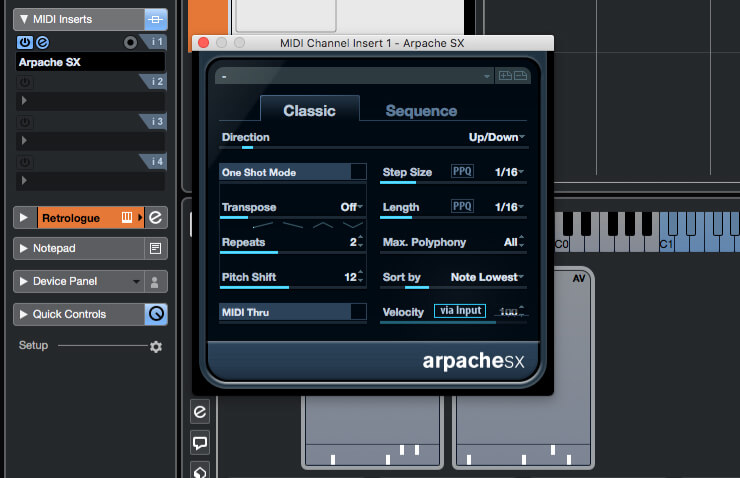
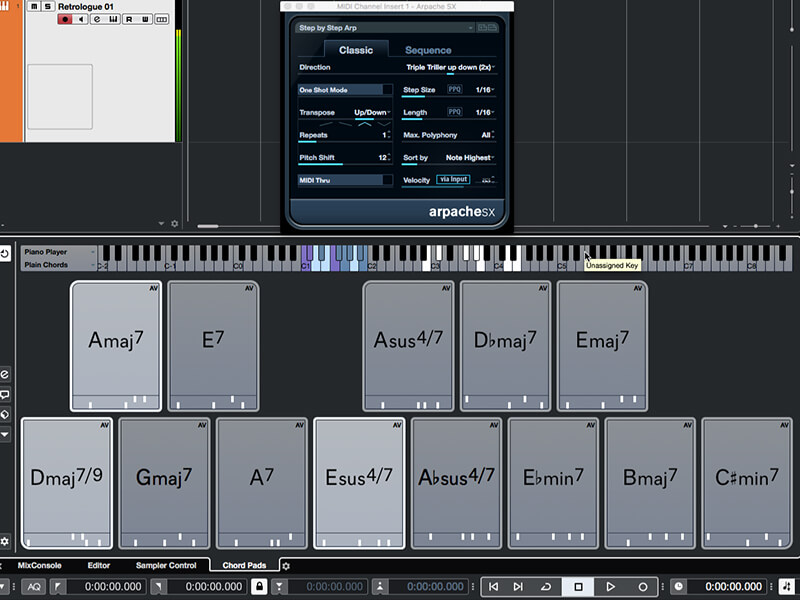
17. A nice little trick to finish with: switch the Player Mode back to Plain Chords. Go to the Track Inspector of your Instrument track, expand its MIDI Inserts section and add an instance of Arpache 5 or Arpache SX to the first insert slot.
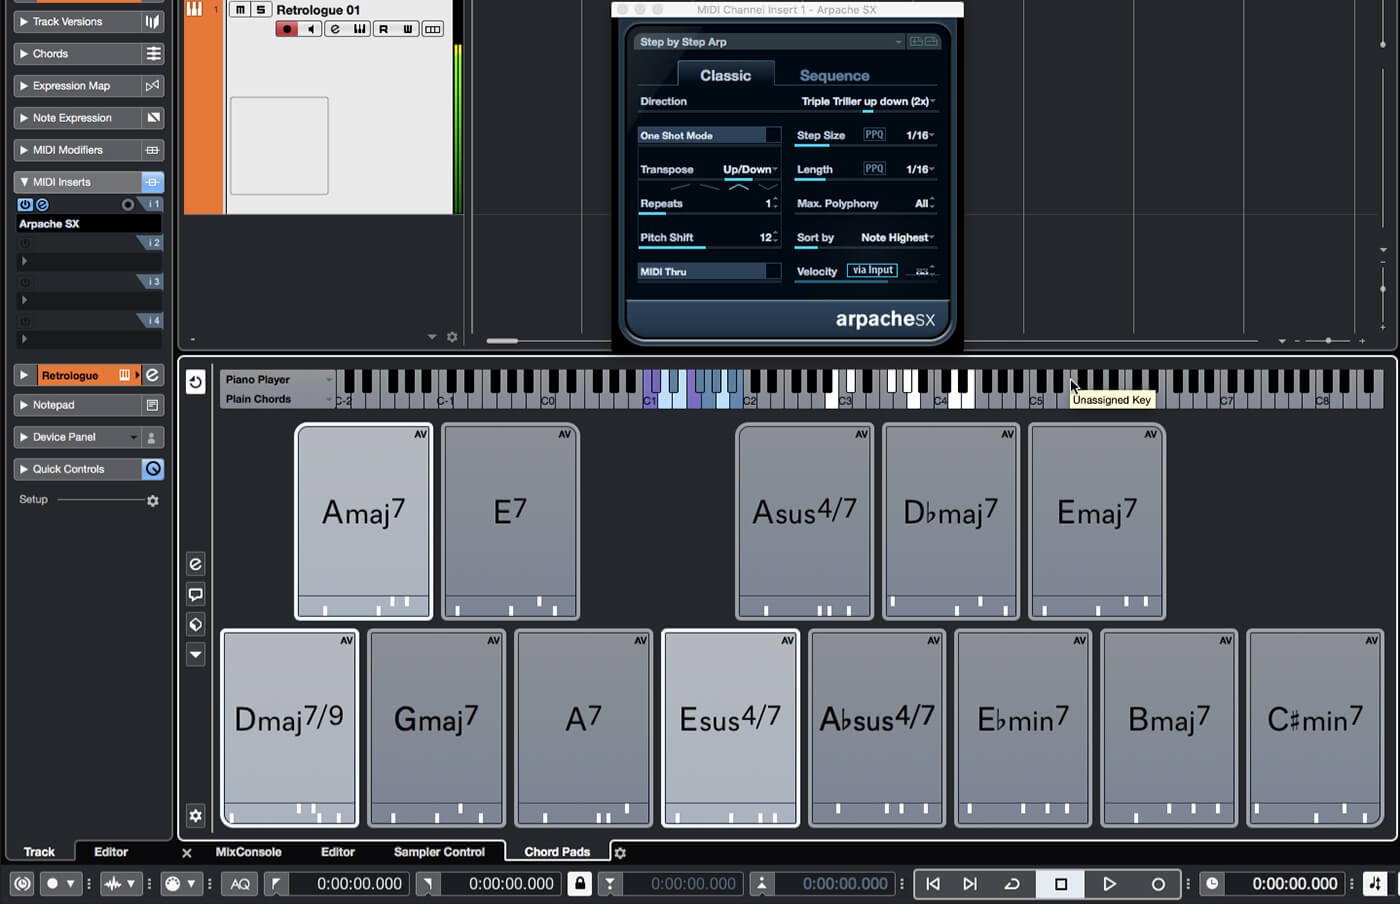
18. Now start triggering chords and experiment with triggering more than one at the same time. This is a really simple yet creative way to come up with shifting and developing arpeggio lines. Try the same technique with the Player Mode set to Sections, too.
For more Cubase tutorials and workshops, check here.