Ableton Live Tutorial: Get Creative With The Impulse Device
The new features of Live 9 are a tempting proposition, but have you fully explored what your current version has to offer? Liam O’Mullane revisits an old friend in this Ableton Live Tutorial Most Live users, old and new, will at this point have their attention fixed on the release of Live 9 […]
The new features of Live 9 are a tempting proposition, but have you fully explored what your current version has to offer? Liam O’Mullane revisits an old friend in this Ableton Live Tutorial
Most Live users, old and new, will at this point have their attention fixed on the release of Live 9 and Ableton’s hardware Push instrument. And while we too are looking forward to these new products, we felt it was time to return to one of Live’s original MIDI devices – the Impulse drum machine. For some, Impulse may be a long-lost friend you’ve forgotten since the appearance of Drum Racks in Live 7.
Newer users of Live may have opened up Impulse and wondered why such a limited-looking drum machine still exists. But regardless of which camp you’re in, this month we hope to raise awareness among all but the few who already know about Impulse’s secrets. Impulse is a unique creative tool that offers unique results, so let’s look at what sets it apart from Drum Racks.
Acting on Impulse
Drum Rack devices are arguably some of the most flexible sample/synthesis-based drum machines available in the software world. They offer various levels of control and none of the unnecessary complexity in function, which most other well-featured machines insist on. Like most things in Live, all of its features make sense visually, which in turn helps them to be easy to pick up and learn.
Impulse is sample-based, and by default sends all sounds through one global stereo output. It’s the global aspect of Impulse that offers something quite interesting: local controls let you control each pad, but global controls enable you to make overall changes as well, something that’s missing from Drum Racks.
Unique Attractions
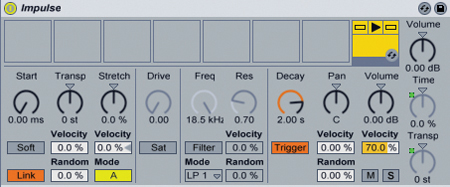
Impulse’s eight sample drum pads function in the same way as those in a Drum Rack, but the buttons for solo and mute are in the upper part of the pad and hot-swap is placed at the bottom for fast sample-swapping.

The parameters directly below the pad section are all unique per pad, so clicking on a new pad will update the parameters to that sound.

In addition to a typical global volume control, global Time and Transpose options are available as well.

Time-stretching is something that’s not available in Drum Racks by default and mass pitch control is practical only via MIDI pitch-bend data. Pitch-bend in a Drum Rack is limited to just five semitones, so any drastic pitch changes over time are available only by using the Transpose value on a Simpler device. The closest you can get to a global pitch control in a Drum Rack is by mapping the value in each Simpler device to a Macro assignment. However, this will control all drum pads with the same pitch setting simultaneously, so you can’t keep intact any tuning that you may already have applied.

Impulse doesn’t have this restriction. The global Transpose dial can be moved at any time and the relative pitch differences between the eight pads remains intact – very handy for tuning your established drum sound around the key or bass line of a song.
As well as a local Transpose control per pad, you can also set velocity to change pitch.

Try setting this to a small amount to get a more drum skin-like behaviour from samples. You’ll also get a raise in pitch when whacking a drum pad controller, giving a much more natural feel to controlling drums. More extreme settings on large, dominant drum sounds will be very obvious and bring a sound to the foreground of a mix – useful for creating a talking drum-type of effect. Shorter, thinner sounds like woodblock, side sticks and so on can sound very interesting after extreme pitch changes, creating a nice decoration for variation and interest while not dominating your drum sound.
Ready To Stretch
To the right of the Transpose section is Impulse’s time-stretching function, Stretch.

This local control enables you to re-shape each pad’s sound in either direction for shorter or longer sounds. You can use it in a set-and-forget fashion or make use of the control in real time for sonic variation. Try keeping the Decay control at a low value;

this will keep the sound short and drum-like, allowing you to then increase the Stretch amount over time to get different textures. Stretch can also work well when used with its Velocity parameter. This is a much more synthetic-sounding effect than pitch via velocity and works well for generating long tones from a drum on expressive, harder notes.
Drum sounds are just one source of material to use with Impulse, but thanks to its Stretch and Transpose features, just about any sound can be turned into a sinister, drone-like tone. Simply set the Decay to maximum to obtain the longest sound possible then set a slowed-down attack time via the Soft button under the Start dial

Finally, increase Stretch to get an artificial pitch sound. Mode B of Stretch can be useful here as it tends to create vibrato-like time-stretching, which has an interesting character when layered with other wavering sounds. Also experiment with raising the Transpose value, as this will shorten the sample and make time-stretching more of an obvious-sounding effect. If Transpose is set too low, you won’t hear any time-stretch characteristics.
To start layering a few different drone-like sounds you can turn one C#3 note going into the Impulse into eight so that all pads are triggered. Add one Chord device and set its Shift dials to the following values: 2, 4, 5, 7, 9 and 11. This will create seven notes, so you need to add a second Chord device and set its first Shift to 12 semitones. Now all pads will be triggered.

A good trick when layering sounds to create sinister tones is to control Transpose by velocity, as already discussed. However, an additional element of discord can be created if you only add velocity to pitch on some of the layers. This can create nice bell-like resonances, but you may want to lower the Velocity amount for volume if you want each hit to be at a similar volume as you focus on pitch changes.

Chaos Theory
Filters, Transpose and Pan all have a Random parameter. When used subtly, it can introduce a more natural velocity behaviour, making your parts sound more like a human is playing them in using a controller. The same thing can also be achieved using Live’s Groove tools, but while the Groove tools will inject a more predictable emphasis to certain feels in a beat, Random is just that, completely unpredictable. We find that these random options are much more useful for happy accidents that help to kick-start the creative flow. If you play with the Transpose and Filter Random factors you can create minutes of percussion parts that are constantly changing from one bar to the next. We’ll set up a programmed percussion sound, set the part to play with the Random values for a minute or so, and record the results. We’ll then listen back through and pick out any moments of quality randomness; these can then be cut out and sequenced as the basis for a new idea.

Best Of Both Worlds
Some of you will at this point be enjoying the sound-shaping and other useful features of Impulse. However, we know that many of you will still find its limit of working with eight drum sounds too basic for your needs. We therefore suggest that you get into the habit of dragging an Impulse onto a Drum Rack drum pad instead. No matter which pad you use, its output to each Impulse will be a C3, so the Chord device trick to layer sounds and get creative with Stretch and Transpose can still be utilised, on as many single pads in a Drum Rack as you please.
Sadly, we haven’t found a way to make Live create an Impulse by default when you drag an audio file onto a drum pad, but you can set up a Drum Rack default to contain a sensible amount of empty Impulse instances. We opt for the second bank above C#1 to D#2 as Impulses are more of a creative tool, and categorise their use more for percussive work, leaving the first pad bank for upfront drum sounds like kick and snare. Drag an Impulse from Live’s Device Browser to fill each pad

then right/[Ctrl]-click on the Drum Rack’s Device title bar and select Save As Default Preset. For a higher level of creative control, set the global Time and Transpose of one Impulse to Macro 1 and 2 respectively. This is done by right/[Ctrl]-clicking on the control and selecting the correct macro.

Each of your Impulses can then have creative global control as well.