Max MSP Beginners Guide: Adding envelopes to a software synth
In this tutorial for our Max MSP Beginners Guide, you’ll learn how to build an envelope system to attach to the oscillator.
Adding envelopes to a software synth with Max MSP
In this tutorial for our Max MSP Beginners Guide, you’ll learn how to build an envelope system to attach to the oscillator, so that the notes being produced by the monophonic synthesizer stop playing once you release the MIDI key.
If you haven’t caught up on the previous two tutorials in which we show you Max MSP’s basic tools, and how to build an input/output and oscillator, please check them out before you embark on this tutorial.
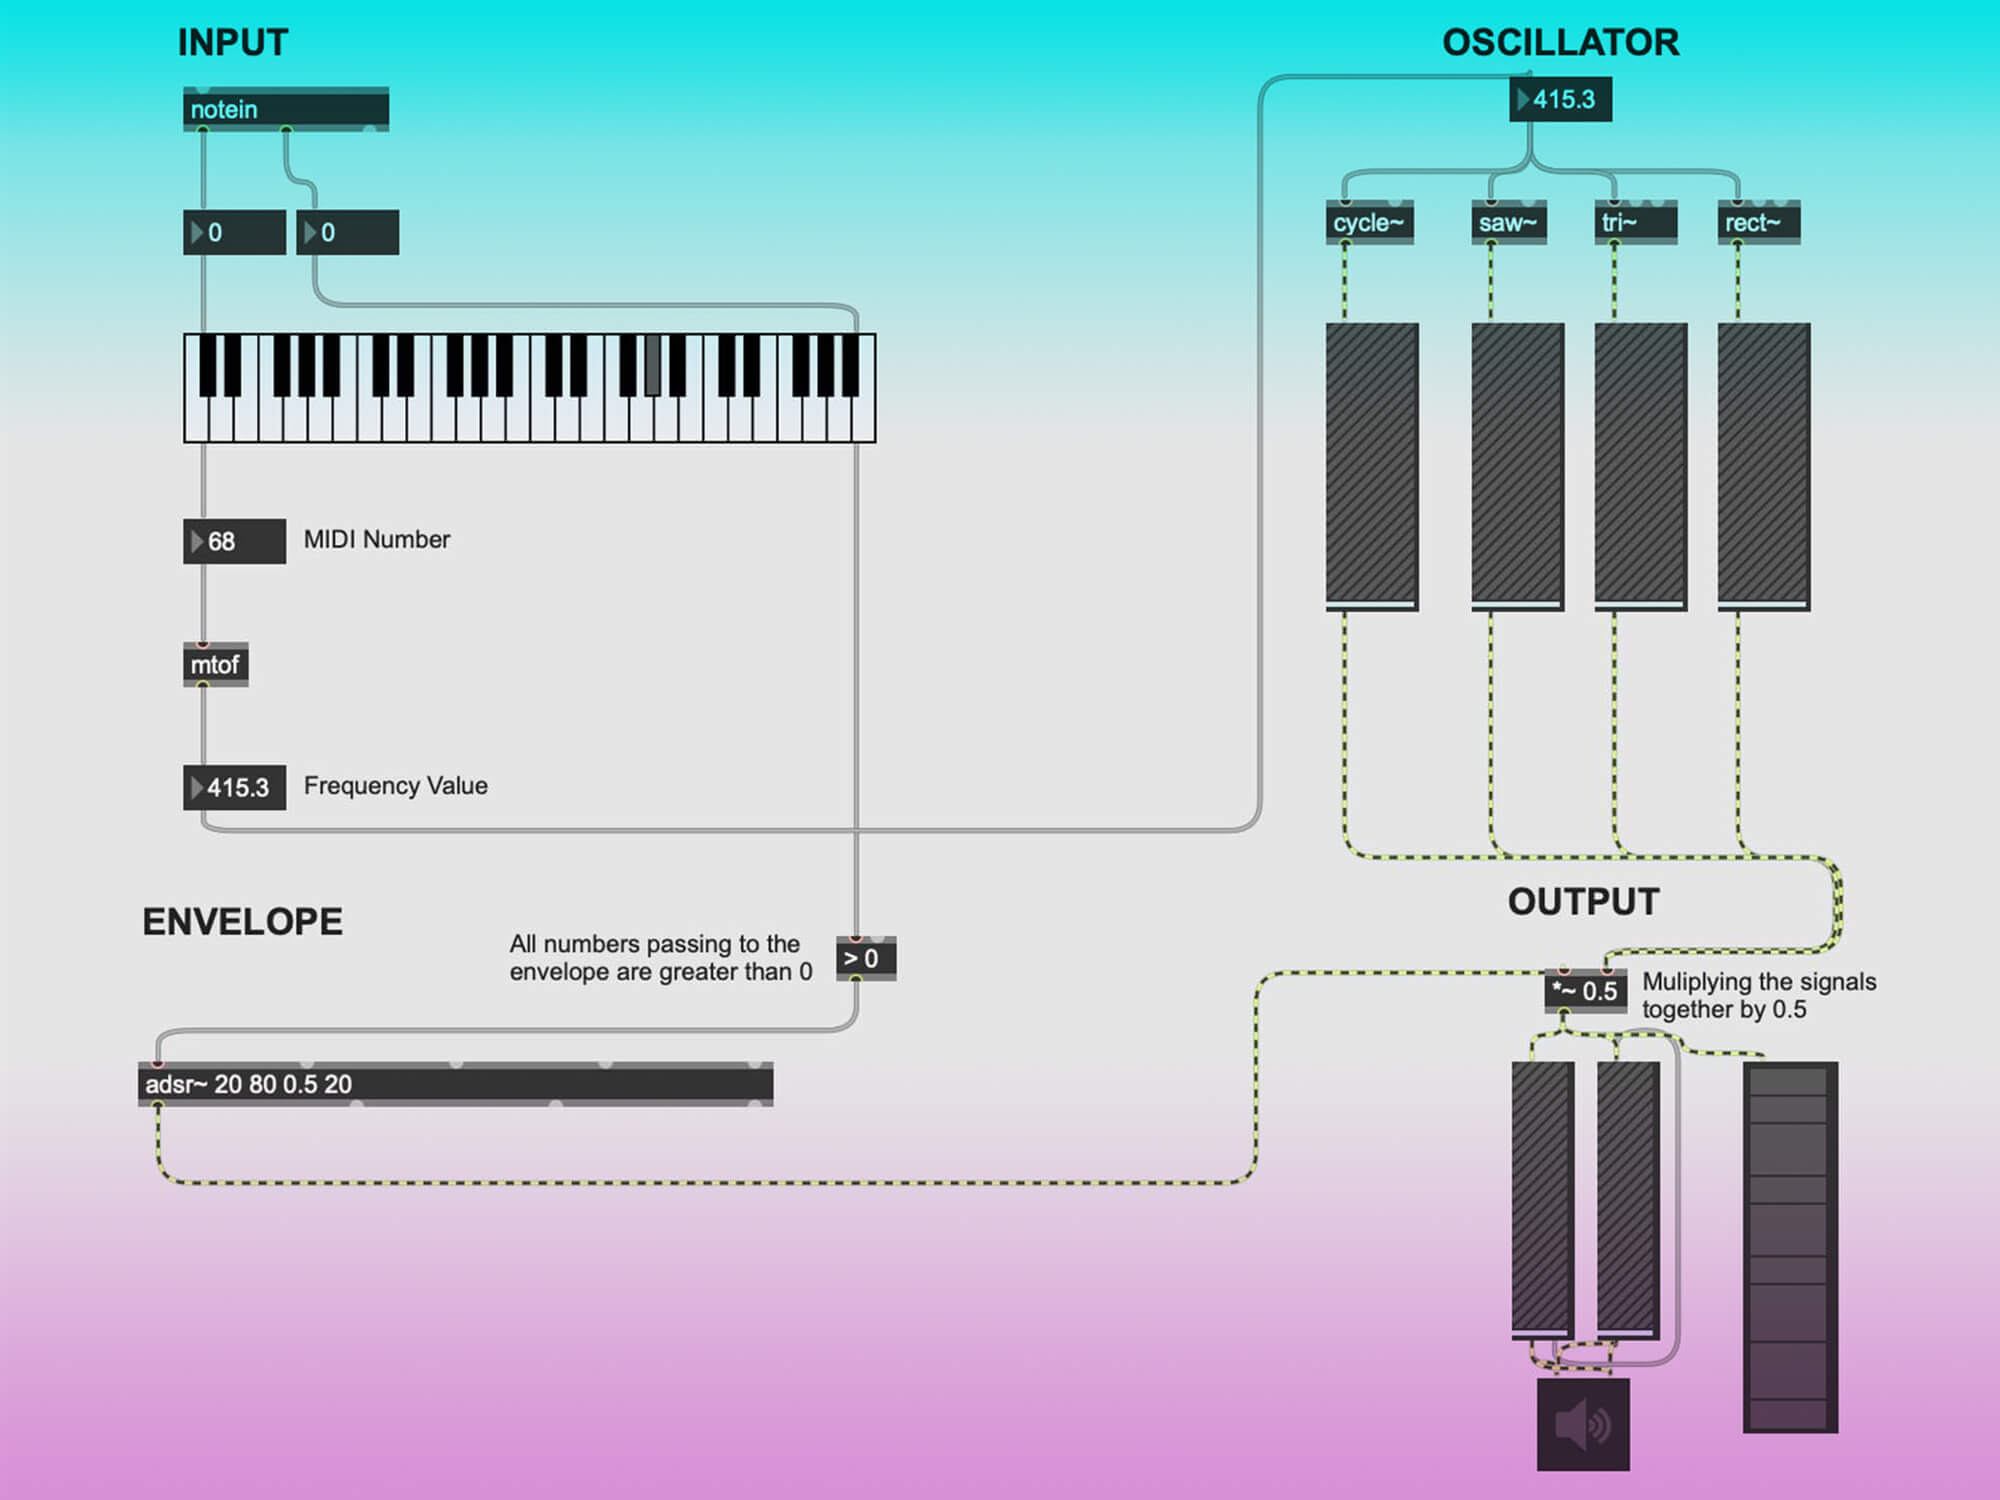
Open up your patch from the last tutorial and ensure that the page is setup correctly before we get going. Unfortunately, these do not save, and need to be reset each time you open up Max MSP. You can refer back to Part 1 of this tutorial series if you need any guidance.
Next, create a new sub header on your patch, named Envelope. Due to it’s function, it’s best placed underneath the input.
The Envelope
Remember the velocity information sent from the MIDI device in the last tutorial? This will be the basis of the envelope; this tells your synth when to start and stop playing a note.
There are four typical components to an envelope: attack, sustain, decay, and release. Luckily for us, there is an object that allows us to set each of these variables in a very simple way.
Create the object ‘adsr~’. If you open up the help file (by holding down alt/option and clicking on the object), you can see that there are multiple ways to trigger the envelope, and also set the arguments of attack, sustain, decay and release. First, you’ll create a simple envelope before learning how they can be triggered by messages and bangs.
You might find that an object is red. This means that Max MSP cannot understand the object and it will need to be corrected. This will also pop up in the Max Console on the right hand side of the patch, and should tell you why Max MSP cannot read what you have created.
As we just want to create a simple envelope for the moment, we’re going to insert the variables directly into the object. This is a useful option if you only want your envelope to have one setting. You can choose whatever numbers you would like, but we will use 20, 80, 0.5, and 2.
Connecting the Envelope
Now we have created the envelope object, it needs to be connected to the rest of the patch. As mentioned previously, it needs to receive the Velocity information being received by the ‘notein’ object. To do this we need to connect a wire from the velocity outlet on the ‘Kslider’ to the ‘asdr~’ trigger which is the inlet on the left hand side, as when the velocity changes, it needs to trigger the envelope to turn on.
Next, you need to connect it to the output, so that we can hear the envelope work its magic.
We recommend that you add the envelope to the left side of the multiplication object inlet, to make the process clearer for you going forward.
However, when you play your note, it might play again when you release your note. If it does this, don’t worry. This means that the envelope is being triggered for both ‘note on’ and ‘note off’. A simple fix for this is to add in the object ‘< 0’ between the Kslider outlet and the ‘asdr~’ inlet, using the left hand inlet of the new object.
This will ensure that all numbers that pass to the envelope are greater than 0, as it’s comparing the incoming number to 0. Therefore it will not trigger a note when you release the key.
At this point, your patch should look like this:

If you would like a visual representation of your signal, you can add the object ‘meter~’ to the outlet of the signal multiplication outlet in the output of your synthesizer. There, you can see how the envelope changes the signal.
Messages and Presets
You’ve now created a working envelope system that turns the note being produced by the oscillator off.
While creating presets will be discussed in more detail in an upcoming tutorial, messages and bangs are an easy way to adjust settings for an envelope, without having to manually adjust the settings each time.
To do this, you’ll need to create a subpatch. This is essentially a patch within a patch, and will reduce the clutter on the page. You make one by creating an object, and then typing in the letter ‘p’, followed by the name of the subpatch. In this case, we have named it ‘p ENVELOPE’.
Once you create it, it will take you to the subpatcher. The first thing you need to create is the inlets and outlets so that you can attach the subpatcher to your envelope object. As there are four variables you need to control, and you’ll want to make four different preset options, you need to create four ‘inlet’ objects and four ‘outlet’ objects.
Back in the main patch, the outlets of the subpatch objects need to wired to the relevant attack, decay, sustain and release on the ‘asdr~’ object. You can hover over each inlet to see which is which.
Subpatchers can be an easy way to patch, especially with software instruments like synthesizers. However, a bang in the main patch cannot trigger a message inside a subpatch.
Therefore, you need to create four bangs inside the subpatch and connected to the inlets, and outside of the subpatch, also connected to the inlets of the object. This means that when the bang is triggered on the main patch, it will trigger the bang inside the subpatch, which will then tell the messages the change the variables in the object.
This is what the envelope in the main patch should look like at this stage:

If you want to see the envelopes change in real time, you can add number boxes inbetween the subpatcher and ‘asdr~’ object and see the numbers change as you trigger the bangs.
Returning back to the subpatcher, we previously mentioned messages and how they can tell objects what to do. Therefore, these bangs will trigger the message to set the envelope object to your desired settings, rather than the one setting that has been written in the envelope object.
Each of the four presets need to be triggered by a bang, but routed to the four different variables: attack, decay, sustain and release. This means we need to create 16 separate messages, grouped into the four presets.
Using the example of the envelope setting used in the previous section, this is what one of the presets inside the subpatcher should look like:
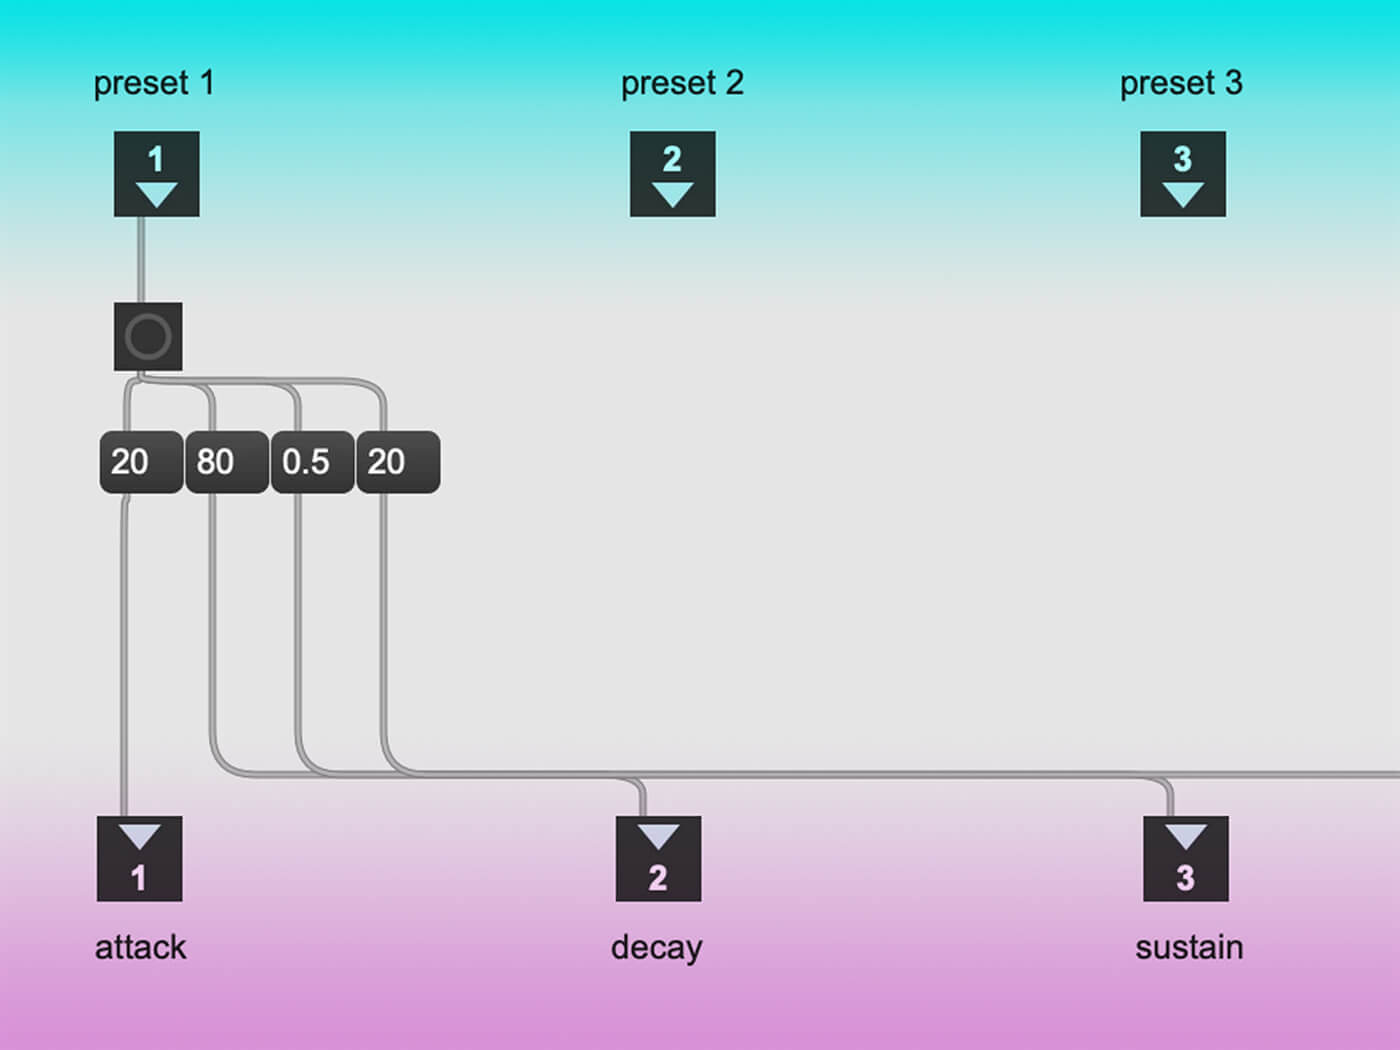
When the bang from the first inlet is triggered, it should set the envelope to those variables, as they are attached to each inlet on the ‘adsr~’ object. You need to repeat this step for the other three inlets, changing the variables to your preferred setting each time.
We have created the four presets so that envelope can change from smooth sounding, to short, airy, and long. After this step is completed, you can close the subpatcher.
This is our example of the completed subpatch, with all of the messages wired to the correct outlet:
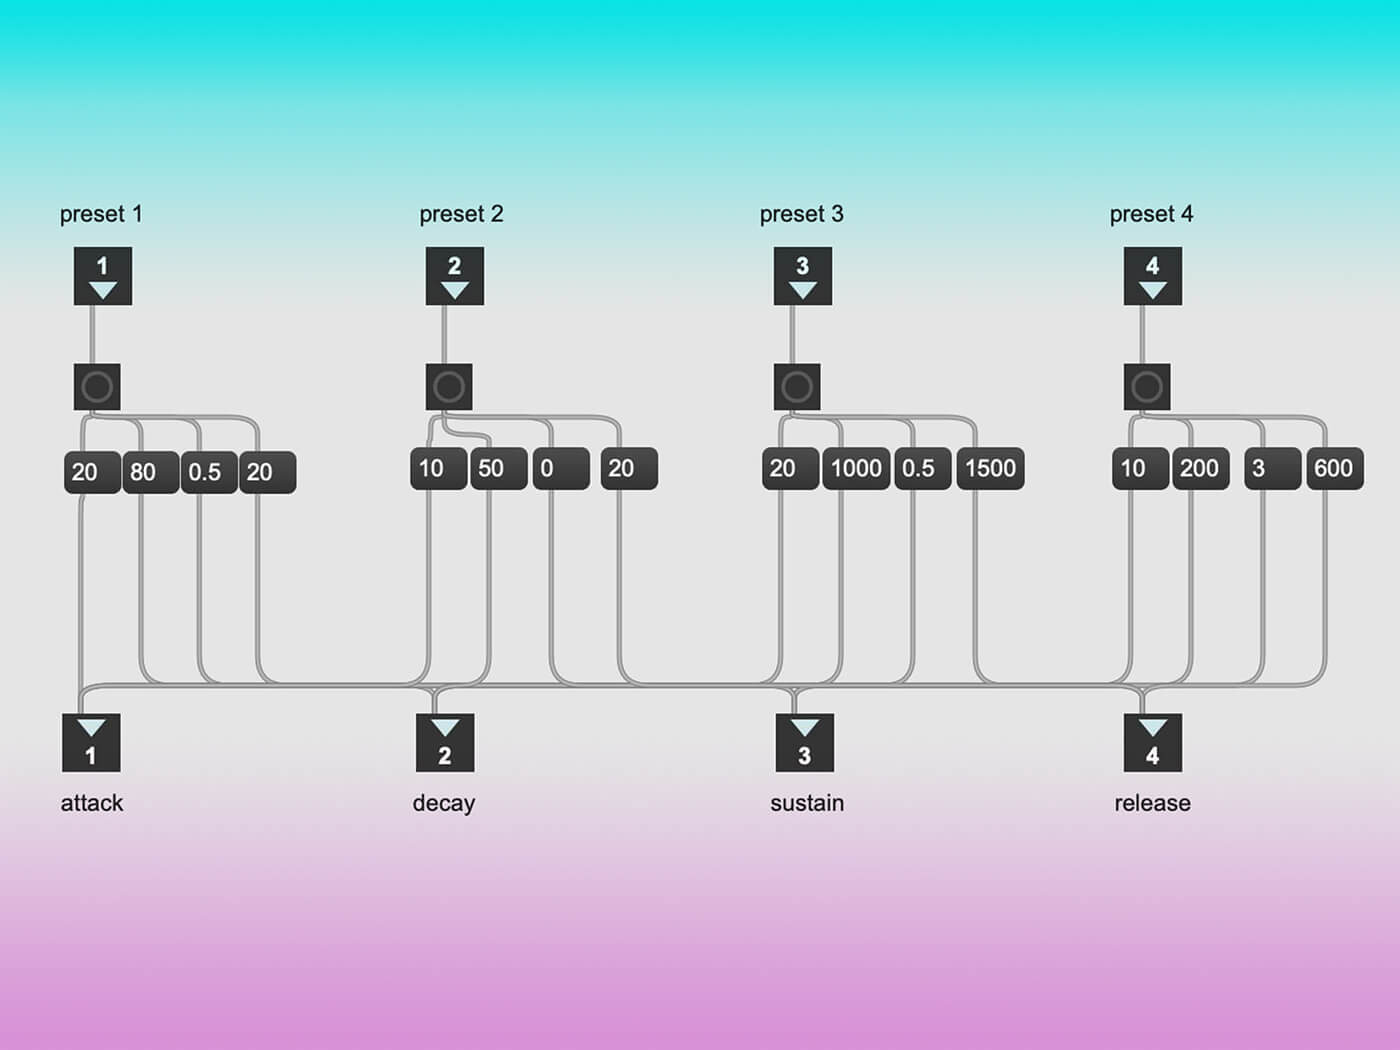
Now, when you play the synthesizer, and trigger the bang messages on the main patch, it should change the envelope settings automatically.
There are a multitude of ways to create presets on Max MSP. While this is only one example, we will be diving into a few other simpler ways to preset different settings on your patch in tutorial five.
You should now have a synthesizer with an oscillator and envelope. Feel free to continue tinkering around with different setting and getting a grip with the platform.
If you haven’t yet downloaded Max MSP, Cycling 74 are offering a four week free trial